8 Ways to Fix a Memory Leak on Windows 11/10
Download and install the 4DDiG Windows Data Recovery to recover the data lost due to Memory Leak or any other systematic error with just one click.
Memory leaks on Windows 11 and 10 can lead to sluggish performance, frequent freezes, or even system crashes, especially if left unaddressed. A memory leak occurs when applications consume more RAM than needed and fail to release it back to the system, gradually depleting available memory. This problem can significantly impact productivity and may lead to data loss if programs or files unexpectedly close. App developers often roll out memory leak fix mod updates to fix it, but it takes a lot of time for them to acknowledge the issue. In this guide, we’ll explain how to identify and fix memory leak GPU and RAM, along with steps to recover any lost data, ensuring your system runs smoothly again.
- Recover Data Lost during Memory Leak HOT
- Way 1: Restart PC and Close Unnecessary Processes
- Way 2: Disable Some Startup Programs
- Way 3: Adjust the Setting for your system
- Way 4: Update Your Device Drivers
- Way 5: Use Windows Memory Diagnostic tool
- Way 6: Defrag Hard Drives Regularly
- Way 7: Scan Malware and Antivirus
- Way 8: Disable Runtime Broker
Part 1: What Cause Memory Leak on Windows 11/10?
Memory leaks on Windows systems typically arise when programs reserve memory space but don’t release it after completing tasks. Over time, this can cause your system to run out of available memory, slowing down performance or even leading to crashes.
These leaks can be triggered by several factors, including poorly optimized applications, outdated drivers, or even corrupted system files.
- reasons
- solutions
- Poorly Optimized Application
-
Certain programs are not optimized to manage memory efficiently. When these applications run, they may allocate more memory than needed or fail to release it back to the system once they’re done, leading to gradual memory exhaustion.
- Outdated or Faulty Drivers
-
Drivers are essential for communication between your system and hardware components. If a driver is outdated or has a bug, it can cause memory leaks by keeping portions of memory locked up unnecessarily. This issue is common with graphics or network drivers.
- Background Services and Processes
-
Windows has multiple background services and processes that run continuously. If one of these services has a memory leak issue, it can drain system memory over time, especially if left unchecked.
- Corrupted System Files
-
Corrupted or damaged system files can also lead to memory leaks. When a core system file is corrupted, Windows may encounter errors in managing memory allocation, resulting in memory not being released properly.
- Memory-Hungry Applications
-
Some applications, such as graphic design software, video editors, and high-performance games, are inherently memory-intensive. If these applications don’t manage memory properly, they can consume significant resources, causing the system to slow down or even crash.
Part 2: How to Fix a Memory Leak on Windows
Now you are aware of the potential causes of memory leaks on Windows, here’s how to fix a memory leak:
Bonus Tip: Recover Data Lost during Memory Leak
Memory leaks on Windows can cause severe problems, impacting day-to-day usage and even data loss when the system crashes abruptly. If you’re facing a data loss situation due to a memory leak, 4DDiG Windows Data Recovery offers an efficient solution.
4DDiG is designed to help normal users retrieve lost, deleted, formatted, or unsaved data with a one-click process. It’s a smart tool equipped with advanced algorithms, enabling it to perform complex data recovery like a breeze.
The software supports various storage devices, and File systems, including external hard drives , SSDs, USB flash drives , and SD cards. 4DDiG offers an easy, and simple data retrieval solution for non-technical users to get lost/ deleted files back within no time.
Key Features:
- Recover your lost/deleted, formatted, and even unsaved data due to abrupt crashes with just a one-click process.
- Supports over 2,000+ file formats, and various file systems, including FAT16, FAT32,exFAT, NTFS, APFS, HFS+, FAT32, and exFAT, enabling you to recover any type of file.
- Two different scan modes, quick, and deep scan mode allows you to selectively search for deleted/lost data based on your needs.
- Preview the files before you even restore them, so you retrieve the files that are needed, saving you time, and effort.
Secure Download
Secure Download
How to recover data lost during memory leak using 4DDiG Windows Data Recovery:
-
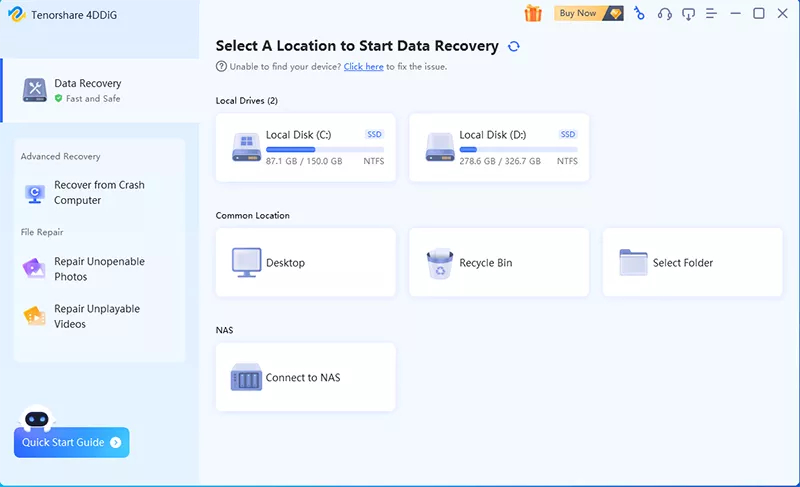
Install, and launch the 4DDiG’s latest version on your computer. Select the disk from the storage options from where you want to recover the data, and hit the Scan button.

-
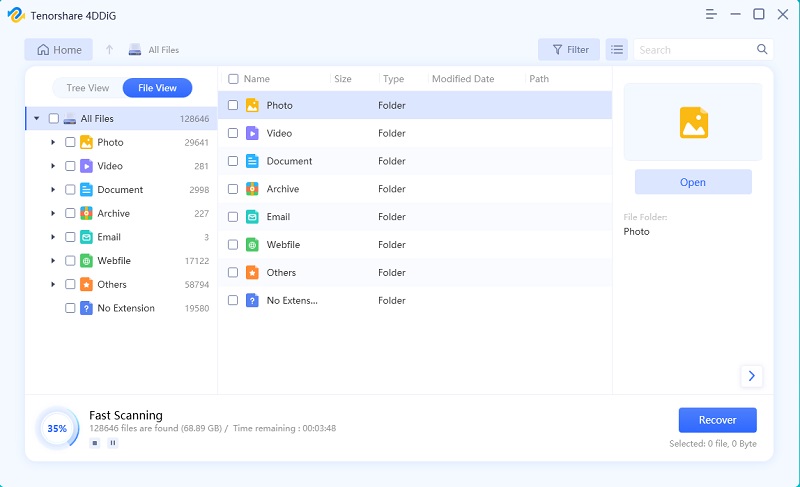
Once the scanning process is initiated, you can pause and stop it at any moment as the targeted files are identified. You can also use the filters to narrow down your search for desired files.

-
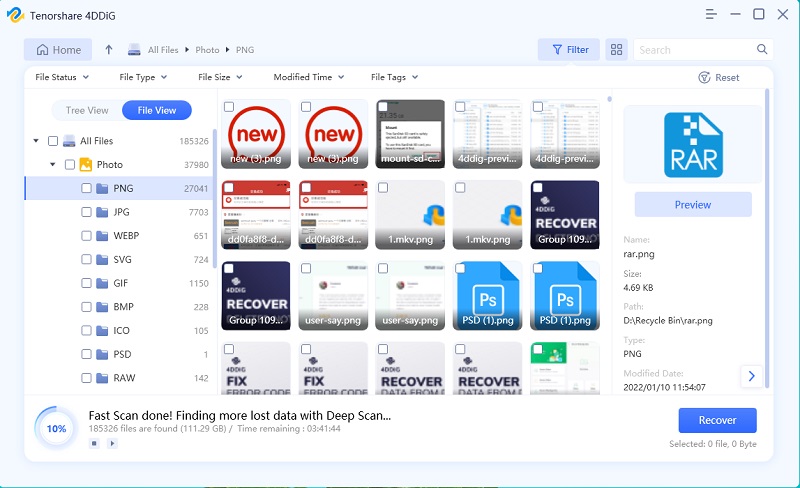
Once the scanning process is finished, you can preview the files available for recovery, After previewing the files, select the files you need, and hit on the Recover button.

Massive Tips to Fix Attempted Write to Readonly Memory Windows 10/11
Way 1: Restart PC and Close Unnecessary Processes
One of the simplest yet effective methods to manage memory leaks is to restart your PC and close unnecessary processes. A reboot clears the memory cache and stops all active processes, providing a fresh start and freeing up RAM that may have been locked by running applications.
After restarting, follow these steps to close unnecessary background processes:
-
Press Ctrl + Shift + Esc to open the Task Manager.
-
In the "Processes" tab, sort by "Memory" usage to identify applications or processes consuming large amounts of RAM.
-
Right-click on any unnecessary or high-memory processes and select End Task to close them.

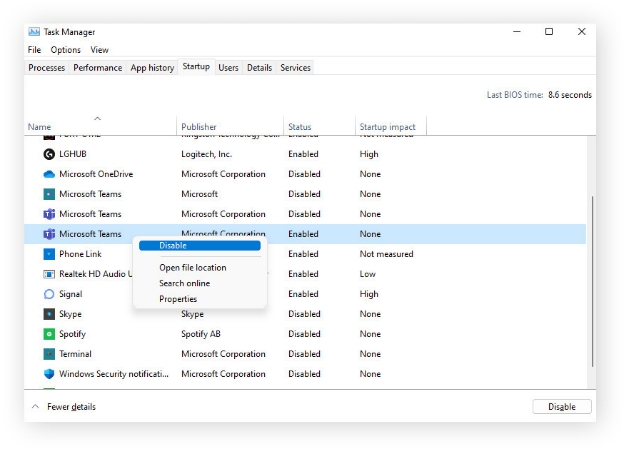
Way 2: Disable Some Startup Programs
Disabling unnecessary startup programs can significantly reduce memory usage, as fewer applications will load automatically when Windows starts. Many programs set themselves to run at startup, consuming system memory even if you don’t immediately use them.
Here’s how to fix a memory leak by disabling startup programs, follow these steps:
-
Press Ctrl + Shift + Esc to launch Task Manager.
-
In Task Manager, navigate to the Startup tab. This shows a list of all applications set to start with Windows, along with their impact on startup speed.
-
Right-click on programs you don’t need immediately at startup (like certain update services, cloud storage clients, or chat applications), and select Disable.

Way 3: Adjust the Setting for your system
Improving system performance can help manage memory usage more efficiently, reducing strain on resources and minimizing the likelihood of memory leaks. Windows has built-in settings to optimize performance, which can be adjusted for a smoother experience.
Follow these steps to adjust system settings:
-
Press Windows + I to open Settings, then go to System > Power & sleep > Additional power settings .
-
Choose High performance if available, as this power plan can allocate more resources to active processes.

Way 4: Update Your Device Drivers
Some users have reported that they’re experiencing memory leaks in the GPU on Windows.
Outdated or incompatible drivers can cause memory leaks, as they may not efficiently handle system resources. Updating your drivers ensures that they are optimized for the latest Windows features, and can help in the rog ally memory leak fix, by preventing memory leaks and improving system stability.
Here are the steps to fix memory leak GPU:
-
Press Windows + X and select Device Manager from the menu.
-
In Device Manager, look for devices with a yellow exclamation mark or focus on critical drivers, such as Display adapters, Network adapters, and Sound, video, and game controllers.
-
Right-click on the device you want to update and select the Update driver.
-
Choose Search automatically for updated driver software. Windows will search online for the latest driver and install it if available.
-
Once updates are installed, restart your computer to apply the changes.

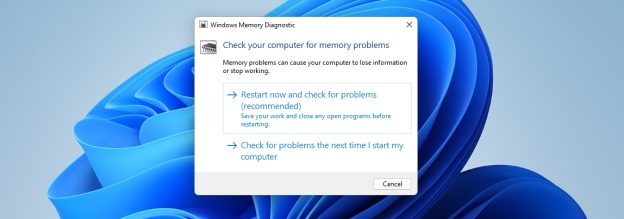
Way 5: Use Windows Memory Diagnostic tool
The Windows Memory Diagnostic tool is a built-in utility that helps identify memory issues, such as faulty RAM, that could be causing memory leaks. Running this diagnostic can reveal hardware issues impacting system performance and help determine if your RAM needs repair or replacement.
Follow these steps to fix memory leak GPU by using the Windows Memory Diagnostic tool:
-
Press Windows + R, type mdsched.exe, and press Enter.
-
Choose Restart now and check for problems to begin the test immediately.
-
Your PC will restart, and the tool will scan your memory for errors.
-
After the test, your PC will reboot. View the results in Event Viewer under Windows Logs > System by finding MemoryDiagnostics-Results.

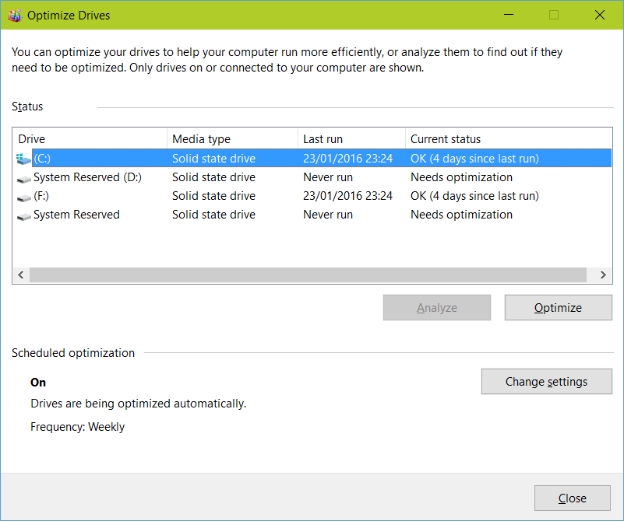
Way 6: Defrag Hard Drives Regularly
Defragmenting your hard drives is an essential maintenance step that can enhance system performance and reduce memory leaks. Over time, files on your hard drive can become fragmented, meaning they are stored in non-contiguous spaces.
This fragmentation can slow down data access and increase memory usage, as the system works harder to retrieve files. Regularly defragmenting your drives helps organize and consolidate files, leading to faster access and more efficient memory usage.
Consider defragging hard drives for memory leak fix by following these steps:
-
Press Windows + S , type Defragment and Optimize Drives, and press Enter.
-
In the Optimize Drives window, choose the drive you want to defrag (typically the C: drive).
-
Click Optimize to begin the defragmentation process.
-
If you have multiple drives, repeat these steps for any additional drives you wish to defragment.

Way 7: Scan Malware and Antivirus
Malware and viruses are a common cause of memory leaks, as malicious software often operates stealthily in the background, consuming system resources. These types of software can trigger memory leaks by running unwanted processes that occupy RAM or interfere with system operations, leading to slowdowns, crashes, and security risks.
Scanning your system for malware and viruses is essential to prevent these issues and maintain system stability. Here’s how you can perform a thorough scan on Windows 11/10 to remove any potential threats:
-
Press Windows + I to open Settings, then go to Update & Security > Windows Security and select Virus & Threat Protection.
-
Under Current Threats , click Quick Scan to perform a quick check of your system. This scan will review common locations where malware is known to hide.

For an additional layer of security, consider running a scan with a reputable third-party antivirus program. Programs such as Malwarebytes, Norton, or McAfee can provide deeper scans and specialized threat removal tools that complement Windows Security.
Way 8: Disable Runtime Broker
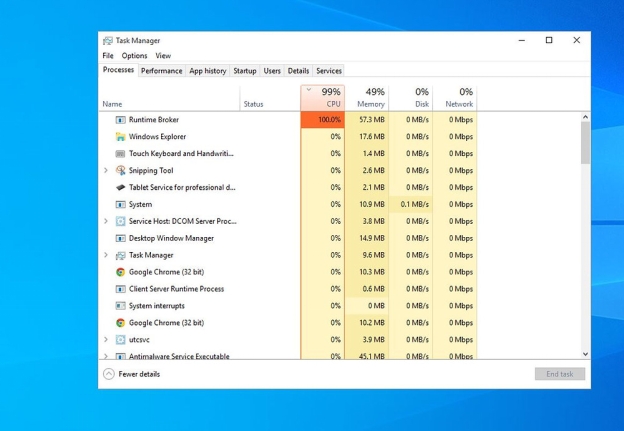
Runtime Broker is a Windows process that manages permissions for apps from the Microsoft Store. While it generally uses a minimal amount of RAM, certain situations can cause it to consume excessive memory, leading to memory leaks and system slowdowns. Disabling or limiting Runtime Broker can help free up system resources and prevent unnecessary memory usage, improving overall performance.
-
Go to the Task Manager on Windows, and locate RunTime Broker.
-
Right-click on RunTime Broker, and select End Task. It’ll immediately disable the runtime broker activity running in the foreground/background.

Part 3: FAQ
Q 1: How Can I Check for Memory Leaks
You can check for memory leaks by using the Task Manager to monitor high memory usage from specific processes. Tools like Windows Performance Monitor and Windows Memory Diagnostic can help identify problematic applications. Look for programs that continue to use more RAM over time without releasing it.
Q 2: Will replacing RAM fix memory leaks?
Replacing RAM won’t fix memory leaks, as the issue lies in software mismanagement, not the physical memory itself. However, adding more RAM can temporarily alleviate symptoms by increasing available resources. The best solution is to identify and fix the software or driver causing the leak.
Q 3: How long do memory leaks last?
Memory leaks can persist indefinitely if left unaddressed, as they result from software not releasing memory. They continue as long as the leaking application or service runs. Restarting the computer can temporarily clear memory, but the issue will recur if the underlying cause isn’t resolved.
Final Words
Memory leaks can severely impact your Windows system’s performance, causing slowdowns, crashes, and even data loss. Regular system maintenance, including updates, scanning for malware, and managing background processes, will help with memory leak fix. If you experience data loss due to memory leaks or unexpected crashes, consider using 4DDiG data recovery software. 4DDiG specializes in recovering lost or corrupted data quickly and efficiently with just one-click operation.



 ChatGPT
 Perplexity
 Google AI Mode
 Grok
Grok

