How to Fix 0xa00f4244 NoCamerasAreAttached Windows 10/11
“0xa00f4244 nocamerasareattached windows 11”
“Hello, my HP Victus 15-fa0031dx cannot detect its integrated camera, I've tried so many methods but it just doesn't work. Any suggestion would be appreciated!”
—A user from Reddit
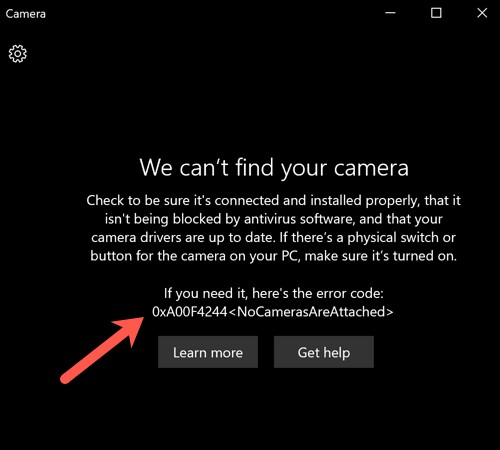
Webcams have become the wheel on which we can communicate and collaborate with others online effectively. Since we rely on the camera camera for various tasks, such as having online meetings, interviewing, live streaming, recording videos, etc, the last thing we would want is our webcam to go awry and show up the error code: 0xa00f4244 NoCamerasAreAttached. But if this camera error has occurred, don’t fret, as in this article, we will show you seven solutions to get rid of this error code. So without any further delay, let's begin!
Part 1. What Does “0xa00f4244 NoCamerasAreAttached” Mean?
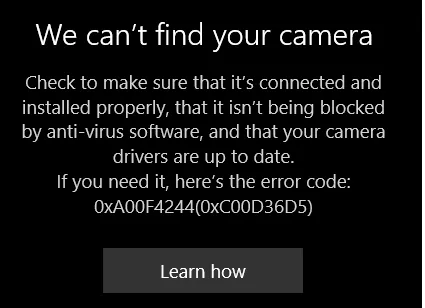
The 0xa00f4244 error indicates that your Windows PC can’t detect the in-built camera in your device or any cameras attached to and thus can't proceed further. This error usually occurs due to the following reasons:
- You accidentally disabled the camera app.
- The camera is physically damaged.
- The camera driver is outdated or corrupted.
- Viruses or malware are messing things up.
- The Registry editor uses the wrong encoding standard.
- There’s a hardware conflict between the webcam and the devices connected to your PC.
Part 2. How to Fix “0xa00f4244 NoCamerasAreAttached”
Since you can’t pinpoint the what is exact causing the no camera attached 0xa00f4244 error, you can try out the following solutions one by one until it is resolved.
Way 1. Ensure the Camera App is Enabled
The camera error code 0xa00f4244 might pop up when the Camera app isn’t turned on, and the system, following your privacy rules, can’t spot the camera. Here’s how to enable it.
-
On Windows 10, press the “Windows + I” keys to open “Settings,” then go to “Privacy.” If you’re on Windows 11, then go to the Privacy & security section.

- Choose “Camera” from the left pane. If your device’s camera access is off, click “Change” and switch it on.
-
Toggle on the option of Allow apps to access your camera.

Way 2. Reset the Camera App
Any issue with your camera app can also cause Windows to throw the message “We can’t find your camera.” So, try resetting Camera, which will revert the app to its default settings to help fix the issue.
Here’s how to reset the app for the in-built camera:
- Press the “Windows + X” keys to open “Settings.”
- On Windows 10, choose “Apps” and then “Apps & Features.” On Windows 11, navigate to the Apps tab and click on Installed apps.
-
Scroll down to the “Camera” app in the right section, click on it and hit “Advanced options.”

-
Move down, and hit “Reset” to reset the “Camera” app. To confirm your choice, hit “Reset” again.

Now check if the webcam is working or not.
Way 3. Update the Camera Driver
Another reason behind the “we can’t find your camera 0xa00f4244” error could be the outdated camera driver. To ensure smooth communication between your webcam and computer, it’s crucial to update your device driver with the instructions given below:
- Press the “Windows + X” keys, choose “Device Manager.”
-
Double-click on “Camera,” right-click on your device’s camera, and select “Update driver.”

-
Opt for “Search automatically for drivers,” and the Device Manager will look for the latest driver and install it if available.

Way 4. Download and Install New Driver from Manufacture’s Website
If updating driver can’t fix the 0xa00f4244 error, consider downloading and installing a new camera driver manually. You can check the manufacturer’s website and download it. Here’s how:
- Press the “Windows + X” keys, choose “Device Manager,” and double-click on “Camera.”
- Head to the “Driver” tab, jot down the camera name and manufacturer, and search for them on Google.
- Find the manufacturer’s website, download and install the latest camera driver, and restart your PC after installation.
Way 5. Scan for Malware & Viruses
Malware and viruses could be why you’re getting the “0xa00f4244 NoCamerasAreAttached Windows 10/11” error. Here’s how you can scan for malware & viruses to get rid of the error :
- Press the “Windows + X” keys to open “Settings” and choose “Update and Security.”
-
Next, select “Windows Security” and “Virus & threat protection.” From there, choose “Scan options.”

-
Pick the “Microsoft Defender Offline scan” tool, and hit “Scan Now” to look for any viruses or malware.

Way 6. Tweak Registry
If different encoding standards are the cause of the “0xa00f4244” error, then tweaking the registry can fix it. Here’s how:
- Type in “Regedit” in the Windows search bar to find “Registry Editor” and open it.
-
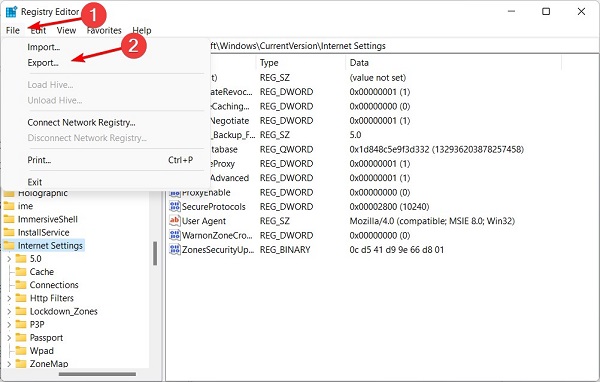
Click “File,” choose “Export,” and back up your registry as a precaution.

-
Next, Now, copy and paste the following path in the section below the Menu bar and click Enter.
- For a 32-bit system:
HKEY_LOCAL_MACHINE\SOFTWARE\Microsoft\Windows Media Foundation\Platform - For a 64-bit system:
HKEY_LOCAL_MACHINE\SOFTWARE\WOW6432Node\Microsoft\Windows Media Foundation\Platform

- For a 32-bit system:
-
Right-click in the right window, choose “New,” and select “DWORD (32-bit) Value.”

- Rename it “EnableFrameServerMode.”
-
Right-click on the value and select “Modify.” Set the registry value to 0, save the changes, and restart your PC.

Way 7. Run the Store Apps Troubleshooter
Despite trying the above methods, if the “No Cameras Are Attached 0xa00f4244” problem persists, run the Store apps troubleshooter. This will fix any corrupted or missing app files or reset permission issues causing this error. Check out the steps below for running the Store apps troubleshooter:
- Press the “Windows + X” keys to open “Settings” and head to “Update & Security.”
- Choose “Troubleshoot” and then “Additional Troubleshooters.”
-
Move down, pick “Windows Store Apps,” and click “Run the troubleshooter.” Wait for it to finish, then check if the issue is resolved.

Part 3. How to Fix Videos Not Playing in Windows 10/11?
If your webcam videos or any other videos are not playing in Windows 10/11, then a tool like 4DDiG Video Repair can fix them. It can repair corrupted, unplayable, fuzzy, grainy footage in internal and external storage devices. Want to know what more this tool can give you? Check out below:
- Repairs pixelated, blurry, and slow playback.
- Fixes audio issues in the footage.
- Upgrades video resolution up to 8K.
- Uses AI to restore and add color to black-and-white videos.
- Resolves a variety of video errors from hard disks, USBs, SD cards, drones, and digital cameras.
- Batch repair multiple video formats.
- Supports repair of all video formats like AVI, MP4, MOV, M4V, MKV, etc.
Follow the instructions below to use the 4DDiG Video Repair tool to fix any video playback errors in Windows 10/11:
-
Choose “Fix Video Errors”
Install and launch the tool on your computer, choose “Fix Video Errors,” and hit “Start.”
FREE DOWNLOADSecure Download
FREE DOWNLOADSecure Download

-
Add Unplayable Videos
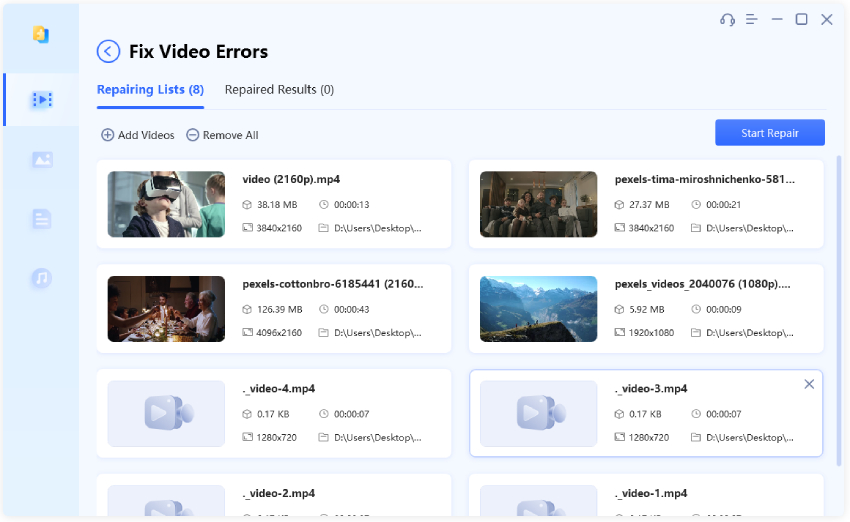
Press “Add Video(s)” to add one or more problematic videos. Once added, hit “Start Repair” and wait for the tool to finish repairing the footage.

-
Save Repaired Videos
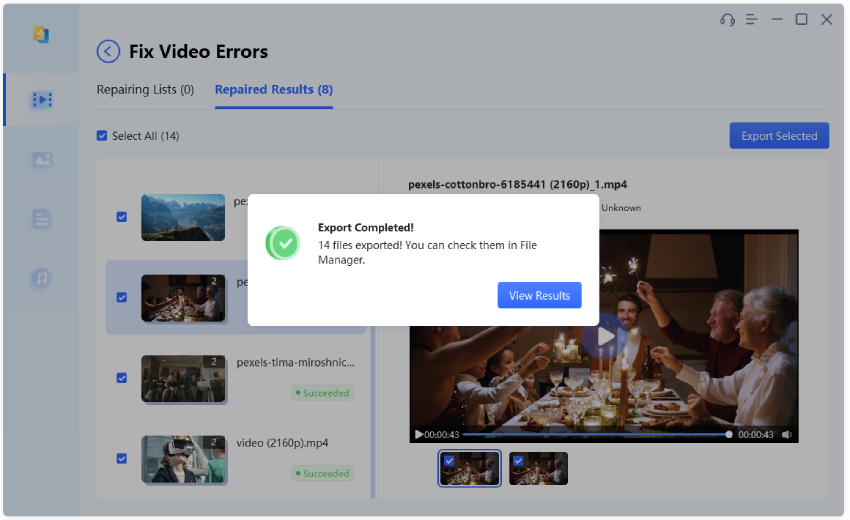
After the repair process, preview the fixed videos with the “View Results.” Next, save the footage individually with “Export” or save selected ones with “Export Selected” to a partition.

Closure
The “0xa00f4244 NoCamerasAreAttached” error indicates your webcam is inaccessible. To make sure your Windows 10/11 can detect it so that you can continue your webcam-related work, we’ve shared seven effective ways. Follow the steps carefully and you should get your camera back on track. In another case, if you’re facing video playback issues, whether from your webcam or downloaded videos, the most reliable solution is 4DDiG Video Repair, which guarantees high success and security in fixing unplayable, corrupted, and error-infested videos.





 ChatGPT
 Perplexity
 Google AI Mode
 Grok
Grok

