How to Fix the Computer Has Rebooted From a Bugcheck?
Download 4DDiG Windows Boot Genius to fix the computer has rebooted from a bugcheck error easily and quickly.
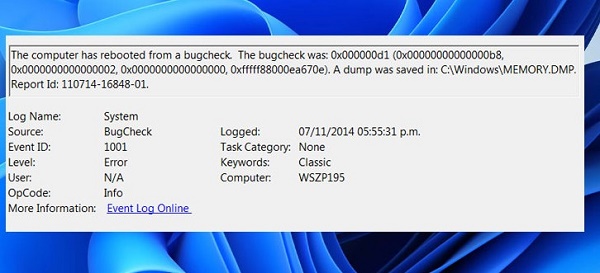
Encountering the computer has rebooted from a bugcheck error can be a frustrating experience for users. This error message often appears on a blue screen, signaling a system crash and an automatic reboot. Understanding the cause of the computer has rebooted from a bugcheck 0x00000116 error can help to resolve this issue.
This article will explain how to fix the computer has rebooted from a bugcheck Windows 11 in detail. We will also explore common causes behind the computer has rebooted from a bugcheck issue and provide practical steps to troubleshoot and resolve the problem.
Part 1: Overview of ‘the Computer Has Rebooted From a Bugcheck’ Error
1. What is ‘the computer has rebooted from a bugcheck’ error?
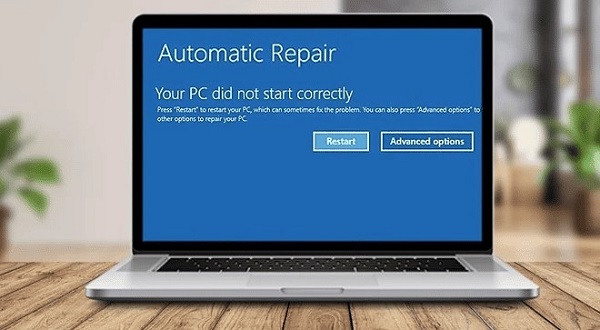
The computer has rebooted from a bugcheck error often accompanied by the infamous Blue Screen of Death (BSOD) that disrupts the normal operation of a computer. This error message is a Windows system alert indicating that the operating system has encountered a critical error, leading to an automatic system reboot as a safety measure. Here are a few common scenarios of this error:
Windows Version error:
- The computer has rebooted from a bugcheck Windows 10
- The computer has rebooted from a bugcheck Windows 11
Specific Events:
- The computer has rebooted from a bugcheck 0x00000116
- The computer has rebooted from a bugcheck 0x00000d1
- The computer has rebooted from a bugcheck 1001
2. What causes 'the computer has rebooted from a bugcheck’ error?
The computer has rebooted from a bugcheck error occurs due to various reasons. Follow the below common factors that can lead to this error:
- Faulty RAM (Random Access Memory): Corrupted or failing RAM modules can result in unpredictable system behavior, including bugcheck errors. Conducting a thorough memory test using diagnostic tools can help identify and address such issues.
- Overheating: Excessive heat can cause hardware components, especially the CPU and GPU, to malfunction. Adequate cooling solutions and regular cleaning of the internal components can mitigate overheating-related bugchecks.
- Outdated or Incompatible Drivers: Drivers are essential software components facilitating communication between the operating system and hardware. Outdated or incompatible drivers can lead to the computer has rebooted from a bugcheck 0x00000116. Regularly updating drivers can prevent driver-related bugchecks.
- Incompatible Software: Some applications may conflict with each other or the operating system, causing instability and triggering bugchecks. Ensuring that software is compatible with the system and keeping applications updated can reduce the likelihood of such conflicts.
- BIOS/UEFI Settings: Incorrect BIOS/UEFI Settings: Improper settings in the system's Basic Input/Output System (BIOS) or Unified Extensible Firmware Interface (UEFI) can cause stability issues. Verifying and, if necessary, resetting BIOS/UEFI settings can resolve such problems.
Part 2: The Most Effective Way to Fix ‘the Computer Has Rebooted From a Bugcheck’ Error
Automatic Repair with Windows Boot Repair Tool
When you face the computer has rebooted from a bugcheck error, you need a reliable and efficient solution to restore their system. One powerful tool that stands out in this regard is 4DDiG Windows Boot Genius. This comprehensive software offers features designed to diagnose and fix various boot-related issues, making it an excellent choice for addressing bugcheck errors.
Follow the below key features of 4DDiG Windows Boot Genius:
- Automatic Repair: 4DDiG Windows Boot Genius provides an Automatic Repair feature that intelligently diagnoses and resolves common Windows startup issues, including those leading to bugcheck errors.
- Backup and Restore: This feature allows users to create a backup of their operating system and restore it in case of critical errors, ensuring data integrity and system stability.
- Create Bootable USB: 4DDiG Windows Boot Genius allows users to create a bootable USB drive. This is invaluable for situations where the system cannot boot normally.
- Advanced Crash Recovery: For bugcheck errors that result in system crashes, 4DDiG Windows Boot Genius offers advanced crash recovery options. Users can analyze crash logs, identify the root cause, and apply targeted fixes to prevent future occurrences.
Follow the below steps that can help how to use 4DDiG Windows Boot Genius to fix the computer has rebooted from a bugcheck error:
-
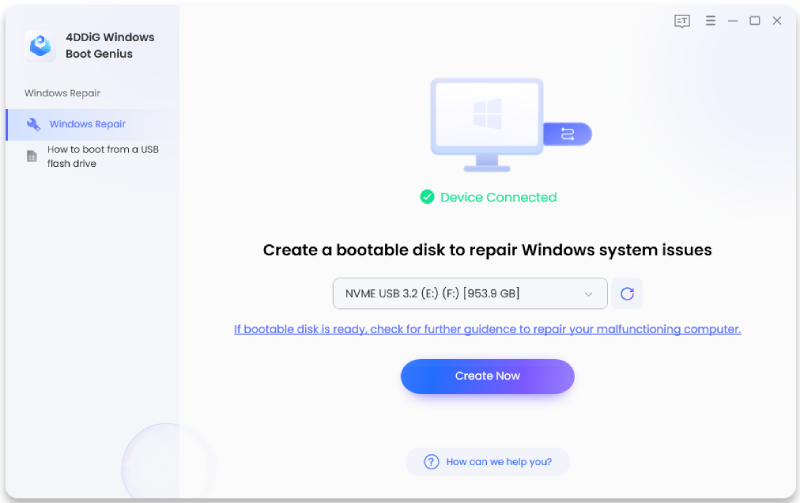
After running the program, insert your prepared CD/DVD into the CD room or connect the USB to the computer. Click "Create boot disk now" to start burning the repair disk.
FREE DOWNLOADSecure Download
FREE DOWNLOADSecure Download

-
After that, you must insert the burned disk into the computer that encounters the error "the computer has rebooted from a bugcheck.” Start the computer and press the Boot Menu hot-key(s) of your device to access the Boot Menu.
-
Once your computer is booted successfully, you should launch 4DDiG Windows Boot Genius. Next, click on "Automated Repair" to proceed.

-
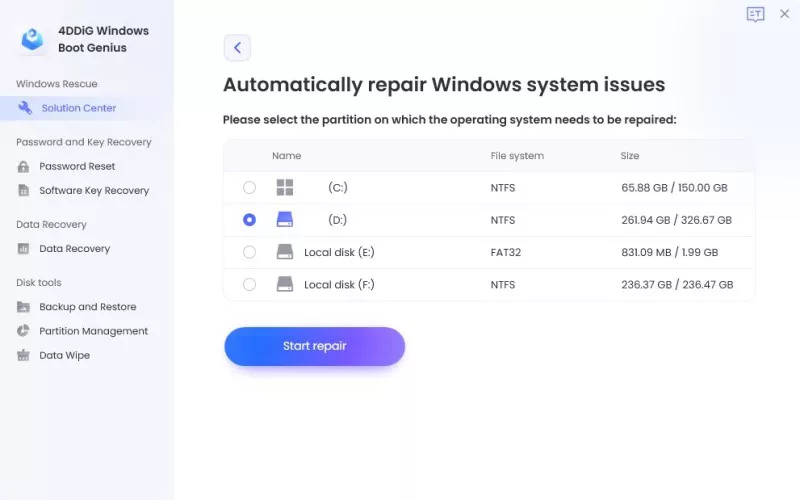
Now it’s time to choose the partition that requires fixing, and you should click on "Start Repair."

-
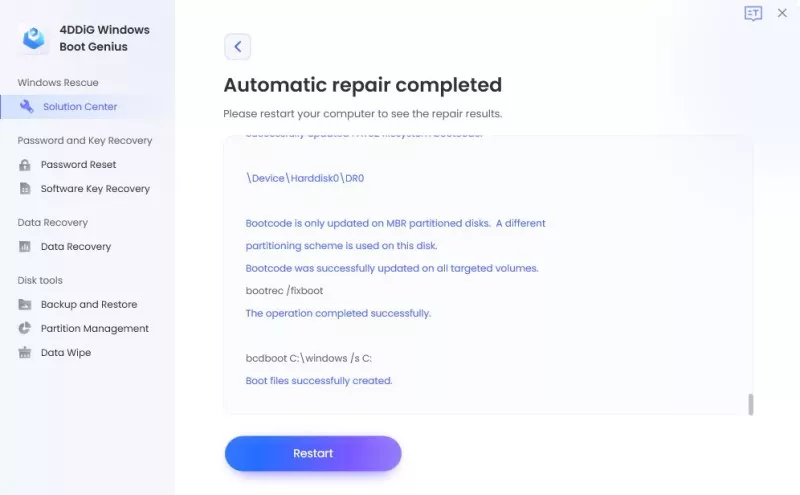
Restart your computer once the repair is completed, and check if the problem is resolved.

Part 3: Alternative Ways to Fix ‘the Computer Has Rebooted From a Bugcheck’ Error
Way 1: Uninstall the Device Driver
The computer has rebooted from a bugcheck Windows 11 error due to faulty or incompatible device drivers. If your specific driver is identified in this error message or if you suspect a driver-related issue, you should uninstall and reinstall the problematic driver to resolve the issue. Follow the below steps:
-
To launch Device Manager, press the Windows key + R, type devmgmt.msc, and click OK.

- To expand an option, double-click on it if you want to remove drivers.
-
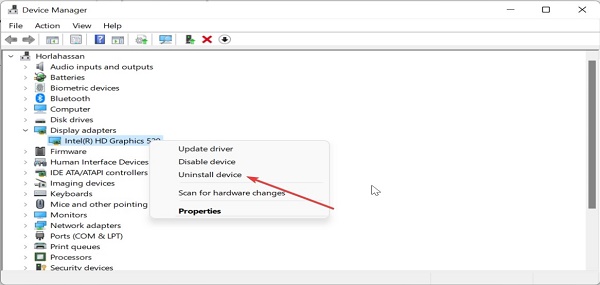
Right-click the problematic driver now and choose Uninstall device.

-
To confirm the action, click the Uninstall button now.

- Finally, you should restart your computer, and the driver will reinstall it automatically.
Way 2: Update the Device Driver
Outdated or incompatible device drivers can be the reason for the computer has rebooted from a bugcheck error. Keeping your drivers up-to-date can often resolve issues related to driver conflicts. Follow the below steps:
- As mentioned above, launch Device Manager.
-
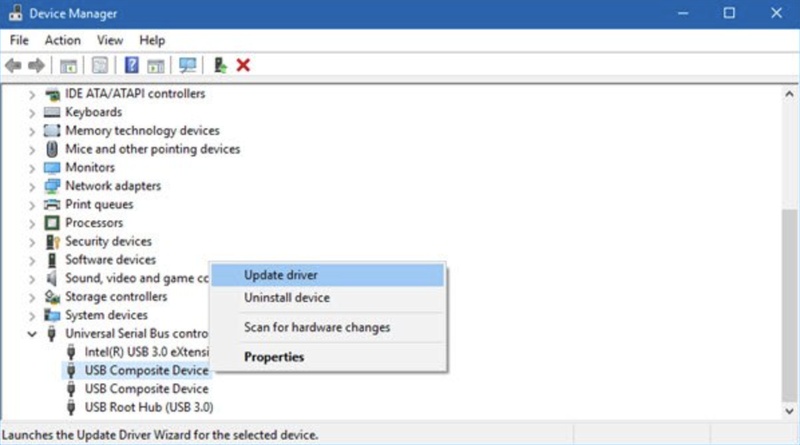
Double-click any options (keyboards, mice, disk drivers, etc.) for which you wish to update the drivers.

- To update a driver, right-click on each one and choose Update driver.
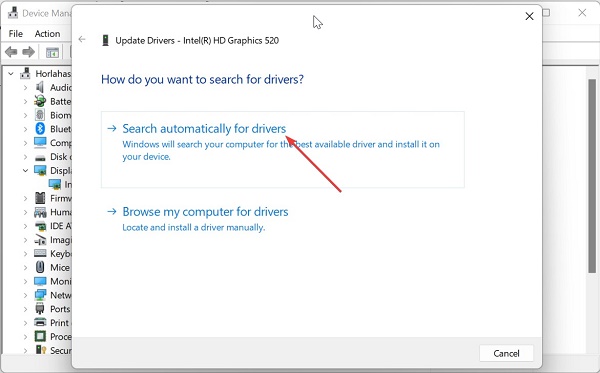
-
Choose "Search automatically for drivers."

- When the scan is finished, install the available updates.
Way 3: Perform a System Restore
Performing a System Restore can be a valuable solution when dealing with the computer has rebooted from a bugcheck Windows 11 error, especially if the issue started after a recent change in the system. System Restore allows you to revert your computer's state to a previous point when it functions correctly. Follow the below steps:
- Type Create a restore point in the Windows Search box and open it.
-
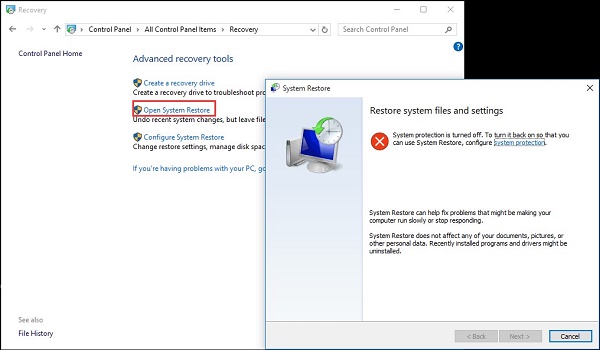
Click System Restore under System Protection.

-
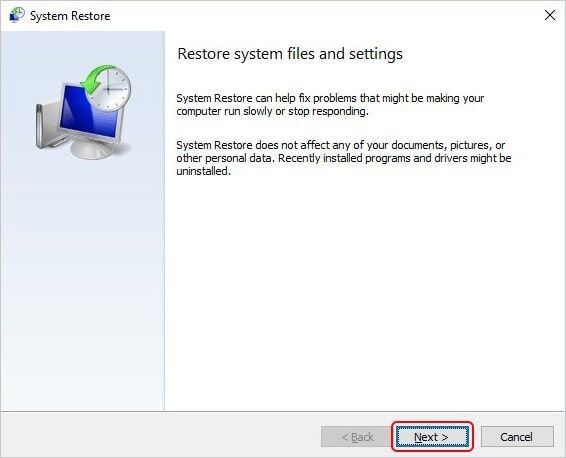
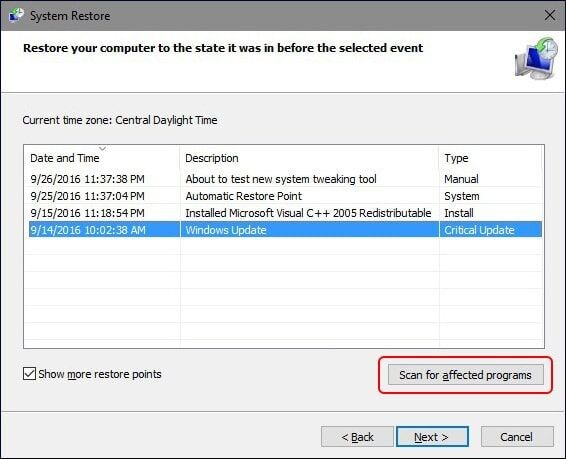
Next, select Next from the System Restore Window.

-
Select the restore point from the available option and Scan for the affected programs using the System Restore.

-
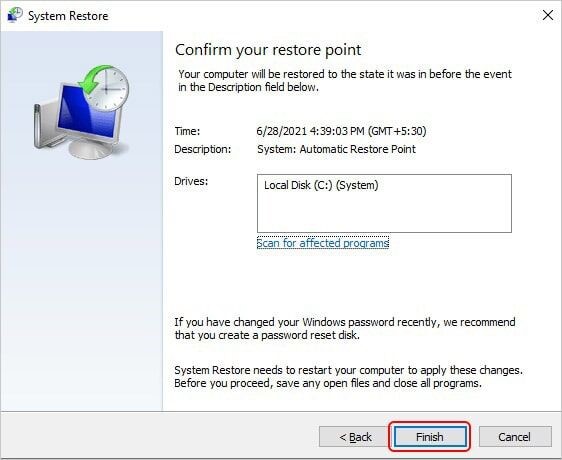
Click Next > Finish now.

- After you close the window and restart your computer, observe if the error has been resolved.
Way 4: Run a Windows Memory Diagnostic Tool
Memory-related issues, such as faulty RAM modules, can cause the computer has rebooted from a bugcheck error. Running the Windows Memory Diagnostic tool can help identify and address problems with your computer's memory. Follow the below steps to perform this diagnostic:
-
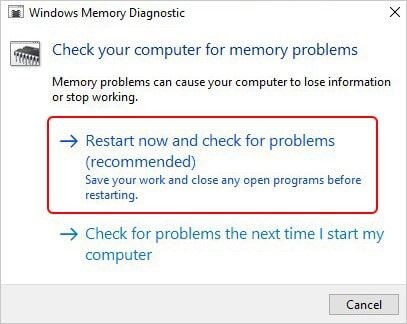
Launch Windows Memory Diagnostic and choose 'Restart now and check for problems (recommended).'

-
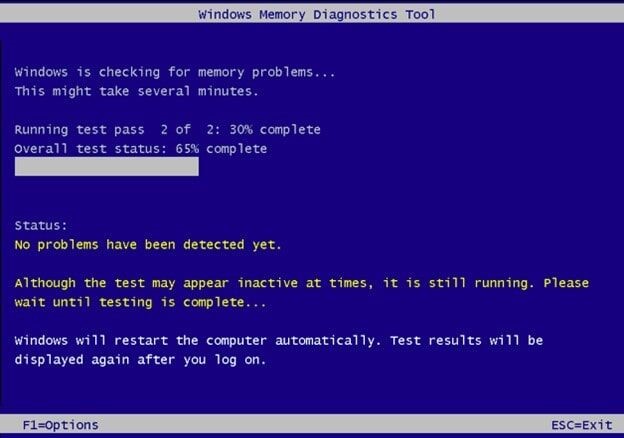
The system will restart, and the test will begin. Allow the test to run.

- When the test is finished, the system will automatically restart and display the test results on the screen.
- If there are any instructions on the screen to follow, you need to proceed with it.
- Once the procedure is finished, check if the issue has been resolved.
Conclusion
In short, if you want to address the computer has rebooted from a bugcheck error, you need a systematic approach to identify and rectify potential causes. We have explored various methods to troubleshoot and resolve the computer has rebooted from a bugcheck 0x00000116 problems effectively. These methods include uninstalling and updating device drivers, performing a System Restore, and running a Windows Memory Diagnostic tool, which can help troubleshoot specific aspects of the error.
Moreover, we have also explained the recommended method by utilizing the 4DDiG Windows Boot Genius tool, which is a comprehensive and user-friendly solution to fix the computer has rebooted from a bugcheck Windows 11 effectively. This tool offers automatic repair features, system recovery options, bootable USB creation, and advanced crash recovery capabilities with a robust toolkit to diagnose and fix various boot-related issues, ensuring a more reliable computing experience.



 ChatGPT
 Perplexity
 Google AI Mode
 Grok
Grok


