How to Fix Device Not Migrated Error Effectively [for Windows 11/10]
Device not migrated is a common error in Windows 11 and 10. This issue often arises during system updates or hardware changes. When you see a message that says, “device not migrated”, it means Windows failed to transfer your device settings. This can cause your hardware to malfunction or stop working altogether. Understanding why your device was not migrated is crucial to fixing the problem. Often, the error message will read, “Device settings not migrated”, which can be confusing.
The good news is, there are straightforward steps to resolve this issue. This guide will help you understand the reasons behind the device settings not migrated Windows 11 error and provide solutions. By following these steps, you can make sure that your devices work smoothly after updates or hardware changes.
Part 1: What Does Device Not Migrated Mean Windows 10?
The "Device not migrated" error often appears in Device Manager when a device driver isn't transferred correctly during an OS upgrade or update.
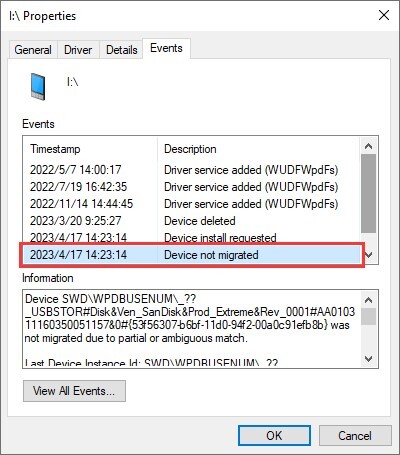
This can result in your device not being recognized or functioning properly. You might see messages like "Device not migrated" or "Device settings not migrated".
Common Symptoms
- Device not recognized or malfunctioning
- Unstable or slow connection
- Yellow triangle with an exclamation mark in Device Manager
- Computer freezes or crashes
- Error messages related to the device driver
Causes
- Compatibility issues with the new OS
- Corrupted or outdated drivers
- Drivers not digitally signed by Microsoft
- Drivers blocked by security policies
Part 2: How to Fix ‘Device Not Migrated’ Error in Windows 11/10?
Fix 1. Connect the Device to Another Port
Sometimes, the "Device not migrated" error is due to a faulty USB port. Checking the connection can often resolve the issue.
- Disconnect the device from its current USB port.
- Plug the device into a different USB port on the same computer. This can help if the original port is malfunctioning.
- If switching ports doesn’t work, try connecting the device to another computer. This helps determine if the issue is with the device or the computer's ports.
Fix 2. Run Hardware and Device Troubleshooter
The Windows Troubleshooter is a built-in tool that helps diagnose and fix common system issues. It's designed to automate the process, saving you time and effort. This tool can resolve a variety of problems, including internet connectivity, audio and video playback, hardware devices, and more. By running a series of automated tests, it identifies potential issues and provides recommended solutions. To fix the "Device Not Migrated" error, you can use the Windows Troubleshooter.
Here are the steps:
-
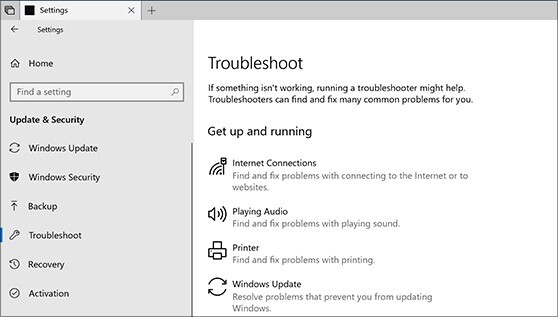
Click Start, then go to Settings > Update & Security > Troubleshoot > Additional troubleshooters.

- Select the device you want to repair and click "Run the troubleshooter".
- Follow the on-screen instructions to complete the troubleshooting process. This can help identify and fix the issue automatically.
Fix 3. Run SFC Scannow
The "SFC Scannow" command is a powerful tool available in Microsoft Windows that stands for System File Checker. Its main purpose is to scan your system for any corrupted or damaged files and repair them. When you run SFC Scannow, it checks all protected system files and attempts to fix any issues by replacing corrupted files with the correct versions from the Windows OS.
To run SFC Scannow, follow these steps:
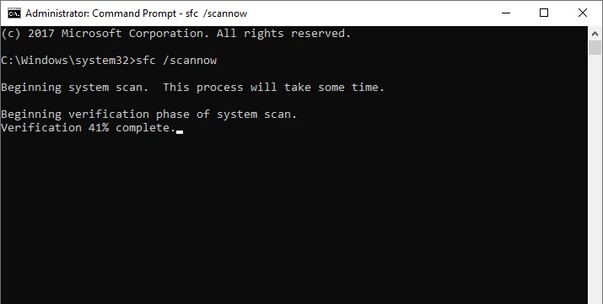
- Open Command Prompt as an administrator. You can do this by searching for "Command Prompt" in the Start menu, right-clicking it, and selecting "Run as administrator."
- In the Command Prompt window, type sfc /scannow and press Enter. The SFC Scannow command will then begin scanning your system files.
This process might take some time, depending on your system's size and complexity.
Once the scan is complete, the tool will inform you if any corrupted files were found and repaired. This can help resolve the "Device Not Migrated" error by fixing any underlying system file issues.
Fix 4. Scan for Hardware Changes in Device Manager
Device Manager is a crucial tool in the Windows operating system, offering a central view of all installed hardware like CPU, hard disk, USB drives, mouse, keyboards, printers, and more. It can also scan for hardware changes to help resolve issues.
Here are the steps:
-
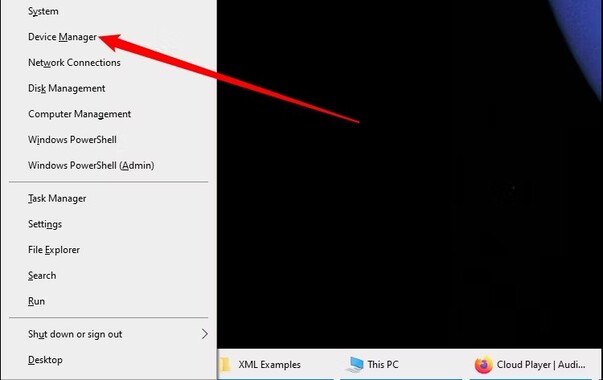
Right-click the Start menu and select "Device Manager".

- In Device Manager, find and select the device that was not migrated correctly.
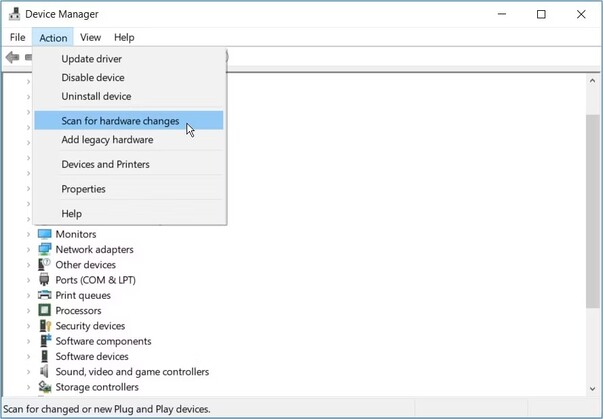
-
Click the "Action" tab in the menu and choose "Scan for hardware changes". Wait for the scanning to complete.

Fix 5. Reinstall Device Driver
If updating or rolling back the driver doesn't fix the issue, reinstalling the driver might help.
Here’s how you can do it:
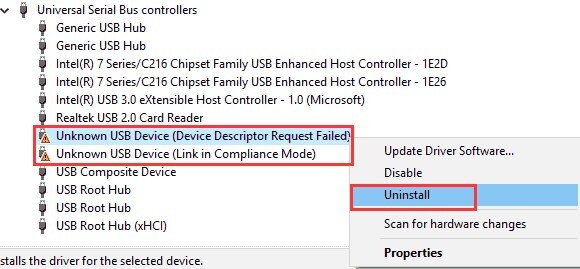
- Open Device Manager and locate the problematic device.
- Right-click on the device and select "Uninstall". Confirm the uninstallation if prompted.
- Restart your computer. Upon restart, Windows may automatically reinstall the driver. If it doesn't, download the latest driver from the manufacturer’s website or use a driver updater tool to reinstall it.
Fix 6. Install Windows Updates
Keeping your system updated with the latest Windows updates is crucial for security, performance, and stability. Here’s how you can make sure that your Windows 11/10 system is up-to-date:
-
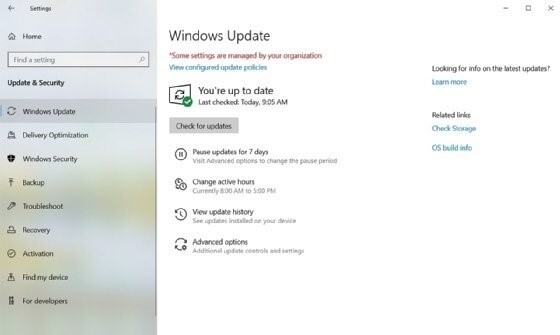
Open Settings by clicking the Start menu and selecting the gear icon. Navigate to "Update & Security" and click on "Windows Update". Then click "Check for Updates" to allow Windows to scan for the latest updates.

- Once the scan is complete, you’ll see a list of available updates. Click "Download" to start downloading them. After the download finishes, click "Install" to apply the updates. You might need to restart your computer to complete the installation.
-
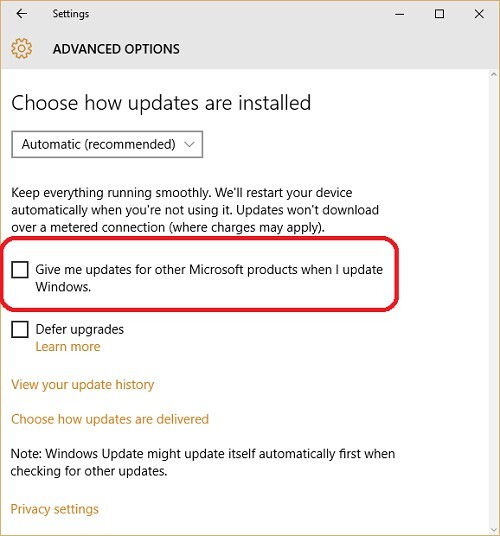
For automatic updates, go to "Advanced options" in Windows Update settings. Select "Automatic (recommended)" under "Choose how updates are installed" to enable Windows to download and install updates automatically in the background.

Bonus Tip: How to Migrate Windows OS to HDD/SSD Easily and Safely?
If you’re looking to migrate your Windows OS to a new HDD or SSD, 4DDiG Partition Manager is a highly recommended tool. It simplifies the process, ensuring a smooth and safe migration without losing any data. The Migrate OS feature of 4DDiG Partition Manager is especially useful when upgrading to a new drive. It allows you to transfer your entire operating system, including system files, applications, and settings, to a new HDD or SSD with minimal effort.
Main Features of 4DDiG Partition Manager
- Seamlessly transfer your Windows OS to a new HDD or SSD.
- Create, delete, format, resize, and move partitions effortlessly.
- Clone entire disks or specific partitions for backup or migration purposes.
- Advanced features to safeguard your data during operations.
- Intuitive design for easy navigation and use.
- Supports various Windows versions, including Windows 11, 10, 8, and 7.
Here’s how to use 4DDiG Partition Manager to Migrate Windows OS to HDD/SSD.
-
First, connect your new drive to your computer after installing 4DDiG Partition Manager. Launch the application, go to "Clone OS Disk" and select your new drive as the target disk. The source disk will be selected automatically. Click on "Next" to initiate the process.
FREE DOWNLOADSecure Download

-
A pop-up window will notify you that all partitions and files on the target disk will be overwritten during the migration. Confirm by clicking "Sure," then click "Start" to proceed with the system migration.

-
The system migration will now begin. The duration will depend on the size of your drives. During the process, you can monitor migration details such as speed and elapsed time.

Conclusion
Dealing with the "device not migrated" error can be frustrating, but with these simple fixes, you can get your hardware running smoothly again. These steps cover all bases to resolve the issue by describing USB ports, running the Windows Troubleshooter, using SFC Scannow, scanning for hardware changes, reinstalling drivers, or updating Windows.
Remember, keeping your system up-to-date is crucial for preventing such errors. Additionally, if you need to migrate your Windows OS to a new drive, the 4DDiG Partition Manager is an excellent tool that simplifies the process. With features like seamless OS migration, comprehensive partition management, and data protection, it makes sure a smooth transition to your new drive.
Secure Download
💡 Summarize with AI:
You May Also Like
- Home >>
- Windows Fix >>
- How to Fix Device Not Migrated Error Effectively [for Windows 11/10]


 ChatGPT
 Perplexity
 Google AI Mode
 Grok
Grok

