UEFI vs Legacy: What Are the Differences & Which Is Better?
UEFI vs Legacy: what are the differences? How to change Legacy to UEFI Boot Mode without data loss? Just download 4DDiG Partition Manager to help you!
When it comes to booting up a computer, the choice between UEFI (Unified Extensible Firmware Interface) and Legacy BIOS (Basic Input/Output System) can significantly impact performance and functionality. Understanding UEFI vs Legacy is crucial for making informed decisions, especially when building or upgrading a system.
Legacy BIOS is the traditional firmware interface that offers basic functionality for initializing the hardware and booting the operating system. However, UEFI, introduced as a modern replacement, brings numerous advantages, including faster boot times, support for larger hard drives, improved security features like Secure Boot, and a graphical user interface for easier configuration.
This article will explain the Legacy vs UEFI and their pros and cons. Let’s explore the UEFI vs Legacy boot which is better in detail!

Part 1: What Is UEFI?
UEFI stands for Unified Extensible Firmware Interface. It is a modern firmware interface designed to replace computers' traditional BIOS (Basic Input/Output System). UEFI provides a standardized way for the operating system to interact with the hardware during the boot process. When a computer boots up, it initializes the hard drive's operating system and sets up the hardware.
UEFI is intended to eventually fully replace the BIOS because it offers many new features and benefits that are impossible with the traditional BIOS. A file called a ".efi file," which is kept on a unique partition known as the EFI System Partition (ESP), contains all of the startup and initialization data used by UEFI. The boot loader software for the computer's installed operating system will also be located on the ESP partition.
Moreover, one of the main reasons UEFI boots up faster is that it can bypass the BIOS self-test procedure and directly boot the operating system thanks to this partition.
Pros and Cons:
- Pros
- Cons
-
- Faster Boot Times: UEFI allows quicker boot-up speeds than Legacy BIOS.
- Support for Larger Storage Devices: UEFI supports booting from and accessing larger hard drives (over 2TB) and SSDs.
- Secure Boot: UEFI includes Secure Boot, which helps prevent unauthorized operating systems or malware from loading during boot.
- Graphical User Interface (GUI): UEFI often comes with a GUI, making it easier for users to configure settings and manage their system.
-
- Compatibility Issues: Some older hardware and operating systems may not fully support UEFI.
- Complexity: UEFI can be more complex to configure and troubleshoot compared to Legacy BIOS, especially for inexperienced users.
- Lack of Standardization: UEFI implementations can vary between manufacturers, leading to inconsistencies in functionality and compatibility.
How to Enter UEFI?
Entering UEFI (Unified Extensible Firmware Interface) varies slightly depending on the computer's manufacturer and model. However, the process is generally similar across most systems. With UEFI-equipped computers booting up quickly, you don't need to press a key to access UEFI Windows 10. However, you have limited time to finish the boot process. To access UEFI Windows 10, you can try the following steps:
-
To access Settings, you must right-click the Windows Start menu. Next, select Security and Update.

-
On this screen, choose Recovery. Click Restart now in the Advanced Startup section. After that, the system will restart.

-
Select Troubleshoot.

-
Select Advanced options to navigate to the following page.

-
Choose UEFI Firmware Settings.

- To access the UEFI interface, click Restart.
Part 2: What Is Legacy (BIOS)?
Legacy BIOS, or Basic Input/Output System, is a firmware interface traditionally used in computers for booting up the operating system and initializing hardware components. It has been a standard feature in computers for many years, predating the introduction of UEFI (Unified Extensible Firmware Interface).
It is easy to comprehend how BIOS functions. The BIOS loads upon computer startup and checks that the hardware components are operating correctly by waking them up. After that, it loads the boot loader, which starts Windows or any other installed operating system.
You should know that the BIOS can only operate in 1 MB of memory and needs to be in 16-bit processor mode. When it initializes all the hardware interfaces and devices on a modern PC, it has difficulties initializing multiple devices at once, which causes the boot process to lag.
Pros and Cons:
- Pros
- Cons
-
- Simplicity: Legacy BIOS is straightforward and easier to understand for users familiar with older computer systems.
- Broad Compatibility: Most operating systems and hardware components are compatible with Legacy BIOS, making it a reliable choice for older systems.
- Legacy Support: Legacy BIOS can boot older operating systems and software that may not be compatible with UEFI.
- Less Prone to Firmware Attacks: Legacy BIOS systems may be less vulnerable to specific firmware-level attacks than UEFI.
-
- Limited Features: Legacy BIOS lacks many advanced features and functionalities in UEFI, such as support for larger storage devices and secure boot mechanisms.
- Slower Boot Times: Legacy BIOS typically has slower boot times than UEFI, especially on systems with large storage devices.
- Limited Hardware Support: Legacy BIOS may not fully support newer hardware components, such as larger hard drives, SSDs, or advanced peripherals.
- Lack of Standardization: Legacy BIOS implementations can vary between manufacturers, leading to inconsistencies in functionality and compatibility.
How to Enter BIOS?
Entering the BIOS (Basic Input/Output System) setup utility varies depending on the computer's manufacturer and model. Here's a general guide on how to enter BIOS:
- Restart or Power On Your Computer: Begin by restarting your computer or turning it on if it's powered off.
- Identify the BIOS Setup Key: During the initial startup process, pay attention to the screen for a message indicating which key to press to enter the BIOS setup. Standard keys include Del, F2, F10, F12, Esc, or Tab. The message usually appears briefly, so you may need to see it quickly.
-
Press the BIOS Setup Key: Once you've identified the correct key, press it immediately to enter the BIOS setup utility. If successful, you should be taken to the BIOS settings screen.

- Navigate BIOS Settings: Once inside the BIOS setup utility, you can navigate the settings using the keyboard. Be cautious while making changes, as modifying specific settings incorrectly can affect the system's functionality.
- Exit BIOS: Save and exit the BIOS setup utility after making the necessary changes.
Part 3: How to Change Legacy to UEFI Boot Mode without Data Loss?
Now you have explored the Legacy BIOS vs UEFI in detail. Follow the below actions that can help how to change Legacy to UEFI boot mode without data loss:
Action 1: Check the Partition Style of Your Disk via Disk Management
To determine the partition style of your disk before converting from Legacy to UEFI boot mode without data loss, follow the below steps:
- You must right-click the Start button and select Disk Management from the pop-up menu.
- Click Properties when you right-click on your system disk.
-
Switch to the Volumes tab and review the Disk Information section's Partition style. You can see if the disk is formatted in MBR or GPT style.

Action 2: Convert MBR to GPT without Data Loss
To convert MBR to GPT without data loss, we recommend using the 4DDiG Partition Manager, which is the ultimate MBR/GPT disk converter software.
Follow the below key features:
- Effortless Conversion: 4DDiG Partition Manager offers a straightforward and user-friendly interface, making the conversion process from MBR to GPT seamless and hassle-free.
- Data Integrity: The tool ensures that all your data remains intact during conversion. It employs advanced algorithms to safely convert the partition style without risking data loss.
Follow the below steps that can help how to use 4DDiG Partition Manager to Convert MBR to GPT without data loss:
-
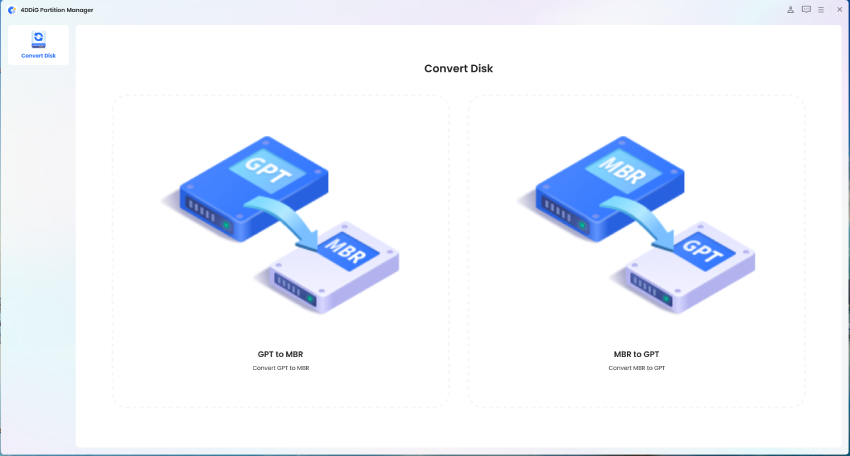
Download and install 4DDiG Partition Manager on your PC. Next, open the application, choose "Convert Disk" from the menu on the left, and then click "Convert MBR to GPT" to continue.
FREE DOWNLOADSecure Download

-
After selecting the disk you wish to convert and clicking "Continue," the execution interface will appear.

The program will download the PE component if the selected disk is the system disk. Once the download has been successful, a prompt window will open. Make sure to prevent power outages and save any unsaved files. Click "Sure" after making sure everything is correct. When the computer restarts, the PE environment will automatically load.

-
In the PE environment, once the program has launched, choose "Convert MBR to GPT" to continue.

-
After choosing the disk to convert, click "Continue."
-
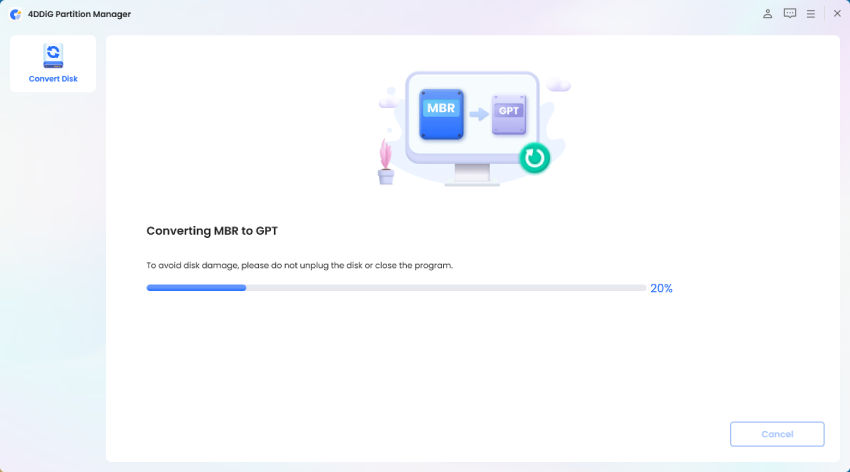
MBR to GPT conversion is being done via 4DDiG Partition Manager. The number of partitions on the disk affects how quickly it converts.

-
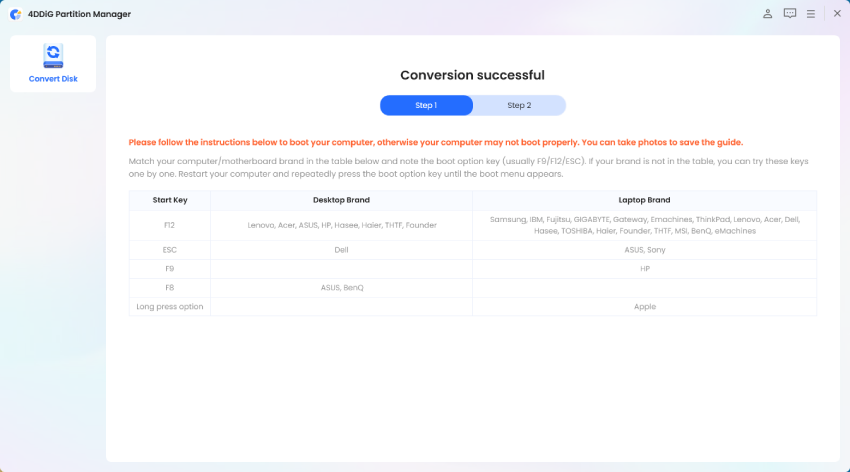
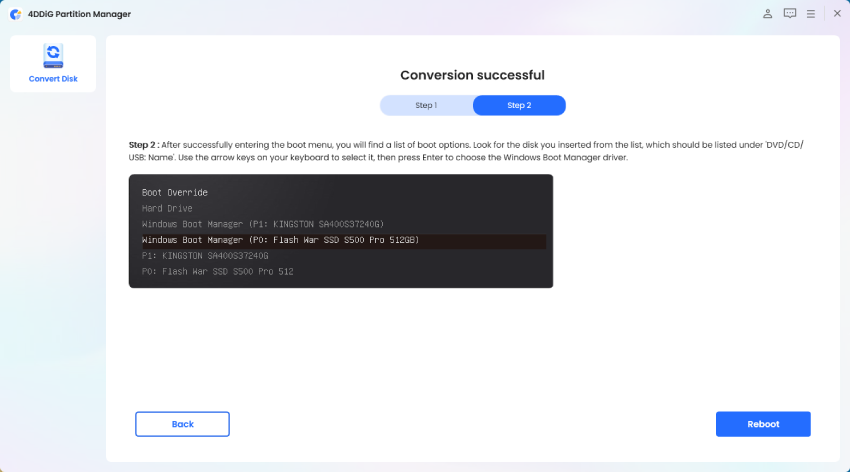
Successful conversion! If you don't follow the steps below, your computer might not boot correctly.


Action 3: Set the UEFI as the Boot Mode
Once you have successfully converted your disk from MBR to GPT without data loss, the next step is to set UEFI as the boot mode. Follow the below steps:
- Restart your computer and enter the UEFI/BIOS setup utility. You need to press a specific key (such as Del, F2, F10, or Esc) during the boot process to access the UEFI/BIOS settings.
- Once inside the UEFI/BIOS setup utility, navigate to the "Boot" or "Boot Options" menu using the arrow keys on your keyboard.
-
Locate the option to select the boot mode. Depending on your system, it may be labelled as "Boot Mode," "Boot Option Priorities," or something similar. Choose the option to set the boot mode, and select "UEFI" as the preferred mode.

- After selecting UEFI as the boot mode, save your changes and exit the UEFI/BIOS setup utility. This action typically involves pressing a key (often F10) to save the changes and reboot the computer.
- Once your computer restarts, pay attention to the boot process. If you've successfully set UEFI as the boot mode, you should see a confirmation message indicating that the system is booting in UEFI mode.
Conclusion
In conclusion, understanding Legacy BIOS vs UEFI is essential for optimizing system performance and functionality. Legacy BIOS may lack the advanced features and compatibility offered by UEFI. Conversely, UEFI provides benefits such as faster boot times, support for larger storage devices, and enhanced security features like Secure Boot.
To transition from Legacy BIOS to UEFI without data loss, it's crucial to follow a systematic approach. This includes checking the partition style of your disk, converting from MBR to GPT using a reliable tool like 4DDiG Partition Manager, and setting UEFI as the boot mode in the system's firmware settings.
💡 Summarize with AI:
You May Also Like
- Home >>
- Windows Fix >>
- UEFI vs Legacy: What Are the Differences & Which Is Better?



 ChatGPT
 Perplexity
 Google AI Mode
 Grok
Grok

