How to Install Windows 11 from USB? Step-By-Step Guide with Pictures
How to install Windows 11 from USB drive? Here is a detailed step by step instructions that will help you. Remember to download 4DDiG Partition Manager to help you extend your C drive for Windows 11 installation!
Are you wondering how to install Windows 11 from USB drive? Don't worry, you're not alone! Many folks are in the same boat, looking to upgrade or reinstall their computer's operating system.
Whether you have got a new PC, want to try out the cool features of Windows 11, or need to fix some issues, this guide with easy steps and pictures is here to help.
Installing a new operating system might sound complicated, but we will make it super simple for you. In this article, we will break down each step in a way that's easy to understand.
So, let's jump right in!
Part 1: What are the Hardware Requirements for Windows 11?
Before getting straight to how to install Windows 11 from USB on new PC, it's better to first understand the hardware requirements for Windows 11.
Here's a brief overview of the key hardware requirements:
- Processor: 1 GHz or faster with 2 or more cores on a compatible 64-bit processor or System on a Chip (SoC).
- RAM: 4 GB or more.
- Storage: 64 GB or larger storage device.
- System Firmware: UEFI, Secure Boot capable.
- TPM: Trusted Platform Module (TPM) version 2.0.
- Graphics Card: DirectX 12 compatible graphics / WDDM 2.x.
- Display: >9" with HD Resolution (720p).
- Internet connection: Internet connectivity is necessary to perform updates and to download and take advantage of some features.
So first check whether your PC meets the requirements of Windows 11 and then proceed to the installation process.
Friendly Reminder: Remember to Free Up Space on System Drive before Installing Windows 11
In order to install Windows 11 on your computer, it's essential to make sure your hard drive have enough disk space. As said above, a minimum of 64 GB space is required to install Windows 11 on your computer.
So if you don't have that much space on your computer, you will have to extend the C drive on your computer. For this, you can consider using 4DDiG Partition Manager. This tool can help manage your disk partitions effectively. You can resize, merge, or split partitions without data loss.
Some of the key features of 4DDiG Partition Manager are:
- Partition Management: Easily resize, extend, split, merge, create, delete and format partitions without losing data.
- Partition Recovery: Recover lost or deleted partitions, as well as data within them.
- Disk Conversion: Convert disks between MBR and GPT without data loss.
- Clone Disk: Clone an entire disk to another without reinstalling the operating system and applications.
- Migrate OS to SSD/HDD: Migrate your operating system to a solid-state drive or hard disk drive without needing to reinstall Windows.
- Intuitive Interface: User-friendly interface making the management of partitions and disks straightforward for users of all levels.
Now let's learn how you can use 4DDiG Partition Manager to extend C drive of your computer for Windows 11 installation.
-
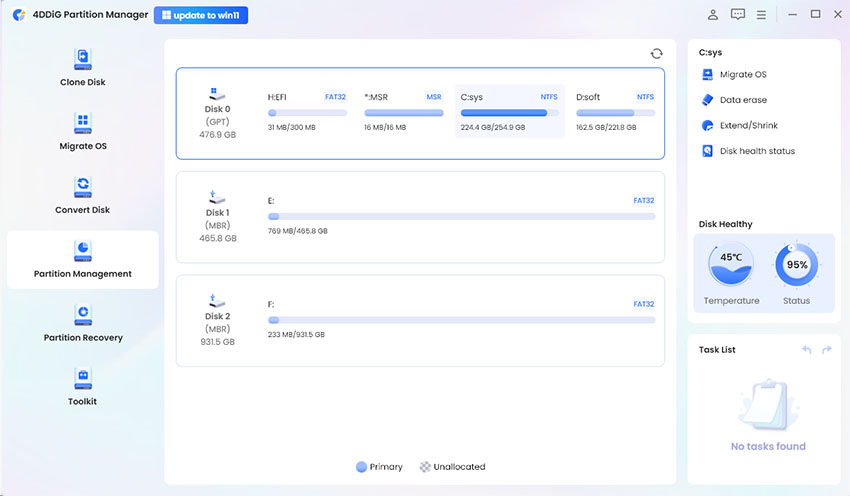
First, install 4DDiG Partition Manager on your computer and launch it. On the main interface, go to Partition Management, select the C Drive, and hit the Extend/Shrink button.
FREE DOWNLOADSecure Download

-
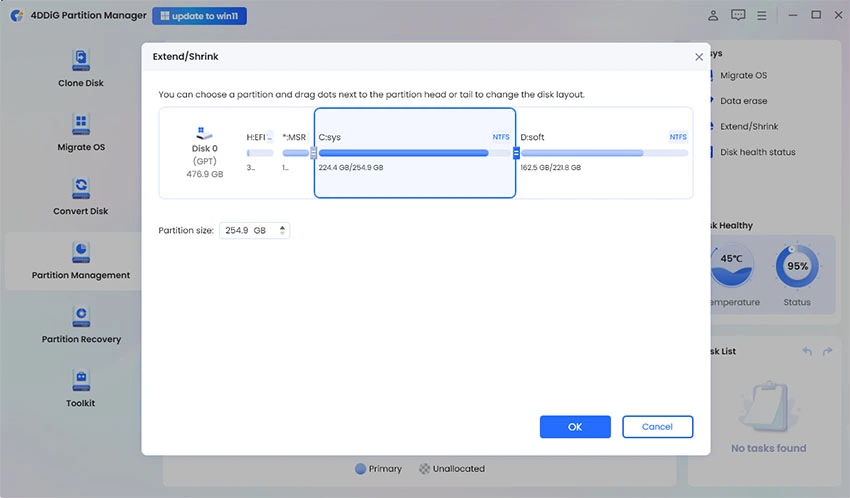
Now you will have to drag the right border of the C Drive rightwards or drag its left border leftwards to extend its size. Once you are satisfied with the size, hit the OK button.

-
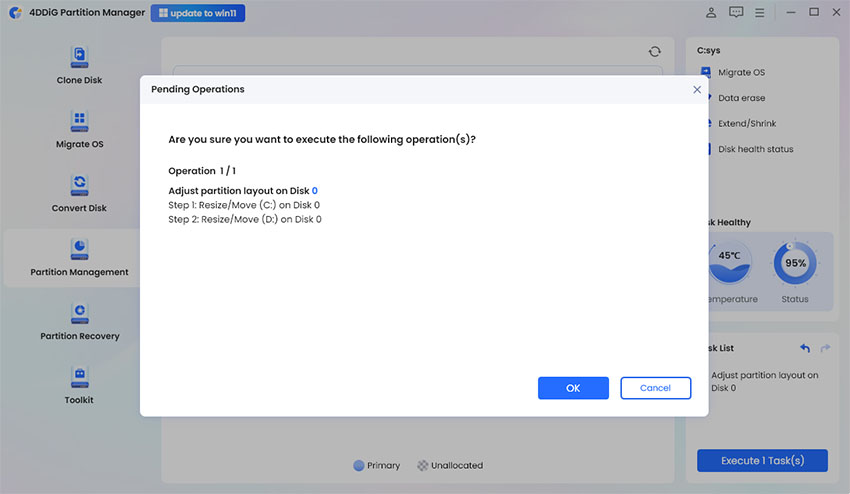
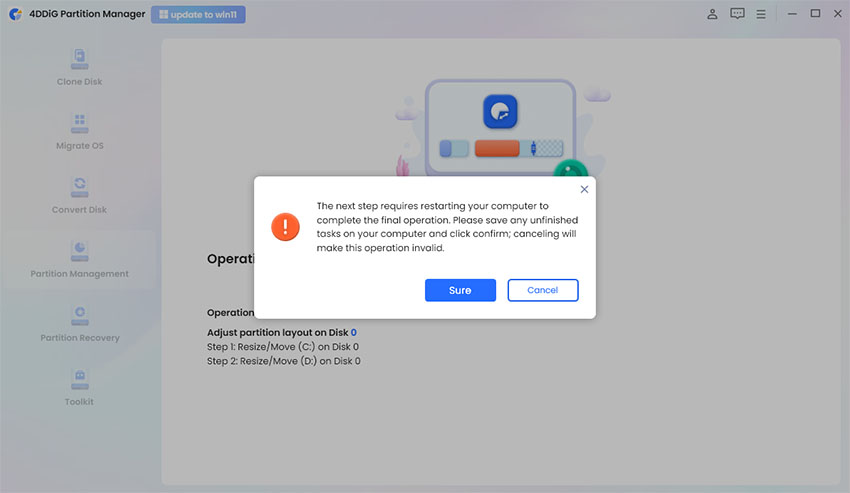
A pending task will show on the tool. Now you just have to hit the Execute 1 Task button and select OK to continue the operation.

-
The C drive extension process will be started and it might take some minutes. So be patient. Once it’s complete, your computer will automatically restart, and your C drive will be successfully expanded.

Now let's learn how to fresh install Windows 11 from USB.
Part 2: How to Install Windows 11 from USB?
Here's how to install Windows 11 from USB.
Action 1. Download Windows 11 ISO File
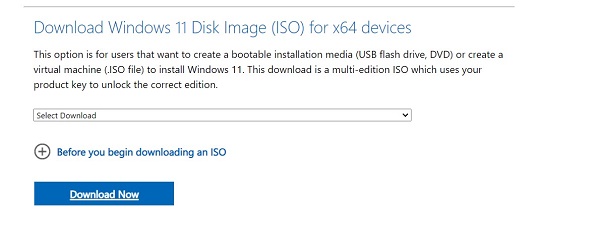
- Visit the Official Microsoft Website: Go to the official Microsoft download page for Windows 11.
-
Select the Windows 11 Version: Find the 'Download Windows 11 Disk Image (ISO)' section and select the version of Windows 11 you need.

- Choose the Product Language: After selecting the version, choose your preferred language for the product.
- Download the ISO File: Click on the 'Download' button to download the Windows 11 ISO file to your computer.
Action 2. Create a Windows 11 Bootable USB Drive
- Insert a USB Drive: Plug a USB flash drive into your computer. The drive should be at least 8 GB in capacity and all data on it will be erased.
- Download Rufus or any other bootable USB creation tool: Rufus is a free, open-source software that allows you to create a bootable USB drive.
-
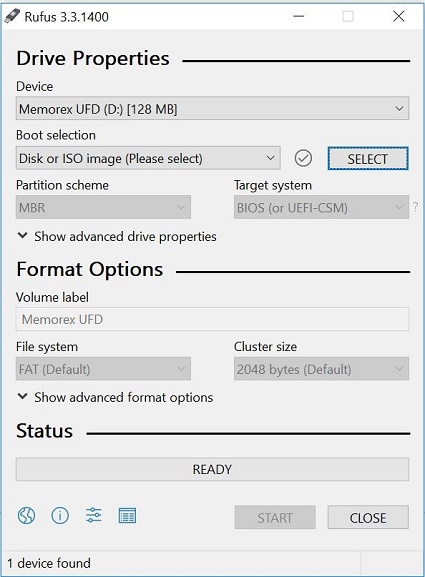
Open Rufus: Run the Rufus tool.

-
Configure Rufus Settings:
- Device: Select your USB drive.
- Boot selection: Click on the 'SELECT' button and browse to choose the Windows 11 ISO file you downloaded.
- Partition scheme: Choose 'GPT' if your system uses UEFI, otherwise, choose 'MBR'.
- File system: Choose 'NTFS'.
- Cluster size: You can leave this as the default value.
- Start the Process: Click on the 'Start' button and wait for Rufus to create the bootable USB drive.
Action 3. Install Windows 11 from USB
- Insert the Bootable USB: Plug the Windows 11 bootable USB drive into the computer where you want to install Windows 11.
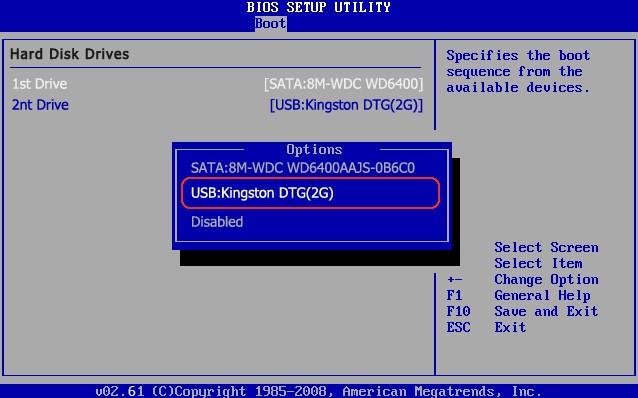
- Enter the BIOS/UEFI Settings: Restart your computer and enter the BIOS/UEFI settings by pressing the designated key (common keys include F2, F10, F12, or Del, depending on your PC).
-
Change Boot Order:
- Navigate to the 'Boot' menu.
-
Change the boot order to start from the USB drive (you might need to use the + key to move the USB drive to the top).

- Save and Exit: Save the changes and exit the BIOS/UEFI.
-
Install Windows 11:
- Your computer will restart and boot from the USB.
-
Follow the on-screen instructions to install Windows 11. This will involve choosing language, time, and keyboard preferences, installing drivers (if necessary), and setting up or logging into your Microsoft account.

So, that's how to clean install Windows 11 from USB. All you have to do is follow the step by step instructions given above, and you will end up installing Windows 11 on your computer.
FAQs about How to Install Windows 11 from USB
1. Can I install Windows 11 directly from USB?
Yes, you can install Windows 11 directly from a USB drive. This is a common method, especially for computers without an optical drive. You need to create a bootable USB drive with the Windows 11 ISO file and then configure your computer's BIOS or UEFI settings to boot from the USB drive. Once the computer boots from the USB, you can proceed with the installation process by following the on-screen instructions.
2. Why won't Windows 11 install from USB?
Several issues could prevent Windows 11 from installing from a USB drive. Common problems and their solutions include:
- USB Recognition: Ensure the USB is properly inserted and recognized.
- BIOS/UEFI Settings: Confirm the boot order prioritizes the USB drive and settings like Secure Boot are correctly configured.
- Corrupt Installation Media: The ISO or bootable USB might be corrupt. Redownload the ISO and recreate the USB drive.
- Hardware Compatibility: Check that your PC meets Windows 11's requirements, including TPM 2.0 and Secure Boot.
- Drive Issues: The target drive may have format issues or incompatible partitions. Consider reformatting or adjusting partitions during installation.
Final Words
In conclusion, understanding how to install Windows 11 from a bootable USB is a valuable skill, streamlining the process of upgrading or setting up a new system. This method not only offers convenience but also the flexibility to install Windows 11 on devices lacking an optical drive.
Before the installation, you might have to extend the C drive to ensure smooth system performance. This is where 4DDiG Partition Manager becomes an essential tool. It offers a user-friendly interface and powerful features to effortlessly manage your partitions, making it an excellent choice for optimizing your new Windows 11 setup.
💡 Summarize with AI:
You May Also Like
- Home >>
- Windows Fix >>
- How to Install Windows 11 from USB? Step-By-Step Guide with Pictures

 ChatGPT
 Perplexity
 Google AI Mode
 Grok
Grok


