How to Fix We Couldn't Update the System Reserved Partition?
Easily resolve the ‘We Couldn't Update the System Reserved Partition’ error on Windows 11/10. Explore the advanced solution like 4DDiG Partition Manager for a seamless experience.
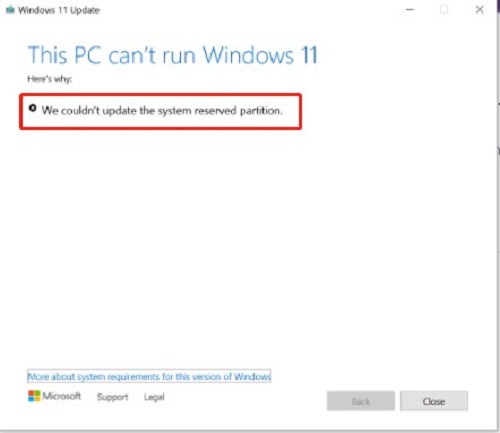
Sometimes, you may have encountered the frustrating error message "We couldn't update the system reserved partition.” This issue often arises during the Windows operating system update process and can be a roadblock to keeping your system secure and up-to-date. The system-reserved partition plays a crucial role in the functioning of Windows, containing essential files required for booting and system updates.
Understanding the error “we couldn't update the system reserved partition HP" is essential. This article will explore how to fix we couldn't update the system reserved partition and the common causes behind this error. Thus, resolving we couldn't update the system reserved partition Windows 10 error is essential for maintaining a stable and secure Windows environment. Let’s get started!
Part 1: Why Can't We Update the System Reserved Partition?
The error “we couldn't update the system reserved partition" occurs for various underlying reasons, each requiring specific attention and resolution. Understanding the reasons behind this error is crucial for effectively troubleshooting and implementing the appropriate fixes. Here are some common factors behind we couldn't update the system reserved partition Windows 11 22h2 error:
- Insufficient Disk Space: The System Reserved Partition requires some free space to perform updates. If the partition runs low on disk space, Windows may encounter difficulties applying updates, leading to an error message.
- File System Corruption: Corruption within the System Reserved Partition file system can hinder the update process. This corruption might occur due to unexpected system shutdowns, disk errors, or other factors that compromise the integrity of the file system.
- Incorrect Disk Configuration: The partition might not be configured correctly, or there may be issues with the disk layout. This includes improper partition sizes, incorrect partition types, or misconfigurations that lead to “we couldn't update the system reserved partition.”
- Third-Party Software Interference: Some third-party antivirus programs or disk management tools may interfere with the update process. These applications can conflict with Windows Update mechanisms, causing errors while attempting to update the System Reserved Partition.
Friendly Reminder: Backup Your Windows System Before You Fix ‘We Couldn't Update the System Reserved Partition’ Issue
Before starting any troubleshooting or fixing procedures for the "we couldn't update the system reserved partition" issue, it's crucial to create a backup of your Windows system. A backup can safeguard your important files, documents, and personal data. If you have an unforeseen issue or unsuccessful troubleshooting, you can restore your system to a previous state without risking data loss. For an efficient and user-friendly system backup solution, consider using 4DDiG Partition Manager. This partition manager can help you migrate Windows OS to SSD without reinstalling system.
Follow the below key features of 4DDiG Partition Manager:
- OS Migration: 4DDiG Partition Manager can help you migrate Windows OS to SSD without reinstalling system.
- User-Friendly Interface: The intuitive design ensures that even those with limited technical expertise can navigate the software effortlessly. The step-by-step guidance makes the troubleshooting process accessible to everyone.
- Data Backup and Protection: Before initiating any repairs on the System Reserved Partition, this tool offers a comprehensive data backup feature. Users can create backups of critical files and folders, providing a fail-safe mechanism to restore data in case unforeseen complications arise during the repair process.
- Efficient System Reserved Partition Repair: 4DDiG Partition Manager stands out for its ability to swiftly identify and address issues affecting the System Reserved Partition. Whether it's insufficient disk space, file system corruption, or misconfigurations, this tool employs advanced algorithms to diagnose and rectify the root cause, facilitating a seamless update process.
- Partition Management and Optimization: This versatile tool goes beyond mere error resolution; it empowers users with partition management features. From resizing and creating partitions to optimizing disk space allocation, 4DDiG Partition Manager enables users to maintain an organized and efficient disk structure.
Follow the below steps that can help how to use 4DDiG Partition Manager to migrate OS:
-
Connect your new drive once 4DDiG Partition Manager has been downloaded and installed on your computer. After that, open the application, go to "Clone OS Disk", choose the new drive as the target disk, and press "Next" to proceed.
FREE DOWNLOADSecure Download

-
You will receive a pop-up window warning that files and partitions on the target disk will be overwritten during system migration. Click "Sure" to initiate the system migration to the next phase.

-
Depending on the size of the drives, system migration will now start under 4DDiG Partition Manager and take some time to finish. Data about migration, including elapsed time and migration speed, can be observed.

Part 2: How to Fix We Couldn't Update the System Reserved Partition?
Follow the below guide to fix we couldn't update the system reserved partition issue:
How to identify if the System Reserved Partition is GPT or MBR Partition Style?
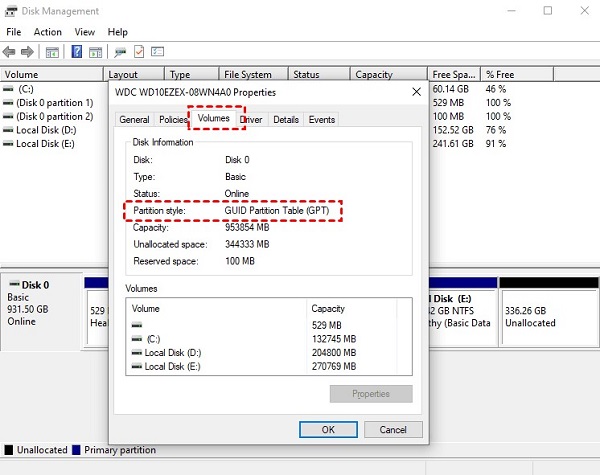
Before proceeding, You must verify whether the SRP is partitioned using the GPT or MBR style. To check the space in my system reserved partition, follow the detailed instructions below.
- To launch the Run Window, simultaneously press Windows, and R. Make sure you input diskmgmt.msc and hit Enter.
-
Select Properties with a right-click on the disk that has the SRP on it. When you select the Volumes tab, the partition style becomes visible such as Master Boot Record (MBR) or GUID Partition Table (GPT).

Steps for Windows 11/10 with GPT Partition Style
If you are using Windows 11 or Windows 10 with a GPT partition style, here are the steps to address the "We Couldn't Update the System Reserved Partition" error:
- In the search box, type cmd. From the selection, choose Command Prompt, then click Run as administrator.
-
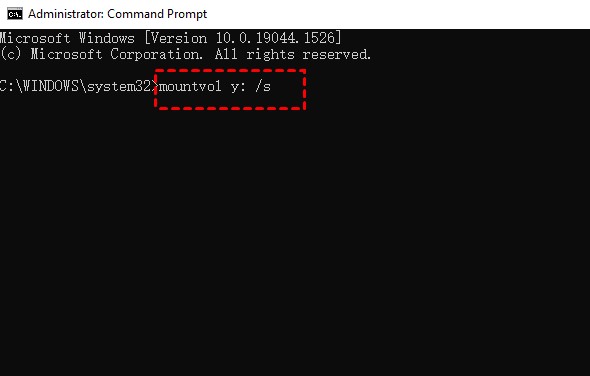
Press Enter after typing mountvol y: /s into the command line window. To access the System Partition, this will append the Y: drive letter.

- Press Enter after typing Y: to switch to the Y drive. Next, use the command cd EFI\Microsoft\Boot\Fonts to browse to the Fonts folder. To remove font files, type del *.*. It may prompt you if you're sure you want to go on, hit Y, and then Enter.
Steps for Windows 11/10 with MBR Partition Style
If you are using Windows 11 or Windows 10 with an MBR partition style, you need to follow the below steps to fix the “we couldn't update the system reserved partition" error:
- Select Disk Management from the search results by right-clicking the Start button.
-
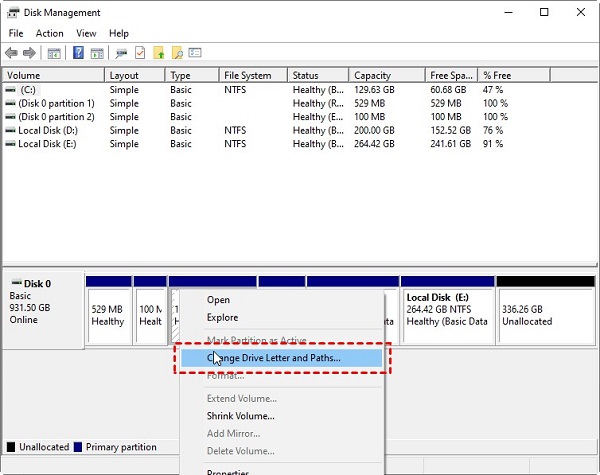
Next, make sure you choose the System Reserved Partition partition. Use your right mouse click to select Change Drive Letter and Paths.

-
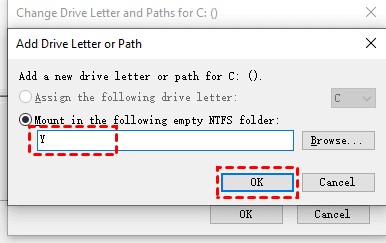
Select Add, type Y for the drive letter, and press OK.

- From the Start menu, type in cmd. Then, right-click Command Prompt in the search results, choose Run as administrator, and press enter.
-
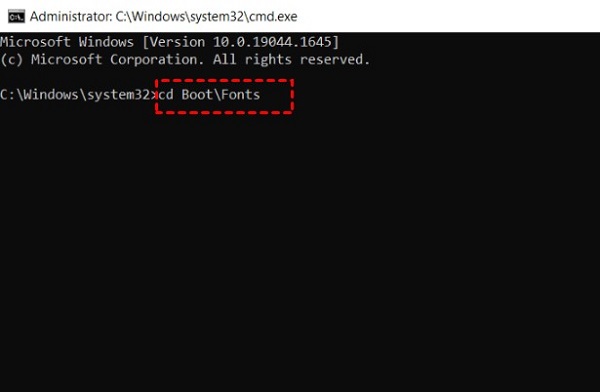
To switch to that drive, put Y: into the command prompt and press Enter. Next, type cd Boot\Fonts to open the Fonts folder.

-
Type the following commands and press Enter after each one:\
- takeown /d y /r /f
- icacls Y:\* /save %systemdrive%\NTFSp.txt /c /t
- whoami
- icacls . /grant :F /t
- del *.*
- icacls Y:\ /restore %systemdrive%\NTFSp.txt /c /t
- icacls . /grant system:f /t
- icacls Y: /setowner “SYSTEM” /t /c
- To eliminate the Y drive letter, use the Disk Management tool's System Reserved Partition by right-clicking on it and choosing Change Drive Letter and Path. Select the Y:drive, choose Remove, and click OK to apply the changes.
- You have resolved the “we couldn't update the system reserved partition Windows 11 22h2” error. Now, you can update or upgrade your operating system using the free space in System Reserved Partitions.
FAQs about ‘We Couldn't Update the System Reserved Partition’ Issue
1. Why am I unable to update to Windows 10 reserved partition?
You might be unable to update the Windows 10 reserved partition for reasons such as insufficient disk space, file system corruption, third-party software interference, incorrect disk configuration, or issues with the bootloader.
2. What is 0x800f0922 system reserved partition?
The error code 0x800f0922 relates to the System Reserved Partition, typically occurring during Windows updates. It indicates an issue preventing the system from updating the reserved partition, which is crucial for the Windows operating system to function adequately.
3. Is the system reserved partition the same as the recovery partition?
No, the System Reserved Partition and the Recovery Partition are different. The System Reserved Partition primarily contains boot-related files, including the Boot Manager and Boot Configuration Data. On the other hand, the Recovery Partition is dedicated to system recovery and often includes a copy of the operating system's installation files.
Conclusion
In short, a systematic troubleshooting approach involves addressing the "we couldn't update the system reserved partition" error on Windows 11 or Windows 10, whether your system uses GPT or MBR partition style. By following the outlined methods, you can fix we couldn't update the system reserved partition Windows 10/11 error easily.
You can also leverage advanced partition management tools such as 4DDiG Partition Manager, which provides a comprehensive solution. This tool offers features like data backup, OS migration, partition optimization, and more. Just give it a try!
💡 Summarize with AI:
You May Also Like
- Home >>
- Windows Fix >>
- How to Fix We Couldn't Update the System Reserved Partition?


 ChatGPT
 Perplexity
 Google AI Mode
 Grok
Grok

