How to Fix Extend Volume Greyed Out? [Windows 11/10]
How to fix extend volume greyed out in Windows 11 or 10? Check our step by step guide and download 4DDiG Partition Manager to help you fix this issue easily and quickly!
Are you struggling with the frustrating issue of extend volume greyed out in Windows 11 or 10? This common error can put a stop on your day, preventing you from expanding your disk space as needed. But there's no need to worry! This article is your guiding light, offering straightforward and effective solutions to this pesky problem.
With easy-to-follow steps and helpful insights, you are just moments away from resolving this issue and getting your system back on track.
So, let's get started.
Part 1: Why Is Extend Volume Greyed Out?
Before getting straight to how to fix extend volume greyed out issue, it's better to first understand why is extend volume greyed out.
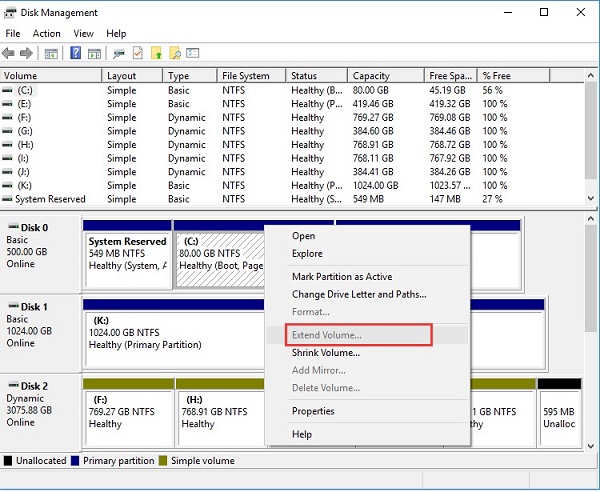
Well, when the extend volume is greyed out in Windows Disk Management, it's typically due to a few common scenarios:
- Lack of Unallocated Space: For a partition to be extended, there must be unallocated space on the disk. However, merely having unallocated space isn't enough; it needs to be directly to the right of the partition you intend to extend. If it's not adjacent or is separated by another partition, the "Extend Volume" option will remain unavailable.
- Incompatible File System: Windows Disk Management supports extending partitions with NTFS or ReFS file systems. If your partition is formatted with a different file system like FAT32 or exFAT, you won't be able to extend it without first converting it to a supported format.
- Partitioning Scheme Issues: The type of partitioning scheme your disk uses can also be a limiting factor. For example, if your disk uses the Master Boot Record (MBR) scheme, you might face limitations, especially if the disk is larger than 2TB.
- Data Location and Disk Management Limitations: Sometimes, the data within the partition you want to extend might not be organized in a way that allows for easy extension, or the built-in Windows Disk Management tool might not provide the flexibility you need.
- Extend to Another Disk (For Non-Boot Volumes): If you are trying to extend a volume across multiple disks, it's crucial to note that this is only possible with non-boot volumes and requires the disks to be dynamic. Converting a basic disk to dynamic allows for the extension of a partition across multiple disks, but it's a one-way operation that can't be easily undone.
Now you know the possible reasons behind Disk Management extend volume greyed out. It's time to learn how to fix extend volume greyed out issue.
Part 2: How to Fix Extend Volume Greyed Out?
There are different methods to fix disk management extend volume greyed out issue.
Let's discuss them in detail.
Method 1. Convert the Partition's File System to NTFS
The first and recommended method to get rid of Windows 10 extend volume greyed out issue is converting the partition file system to NTFS.
For this, you can use 4DDiG Partition Manager. With it's easy to use interface, you will be able to convert file system to NTFS within a few seconds. It simplifies the conversion process, making it accessible even to those less tech-savvy.
Here are some key features of 4DDiG Partition Manager that you must know:
- Convert File Systems Easily: Switch between NTFS, FAT32, and exFAT file systems quickly, making your drive compatible with different devices.
- Works with Many Devices: Use it on your hard drive, USB drive, or SD card. It's versatile and ready for various storage needs.
- Simple to Use: The interface is clear and straightforward, making it easy for anyone to navigate and use.
- Keeps Your Data Safe: Designed to protect your files, so you don't have to worry about losing important data while managing your partitions.
Now let's learn how you can use 4DDiG Partition Manager to convert file system to NTFS.
-
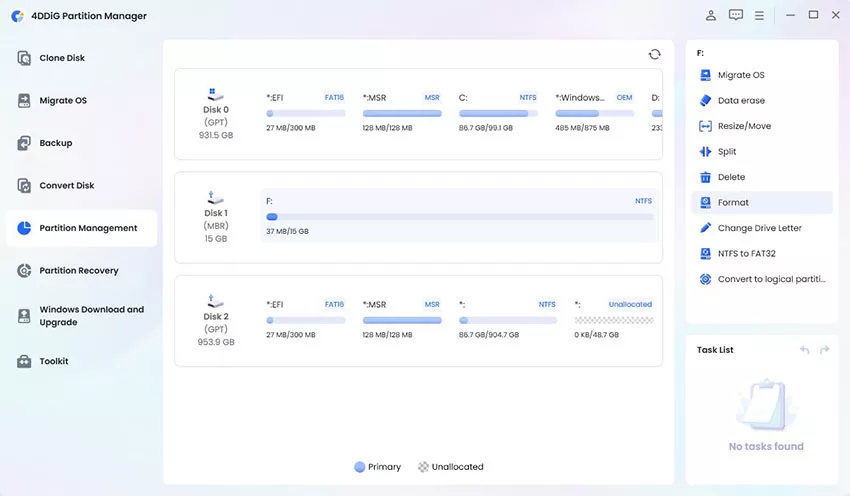
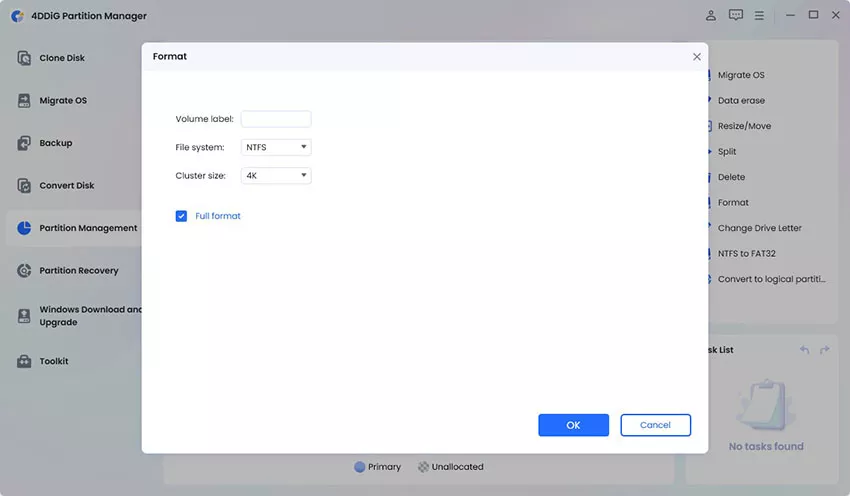
First, install and launch 4DDiG Partition Manager to your computer. Now go to Partition Management option, right click on your desired disk and hit the Format button.
FREE DOWNLOADSecure Download

-
Here, you will have to specify the Volume according to your needs and select NTFS for file system and hit OK button.

-
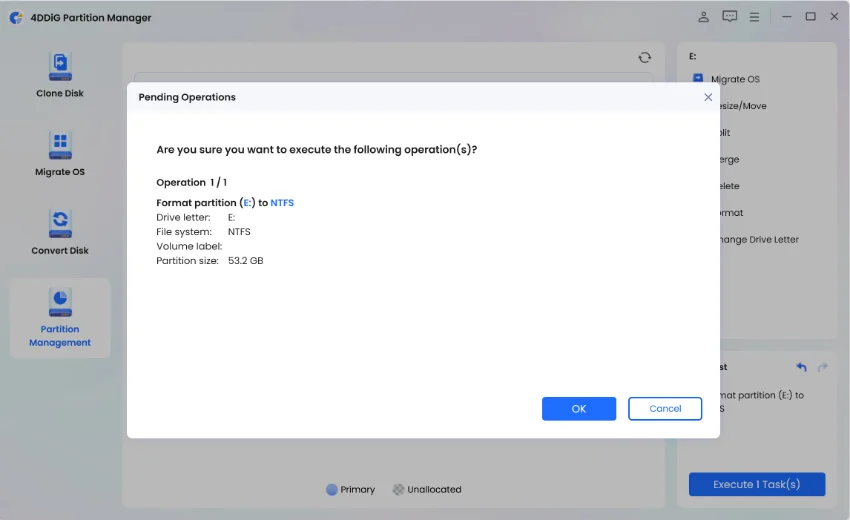
Now review everything and hit the OK button to proceed.

-
The process will be started and you will have to wait for it to complete. Once it is finished, hit the Done button.

Now go to Disk Management and extend volume according to your needs.
Method 2. Create Adjacent Unallocated Space
If the Windows 11 extend volume greyed out, it's often because the free space on the drive isn't right next to the part you want to make bigger. In this situation, you will have to make sure the empty space is directly next to the part you are trying to expand. This allows the computer to add the extra space without any issues.
Here's how you can do that.
- Press Windows + X and pick 'Disk Management'.
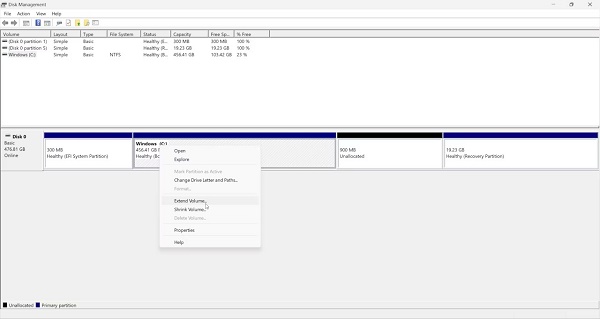
- Find the section next to the one you want to make bigger. Right-click on it and choose 'Shrink Volume' to make space. If you don't need that section, click 'Delete Volume' instead.
-
Then, right-click on the part you're expanding and click 'Extend Volume'. Follow the steps to add the new space.

Method 3. Delete the Recovery Partition
Sometimes, a special section on your drive, called a recovery partition, is in the way of making your main section (like the C drive) bigger. If you remove this recovery part safely, you can use its space to make your main section larger.
Here are the steps that will help you:
- Press Windows + X and pick 'Disk Management'.
-
Right-click on the recovery partition and choose 'Delete Volume'.

- Now, right-click on the part you're expanding (usually the C drive) and choose 'Extend Volume'. The space that the recovery part was using should now be available to make your main section bigger.
Method 4. Convert MBR to GPT When MBR Partition Reaches 2 TB
As said above, you will have to convert MBR to GPT when MBR partition reaches 2TB.
The whole process is divided into 2 parts.
Action 1. Check the Partition Style in Disk Management
Before changing anything, you need to check if your drive is indeed using MBR.
Here's how you do it:
- Press Windows + X and select 'Disk Management'.
- In Disk Management, look for the drive you're concerned about. It's usually listed at the bottom.
-
Right-click on the space where the drive is listed (not on the partitions themselves, but where it says 'Disk 0', 'Disk 1', etc.). Choose 'Properties'.

- In the new window, go to the 'Volumes' tab. Here, look for 'Partition style'. It will tell you if it's MBR or GPT.
If it says MBR and your drive is reaching or exceeds 2TB, it's a good idea to convert it to GPT for better space utilization and features.
Action 2. Convert MBR to GPT If Your Disk Is in MBR Partition Style
When it comes to converting from MBR to GPT, 4DDiG Partition Manager is a reliable choice. It stands out because it can change your disk's partition style from MBR to GPT without causing any data loss.
This feature is especially valuable because it allows you to upgrade your disk's capabilities while keeping all your files and data untouched.
If you want to know how to use 4DDiG Partition Manager to convert MBR to GPT without data loss, we recommend you to check this detailed guide.
Secure Download
FAQs about Extend Volume Greyed Out
1. Why am I unable to extend my C drive?
There are a few common reasons you might not be able to extend your C drive. First, the extra space you want to add must be right next to the C drive; if it's not, the 'Extend Volume' option won't work. Also, your C drive needs to be formatted with NTFS or ReFS; other file formats aren't supported for extension in Windows Disk Management.
2. How do I extend unallocated space on my C drive?
To add unallocated space to your C drive, first, make sure the space is directly next to your C drive. If it's not, you might need to move things around.
After that, you can extend unallocated space on your C drive by following the steps given above.
Conclusion
In conclusion, tackling the extend volume greyed out even with unallocated space issue might seem tough at first, but it's definitely something you can handle with the help of methods given above.
A big help in this process is the 4DDiG Partition Manager. It's a tool that makes these tasks much simpler and keeps your files safe while you are making changes.
So, whether you are trying to add more space to a drive, change the file system, or manage the parts of your disk, 4DDiG has got your back. Give it a try now!



 ChatGPT
 Perplexity
 Google AI Mode
 Grok
Grok

