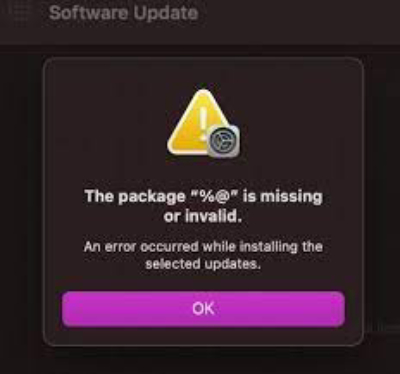
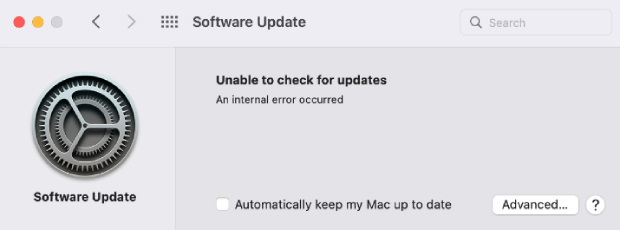
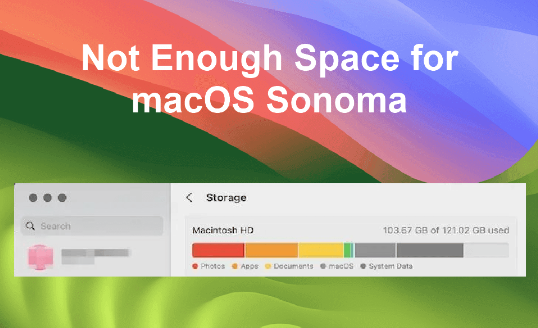
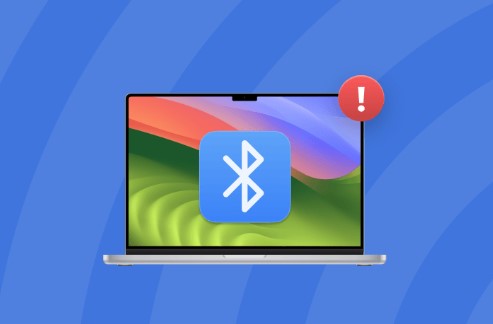
How to Fix macOS Installation Couldn't Be Completed

5 mins read

Updated on 2024-04-24 12:14:47 to Windows Fix

Installing macOS updates or a fresh version can be a smooth process, but users occasionally encounter the frustrating message, "macOS Installation Couldn't Be Completed." This issue can arise for various reasons, from compatibility issues to disk errors. In this comprehensive guide, we will explore the potential causes behind the the macos installation Couldn't be completed and provide effective solutions to get your macOS installation back on track.

macos installation couldn t be completed

Part 1: What's macOS Installation Couldsn't Be Completed

Understanding the nuances of this issue is crucial for anyone looking to troubleshoot and successfully install or update macOS. The error message indicates a failure in the installation process, but the reasons behind it can vary widely. From hardware incompatibility to software conflicts, insufficient disk space, or corrupted system files, pinpointing the root cause is the first step in resolving the problem.

Common Causes of macOS Installation Issues:

  • One of the leading causes of the "macOS Installation Couldn't Be Completed" error is hardware that doesn't meet the requirements of the macOS version being installed. It could include outdated graphics cards, insufficient RAM, or incompatible peripherals.
  • macOS updates often require significant free disk space. The installation process may fail if your Mac's storage is nearly full. Cleaning up unnecessary files or expanding your storage capacity may be necessary.
  • Software Conflicts between existing software and the new macOS version can disrupt the installation process. Third-party applications, especially those with kernel extensions or system modifications, might interfere with the update.
  • Over time, system files on your Mac can become corrupted, leading to installation errors. It could result from unexpected shutdowns, software glitches, or even malware.
  • If the installation involves downloading macOS updates from the internet, network interruptions or slow connections can cause the process to fail. A stable and reliable internet connection is essential for a smooth installation.

Quick Tip: Recover Data when Mac Stuck at macOS Installation Error

In cases where the the os x installation Couldn't be completed error has led to data loss or if you need to recover files from a Mac stuck in this state, 4DDiG Mac Data Recovery can be a reliable solution. This software is known for recovering lost or deleted files from various storage devices. The user-friendly interface and powerful recovery algorithms make it a preferred choice for many users.

4DDiG Windows Data Recovery stands out for several reasons:

  • High Success Rate: This software boasts a high success rate in recovering lost or deleted files, ensuring that your valuable data is restored.
  • Versatility: It supports the recovery of various file types, including documents, photos, videos, and more, from storage devices like hard drives, SSDs, USB drives, and memory cards.
  • Ease of Use: The intuitive interface makes data recovery accessible to users with varying technical expertise.
  • Preview Feature: Before proceeding with the recovery, users can preview the recoverable files, allowing them to restore only the essential data selectively.
FREE DOWNLOAD

Secure Download

FREE DOWNLOAD

Secure Download

  • Select Local Disk
    Upon installing and launching 4DDiG, navigate to the Data Recovery section. Choose your local disk and initiate the scan by clicking Start. Optionally, tailor the process by selecting specific file types from the options in the upper-right corner.

    elect location
  • Scan the Local Disk
    4DDiG performs a comprehensive scan on the chosen drive, swiftly locating missing data. Feel free to pause or stop the scan at any point during the process. The intuitive interface categorizes files under Deleted Files and other sections for easy identification. Switch to File View for a detailed look at specific file types.

    review
  • Preview and Recover
    Once the target files are identified, preview them for accuracy before initiating the recovery process. For data safety, recover files to a secure location, avoiding the same partition where the data was initially lost. This straightforward approach ensures a smooth and fast data recovery experience with 4DDiG.

    ave recovered files

Part 3: How to Fix macOS Installation Couldn't Be Completed

Let's explore practical ways to resolve the "macOS Installation Couldn't Be Completed" error.

Way 1: Restart macOS from Safe Mode.

One of the initial steps to troubleshoot macOS installation issues is to restart your Mac in Safe Mode. Safe Mode loads only essential system files, helping identify and eliminate potential conflicts hindering installation. To restart in Safe Mode:

  • Begin by shutting down your Mac completely. Ensure all applications are closed and no processes are running.
  • Power on your Mac and immediately press and hold the Shift key. Continue holding it until you see the Apple logo and the progress bar. Safe Mode will load only essential system files, potentially bypassing any issues causing the installation error.
  • Once in Safe Mode, check for any signs of progress or changes. If the installation issue was caused by conflicting software or drivers, you may now be able to proceed with the installation.

    restart safe mode

Way 2: Create a New Backup with a Time Machine

Before troubleshooting, it's wise to ensure your data is backed up. Time Machine provides a convenient way to create backups on an external drive. Follow these steps:

  • Attach an external drive to your Mac. This drive will serve as the backup destination for Time Machine.
  • Navigate to Apple Menu > System Preferences.
  • In the System Preferences window, select Time Machine.
  • Toggle the switch to turn on the Time Machine. If prompted, choose the external drive you connected as the backup disk.
  • Click on Back Up Now to start the backup process. Allow Time Machine to complete the backup, ensuring that your data is securely stored before attempting further troubleshooting.

Way 3: Check the Mac's Compatibility with the macOS Version.

Ensure your Mac is compatible with the macOS version you are trying to install. Go to the official Apple website and check the compatibility of your Mac with the macOS version you are trying to install. Apple usually provides a list of supported models for each macOS release.

Ensure that your Mac meets the system requirements for the specific macOS version. Pay attention to processor type, RAM, and available storage space.

If your Mac falls short of the required specifications, consider upgrading components such as RAM or storage to meet the minimum requirements for the macOS version you want to install.

Way 4: Use Startup Manager to start your Mac.

The Startup Manager allows you to choose a different startup disk and can help bypass any issues related to the current startup disk. Follow these steps:

  • Initiate a restart on your Mac.
  • Hold down the Option key as your Mac restarts until the Startup Manager screen appears.
  • Use the arrow keys to select a different startup disk from the list. Press Enter to confirm your choice and proceed with booting from the selected disk.
  • If the installation error was related to the startup disk, you can bypass the problematic disk and proceed with the macOS installation.

Way 5: Repair Your Disk via Disk Utility

Disk errors can impede the macOS installation process. Disk Utility can be used to identify and repair these errors. Here's how:

  • Restart your Mac and hold down Command + R until the Apple logo appears. It will boot your Mac into Recovery Mode.
  • From the Utilities menu, select Disk Utility.
  • In Disk Utility, select your Mac's startup disk from the list on the left.
  • Click on First Aid and then click Run. This process will identify and repair any disk errors hindering the macOS installation.
  • After Disk Utility completes the repair process, exit the utility and reattempt the macOS installation. The disk repair may have resolved the issues causing the installation error.

    repair via disk utility

Way 6: Reinstall macOS via Recovery Mode

If all else fails, reinstalling macOS via Recovery Mode can often resolve installation issues:

  • Restart your Mac and hold down Command + R until the Apple logo appears, entering Recovery Mode.
  • In the Utilities menu, select Reinstall macOS. Follow the on-screen instructions to reinstall the operating system.
  • Allow the reinstallation process to complete. This method installs a fresh copy of macOS while preserving your data, potentially resolving any issues that caused the initial installation error.

    use recovery mode

Part 4: FAQ

Q 1: How do I fix macOS that could not be installed?

To fix the "macOS could not be installed" error, try the following steps:

  • Restart your Mac in Safe Mode.
  • Create a new backup with Time Machine.
  • Check your Mac's compatibility with the macOS version.
  • Use Startup Manager to choose a different startup disk.
  • Repair your disk using Disk Utility.
  • If all else fails, reinstall macOS via Recovery Mode.

Q 2: How do I reinstall macOS could not be completed?

If the macOS installation can't be completed, consider the following steps:

  • Restart your Mac in Safe Mode.
  • Create a new backup with Time Machine.
  • Verify your Mac's compatibility with the macOS version.
  • Use Startup Manager to select a different startup disk.
  • Repair your disk using Disk Utility.
  • As a last resort, reinstall macOS via Recovery Mode.

Q 3: How do you fix the operation that could not be completed on Mac?

To fix the "operation could not be completed" error on Mac, try these solutions:

  • Restart your Mac in Safe Mode.
  • Create a new backup with Time Machine.
  • Verify your Mac's compatibility with the macOS version.
  • Use Startup Manager to choose a different startup disk.
  • Repair your disk using Disk Utility.
  • If necessary, reinstall macOS via Recovery Mode.

Conclusion

Encountering the "macOS Installation Couldn't Be Completed" error can be a frustrating experience, but with the right approach, it's a challenge that can be overcome. Whether restarting in Safe Mode, creating backups with Time Machine, or using advanced tools like Disk Utility, this guide has provided various solutions, such 4DDiG Mac Data Recovery to address the issue. By following these steps, you can increase the likelihood of a successful macOS installation and enjoy the latest features and improvements that come with it.

William Bollson (senior editor)

William Bollson, the editor-in-chief of 4DDiG, devotes to providing the best solutions for Windows and Mac related issues, including data recovery, repair, error fixes.

(Click to rate this post)

You rated 4.5 ( participated)