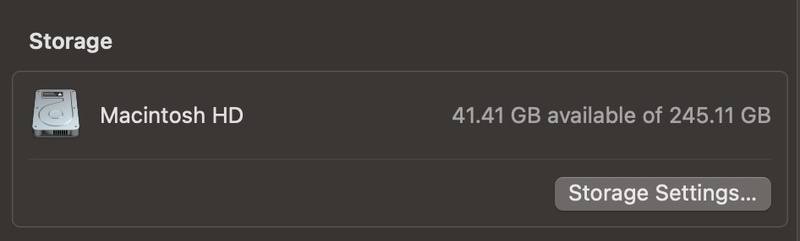
How to Solve macOS Sonoma System Data Storage Large?

5 mins read

Updated on 2024-04-17 15:10:25 to Remove Duplicates

In the ever-evolving world of technology, few things can be as pesky as unexpectedly running out of storage space. Mac users, particularly those using macOS Sonoma, have been chattering about the Mac system data large issue that's munching up their precious storage. This often leaves many scratching their heads, wondering why their system data is ballooning and how they can trim it down to size. Today, we're diving into six effective ways to tackle this digital conundrum and free up some space on your Mac.

mac system data large

Patr 1:What Is System Data on macOS Sonoma's Storage?

When examining your Mac's storage details, the "System Data" category often stands out, especially if it's taking up a significant chunk of space. So, what does this enigmatic label entail on macOS Sonoma?

  • Core Operating System Files: The files essential for the macOS Sonoma to function are at the heart of the "System Data" category. These encompass the foundational files that operate the OS: the boot files, system libraries, frameworks, and more.
  • Cached Data: Cache files are crucial, allowing faster access to frequently used data. System processes and individual applications can create them. Over time, these cache files can accumulate, particularly if they aren't regularly cleared.
  • Temporary Files: These are files that macOS or apps create for short-term use. They're supposed to be deleted once their purpose has been served, but sometimes they linger and occupy storage.
  • Swap and Virtual Memory Files: When your Mac runs out of RAM, it turns to swap files on the hard drive as a sort of makeshift memory. This process, while helpful, can consume storage space, especially if you're running many memory-intensive applications.
  • Local Snapshots and Backups: the Mac's built-in backup tool, Time Machine, creates local snapshots. These are temporary backups when an external backup drive isn't connected. While convenient, they can also take up considerable space.
  • System Logs and Diagnostics: macOS Sonoma logs a range of system activities, aiding in troubleshooting and system diagnostics. Over extended use, these logs can grow in size.
  • App Support and Libraries: Over time, as you install applications, they'll add support files, libraries, and other data essential for their functionality. Some of this data is categorized under System Data.

If the System Data occupies more space than expected on macOS Sonoma, it's often a combination of the factors listed above. Understanding them is the first step in managing and potentially reclaiming some of that space.

Part 2:How to Clear System Data Large Storage on Mac?

To reduce system data storage effectively, consider managing duplicate files that might be hogging space.

Way 1: Clear System Data via 4DDiG Duplicate File Deleter Mac

In the sprawling world of digital tools, the 4DDiG Duplicate File Deleter emerges as a stellar choice. Not just confined to your Mac, this tool scours various storage mediums, be it external hard drives or SD cards, rooting out identical files. Its prowess extends to cloud storage, swiftly detecting and eradicating duplicates from Google Drive. What sets 4DDiG apart is its astute algorithms and real-time notifications, ensuring you're always a step ahead in maintaining an organized digital space. And if you're still on the fence, they tempt you with an irresistible offer: clearing out 15 duplicate files for free. Why choose 4DDiG? Simply put, it promises cleaning and an enhanced performance boost for your Mac.

FREE DOWNLOAD

Secure Download

FREE DOWNLOAD

Secure Download

  • Launch this program and click to select a folder or partition to start scanning.

    interface
  • Set Scan Mode and Start Scanning. Click the gear button to customize your file searching. Under the General tab, you can set file size for serching.

    general settings
  • Once the scan completes, all the duplicate files will be listed on your screen. Select all the files you want to delete and click on the delete button and you'll be free of all the duplicate files.

    preview to remove

Way 2: Clear macOS Sonoma's Cache:

Your Mac's performance can be influenced by the cache files generated by the system and various applications. These files are stored primarily in the Library Folder; over time, they can consume a significant amount of storage space. If you wish to declutter your Mac and regain some of that space, here's how to manually clear those cache files:

  • Open Finder.
  • Navigate to the Go menu at the top and select Go to Folder.
  • In the dialog box, input the following path: ~/Library/Caches/. Hit the Return key.
  • Review the files and folders, and drag any unwanted cache items to the Trash.
  • Repeat the previous two steps for these paths as well:

    • /Library/Caches/
    • /System/Library/Caches/
  • Once you've moved all unnecessary cache files, right-click on the Trash icon in the dock and select Empty Trash.
Note:

Always exercise caution when deleting cache files. Removing essential files could impact the functionality of some applications. It's wise to back up important data before making such changes.

Way 3: Clear Local Snapshots of Time Machine:

While incredibly handy for backing up your Mac's data, Time Machine also keeps local snapshots. These are essentially backups of your Mac's data stored locally on the hard drive, providing additional protection if the external backup drive isn't accessible. Over time, these local snapshots can consume a sizable portion of your storage over time. Fortunately, they can be managed manually. Here's how:

  • Launch the Terminal application, which can be found using Spotlight or within the Utilities folder in Launchpad.
  • Once the Terminal is open, type the command tmutil listlocalsnapshotdates and press the Return key. This will display all the local snapshots sorted by their respective dates.
  • To remove a particular snapshot, you'll use the tmutil deletelocalsnapshots command followed by the specific date of the backup. For instance, If prompted, type in your user account password and hit Return.
  • You can repeat the above step to get rid of any additional snapshots you no longer require.

A Word of Caution: Local snapshots are a safety net, ensuring you have backups even if your external backup drive isn't available. If you believe there's a chance you might need them down the line, think twice before hitting delete. Always make sure your regular Time Machine backup is up-to-date before making any deletions.

Way 4: Delete Log Files:

System-generated log files on your Mac serve as a chronicle of system activities, errors, and diagnostics. Over time, they can accrue and take up valuable space. Here's how you can regain that space by deleting these logs:

How to Manually Clear Log Files on Mac:

  • Open Finder.
  • Navigate to the Go menu at the top of your screen and select Go to Folder from the dropdown.
  • In the ensuing dialog box, input ~/Library/Logs/ and press the Return key.
  • Within this folder, you'll see various log files. Browse through and select the ones you want to delete. Once selected, press Command + Backspace to move them to the Trash.
  • To ensure a thorough clean-up, revisit the Go to Folder option and, this time, input /Library/Logs/. Peruse this folder and, similarly, select and delete any unnecessary logs.

Way 5: Delete Old iOS Backups:

With each backup of your iPhone or iPad, the corresponding data is saved on your Mac, gradually nibbling away at your available storage. Over time, especially if you've owned multiple iOS devices or frequently backup, this can amount to a substantial sum of space. Clearing out old backups can be a quick win in the battle for storage. Here's how you can manage and delete these old iOS backups:

Using Finder:

  • Connect your iPhone or iPad to your Mac using a USB cable.
  • Launch Finder.
  • In the Finder sidebar, you'll see your device listed. Click on it.
  • In the right pane, click on the Manage Backups button. This will display all the backups for your iOS device.
  • Peruse the list and select the backups you don't need. Once chosen, click the Delete Backup button.

Manually Clearing iOS Backups:

  • On your Mac's desktop, simultaneously press Shift + Command + G. This will prompt the "Go to Folder" window.
  • In the window, input the following path: ~/Library/Application Support/MobileSync/Backup/ and hit Return.
  • This folder contains all the iOS backups. Each backup is in a separate folder, typically named by a long string of numbers and letters. To identify which is which, you might have to look at the date of the last modification.
  • Once you've identified the backups you don't require, simply drag them to the Trash.

Way 6: Clear out Unnecessary Downloaded Files:

Just like an attic filled with forgotten treasures, the Downloads folder on your Mac can rapidly become a digital dumping ground. It often houses files you no longer need — from application installers to zip files and more. Cleaning this folder periodically is a surefire way to free up space and boost your Mac's overall performance.

  • Launch Finder on your Mac.
  • In the Finder sidebar, locate and click on Downloads.
  • To get a clearer view of the most storage-consuming files, sort your files by size. This can be done by clicking on the Size column header. If you don't see the Size column, right-click on any column header and choose Size from the dropdown.
  • Peruse through the list and select the files you no longer require.
  • Once selected, drag them to the Trash or right-click and choose Move to Trash from the context menu.
Tip

It's good practice to review the Downloads folder monthly or even weekly, depending on how often you download files. Regular maintenance ensures you're not hoarding unnecessary files and optimizes your storage.

Way 7: Empty Your Trash:

It's easy to overlook, but the Trash on your Mac isn't just a holding pen – it's a space consumer. When you "delete" files by dragging them to the Trash, they're set aside, not actually deleted. These trashed files remain hidden away, silently hogging storage until the Trash is emptied. To truly free up that space, you need to take the final step of emptying the Trash. Here's how:

  • Look for the Trash icon in your dock, usually on the far right.
  • Right-click (or Ctrl-click) on the Trash icon.
  • From the context menu, select Empty Trash.

A confirmation dialog might appear, reminding you that the action is irreversible. Ensure you've reviewed your Trash's contents one last time, ensuring there's nothing you'll regret discarding.

Part 3: Can You Delete Files in the System Data on macOS Sonoma?

Yes, you can delete certain files categorized under "System Data" on macOS Sonoma. However, it's crucial to proceed with caution. While some files, like cache files, logs, local Time Machine snapshots, and old iOS backups, can safely be deleted, others are vital for the system's proper functioning. Before deleting any file, ensure you clearly understand its purpose and the potential implications of its removal.

Part 4:Why Do You Need to Delete Mac System Data?

Deleting unnecessary files from the "System Data" category can free up valuable storage space on your Mac. Over time, files such as caches, logs, and old backups accumulate and take up space, leading to decreased performance and limited storage for new files and applications. By periodically clearing out redundant or obsolete system data, users can optimize their Mac's performance, ensure efficient storage utilization, and maintain a cleaner, more organized system.

Conclusion

Navigating the intricacies of Mac system data issues can seem daunting, but as we've explored, there are several actionable steps to reclaim that essential storage space. From clearing caches and logs to managing old iOS backups, every bit contributes to a more optimized and efficient Mac experience. Remember, while it's crucial to free up space, always proceed cautiously and ensure you understand the importance of each file before deletion. And as a final call to action, don't just read and forget. Take charge, implement 4DDiG Duplicate File Deleter , and enjoy a more streamlined macOS Sonoma experience. Your Mac deserves it!

William Bollson (senior editor)

William Bollson, the editor-in-chief of 4DDiG, devotes to providing the best solutions for Windows and Mac related issues, including data recovery, repair, error fixes.

(Click to rate this post)

You rated 4.5 ( participated)