Clone OS Disk(Migrate OS to SSD/HDD)
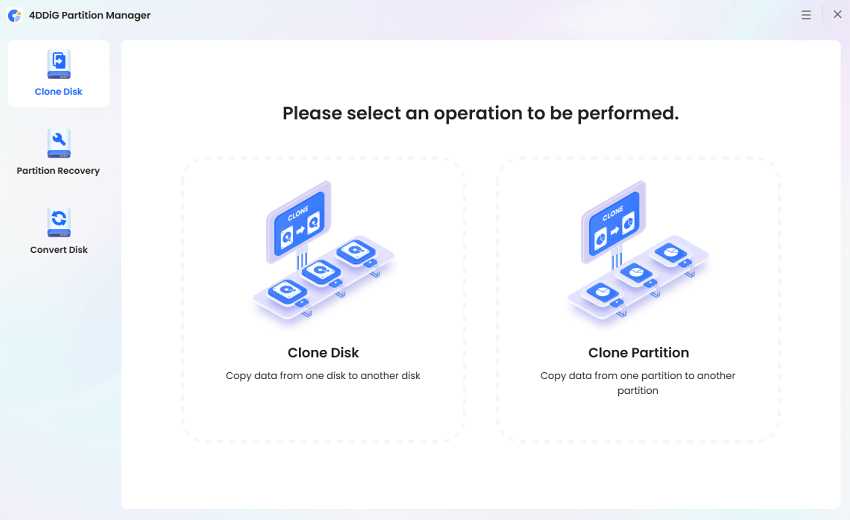
4DDiG Partition Manager is the ultimate disk cloning software that enables you to safely and quickly clone data from your source disk or partition to a new target disk or partition. This cloning feature makes it easy to upgrade, replace, or backup your hard disk. In the following sections, we'll demonstrate how to clone a disk and how to clone a partition.
Secure Download
- Even if the target disk is smaller than the source disk, cloning is still possible as long as the target disk is equal to or larger than the used capacity.
- The partitions on the source disk will fit the entire target disk, you can reseize partitions on the auto-match disk layout.
- The data on the target disk will be cleared, so if you have important data on it, please make sure to make a backup first.
- The data on the source disk will be cloned to the target disk intact, and the data on the source disk will not be changed or lost during the cloning process.
-
Step 1:Connect an external disk to your computer after downloading and installing 4DDiG Partition Manager on your computer. Then launch the application, select “Clone OS Disk”.

-
Step 2:Select a target disk to receive cloned data from the source disk and then click on the Next button. (The source disk is the system disk and the target disk defaults to the disk you connect to the computer).

-
Step 3:Then, you will see a preview interface showing the effect of the cloned disk. The partitions on the source disk will occupy the entire target disk by default, and you can drag the handle on both sides to resize cloned partition. After confirming that the preview is correct, click on the Start button to start the cloning operation.

-
Step 4:Please note that cloning will overwrite all data on the target disk, so after you confirm that everything is correct, click on the Sure button.

-
Step 5:Wait for the disk cloning to complete. The speed of cloning depends on the size of the source disk. Please wait patiently and do not perform other operations or interrupt the current operation.
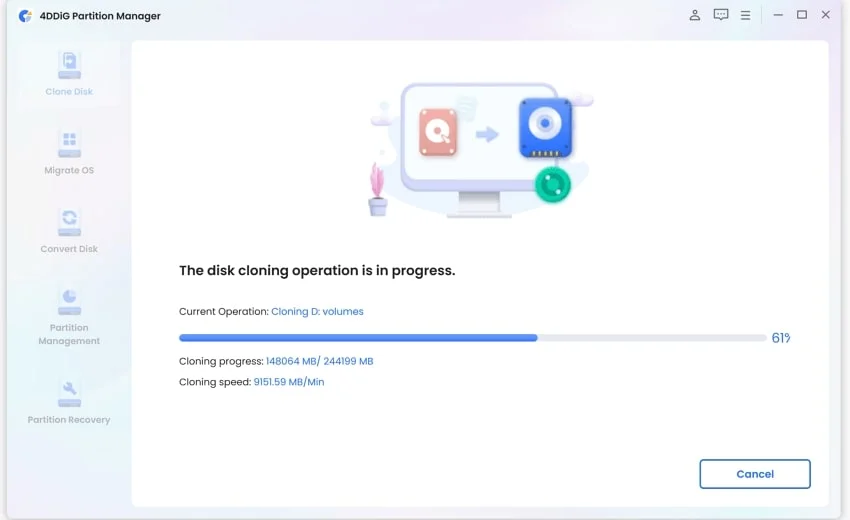
Now you have successfully cloned the data from the source disk to the target disk.

Boot PC from the New Drive
After successfully transfer OS to your target disk with 4DDiG Partition Manager, you're probably wondering how to boot your computer from the new drive after transferring your entire system to it. Here's how you can do:
-
Step 1:Remove the source disk and insert the target disk into the original slot. After entering BIOS, restart the computer to change the boot order.
Clone Data Disk
- Even if the target disk is smaller than the source disk, cloning is still possible as long as the target disk is equal to or larger than the used capacity.
- The partitions on the source disk will fit the entire target disk, you can reseize partitions on the auto-match disk layout.
- The data on the target disk will be cleared, so if you have important data on it, please make sure to make a backup first.
- The data on the source disk will be cloned to the target disk intact, and the data on the source disk will not be changed or lost during the cloning process.
-
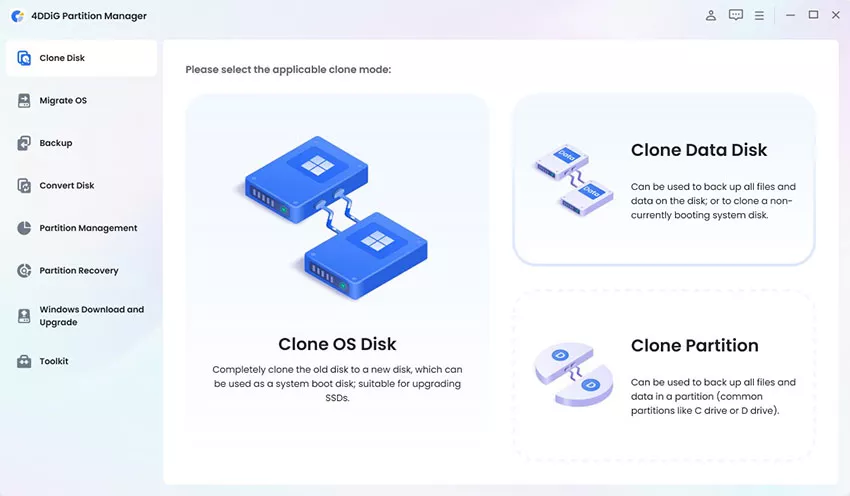
Step 1:Connect an external disk to your computer. Then run 4DDiG Partition Manager, select "Clone Data Disk" in "Clone Disk" section. This feature allows you to clone any data disk in your computer.
-
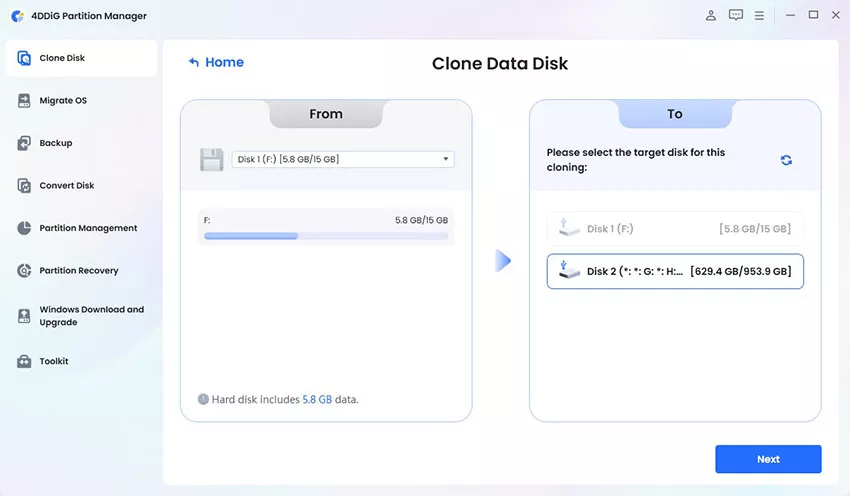
Step 2:Here select the source disk you want to clone and select the target disk to receive cloned data. Then click Next.
-
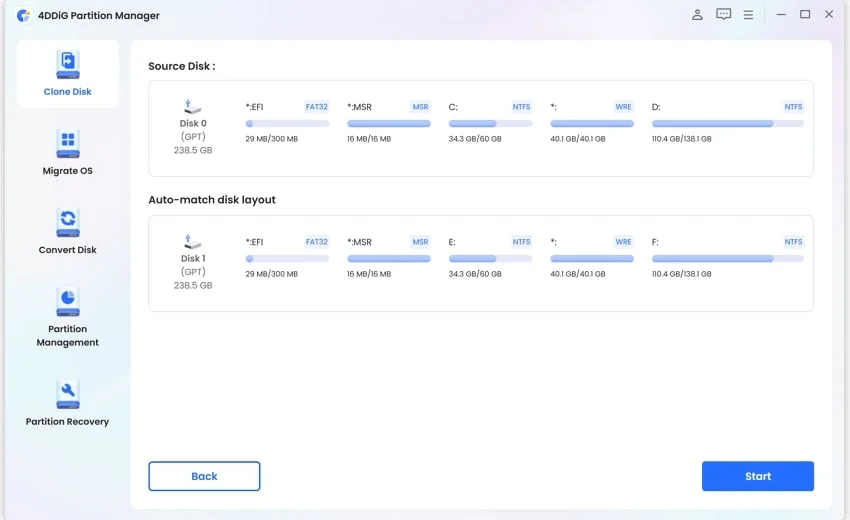
Step 3:Then, you will see a preview of the cloned disk. The partitions on the source disk will occupy the entire target disk by default, and you can drag the handle on both sides to resize cloned partition. Click on the Start button when you are satisfied with the layout.
-
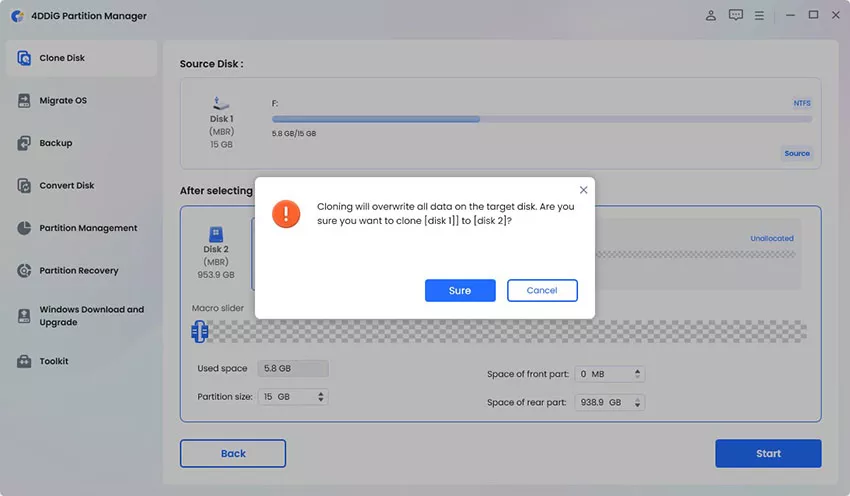
Step 4:Kindly note that cloning will overwrite all data on the target disk, click on the Sure button after you confirm that everything is correct.
-
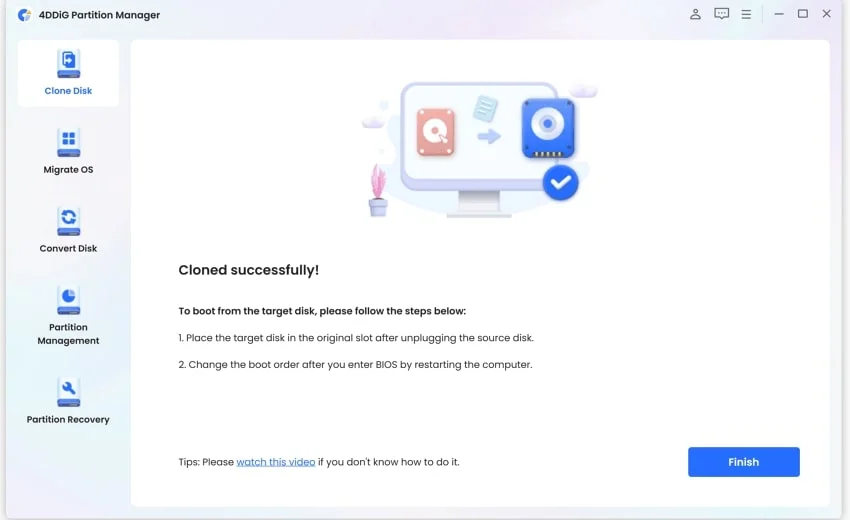
Step 5:Wait for the disk cloning to complete. The speed of cloning depends on the size of the source disk. Please wait patiently and do not perform other operations or interrupt the current operation.

Now you have successfully cloned all the data from the source disk to the target disk.
Clone Partition
-
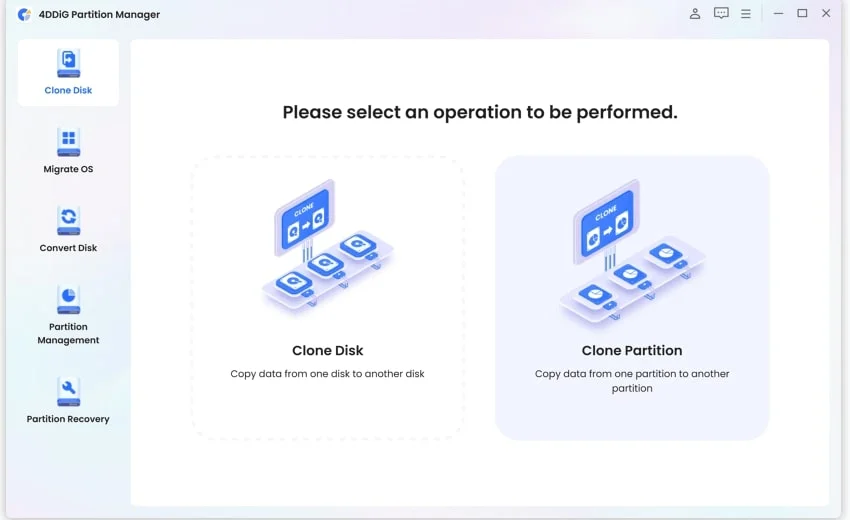
Step 1:Connect an external disk to your computer after downloading and installing 4DDiG Partition Manager on your computer. Then launch the application, select “Clone Disk” in the left navigation panel and then select “Clone Partition”.
-
Step 2:Select a source disk and a source partition you want to clone from. Then choose a target partition. Make sure that your selection is correct, click on the Next button.

-
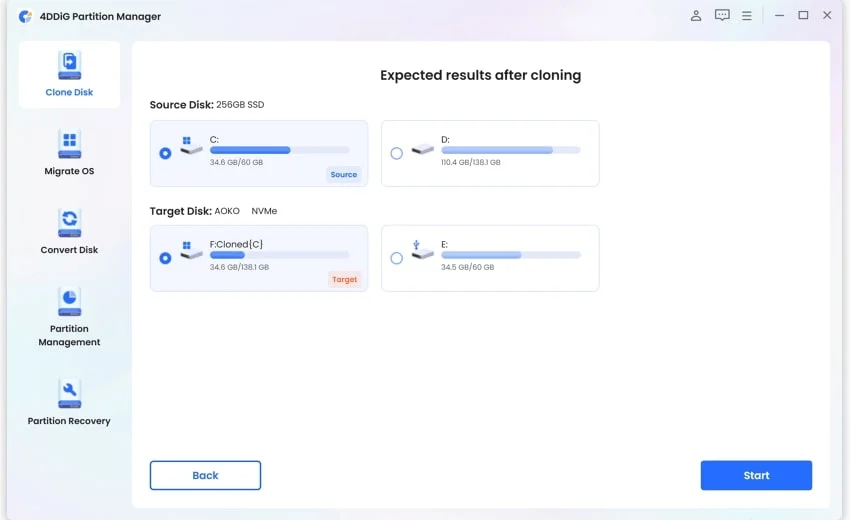
Step 3:Then, you will see a preview interface showing the effect of the cloned partition on the target disk. After confirming that the preview is correct, click on the Start button to start the cloning operation.
-
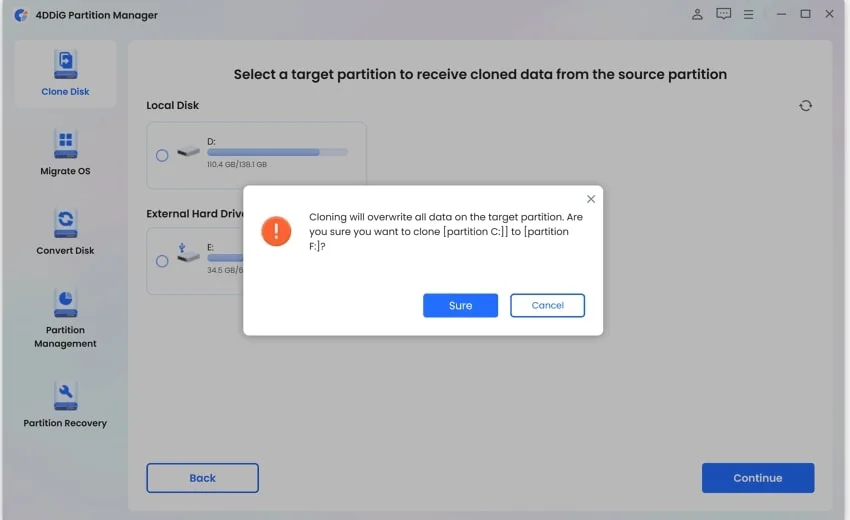
Step 4:Note that cloning will overwrite all data on the target partition, so after confirming that everything is correct, click on the Sure button.
-
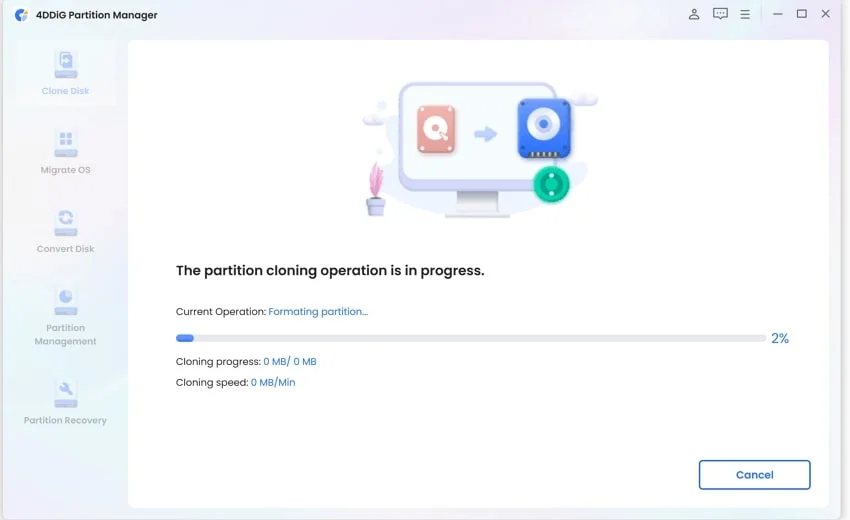
Step 5:Wait for the partition cloning to complete. The speed of cloning depends on the size of the source partition.
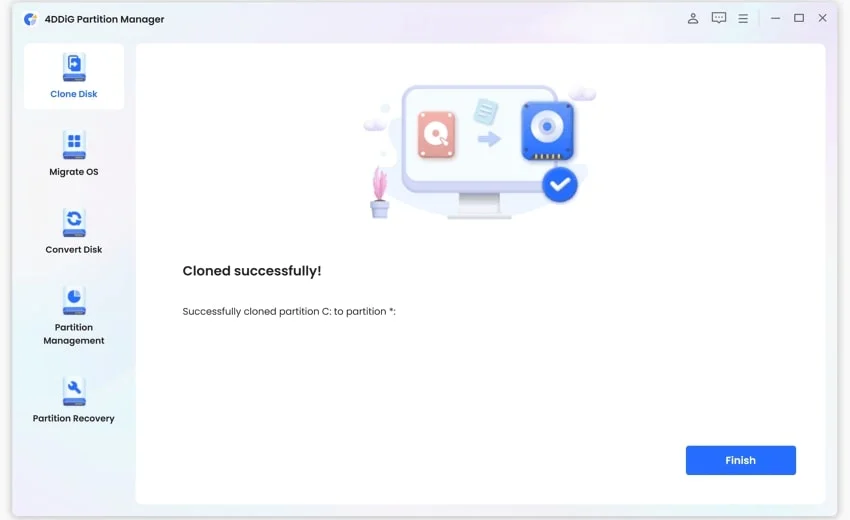
Now you have successfully cloned the data from the source partition to the target partition.
Move Programs to Another Drive
4DDiG Partition Manager provides to move installed programs to another drive. If you need to move installed software to another drive to free up disk space or imporve performance, follow detailed steps below.
Secure Download
-
Step 1:Launch 4DDiG Partition Manager and navigate to "Clone Disk", select "Application Migration".

-
Step 2:Select applications you want to move. Then click the folder below to select a path where you want to move applications.

-
Step 3:Click "Migrate" and confirm to start migration.

-
Step 4:Wait for a while, your applications will be moved to target drive.


File Backup
4DDiG Partition Manager offers computer file backup option for you to avoid data loss. You can use 4DDiG Partition Manager to backup your files for data restore.
Secure Download
-
Step 1:Install and run 4DDiG Partition Manager on your computer. Go to Backup and select File Backup.

-
Step 2:It will create a file backup task, choose which files you want to backup. Click Next.

-
Step 3:Then customize the storage path here. Once done, click Start.

And you can click "Backup Settings" at bottom left corner to set compression level or if shutdown after the backup.

-
Step 4:Wait for a few moment, it will complete the backup.


Restore from File Backup
After backing up files with 4DDiG Partition Manager, you can restore files from it when the origianl file is lost or damaged.
-
Step 1:In File Backup, click on Restore.

-
Step 2:Here, you can choose which backup file to restore. Then choose whether you want to save restored files to another path or restore to original location.

-
Step 3:If you choose to restore files to original location, it will overwrite the source file. Confirm and start to restore.


-
Step 4:Later, you will get your files back.

System Backup
4DDiG Partition Manager is a reliable data backup software, it offers to backup your Windows system to prevent system crash and leave you an option to revert to previous version.
Secure Download
Step 1:Open 4DDiG Partition Manager and go to Backup, click System Backup. If you have used the backup feature before, click on "New" you can select new backup option.

Step 2:Here you can choose to backup system partition only or backup system and data all. Click "Change" choose a storage path to backup your system. Hit on Start button

It will take some time to backup your system, please wait patiently.

Step 3:Later, you will finish to backup system.

Restore from System Backup
After sucessfully backup your computer syetem, you can restore system anytime with 4DDiG Partition Manager.
Step 1:In System Backup, click Restore button.

Step 2:Then select the backup to restore, and choose the target disk. Click Restore.

Confrim to restore to the backup state.

Step 3:Wait patiently to restore from system backup.

Step 4:Later, you need to restart to complete system restore.

Disk/Partition Backup
Except for File Backup and System Backup, 4DDiG Partition Manager could also help backup disk or partition.
Secure Download
Step 1:Lauch 4DDiG Partition Manager and navigate to Backup. Click Disk/Partition Backup.

Step 2:Select the partitions or disk you want to backup, click Next.

Step 3:Confirm the source partitions or disk and the storage path, if it not the one you want, click "Change". And click Start.

It will start backing up selected partitions or disk, just wait patiently.

Step 4:Later, the backup will be completed, click OK to finish.

Restore from Disk/Partition Backup
With 4DDiG Partition Manger, you can easily restore your partition or disk from backup, here is how to do it.
Step 1:In Backup section, select your disk partition backup, click Restore.

Step 2:Select the target disk backup to restore from.

Click Restore, it will start to restore to selected path.

Step 3:Once done, click Confirm to go back to the intereface.

Convert MBR to GPT
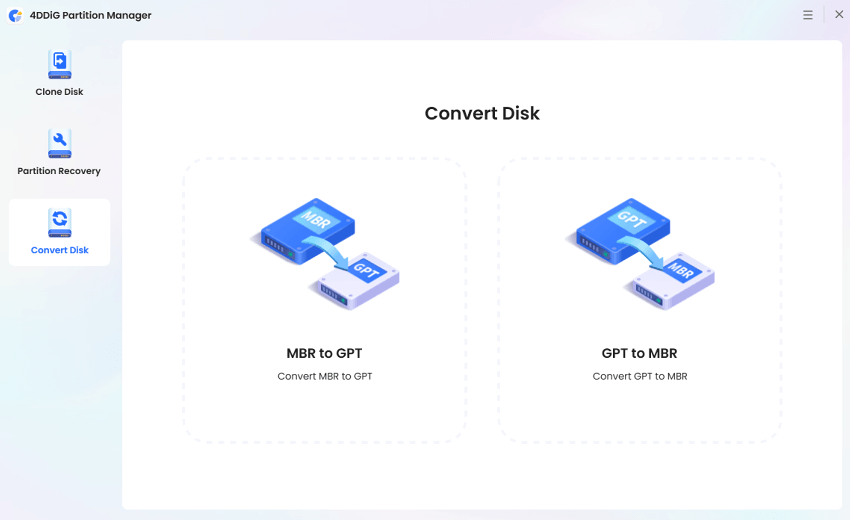
4DDiG Partition Manager is the ultimate MBR/GPT disk converter that enables you to convert MBR to GPT or GPT to MBR quickly and safely. You can use this software to easily convert MBR to GPT for Windows 11 upgrade without data loss.
Secure Download
-
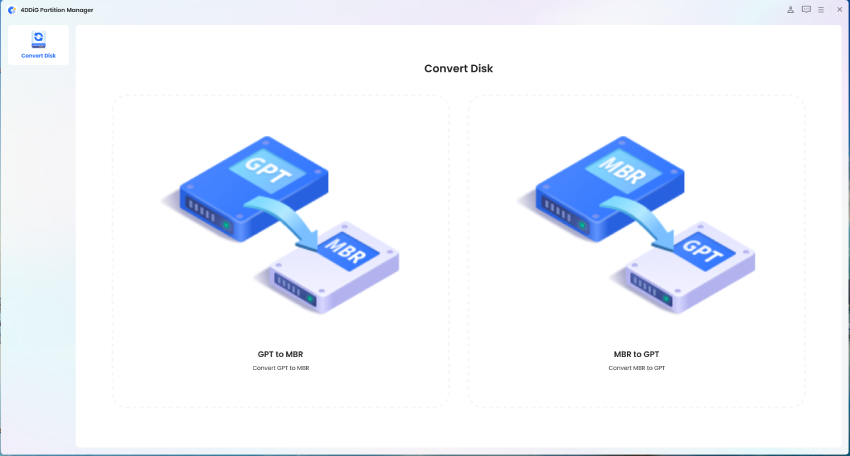
Step 1:Download and install 4DDiG Partition Manager on your computer. Then launch the application, select "Convert Disk" in the left navigation panel and click on "Convert MBR to GPT" to proceed.

-
Step 2:Select the disk you want to convert, click ”Continue”, and then you will enter the execution interface.

If the chosen disk is the system disk, the program will download the PE component. After successful download, a prompt window will appear. Ensure there is no unsaved files and power is sufficient or connected well. Click "Sure". The computer will restart and enter the PE environment automatically.

Note
If the disk you want to convert is an external disk, the program will convert it automatically without the need to restart and enter the PE environment.
-
Step 3:After the program starts in the PE environment, select "Convert MBR to GPT" to proceed.
-
Step 4:Select the disk you want to convert, click ”Continue”.
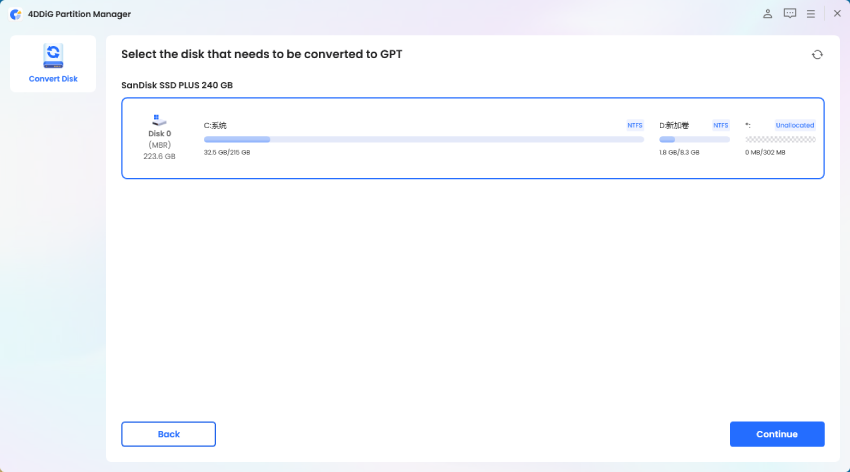
Note
Please note that in the PE environment, users can only see their own system disk.
-
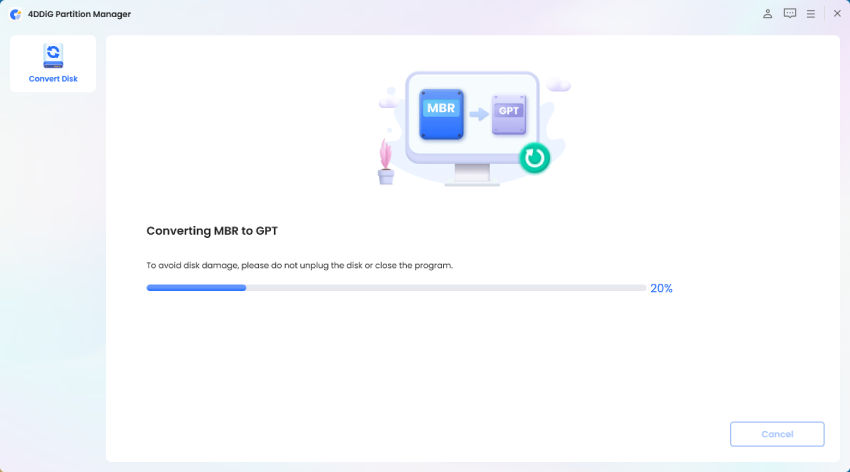
Step 5:4DDiG Partition Manager is converting MBR to GPT. The speed of disk conversion depends on the number of partitions on the disk.
-
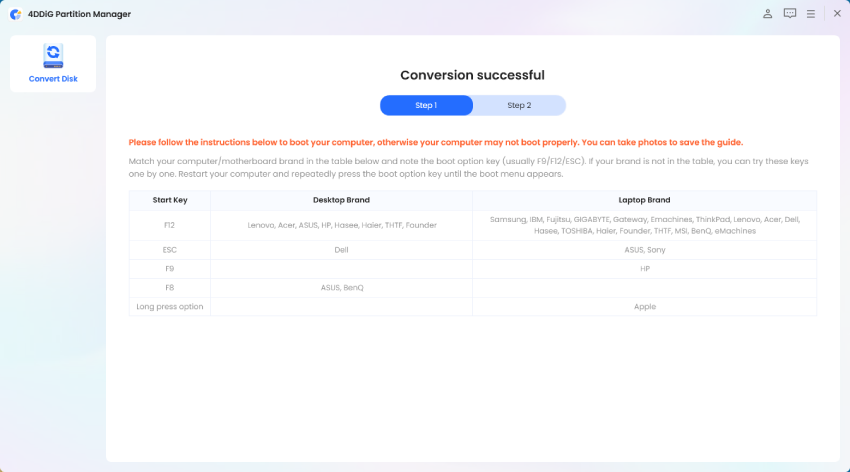
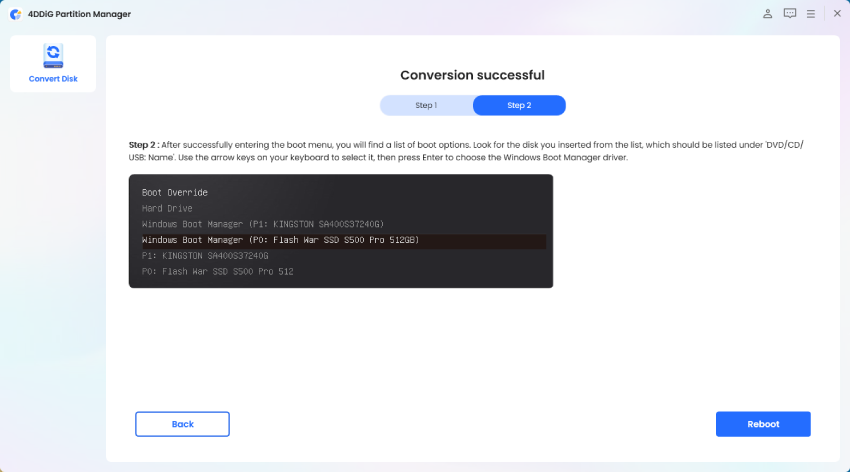
Step 6:Conversion successful! Please follow the instructions below to boot your computer, otherwise your computer may not boot properly.
Convert GPT to MBR
4DDiG Partition Manager is the ultimate MBR/GPT disk converter that enables you to convert MBR to GPT or GPT to MBR quickly and safely. You can use this software to easily convert MBR to GPT for Windows 11 upgrade without data loss.
Secure Download
-
Step 1:Download and install 4DDiG Partition Manager on your computer. Then launch the application, select "Convert Disk" in the left navigation panel and click on "Convert GPT to MBR" to proceed.

-
Step 2:Select the disk you want to convert, click ”Continue”, and then you will enter the execution interface.

If the chosen disk is the system disk, the program will download the PE component. After successful download, a prompt window will appear. Save your work and make sure power is connected well, and click Sure. The computer will restart and enter the PE environment automatically.

Note
If the disk you want to convert is an external disk, the program will convert it automatically without the need to restart and enter the PE environment.
-
Step 3:After the program starts in the PE environment, select "Convert GPT to MBR" to proceed.

-
Step 4:Select the disk you want to convert, click ”Continue”.
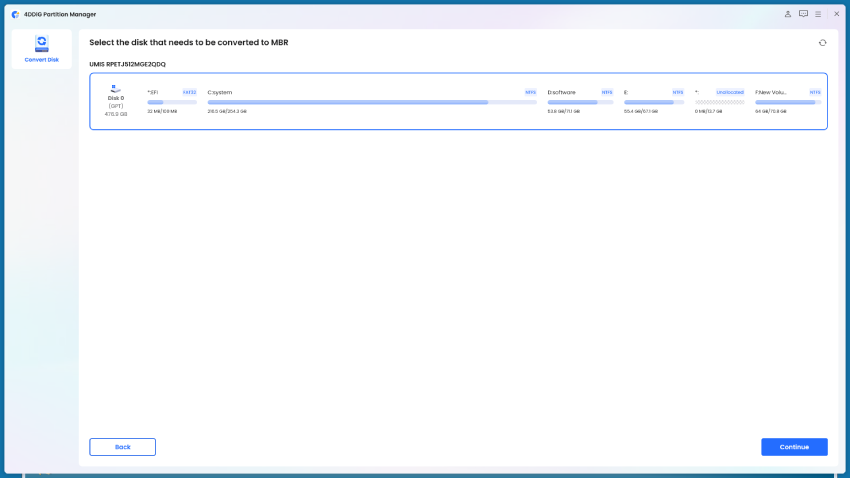
Note
Please note that in the PE environment, users can only see their own system disk.
-
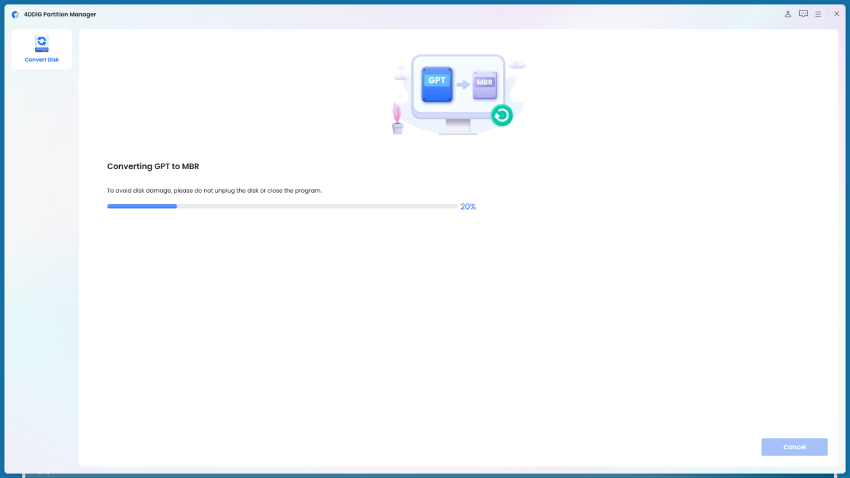
Step 5:4DDiG Partition Manager is converting GPT to MBR. The speed of disk conversion depends on the number of partitions on the disk.
-
Step 6:Conversion successful! Please follow the instructions below to boot your computer, otherwise your computer may not boot properly.


Resize/Move Partition
Resizing a partition is the process of making a partition smaller to release some space/get some unallocated space. The unallocated space can be merged with its adjacent partition(s) or can be used to create one or more new partitions.
To resize and move a partition:
-
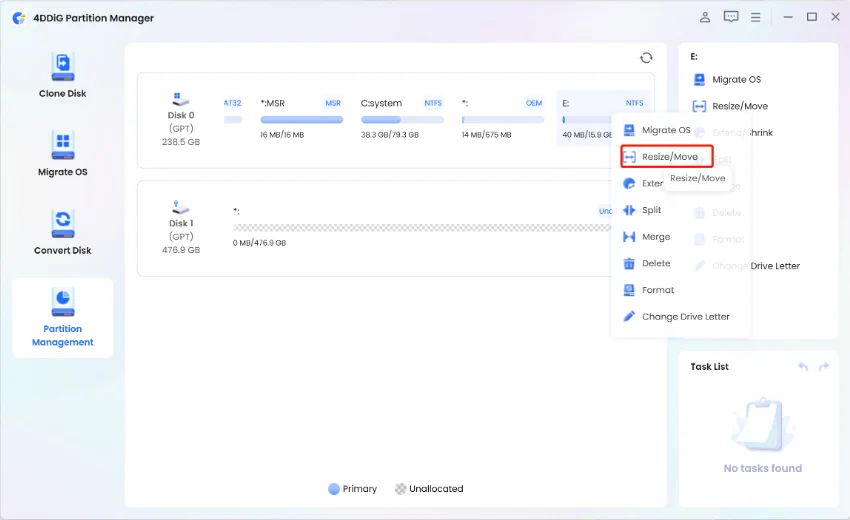
Step 1:Install and launch 4DDiG Partition Manager. Select "Partition Management" in the left navigation bar. Then select the partition you want to resize or move. Click "Resize/Move" in the right menu.
-
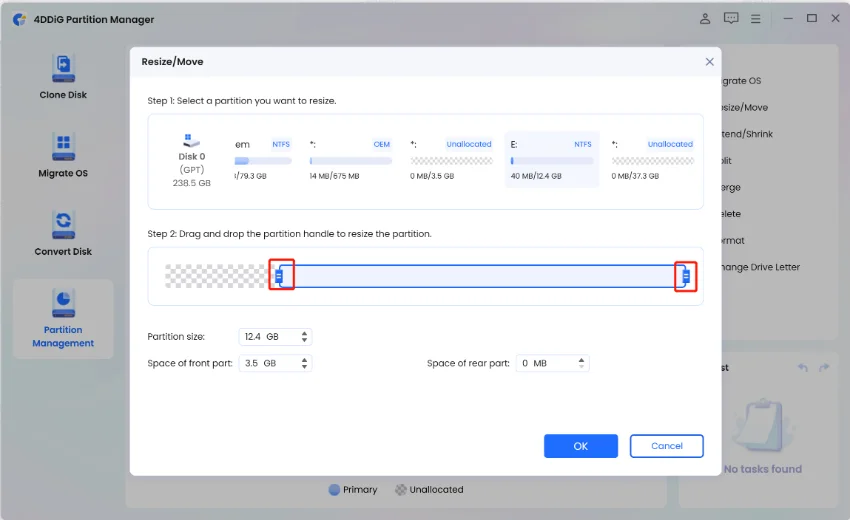
Step 2:In the pop-up window, drag and drop the borders of the selected partition to change its size. Alternatively, you can enter a specified partition size in GB. Once the partition size is set, you can preview the result of the changes you made. If you are satisfied with it, click OK to queue the operation.
Note
To move a partition, drag the whole partition handle towards unallocated space or manually define the amount of unallocated space in the front or rear part of the partition.
-
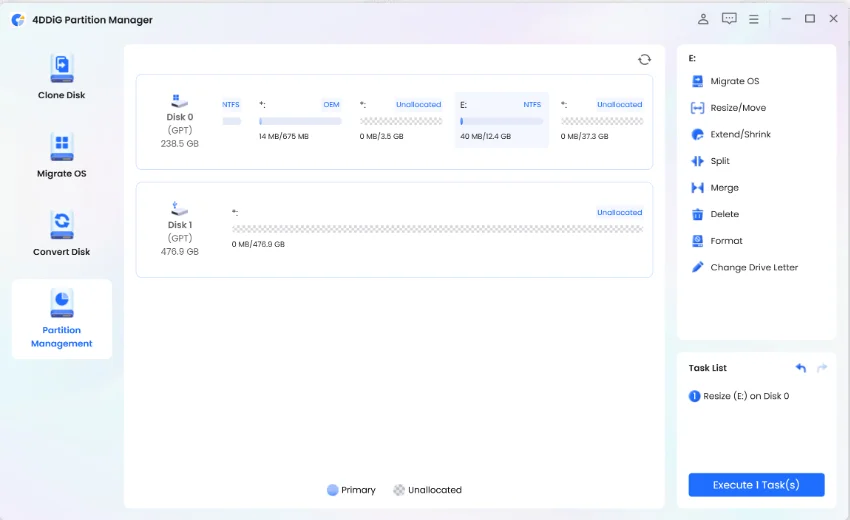
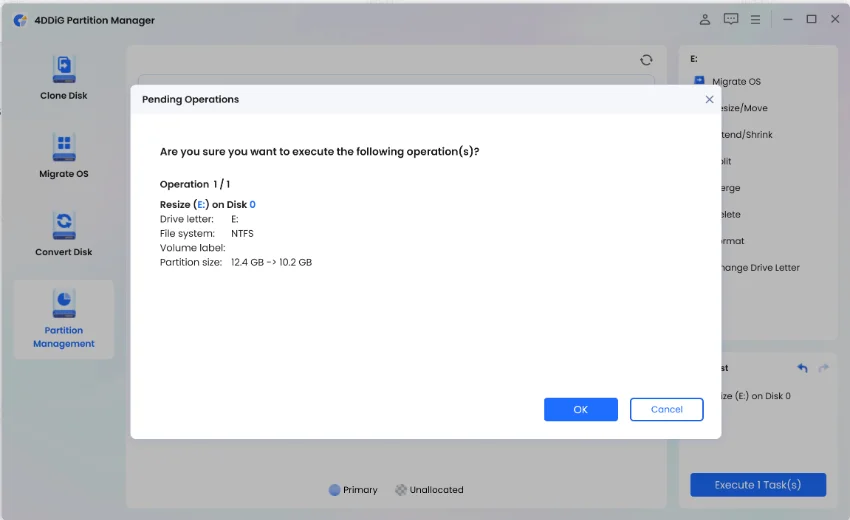
Step 3:The queued resizing operation is shown in the Task List. Click Execute 1 Task(s) and click OK to commit the operation.
-
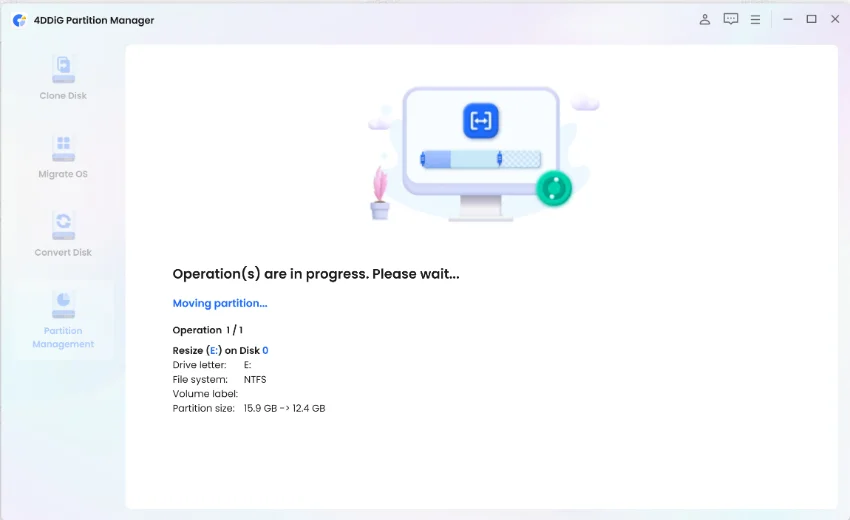
Step 4:The partition resizing process will start immediately and will take some time.
-
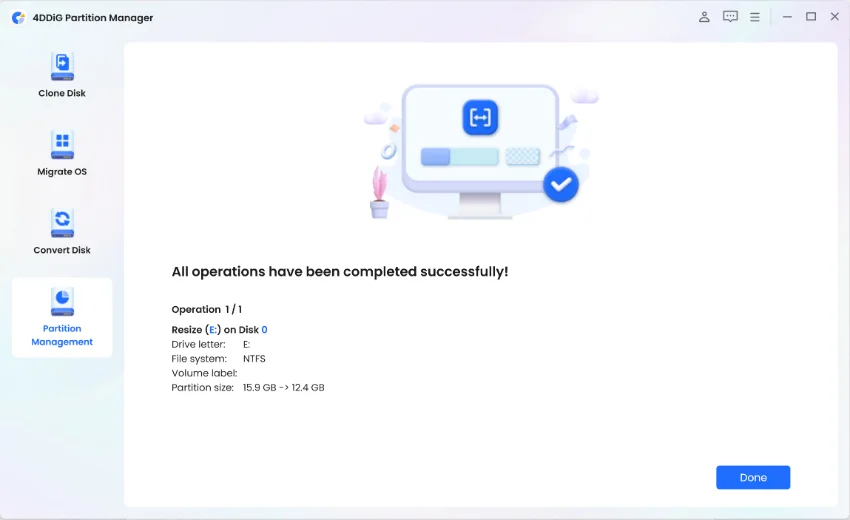
Step 5:Wait until the partition size is adjusted as expected and click Done.
Split Partition
Splitting partition refers to dividing a large partition into two or more smaller ones. When you buy a new computer with only one partition, or there is a large partition on the hard drive, you may need to split the partition to create new partitions and store various data.
To split a partition:
-
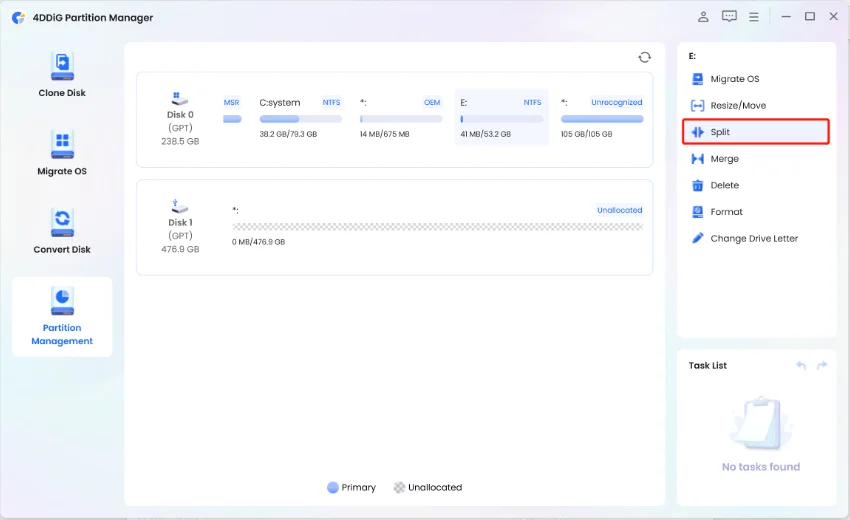
Step 1:Download and launch 4DDiG Partition Manager. Select "Partition Management" in the left navigation bar. Then choose the partition you're going to operate and select "Split" in the right menu.
-
Step 2:Drag the partition handle leftwards or rightwards to specify the size for the new partition, or you can manually enter an exact value as the new partition size. Then specify other parameters for the new partition, including drive letter, files system (NTFS, exFAT, FAT16, or FAT32), and cluster size.
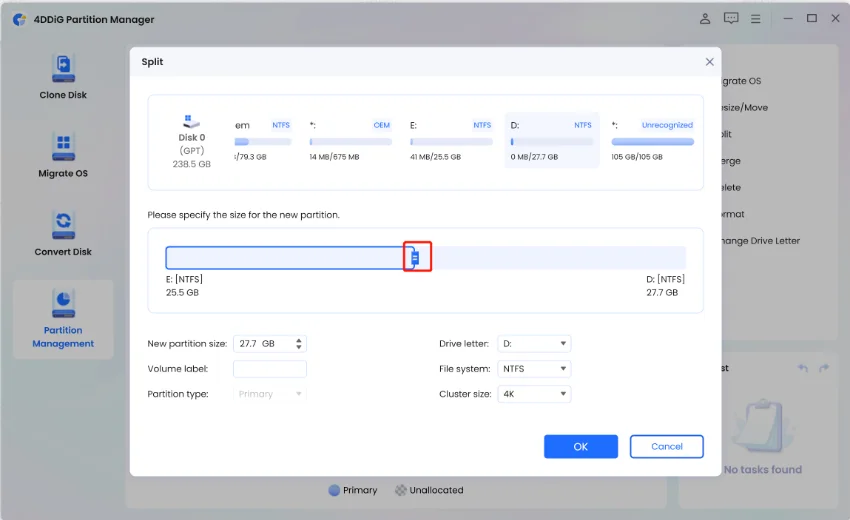
If there is a bootable system in the partition you want to split, you need to confirm that. Click Sure to proceed.

-
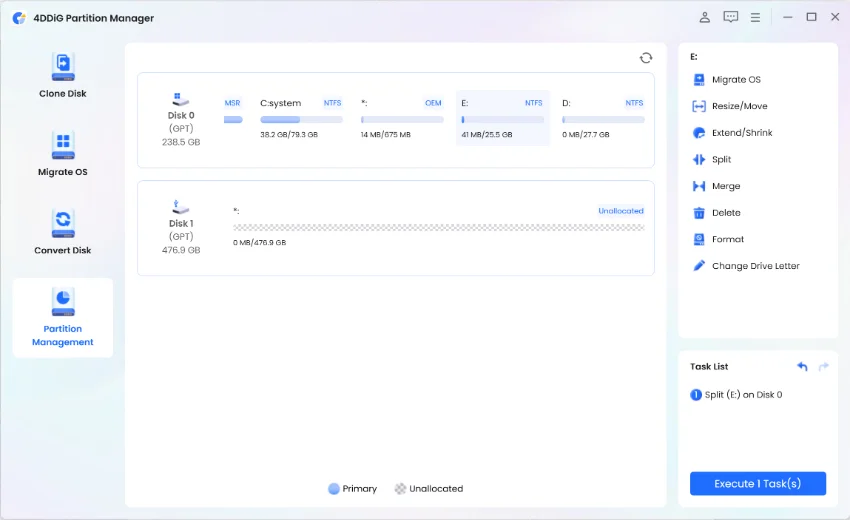
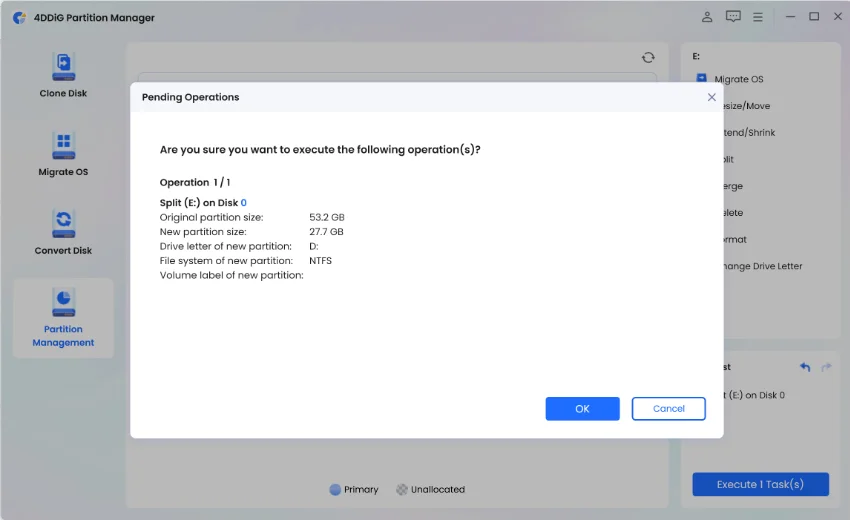
Step 3:You will see the splitting operation pending in the Task List. Click Execute 1 Task(s) and select OK when the program prompts operations to be done.
-
Step 4:The splitting process may take some time, so wait patiently and do not close the program until the process is finished.
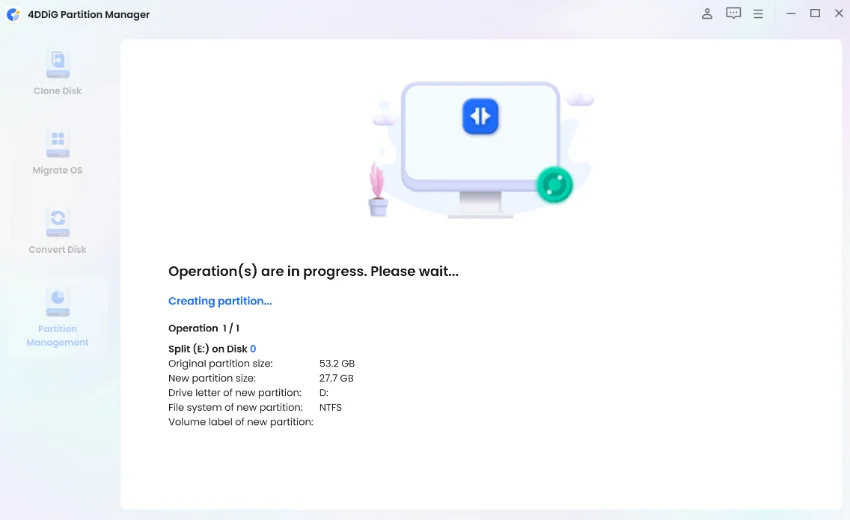
-
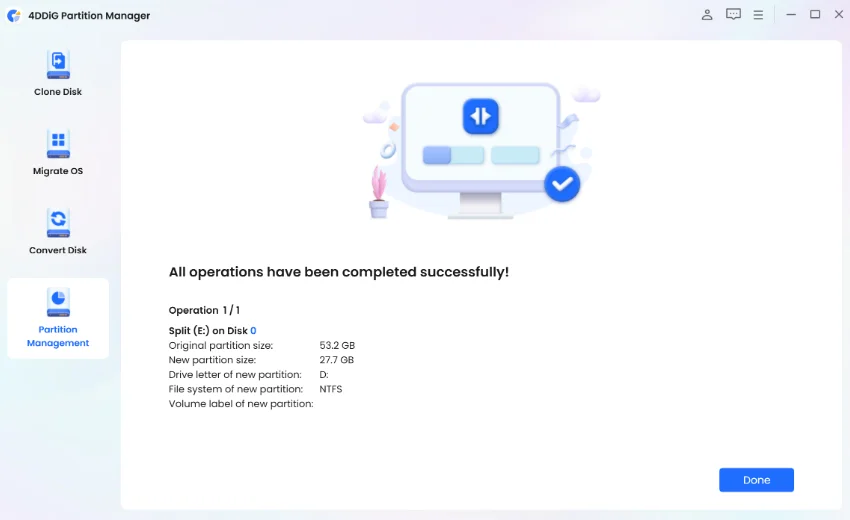
Step 5:Click Done when the partition is successfully split into two small ones.
Note
The split partition feature is currently available for NTFS and FAT32 partitions. Besides, you can only split the unused space of a partition to create a new partition. A partition that is totally used up and an unallocated partition cannot be split.
Merge Partitions
Merging partitions refers to combining two partitions of one hard drive into a single larger one or combining unallocated space with an existing partition to expand the available space on a partition. Partition merging is quite necessary when you have multiple partitions on your hard drive and you want to reduce the redundant ones for better management, or when one of your partitions is getting full but other partitions are nearly empty.
To merge two partitions or merge unallocated space into a partition without losing data:
-
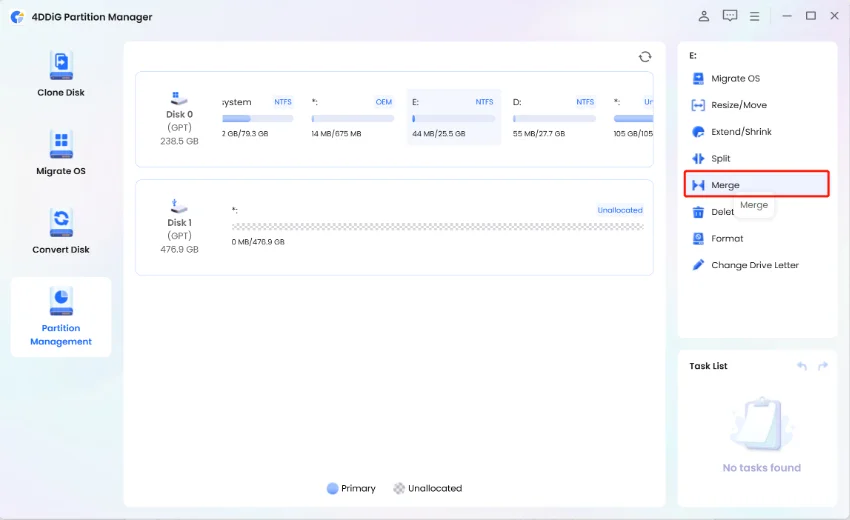
Step 1:Click on the target partition that you want to increase its capacity and select "Merge" in the right menu.
-
Step 2:Select a partition or unallocate space adjacent to the target partition and preview the disk layout after partition merging. Then click OK to merge the selected partition or unallocate space with the target partition.

Note
Currently you can only merge two adjacent partitions. If a partition or unallocated space is not adjacent to the target partition, you cannot merge them.
-
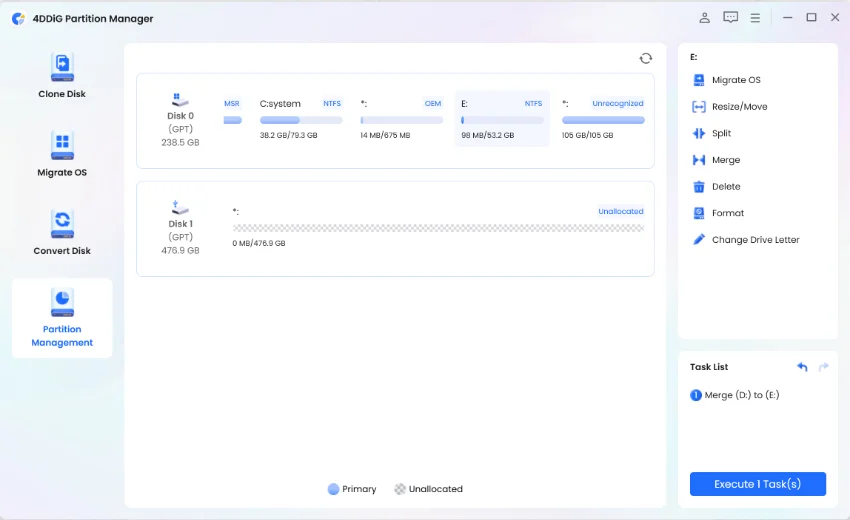
Step 3:A pending operation will be added to the Task List. Simply click "Execute 1 Task(s)" and select OK to commit the operation.
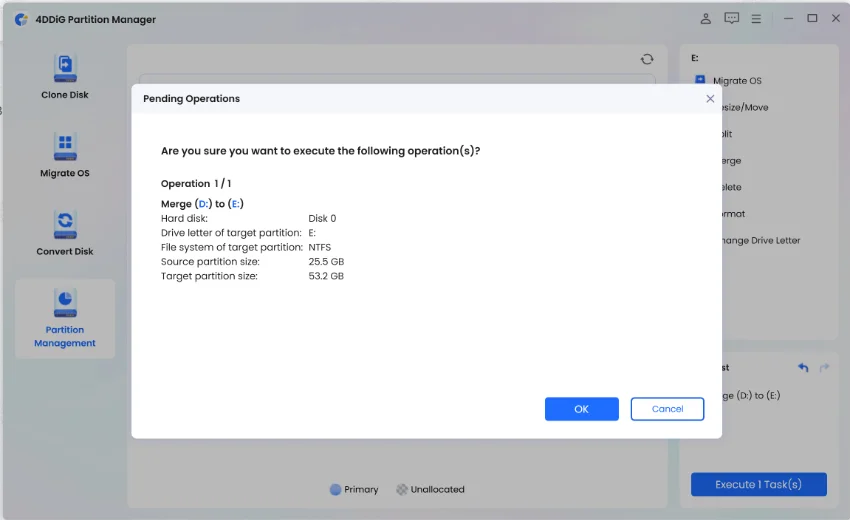
-
Step 4:The partition merging process can take some time to complete, depending on the size of the partition you want to merge. To avoid data loss or corruption, please do not close the program until the process is complete.
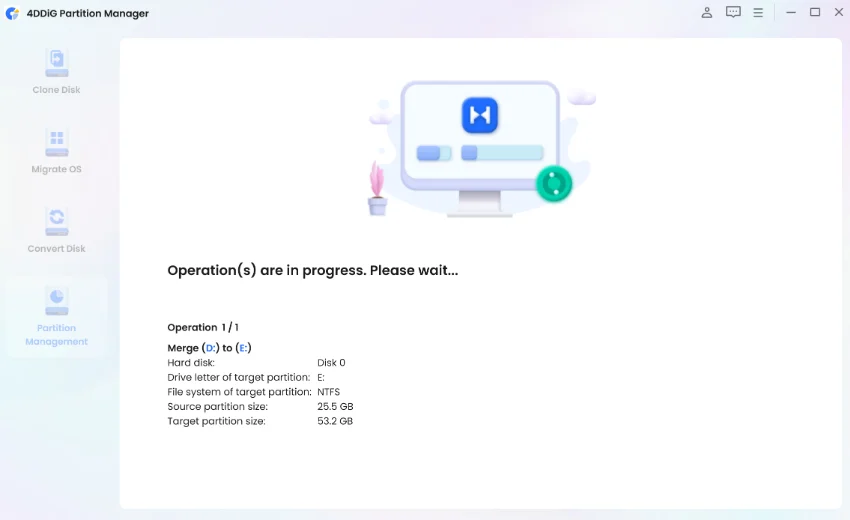
-
Step 5:Click Done after successfully merging the partitions.
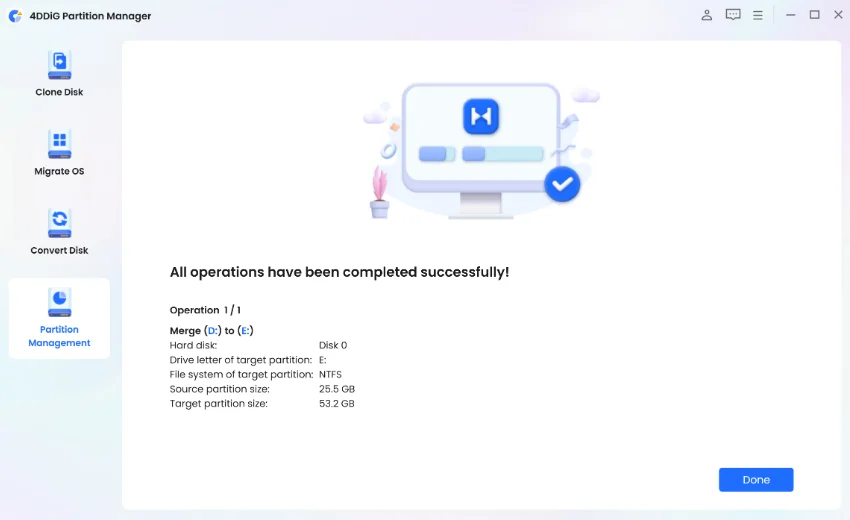
Create New Partition
If there is unallocated space on a hard disk, you can create a new partition from the unallocated space by adjusting its size, file system format, and drive letter. If there is no unallocated disk space, you can create some by shrinking an existing partition.
To create a partition from unallocated space:
-
Step 1:Download and launch 4DDiG Partition Manager. Select "Partition Management" in the left navigation bar. Then click the unallocated partition from which you want to create a new partition and select "Create" in the right panel. (This option is unavailable if there is no unallocated disk space.)

-
Step 2:In the popup window, set parameters for the new partition, including partition size, drive letter, volume label, and files system (NTFS, exFAT, FAT16, or FAT32), and then click OK.

Note
You can either drag the partition handle to specify the size of the new partition or manually enter the size of the volume you want to create in GB.
-
Step 3:From the main interface, you can preview the size and position of the newly created partition. Click "Execute 1 Task(s)" and click OK if confirmed.


-
Step 4:Wait for the new partition to be created. During the partition creation process, the program will automatically format the partition so that it can be used to store data.

-
Step 5:Click Done when a new partition is created successfully.

Delete Partition
Deleting a partition on a hard disk can help free up disk space. If there is a partition you no longer need on your disk, you can use 4DDiG Partition Manager to delete it with ease, and turn it into unallocated space that is available for extending the size of another partition on the same disk.
To delete a partition:
-
Step 1:Download and launch 4DDiG Partition Manager. Select "Partition Management" in the left navigation bar. Then click on the partition that you want to delete and select the Delete option from the right panel.

-
Step 2:Click Yes when a dialog that asks for confirmation appears.

-
Step 3:The program then adds the deletion task to the Task List. Click "Execute 1 Task(s)" in the bottom right corner and click OK to make the deletion take effect.


-
Step 4:Allow a few seconds for the program to finish the partition deletion.

-
Step 5:Click Done when the selected partition is deleted successfully.

Format Partition
Formatting a partition is the process of deleting all data on a chosen partition and installing a file system to prepare available space for the operating system. There are many situations when you need to format a partition:
- When you want to delete all data on a partition without deleting the partition, you can format it for rearrangement.
- A partition that is newly created should be formatted before it can be used to store data.
- When the file system of a partition is not supported or gets damaged or corrupted, you can format the partition with a new file system like NTFS and exFAT.
To format a partition:
-
Step 1:Download and launch 4DDiG Partition Manager. Select "Partition Management" in the left navigation bar. Then click the partition that you want to format and select the Format option.
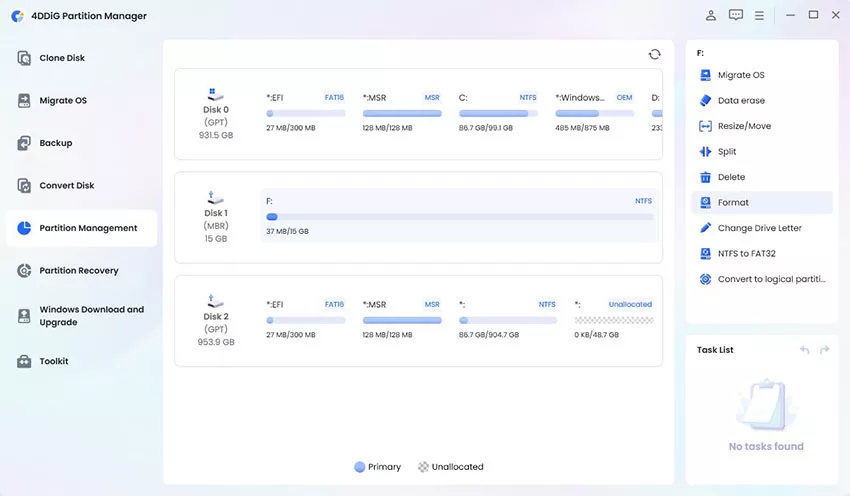
-
Step 2:Reset the volume label, file system, and cluster size for the partition. Once confirmed, click OK to continue.
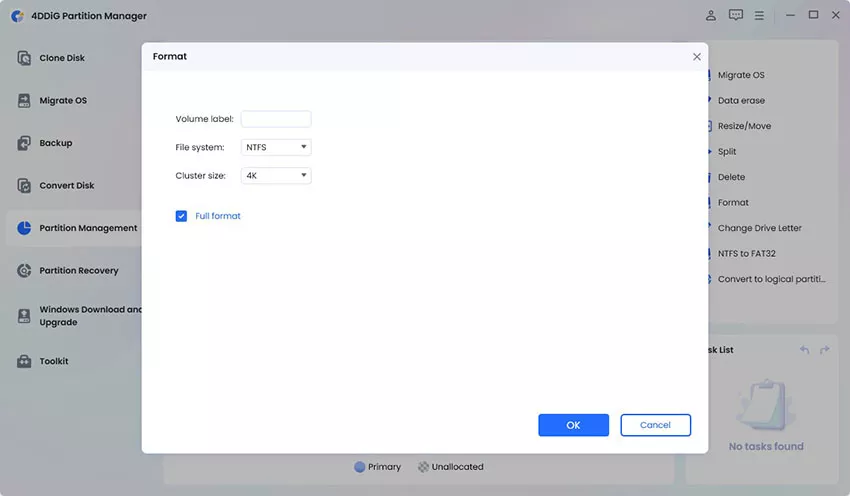
Note
If you select the "Full Format" option, it will take longer than a quick format, so please be patient.
-
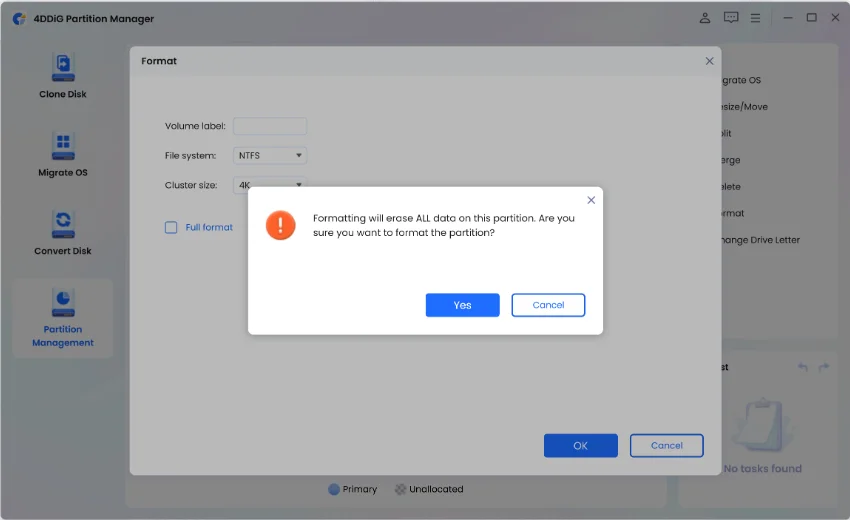
Step 3:Click Yes when you are ready to format the partition.
-
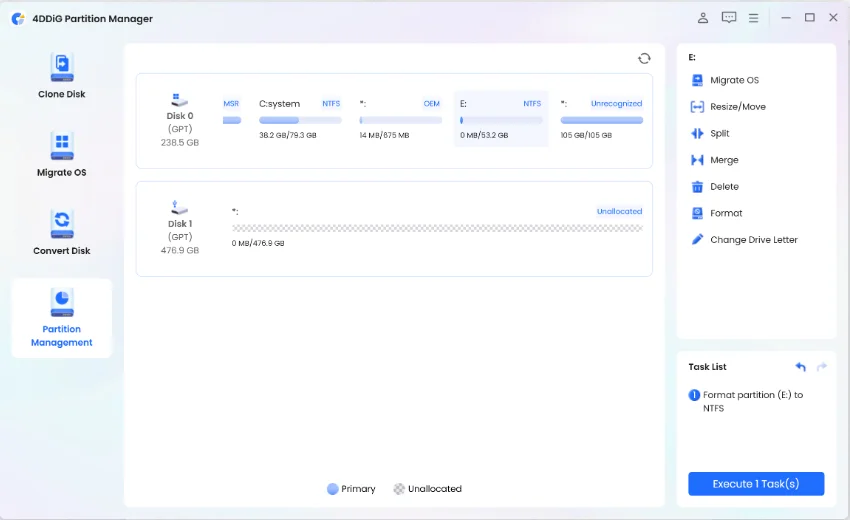
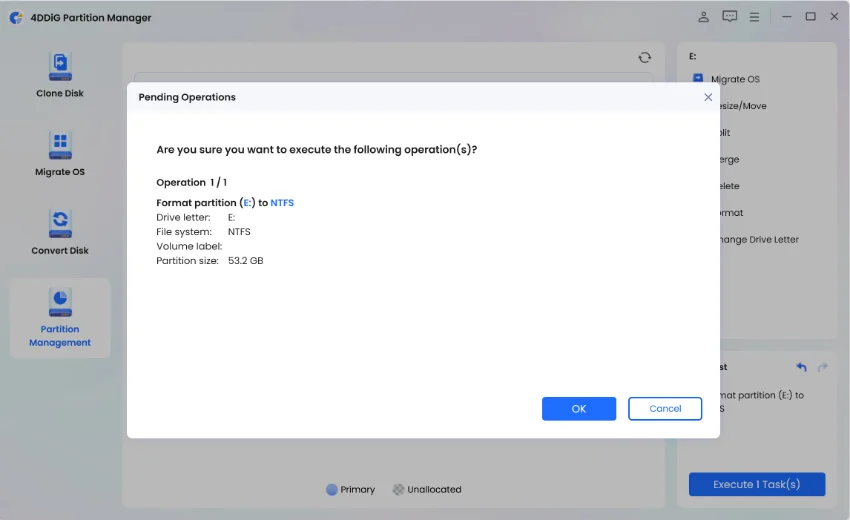
Step 4:You can preview the result after the partition is formatted. If it is satisfying, click "Execute 1 Task(s)" and then OK to start the partition formatting process.
-
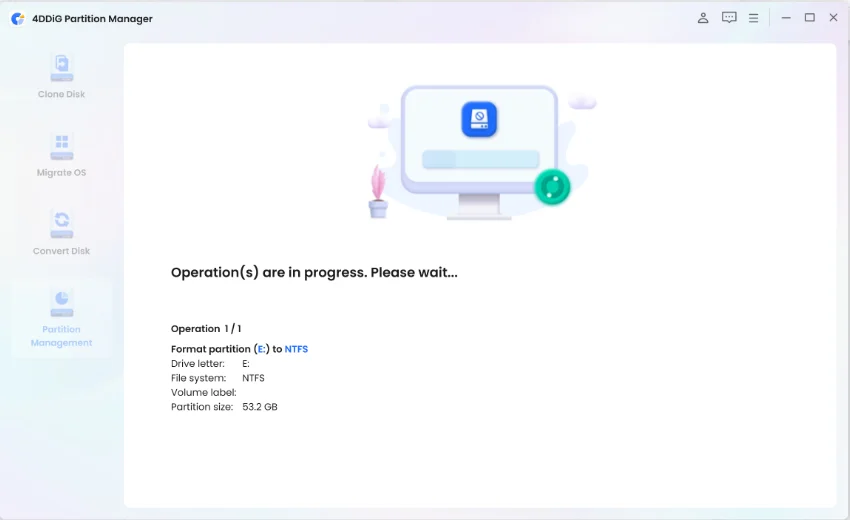
Step 5:Wait for the program to finish formatting the partition.
-
Step 6:Click Done when the partition is formatted successfully.

Change Drive Letter
Typically, Windows will assign a drive letter to any disk drive it detects automatically when the file system on its partition is recognized. However, you can change the drive letter of a partition according to your preference.
To change the drive letter of a partition:
-
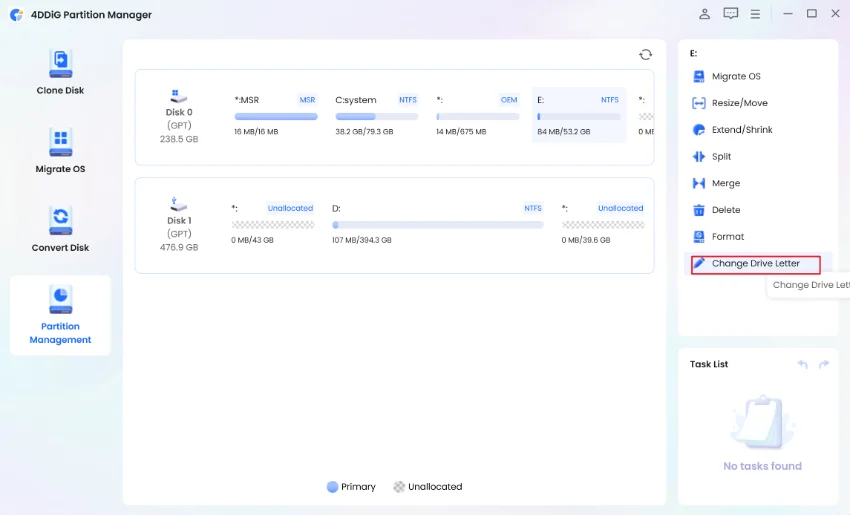
Step 1:Click the partition whose drive letter you want to change and select "Change Drive Letter".
Note
You cannot change the drive letter of the drive that the Windows operating system is installed on, that is, your local C: drive letter, otherwise, it will result in Windows not booting, and apps won't run at all, etc.
-
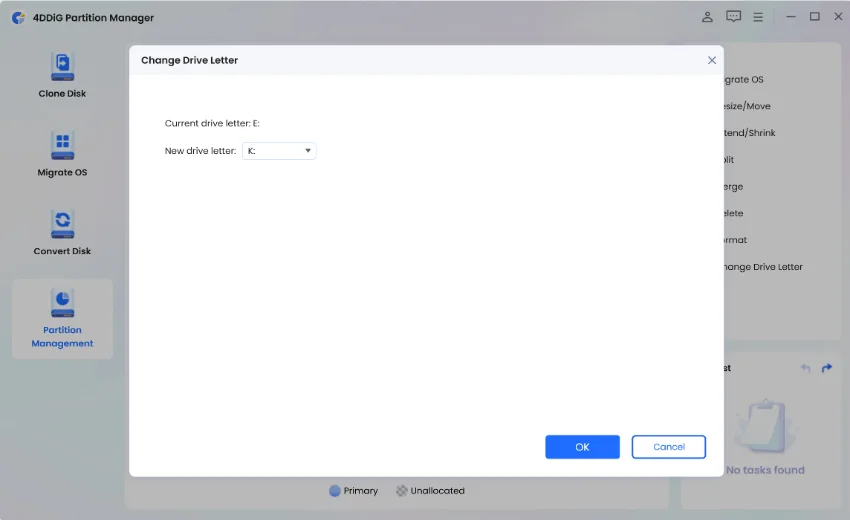
Step 2:Select a new drive letter that hasn't been taken up by other partitions for the partition and click OK.
Note
The drive letter of the selected partition will be removed if you choose None as the new drive letter.
-
Step 3:The main interface displays a preview of the partition with the new drive letter. Click "Execute 1 Task(s)" and then select OK to commit the change.


-
Step 4:Wait patiently until the process is complete.

-
Step 5:Click Done when the drive letter of the partition is successfully changed to the one you specify.

Convert NTFS to FAT32
Converting NTFS to FAT32 may be needed for compatibility with older systems, better cross-platform usage, device requirements like gaming consoles, and creating bootable drives. 4DDiG Partition Manager can easily convert NTFS to FAT32 without data loss, which means that you don’t need to format the drive.
-
Step 1:Install and launch 4DDiG Partition Manager. Select "Partition Management" in the left navigation bar. Then click on the partition that you want to convert to FAT32 and select "NTFS to FAT32".

-
Step 2:Please note that this conversion will not save very large files. Save large files in the partition to your computer before converting it to FAT32. Then click the Sure button to proceed.


-
Step 3:Conversion process will start immediately and will take some time. When it's finished click the Done button.

Convert FAT32 to NTFS
Convert FAT32 to NTFS is beneficial for handling larger files (over 4GB), utilizing advanced features such as file permissions and encryption, and supporting larger volume sizes. NTFS offers improved reliability and security, making it ideal for modern systems and applications that require robust file management and data integrity. 4DDiG Partition Manager can easily convert FAT32 to NTFS without data loss.
-
Step 1:Install and launch 4DDiG Partition Manager. Select "Partition Management" in the left navigation bar. Then click on the partition that you want to convert to NTFS and select "FAT32 to NTFS" from the right menu.

-
Step 2:Confirm to convert FAT32 to NTFS and click Sure to start.

-
Step 3:Conversion process will start immediately and will take some time. When it's finished click the Done button.

Partition Recovery
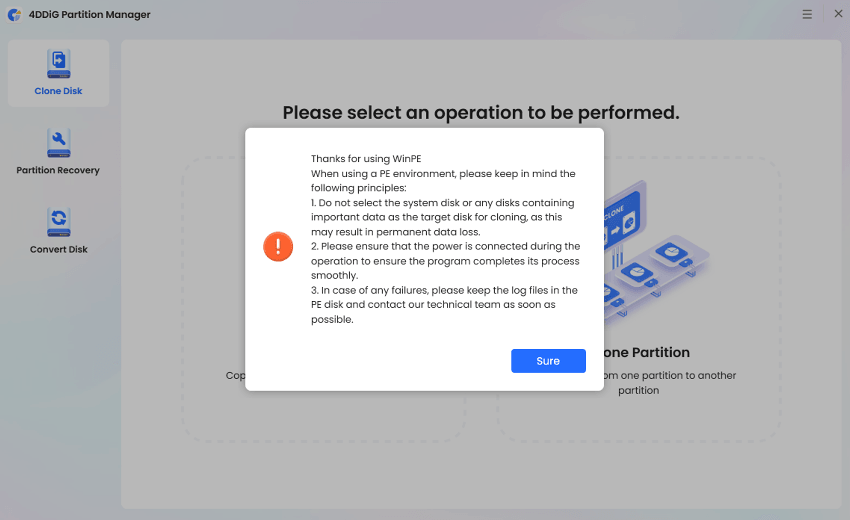
4DDiG Partition Manager is reliable partition recovery software. It offers a comprehensive solution that enables you to recover deleted or formatted partition, repair raw partition and repair boot easily and safely. Also, it can help you create WinPE, so you can clone disk, repair partition and convert disk on a computer that cannot boot up normally.
Secure Download
-
Step 1:Install and launch 4DDiG Partition Manager. If you need to recover partition on an external hard drive, please connect your external hard drive to your computer. Select "Partition Recovery" in the left navigation bar, then select the disk where the partition you want to recover is located and then click on "Quick scan" to proceed.

If you can't find the partition you're looking for, please try a deep scan.

If you still unable to find the desired partition(s), you can try performing a full scan.

-
Step 2:The full scanning process will take some time, so please be patient. Once you find the partition you want to recover, you can click the Stop button to pause the scan at any time.

-
Step 3:Choose the partition(s) you want to restore. Please noted that this operation will overwrite existing partition(s), so you need to confirm whether you want to perform the operation. After that, click on "Sure" and then click on "Start recovery" to proceed.

-
Step 4:Click Finish when the partition is successfully restored.

Bypass Windows 11 Upgrade Requirements
4DDiG Partition Manager is a reliable Windows 11 upgrade assistant. It offers to bypass Windows 11 upgrade requirements and create Windows installation disk. If your PC doesn’t meet the minimum system requirements for Windows 11, follow the guide to bypass TPM 2.0, CPU or secure boot.
Secure Download
-
Step 1:Install and launch 4DDiG Partition Manager. Navigate to Windows Download and Upgrade, select Windows 11 Upgrade.

-
Step 2: It will detect your Windows compatibility automatically.

-
Step 3:Later, you will get a list whether your PC could be upgraded to Windows 11.

If your PC doesn’t meet the system requirements, please follow the instructions to do a bootable installation or covert your disk type.


-
Step 4:Then, choose the system language and version, click Start to upgrade.

And click Sure to proceed.

-
Step 5:It will take some while to bypass Windows 11 requirements, just wait patiently.

Once done, you can upgrade to Windows 11.

Download and Create Windows Bootable Installation Disk
4DDiG Partition Manager is a trust worthy Windows installation assistant. It offers to create Windows 10 or Windows 11 bootable installation disk, or just download Windows ISO file to the computer. Follow the guide to create a Windows installation disk.
Secure Download
Create Installation Disk
-
Step 1:Connect an external disk to your computer and run 4DDiG Partition Manager. Go to Windows Download and Upgrade, select Windows Download.

-
Step 2:Choose Windows version, select system language. Then select the connected disk as target disk. Click Start.

Note that creating bootable disk will erase the selected disk. Make sure you have a backup or there is nothing in the selected device.

-
Step 3:It will take some time to download and burn the image to the selected disk. Just wait patiently.


Download Windows System Image Only
-
Step 1:Launch 4DDiG Partition Manager, click Windows Download and Upgrade, select Windows Download.

-
Step 2:Switch to Download System Only, select Windows version and system language. Choose a path to download the ISO file. Click Start and confirm.


-
Step 3:Once done, you can check the Windows ISO file in the selected location.

Quick Install Windows
4DDiG Partition Manager is a reliable and user-friendly Windows installation assistant designed to simplify system reinstallation or fresh setups. With its "Quick Install Windows" feature, you can effortlessly install Windows 10, Windows 11 24H2, or the latest Windows 11 25H2 to a disk directly without a installation media. Follow the guide to install Windows fastly.
Secure Download
-
Step 1:Open 4DDiG Partition Manager and navigate to the "Quick Install Windows" section.

-
Step 2:In the next page, select the desired Windows version and your inserted hard drive. Keep the recommended GPT partition style for systems or switch to MBR for older ones, optionally adjust the language and edition, then review everything and click Start.

And click Sure to proceed.

-
Step 3:Installing Windows will take some time, please wait patiently.


Remove BitLocker
4DDiG Partition Manager is reliable partition management tool. It offers an extra solution that enables you to unlock or remove BitLocker. Also, it can help you bypass BitLocker recovery screen when you forgot the password.
Secure Download
-
Step 1:Run 4DDiG Partition Manager. If you need to unlock a BitLocker locked partition or remove BitLocker without password, go to toolkit, and click "Remove BitLocker".

-
Step 2:Select the disk or partition with BitLocker, click "Unlock".

-
Step 3:Click "Sure" to remove BitLocker from the partition, or click "Cancel" to unlock Bitlocker only.

-
Step 4:Wait 4DDiG Partition Manager to decrypt the partition for a while.

Repair Partition(s)
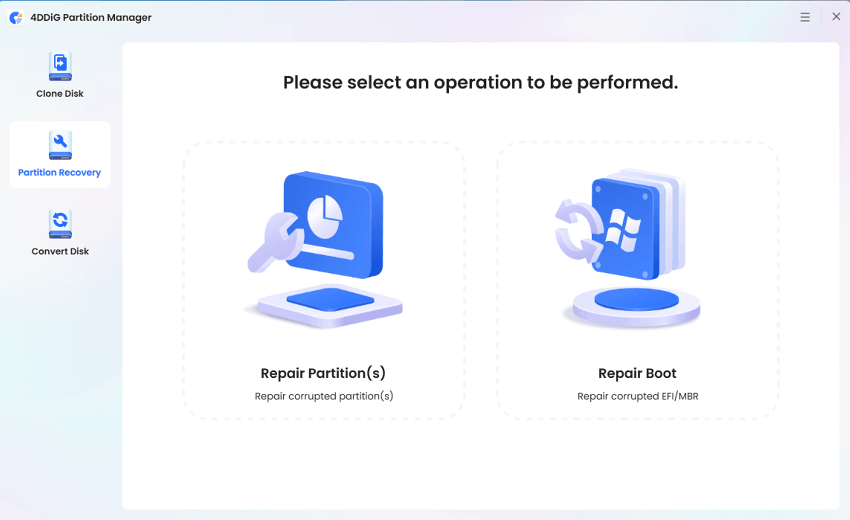
4DDiG Partition Manager is reliable partition recovery software. It offers a comprehensive solution that enables you to recover deleted or formatted partition, repair raw partition and repair boot easily and safely. Also, it can help you create WinPE, so you can clone disk, repair partition and convert disk on a computer that cannot boot up normally.
Secure Download
-
Step 1:Install and launch 4DDiG Partition Manager. If you need to repair partition on an external hard drive, please connect your external hard drive to your computer. Select "Toolkit" in the left navigation bar, then select "Repair Partition(s)" to proceed.

-
Step 2:Select the disk where the partition you want to repair is located and then click on "Repair now" to proceed.

-
Step 3:Click Finish when the partition is successfully repaired.

Repair Boot
4DDiG Partition Manager is reliable partition recovery software. It offers a comprehensive solution that enables you to recover deleted or formatted partition, repair raw partition and repair boot easily and safely. Also, it can help you create WinPE, so you can clone disk, repair partition and convert disk on a computer that cannot boot up normally.
Secure Download
-
Step 1:Install and launch 4DDiG Partition Manager. Select "Toolkit" in the left navigation bar, then select "Repair Boot" to proceed.

-
Step 2:Select the boot disk and then select the system partition that needs to be repaired. Click Repair Now.

-
Step 3:It will take some time to repair the corrupted boot, please be patient. To avoid disk damage, please do not unplug the disk or close the program.

-
Step 4:Click Finish when the corrupted boot is successfully repaired.

Wipe Disk
4DDiG Partition Manager is reliable disk wiping software. It can help you wipe disk easily and safely. Data cannot be recovered after wiping, preventing data from being stolen.
Secure Download
-
Step 1:Install and launch 4DDiG Partition Manager. If you need to erase partition on an external hard drive, please connect it to your computer. Select "Toolkit" in the left navigation bar, then select "Data erase" to proceed.

-
Step 2:Select the disk or partition that needs to be wiped and then click the Continue button.

-
Step 3:After you make sure that you have selected the correct disk or partition to be wiped, click the Sure button to proceed.

-
Step 4:It will take some time to wipe the disk, please be patient. To avoid disk damage, please do not unplug the disk or close the program.

-
Step 5:Click Finish when the disk is successfully wiped.

Create WinPE
4DDiG Partition Manager is reliable partition recovery software. It offers a comprehensive solution that enables you to recover deleted or formatted partition, repair raw partition and repair boot easily and safely. Also, it can help you create WinPE, so you can clone disk, repair partition and convert disk on a computer that cannot boot up normally.
Secure Download
How to Create a Bootable WinPE Media with 4DDiG Partition Manager?
-
Step 1:Install and launch 4DDiG Partition Manager and then connect a USB flash drive or CD/DVD to your computer. Select "Toolkit" in the left navigation bar, then select "Create WinPE" to proceed.

-
Step 2:Select ISO file to create the WinPE bootable media based on your needs, then click on "Start" button to proceed. (It will burn the program to the media if you didn't choose any other ISO file.)

-
Step 3:After you select the connected USB as the target disk, click the Continue button and a pop-up window will appear to remind you that the USB flash drive will be formatted. Please confirm that you have backed up the important data inside, and then click the "Sure" button.

-
Step 4:The creation process will begin now. It may take a few minutes to create a WinPE bootable USB drive. Once it is complete, click "Finish".


How to Boot from the USB?
-
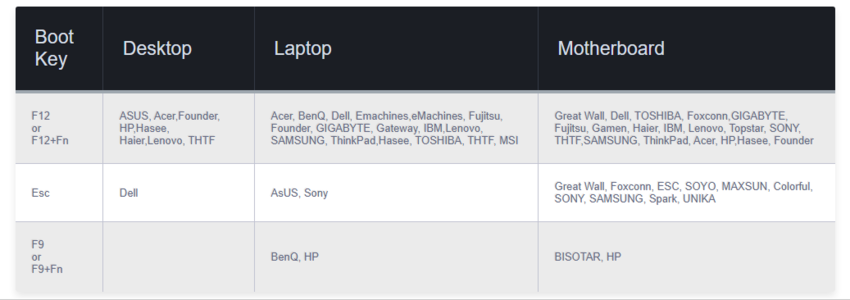
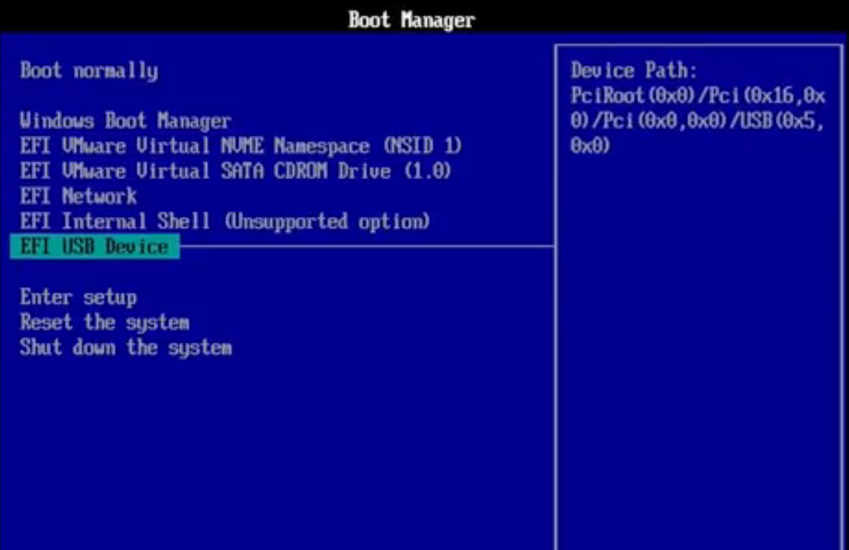
Step 1:Insert the burned USB into the dead computer. Start the computer and use the Boot Menu hot-key(s) to enter the Boot Menu on your device.
-
Step 2:When you get into the boot menu, use the arrow keys to navigate the bootable media and simply tap on "Enter" to select it as a boot drive.
-
Step 3:Once you are in the boot disk system, you can use 4DDiG Partition Manager PE version. In PE environment, you can clone disk, repair partition and convert disk easily and safely.
