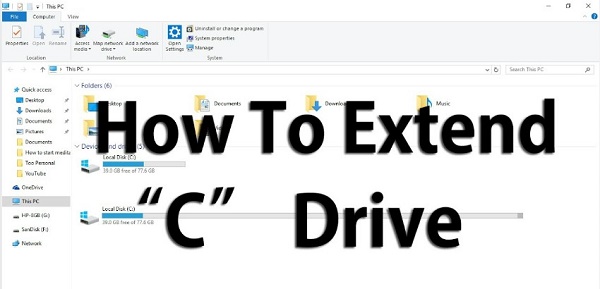
How to Extend C Drive in Windows 11/10? [100% Work]
Download 4DDiG Partition Manager to extend C drive in Windows 11/10 easily and safely.
Is your C drive shrinking? Are you running out of space? Is your Windows 11 or Windows 10 system giving you way too many problems in that department than you can deal with? Then you’ve come to the right place to learn how to extend C drive and solve your computer problems.
Whether you’re dealing with unallocated space, or simply looking to optimize your C drive’s volume, we’ve got you covered. Join us as we journey through three workable solutions to how to extend C drive in Windows 10 or 11.
Part 1: How to Extend C Drive with 4DDiG Partition Manager? (The Easiest Way)
Wondering how to make space in C drive? Using 4DDiG Partition Manager is the easiest method to extend C drive. In partition management, 4DDiG Partition Manager , a storage size changer for laptop, stands out as a reliable and efficient solutions for your every need.
With 4DDiG Partition Manager, you only need to follow four easy steps to configure how to increase the space in C drive. Still, before we jump right into that guide, let us help you discover an extensive list of the capabilities offered by 4DDiG in terms of features and uses:
- 4DDiG allows you to resize, split, extend, create, delete, or format your partitions in any way you want to maximize and optimize any available disk space.
- 4DDiG provides an easy migration pathway from Windows OS to SSD - one click is required, and there is no need to configure an entire system reinstallation!
- This tool can effectively clone your entire hard drive to back up your data easily.
- You can also easily convert MBR to GPT, which is great for a Windows 11 upgrade if you’re trying to figure it out without data loss.
And now, let’s figure out the steps required to follow how to get more C drive space with 4DDiG Partition Manager!
-
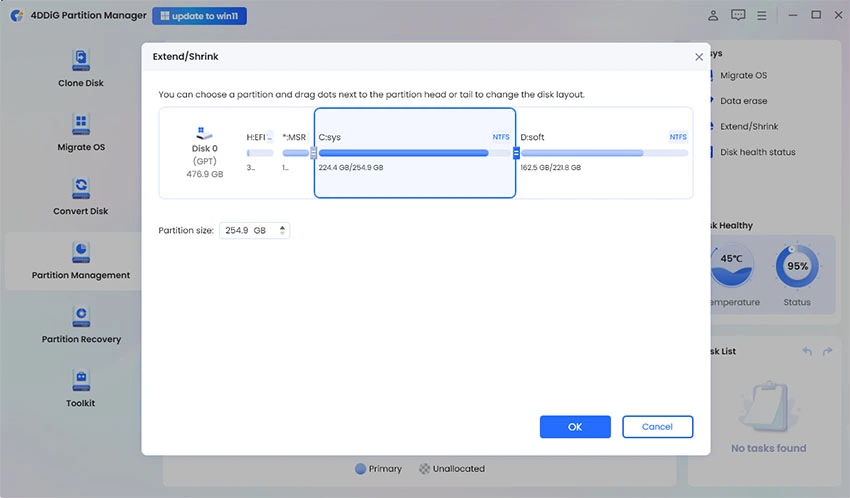
Download, install, and run 4DDiG Partition Manager on your computer. Once it’s open, choose “Partition Management” from the left sidebar and click “Extend/Shrink.”
FREE DOWNLOADSecure Download

-
To extend the partition, select and pull the right border of the partition in the image that pops up to the right or the left leftwards. Otherwise, you can select one of the adjacent partitions with free space and pull the border to release that space for your intended partition.

-
Your task list will now have a pending operation, so you must pick “Execute 1 Task(s)” and then select OK to extend your C drive.

-
Depending on the extent of space you’re looking to attach to the partition, it will take some time. Therefore, don’t close the program to minimize possible data loss and corruption (of files and processes). Once it’s complete, your computer will automatically restart, and your C drive will be successfully expanded.

Part 2: How to Extend C Drive Using Command Prompt?
If the above process doesn’t work for you, you can try figuring out how to make space in C drive using command prompt, which is the second solution on this list and works like a charm.
To complete the process, you’ll need to follow the steps outlined below to make the most of the command-line interface and reclaim valuable space on your Windows 10 or 11 system.
Please proceed carefully—this method can permanently damage your drive or system if a mistake is made.
-
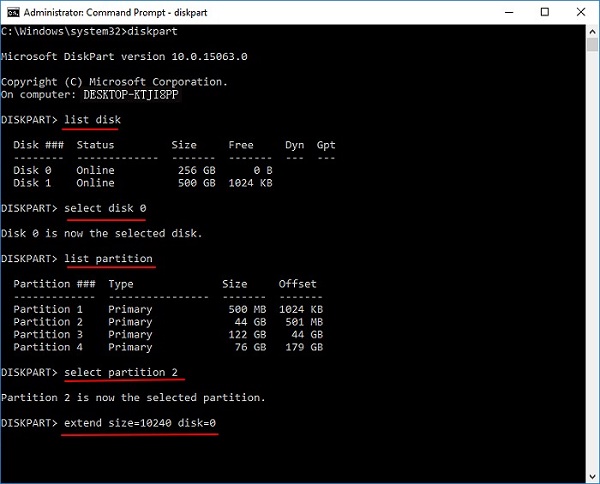
Press ‘Windows’ key and “X” at the same time, and from the list that pops up, select “Command Prompt (Admin)”. You can also try opening it from the start menu with a right- to select admin access.

- Type in the following:
- diskpart
This process activates the ‘diskpart’ utility, a powerful built-in tool for managing disk partitions. - list volume
This allows you to view all available volumes, in this case disks. - Select volume x (x is the C drive number)
You can identify your C drive’s volume number from the above list and type “select volume X,” replacing “X” with your C drive’s volume number. - Extend size =number (the number is the MB size for extending the C drive)
Once the C drive is selected, enter the above command to allot unallocated space and extend the C drive, but only if the space is available.

- diskpart
You must press ‘Enter’ after each entry and work according to the answers provided.
Part 3: How to Extend C Drive Using Disk Management?
Another method to figure out how to extend C drive with non-adjacent unallocated space is to follow the steps utilizing Windows disk management, which can then optimize your C drive’s storage capacity. Let’s cover those simple steps in this guide:
-
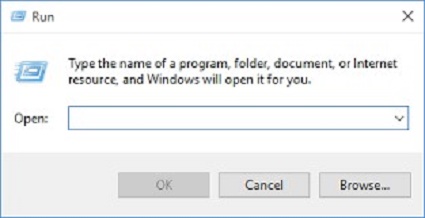
Press ‘Windows’ key and “R” simultaneously, opening the ‘Run’ Dialogue.

-
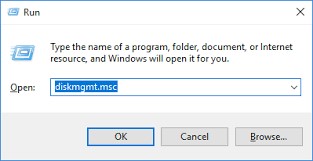
Type “diskmgmt.msc” and press ‘Enter’.
On the other hand, you can also try reaching disk management by right-clicking “This PC” and going from ‘Manage’ to ‘Storage’ to ‘Disk Management’.
-
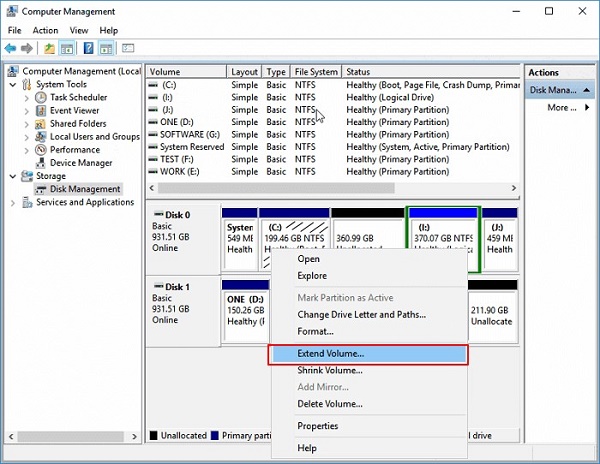
Open the pop-up menu by right-clicking on the C drive and choosing “Extend”.

-
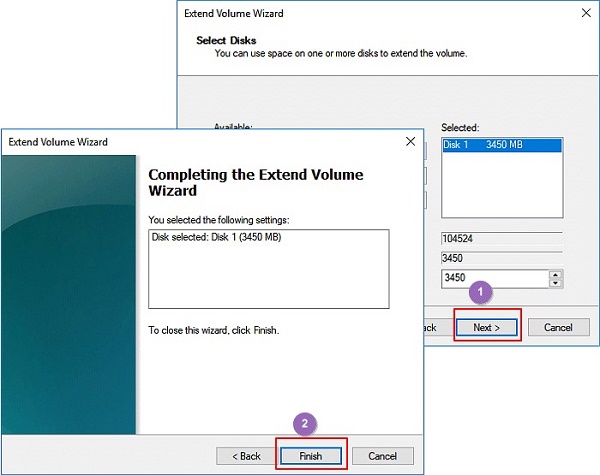
Add more size to the C drive and click “Next” and “Finish”.

If your C drive is running out of space and slowing down your PC, one of the most effective solutions is to add unallocated space to C drive. Here is the complete guide: How to Fix My C Drive Is Full without Reason in Windows 11/10/8
Part 4: Benefits of Extending C Drive
Extending the C drive’s primary goal is to address the immediate concern of stage limitations, but some benefits extend beyond mere space allocation.
Therefore, learning how to extend C drive with unallocated space can enhance your system’s overall performance, ensuring a smoother, better computing experience.
These advantages include:
- Optimized System Speed: With more space, your operating system (OS) can function more efficiently, which, in turn, infers faster boot times and incredibly improved responsiveness.
- Enhanced Multitasking: With a lot of extra space, your C drive can run multiple applications and tasks more capably, reducing the chance of the system slowing down during more intense jobs.
- Room for System Updates: A workable OS requires a lot of space, and a well-extended C drive can help you configure room for updating your system and keeping your computer in tip-top shape.
- Prevention of System Errors: Lastly, running out of space can lead to several errors, which can prevent your entire computer from working and may even lead to your OS crashing entirely. Learning how to extend C drive can be a preventive measure against such problems.
FAQs About How to Extend C Drive
1. Why Can’t the C Drive be Extended?
There can be a few reasons why the above might happen, and the most common of those can be narrowed down to there being no unallocated space right next to the C drive for the computer to utilize, the existing unmovable files at the end of the partition, or there being limitations imposed by certain system files.
2. How Do I Shrink My D Drive and Extend My C Drive?
To shrink the D drive and extend the C drive, you can utilize a partition manager tool for the most effectiveness. You’ll need to back up the data first, but by utilizing tools like 4DDiG Partition Manager, you won’t have to worry about data loss and can effectively shrink the D drive by extending the C drive.
How to Add Unallocated Space to the C: Drive in Windows 11/10/8
Final Words
In short, managing the space on your C drive is crucial for maintaining a high-performing system, after understanding how to extend C drive with unallocated space allows you to fix that problem and make your OS easier to manage.
This guide has covered three easy methods for how to extend volume on C drive. 4DDiG Partition Manager can give you the most hassle-free experience, for its unmatched efficiency in handling different scenarios. Don’t let a cramped C drive hinder your computing experience—expand it with confidence, optimize the system, and enjoy a smoother journey.
Secure Download



 ChatGPT
 Perplexity
 Google AI Mode
 Grok
Grok

