Question“Is there a way to turn an image of low resolution into one of higher quality and resolution?”
-Question from Quora
Photography is the perfect way of preserving precious memories as well as valuable information. It has also become a significant part of our everyday lives, and that is why users often feel disappointed when the images they capture come out blurry or pixelated. Because low-quality pictures are unpleasant and unappealing, it is important to always take certain measures to ensure they come out clean, sharp, impressive, and of high quality. The primary objective of this article is to show you how to make a low-quality picture look better. In it, you will also find the fundamentals of image quality and how to use it to your advantage, as well as the causes of low-quality images and pro tips on how to avoid them.
-
Part 1: How to Make Low Quality Picture Look Better?
- Fix 1: Use 4DDiG File Repair to Make Bad Quality Photo Look BetterHOT
- Fix 2: Make Low Qualitu Pictures Look Better Via Photoshop
- Fix 3: Make A Low Quality Photos Look Better with Paint.net
- Fix 4: Improve Bad Quality Pictures Look Better by Croping It
- Fix 5: Convert Bad Quality Photos to Black or White to Make it Better
- Fix 6: Sharpen the Low Quality Photo to Make it Look Better
- Fix 7: Change Bad Quality Pictures Resolution to Make it Look Better
- Part 2: High Quality Photos VS Low Quality Photos
- Part 3: What Causes Low Quality Pictures?
- Bonus Tip: How To Avoid a Low Quality Picture?
Part 1: How to Make Low-Quality Pictures Look Better?
Making a low-quality picture look better tends to be an easy task if you know the right approach and methods to use. In this section of this article, we will walk you through seven easy ways on how to make low-quality pictures look better. Although some of these methods require the use of third-party software, they are all guaranteed to get rid of low-quality issues associated with images.
Fix 1: Use 4DDiG File Repair to Make Bad Quality Photo Look BetterHOT
4DDiG File Repair software is a third-party tool that’s capable of repairing and restoring damaged or corrupted photos and videos with just a click. It is also capable of:
- Restoring photos that are pixelated, overexposed, or blurry.
- Repairing damaged or corrupt photos of several formats such as jpeg, jpg, Cr2, arw, pef, nef, raw, orf, srw, raf, and crw.
- Repairing up to 3000 images at once.
- Undergoing batch repair in several formats.
- Repairing scratched old photos.
Follow the steps below to learn how to make a low-quality photo look better using the 4DDiG File Repair software.
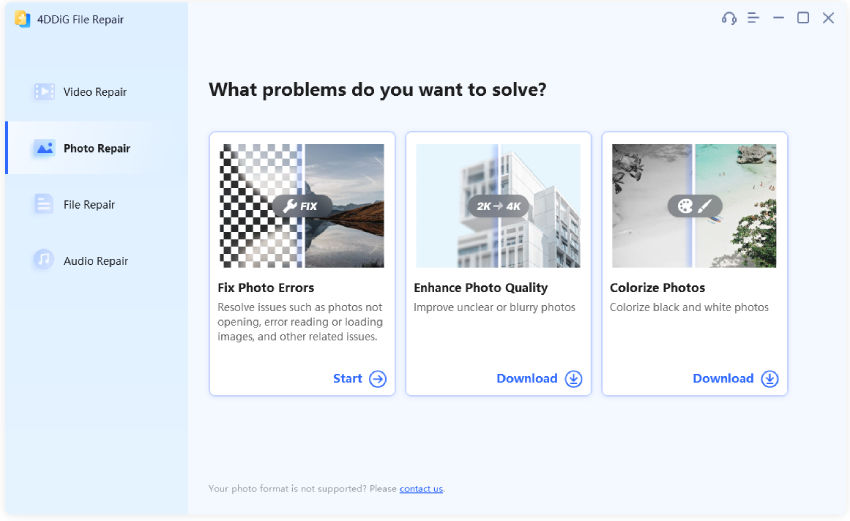
Click the button below to download and install the 4DDiG File Repair software. Next, launch it and then proceed by clicking the "Download" button under the "Enhance Photo Quality" option.
FREE DOWNLOADFor PC
Secure Download
FREE DOWNLOADFor MAC
Secure Download

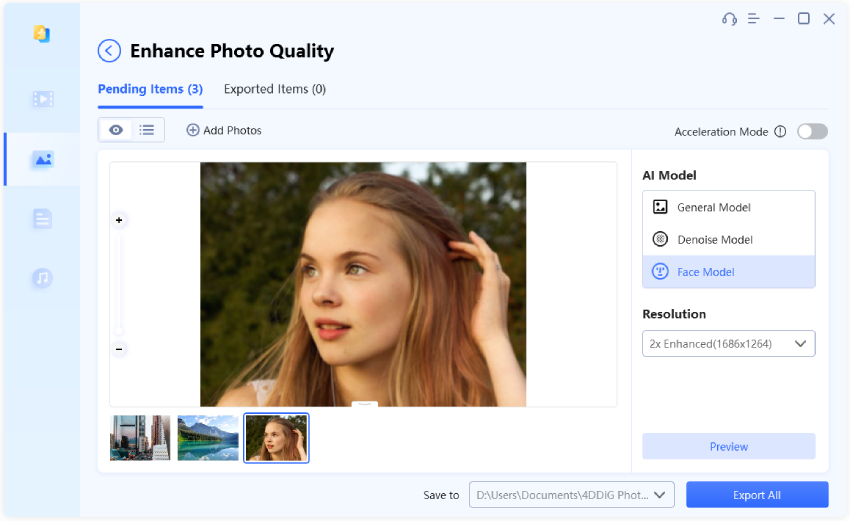
Select or drag your blurry, corrupted, or damaged photos to import them to the software, then select an AI model and adjust the resolution for a better quality.

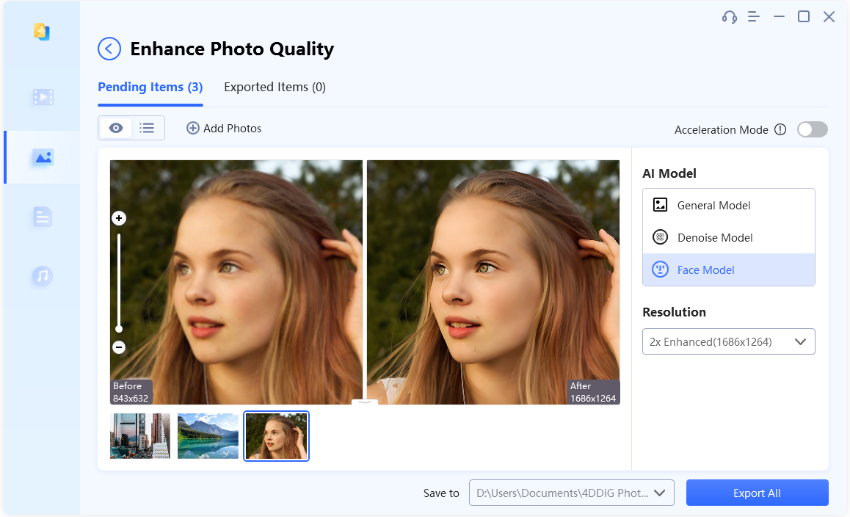
Click preview and 4DDiG Photo Repair will display both the original low-quality picture and the enhanced one. Check the improvements and click on "Export All" to save the image in a secure location.

Fix 2: Make Low-Quality Pictures Look Better Via Photoshop
Think of a tool that is quite good at improving almost every aspect of images, it would be Photoshop. In it, you will find a handful of utilities and options that allows a user to efficiently fix picture quality issues. Follow the steps seen below to learn how to make bad quality photos look better using Photoshop.
- Download, install, and launch Photoshop. Next, open the low-quality image you wish to fix and select the “Filter and Blur” option.
- Next, select “Gaussian Blur” and then attain a suitable range by adjusting the sliding bar.
- Proceed by clicking “OK” and then move on to the “Filter and Sharpen” option.
- Click on “Unsharp” and then adjust the slider bar until your desired result is produced. Proceed by clicking on “OK”.
- Save the image by navigating to File Tab and clicking on “Save”.
In a situation where this method does not suffice, you can try fixing the quality of your image by following the steps below.
- Open the Photoshop software on your computer, navigate to “File” and then click on “Open” to import your low-quality pictures to Photoshop.
- Create a new layer by right-clicking on the image and then selecting “Layer” from the drop-down menu.
- Navigate to “Blending Options” which can be seen at the top menu and then click on the “Soft Light” option.
- Navigate to “Filter and Noise” and then click “Despeckle” and set it to a level you deem suitable.
- Save the image after finding a suitable level of contrast and brightness.
Fix 3: Make Low-Quality Photos Look Better with Paint.net
Making use of paint.net to improve the quality of your images is an alternative method to using Photoshop. You can increase the quality of your images with this tool by following the steps below.
Step 1: Open paint.net and then import the desired image.
Step 2: Under the “Effects” tab, select the “Blur” option and the “Gaussian blur”.
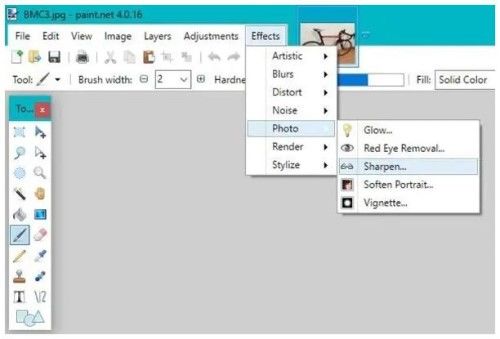
Step 3: Reduce the pixelation by adjusting the slide bar.
Step 4: Next, under the “Effects” tab, navigate to “Photo” and then select “Sharpen”.
Make use of the slide bar to achieve a suitable level and then save the image afterward.
Fix 4: Improve Bad Quality Pictures Look Better by Cropping It
Sometimes, all that’s needed to transform a poor-quality picture into a better-looking one is to crop it. The image could look even better when distracting elements around the edges or background are removed. There are lots of software a user can use to crop images, below are a few of them.
Pixlr: This is a free tool and an alternative to Photoshop.
Photoshop: Unlike Pixlr, this tool is priced at a reasonable amount. However, it is considered the best option and the most recognized around the world.
PicMonkey: This is also a free tool with all the photo editing options you could ever need.
Fix 5: Convert Bad Quality Photos to Black or White to Make them Better
This may not sound like an ideal option but it could be just what you need, especially if the image in question has clashing patterns and colors, and seems too busy. By eliminating distracting colors, the subject in the image automatically stands out in stark contrast. To do this, all you’ll need is your usual photo editing software.
Fix 6: Sharpen the Low-Quality Photo to Make it Look Better
As easy as it seems, this is quite an effective way of making low-quality photos look better, especially with very detailed images. Because this is a very powerful image effect, it must be used judiciously because too much of it will make your photo look unnatural. The saying “less is more” works perfectly well with this picture effect.
Fix 7: Change Bad Quality Pictures Resolution to Make it Look Better
For this fix, we will be using Adobe Photoshop software as it presents the resolution information of an image to the user, and is also capable of altering the resolution. Changing the resolution of an image is usually done for printing purposes, this is because the quality of the output entirely depends on the resolution. Follow the steps below to learn how to make a low-quality image look better by changing its resolution.
Step 1: If you already have Photoshop installed on your computer, navigate to and click on “File” and then click on “Open” to select the low-quality image.
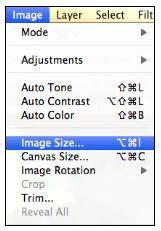
Step 2: Select “Image Size” after clicking on the “Image” tab.
Step 3: On the Image Size dialogue box, alter only the resolution and then uncheck the box next to “Resample Image”.
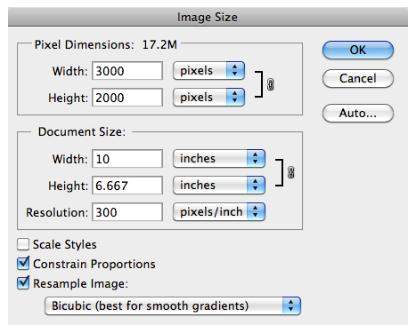
Step 4: Key in your desired resolution into the “Resolution” field. Expect to see the values of the image height and width change.
Step 5: Review the settings and then click on “OK” to accept the changes.
Part 2: High-Quality Photos VS Low-Quality Photos
What determines a low or high-quality image is the resolution. The quality of an image can be perceived as the measure of its excellence and the representation of its sharpness. Typically, the methods by which the quality of an image can be accessed are subjectively and objectively. With subjective methods, the superiority and quality of an image are the focus of a viewer’s evaluation. Whereas the standards through which the image can be accessed by the viewer are defined by objective methods.
Image Resolution/Image Quality: What Is It?
The collective number of pixels a digital image contains is known as the resolution. This can be determined by the number of pixels on an image’ height and width. This is a perfect example – an image can be 1105 X 552, which implies that it is 1105 pixels wide and 552 pixels high. Changing the height and width of an image is simply changing its resolution. And if the image resolution is high, so is the quality.
Low Resolution/Low-Quality Image: What Is It?
Digital images in the range of 72dpi to 150dpi are considered to be of low quality. Their color settings are RGB. Although images of low resolution tend to look good on screen, they become blurry when printed out.
How can I tell what resolution my picture is?
To determine the resolution of your image on Windows, navigate to the image file and then place your cursor on it – the details of the image will automatically pop up which includes the resolution. You can also view the resolution of an image when viewing the image properties. For Mac users, under the image name is where you can find its resolution.
Part 3: What is the Cause of Low-Quality Pictures?
Knowing the cause of a problem contributes greatly to the success rate when fixing that problem. And that is why in this section, we will go through the common causes of low-quality pictures. Although they are several causes, below are just a few of them.
Resizing an image: This is one of the most common causes of low-quality images and that is why it is number one on this list. Not properly resizing an image can cause pixelation. For example, enlarging smaller images will make them blurry, resulting in a reduction in their quality.
The lack of focus when taking shots: When the lens of a camera is not focused on the object when taking a shot, there’s a high chance of the outcome being pixelated and blurry.
Possible camera errors: Check to see that the lens you are using is in order and not damaged. A damaged device lens can negatively impact the quality of images.
Possible incompatibility problems: When the application you are using to view the image does not support its file format, there’s a possibility you might experience low-quality problems, which may result in blurriness or pixelation.
Unstable camera: Taking shots with a shaky camera can result in blurry images. Stabilizing your device when taking shots will help in fixing the quality of your picture.
Bonus Tip: How to Avoid a Low-Quality Picture
There are certain precautionary measures a user can adopt to avoid low-quality pictures. Below you will find the best of them. These tips are guaranteed to greatly improve the quality of your pictures.
- To increase your chances of taking better-quality pictures, you’d want to keep your ISO to a minimum. Having a high ISO can result in pixelated and grainy images.
- When it comes to taking pictures, lighting plays an important role. To maximize your chances of taking high-quality images, perfect your lighting.
- Stabilize your camera by either making use of a monopod or tripod.
- It is a good idea to always take pictures in RAW format. This way, your images will remain intact even after editing and compressing.
- It is advisable to edit and fix some areas of your images such as exposure and sharpness after taking them. This will only make them look better.
Bottom Line
Being in a digital age, the desire for perfect-looking and high-quality pictures is understandable, and that is why having low-quality pictures seems like a letdown. Hence the need to learn how to make bad quality pictures look better. The above-listed ways a user can avoid, or get rid of low-quality pictures are effective and are guaranteed to lift your spirit. However, it is important to note that one of the most effective ways of fixing a blurry, damaged, or corrupt picture is with the use of third-party software like 4DDiG File Repair software.
 ChatGPT
 Perplexity
 Google AI Mode
 Grok
Grok

