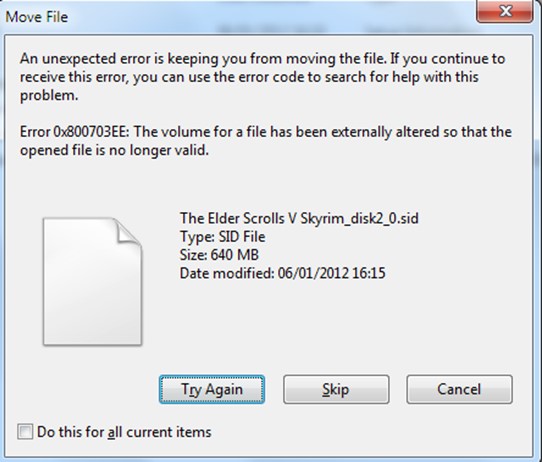
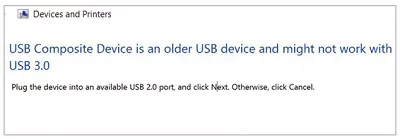
How to Format Write Protected USB?

5 mins read

Updated on 2024-05-15 12:05:00 to Windows Fix

Are you trying to format your USB flash drive but can’t do that as “Disk is write protected”? Formatting is an easy way to change a file system on your USB flash. It helps fix many issues, remove malware viruses, and remove the data stored on it.

However, getting an error “disk is write” can be a frustrating experience, as it should take no more than a minute to process and execute this task. This guide will show 4 effective ways to format write-protected USB flash drives. Let’s start with how to format write protected USB.

how to format write protected usb

Part 1: Why Can't I Format Write Protected USB Flash?

If you’re getting an error disk write is protected while the USB flashing drive, it means the write protection is on your USB. When the write protection is turned on your USB or memory card, you can’t modify the data written on.

The write protection on the USB pen drive helps protect the data from accidental deletion or protects the data from unauthorized persons. With the write protection on, you can’t edit, add, delete, or format the USB. Instead, you can only read the stored data.

In order to format the USB flash drive with the write protection turned on, you’ll need to remove the write protection first. Move to the next section to learn how to format a write-protected USB.

Part 2: How to Format Write Protected USB?

Whether you’ve intentionally turned on the software, write protection on your USB, or accidentally, the following solutions will help you learn how to format a write protected USB.

Way 1: Use 4DDiG Partition Manager to Format Write Protected USB

The best and most effective way to remove the partition from the write protect USB is by using the tool 4DDiG Partition Manager . This tool helps you format your USB or any other memory device with write protection turned on.

The best thing is its friendly and straightforward user interface that lets you format the write protected USB with a one-click process. No need to follow lengthy steps and write commands. Here’s how to format write protected USB using 4DDiG Partition Manager.

FREE DOWNLOAD

Secure Download

  • Launch 4DDiG Partition Manager on your computer, and insert the USB with write protection turned on. Select the Partition Manager option, and hit on the Format option.

    format partition
  • On the next screen, choose the file system, label, volume, etc, for your USB drive.

     format volume label
  • Wait for the formatting process to be complete. Once done, you can take out the USB and use it anywhere without the error.

    format wait

Way 2: Format Write Protected USB via Diskpart

Diskpart is a great Windows tool that lets you manipulate the attributes of the USB with write protection turned on to help reformat it. You can access the Diskpart using the CMD and type the following commands to format Format write protected USB.

  • Connect the write protected USB drive to the computer, and navigate to the Start Menu. Search CMD and run it as an administrator.
  • Type the following commands in the command line interface:

    • List Disk: Enter this command to display all the drives internally and externally connected to the computer. This will also show your write-protected USB, identify and note down its number.
    • Select Disk X: Replace the X letter in this command with the number of USB drives in your computer list. This command will select the USB-protected drive to manipulate its attributes.
    • Disc characteristics clear readonly: Enter this command, and it’ll format your USB and will remove the write protection on it.
  • Once you’re done formatting your USB drive, type close Diskpart, and that’s it.

    use diskpart

Way 3: Format Write Protected USB via Windows Explorer

Sometimes, the USB isn’t locked or write-protected. Instead, it’s selected as read-only from the settings. You can change this setting anytime from Windows Explorer and remove the write protection restrictions to modify the USB.

Here are the steps for how to format write protected USB via Windows Explorer:

  • Connect your USB with write protection to the computer.
  • Go to the My PC, right-click on a USB drive, and select the Property option.
  • Select the General tab from the top, and uncheck the “Read Only” box next to the Attributes.
  • Hit on the OK button to save changes, and that’s it.

    use windows explorer

After removing the Read-only restriction from your USB, you can access it directly. However, if you’re still unable to access it or perform modifications, you need to format it first and then see if it's recognized.

Way 4: Run Disk Management to Format Write Protected USB

If formatting the write protection USB via Windows Explorer didn’t work in your case, there’s another solution that you can try. Disk Management is also a great Windows tool for managing system disks. Using disk management, you can also format your write-protected USB. Below are the steps for how to format write protected USB.

  • Insert the USB with a write protection to the USB slot on the computer.
  • Hover the cursor over the Start Menu, right-click on it, and select the Disk Management option. It’ll open a window showing connected drives.

    use disk management
  • Locate the USB drive, right-click, and choose the Format option.

    click to format
  • In the next pop-up window, enter the name of the USB drive in the Volume Label and select the file system. Choose the FAT32 file system, as it’s universal and works with most devices.

    volume label
  • Once done, click the OK button to proceed with the formatting process.

Way 5: Check for Write Protection

There are two main ways to turn on write protection on the USB drive: hardware and software. In the above solution, we discussed how to format the USB with software write protection. However, if you’re still unable to format it, there might be a physical switch. On some USB flash drives, the physical switches can be used to turn on & off the write protection.

If the write protection switch is turned on, you won’t be able to format it. Inspect your USB closely, find the write protection switch, and turn off it. Try formatting the USB flash drive after turning off the physical switch on the USB and see if it works.

Part 3: FAQ

Here are the answers to the most frequently asked questions by users facing formatting issues with write-protected USBs.

Q 1: What Is Write Protected USB?

Write Protected USB is a hardware and software feature that prevents the user from modifying the data on the USB. With the write protection on, the user can only perform the read-only task and can’t delete, modify, or alter the data.

Q 2: How do I format a USB that can not be detected?

You can format a USB that can’t be detected in various ways. The simplest and straightforward way is to use 4DDiG Partition Manager and do reformatting. This will create a new file system on the USB that’ll fix the issue of not getting detected.

Q 3: How do I force a USB drive to Format using CMD?

Diskpart command can format the USB using the CMD (command line interface). You’ll need to enter three to four commands in the cmd, and it’ll format the USB drive even with the write protection.

Conclusion

Write Protection is a great way to prevent your important data from being deleted or altered from the USB drive. However, formatting is a way to eliminate it if you've accidentally done this. In this guide, we discussed how to format USB which is write protected. 4DDiG Partition Manager is a simple way to format your write protected USB with a one-click solution. It doesn’t save time and prevents you from using lengthy, complex methods to format it.

William Bollson (senior editor)

William Bollson, the editor-in-chief of 4DDiG, devotes to providing the best solutions for Windows and Mac related issues, including data recovery, repair, error fixes.

(Click to rate this post)

You rated 4.5 ( participated)