Wsappx High CPU? 6 Proven Fixes for Windows 10/11 (Step-by-Step Guide)
If your Windows 10 or 11 PC is running slow, Wsappx might be the problem. Wsappx is a system process that manages Microsoft Store apps and updates. However, it sometimes consumes too much CPU and memory, causing performance issues. This is common on older computers or systems with low resources.
The good news is that there are simple fixes to reduce Wsappx resource usage like disabling unnecessary services and adjusting system settings. Let's check out 6 ways to fix Wsappx high CPU and memory usage.

Part 1: What Is Wsappx?
➤ Definition of Wsappx
So many people ask "what is Wsappx on my PC?" Actually, it is a background process related to the Windows Store and Universal Windows Platform (UWP) apps. It manages app installations, updates and removals from the Microsoft Store. Although it's a necessary part of Windows, it can sometimes use too many resources causing system slowdowns.
➤ Component of Wsappx
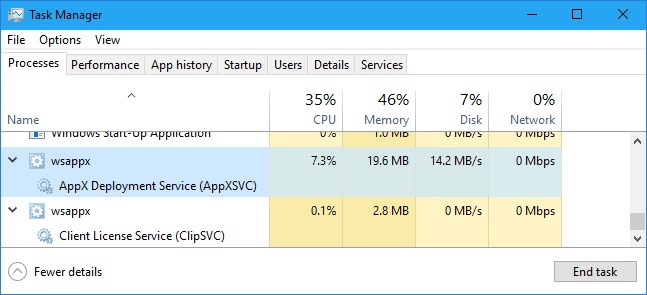
Wsappx consists of two main services in Windows 10: AppXSVC and ClipSVC.
- AppX Deployment Service (AppXSVC): Handle app installations, updates, and removals from the Microsoft Store.
- Client License Service (ClipSVC): Handle licensing and digital rights management for Store apps.
In Windows 8, another service called WSService (Windows Store Service) replaces ClipSVC. All these services run under WSappx and are required to manage store apps. Since WSappx manages app-related tasks, it will run automatically whenever you install, update, or remove apps from the Microsoft Store.
Part 2. Why Is Wsappx Using So Much CPU/Memory?
Wsappx can sometimes cause high CPU and memory usage, making your PC slow. Here are the main reasons why:
- Microsoft Store Activity: Wsappx becomes active whenever you download, install, or update apps from the Microsoft Store. If updates are running in the background, it can use a lot of CPU and disk space.
- Background App Updates: Windows automatically updates Store apps in the background. This process uses CPU and disk space, which can cause slow performance.
- App Installation and Removal: If you install or uninstall multiple apps, Wsappx will work harder to manage these changes, hence higher resource usage.
- Licensing and Security Checks: ClipSVC ensures Store apps have valid licenses. If this process runs continuously, it might cause high memory usage, especially if an app has licensing issues.
- Potential Malware or System Corruption: Though Wsappx is a legitimate Windows process, malware can disguise itself under similar names. If Wsappx is consuming extremely high resources all the time, it's worth scanning your system for viruses.
- Windows System Updates: Windows updates sometimes trigger Wsappx to run as part of system maintenance and cause temporary high CPU usage. Please view how to check CPU usage.
Part 3: How to Diagnose Wsappx Service High CPU Usage
If your PC feels sluggish and Task Manager shows Wsappx consuming unusually high CPU, it's time to diagnose the issue. Wsappx is a Windows service managing Microsoft Store apps and UWP applications. While it's necessary, its heavy resource use can sometimes indicate underlying issues like pending updates or background tasks.
😀 Steps to Diagnose Wsappx High CPU Usage
-
Press Ctrl + Shift + Esc to open the Task Manager.
-
In the "Processes" tab, find Wsappx and check its CPU usage.
-
Right-click Wsappx, select "Go to Details" and check for AppXSVC (app installations) or ClipSVC (app licensing), which might be causing high usage.
-
Go to the "Performance" tab to see if CPU, disk or memory usage is too high.
-
Open "Resource Monitor" to track Wsappx's resource consumption in real time.

Part 4: How to Fix Wsappx High CPU on Windows 11/10
If you're experiencing high CPU or memory usage due to Wsappx, you're not alone. This system process manages Windows Store and Universal Windows Platform (UWP) app installations but sometimes consumes too many resources. Here are 6 proven ways to fix Wsappx high CPU or RAM usage.
Way 1: Reinstall Windows Store in PowerShell
Reinstalling the Windows Store can resolve issues where corrupt or outdated app packages cause Wsappx to work overtime. This approach, suggested by Phillip_KKLTD on the Microsoft Answers forum, refreshes the core components involved in app deployment.
-
The following command fetched the package name and full package identifier:
Get-AppxPackage WindowsStore | Select Name, PackageFullName -
Using the PackageFullName from step one, the Store app was removed:
Remove-AppxPackage -Package Microsoft.WindowsStore_12010.1001.2.0_x64__8wekyb3d8bbwe -
System reboot.
-
With the Name from step one, the Store app was restored using
Files\WindowsApps\Microsoft.WindowsStore\AppxManifest.xml" -DisableDevelopmentMode -
Another reboot to check if it fix the Wsappx process high CPU usage.

Way 2: Check and Repair Disk Partition Errors Using 4DDiG Partition Manager
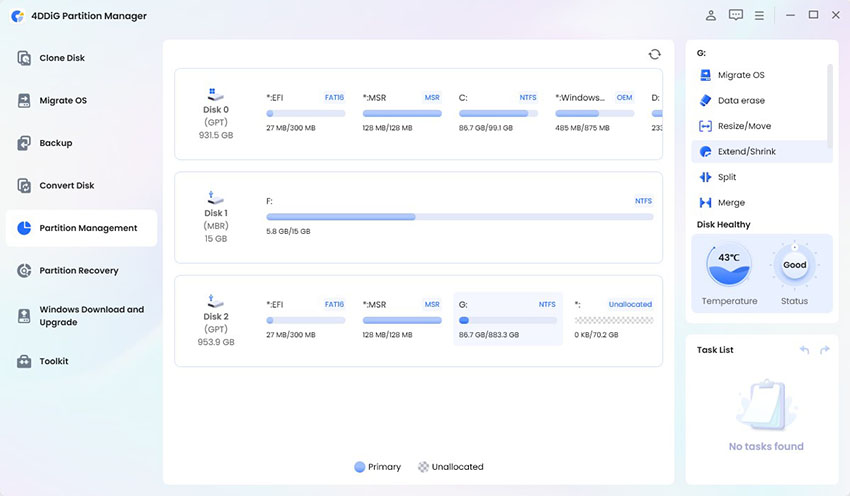
Sometimes, underlying disk partition issues make system services like Wsappx work harder. One possible reason for this issue is disk partition errors. You can use a reliable tool like 4DDiG Partition Manager to fix these errors. 4DDiG Partition Manager is an all-in-one disk management tool to help users maintain their disk health and performance.
What Can 4DDiG Partition Manager Do:
- Check disk health to identify errors affecting system performance.
- Repair disk partitions that may be causing high CPU usage.
- Can resize, split, merge, extend, shrink, create, move, and delete partitions.
- Clone disks for easy data migration and backup.
- Able to erase data and wipe disk to free up space
- Support formatting hard drives like SD card, HDD, USB, etc. to FAT32, exFAT, NTFS, and more file system formats.
- Repair boot errors to optimize computer and software performance
- Create a bootable WinPE media without Media Creation Tool easily.
- Help detect and download Windows ISO for upgrade to the latest OS, such as Windows 11 version 25h2
Steps to Repair Disk with 4DDiG Partition Manager:
-
Download, install, and launch 4DDiG Partition Manager. If the partition is on an external drive, connect it to your computer. Head to "Partition Management", select your disks, and click om the "Disk Healthy" section on the right panel to check the disk status on your PC.

-
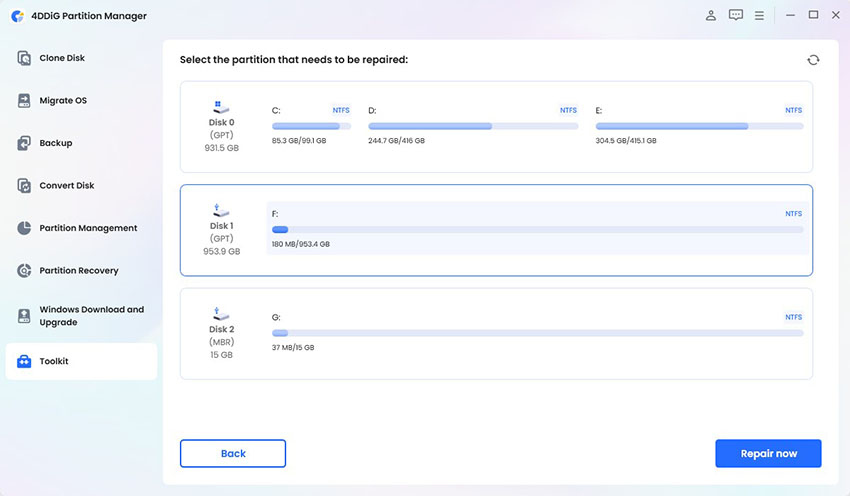
Go to "Toolkit" in the left panel and select "Repair Partition(s)".

-
Choose the disk where Wsappx is located and click "Repair Now".

-
Wait for the repair process to complete, then click "Finish". Restart your computer to apply changes and check if this method help resolve the Wsappx high CPU and RAM usage.

Way 3: Disable Antimalware Service Executable (Use with Caution!)
The Antimalware Service Executable (part of Windows Defender) may sometimes conflict with other services, causing high CPU usage.
Disabling this service exposes your computer to threats. Only do this if you're using an alternative security solution and understand the risks.
-
Press Win + R, enter regedit, and press Enter.
-
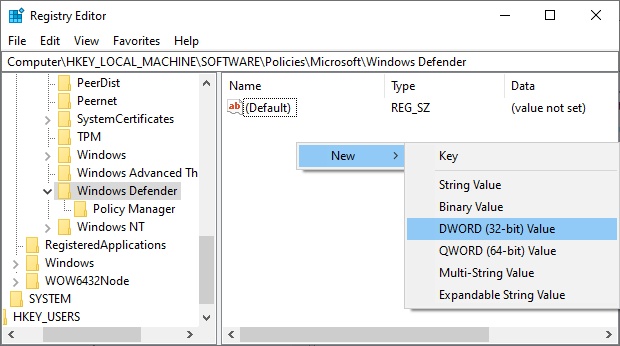
Go to: HKEY_LOCAL_MACHINE\SOFTWARE\Policies\Microsoft\Windows Defender
-
Right-click on the right pane, select "New" > "DWORD (32-bit) Value" and name it "DisableAntiSpyware".
-
Double-click "DisableAntiSpyware", set its value to 1, and click "OK".

Restart your system so the changes take effect.
How to Fix Antimalware Service Executable High Memory and CPU Usage?
Way 4: Stop Superfetch (Service Host: SysMain)
The SysMain service (formerly known as Superfetch) helps improve system performance by preloading frequently used apps. However, it can sometimes interfere with other services, including Wsappx. Chandy (MSFT) on Microsoft Answers recommends this method to alleviate CPU spikes.
-
Press Win + R to open the Run dialog box.
-
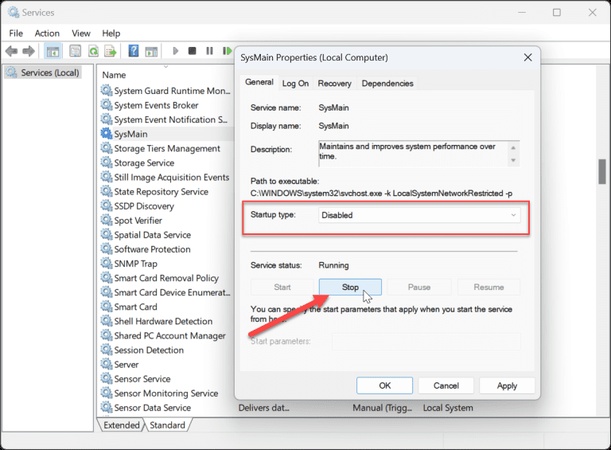
Type services.msc and click "OK" to open the Services console.
-
In the Services window, locate "SysMain" by scrolling down.
-
Double-click "SysMain", then click "Stop" to halt the service.
-
Set the Startup type to "Disabled" using the dropdown menu.
-
Click "Apply", then "OK" to confirm your changes and close the window.

Way 5: Disable Automatic Store App Updates
Automatic updates from the Microsoft Store can trigger Wsappx activity as it checks, downloads, and installs updates in the background. Disabling auto-updates can help keep resource usage steady.
-
Open the Microsoft Store. Select your Profile icon located in the top-right corner.
-
Select "App settings" from the menu.

-
Locate the "App updates" option with the "Update apps automatically" tab and toggle the switch to "Off".
-
Restart your computer and check CPU usage.
Way 6: Check for Malware
While Wsappx is a legitimate process, persistent high resource usage could sometimes be the result of malware masquerading as a system process. Running a full system scan can rule out any infections.
-
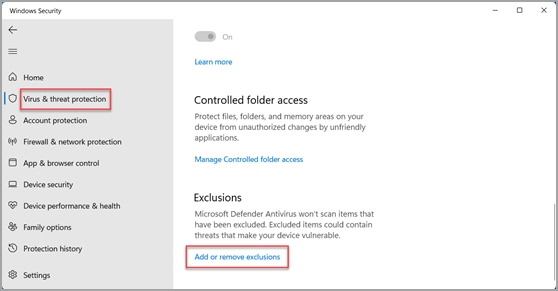
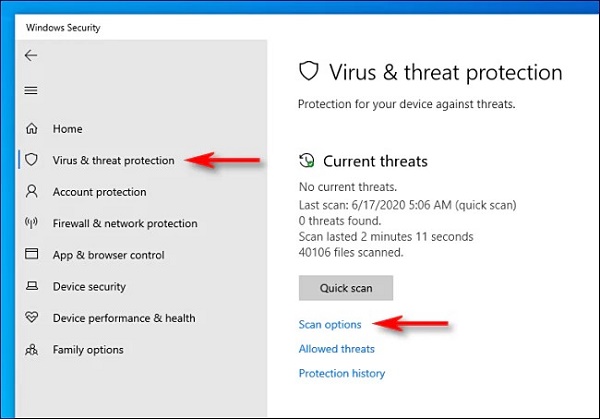
Open Windows Security.
-
Select "Virus & Threat Protection", then select "Scan Options".

-
Choose "Full Scan" and click "Scan Now".
-
If malware is detected, follow the removal instructions and restart your system.
Part 5: People Also Ask About Wsappx High CPU Usage
Q1: What does Wsappx appx deployment service high CPU mean?
Wsappx high CPU usage occurs when the AppX Deployment Service (AppXSVC) manages app installations, updates, or removals in Windows. This process can lead to wsappx process high CPU and Wsappx high disk usage during operations.
Q2: What is Wsappx and do I need it?
Yes, you do need it for Windows to properly install and update Store apps. In short, wsappx is a Windows system process that manages Microsoft Store app installations, updates, and licensing services.
Q3: Is Wsappx a virus? Is it safe to use Wsappx?
No. Wsappx is not a virus and it is safe to use. It is a legitimate Windows system process responsible for Microsoft Store app installation, updates, and licensing services. While Wsappx may sometimes cause high CPU usage, this behavior is usually related to background app updates rather than malware or security threats.
Q4: Is it OK to disable Wsappx?
Disabling Wsappx is not recommended, as it manages app installations and updates. However, limiting background app activity can help reduce Wsappx service's high CPU and wsappx's high memory usage.
Q5: How to fix high CPU usage?
Try disabling background apps, updating drivers, repairing the disk with 4DDiG Partition Manager, and scanning for malware.
Q6: Why is my CPU 100% usage?
Several reasons can cause high CPU usage like background apps, malware, hardware issues or inefficient system processes like Wsappx.
Conclusion
Wsappx high CPU can slow down your PC, but the above solutions can fix the issue. If the problem is due to disk errors, 4DDiG Partition Manager is the best solution to scan, repair and optimize your storage. By managing background processes and keeping your system clean, you can ensure smooth performance and avoid high CPU/memory usage.
Secure Download
💡 Summarize with AI:
You May Also Like
- Home >>
- Windows Fix >>
- Wsappx High CPU? 6 Proven Fixes for Windows 10/11 (Step-by-Step Guide)




 ChatGPT
 Perplexity
 Google AI Mode
 Grok
Grok

