How to Take High Resolution Screenshots on Windows 11/10 as a Pro
When we need to capture a high quality screenshot, there are a few basic tools that we want to have with us. To achieve clarity and sharpness, however, this can be difficult with compression or are set incorrectly. Have you been searching for a way to take a high-resolution screenshot in Windows 11/10?
This article will explain six different ways to take a Windows 11/10 screenshot, as well as some tips to improve your screenshot resolution with advanced tools.
Part 1. What Common Factors Affect Screenshot Quality?
The quality of screenshots can be impacted by several factors including the following:
- Screenshots from low-resolution displays are less detailed.
- If you save screenshots in compressed formats such as JPEG, the quality of that image may be lost.
- The images are compressed during the capture process using some tools.
- When taken on scaled displays, occasionally screenshots can appear blurred.
- Resize or edit too much and the quality will degrade.
- Often screenshot tools can have bugs in them that distort images.
Knowing these factors can give you some ground to walk to change the screenshot quality.
Part 2. How to Take High-Quality Screenshots on Windows 10/11
1. Take 4K Screenshots on Windows Using Developer Tool's Capture Screenshot [Recommend]
The method employs developer tools to take ultra-high-resolution screenshots from the YouTube content or other platforms. Below is a step-by-step guide that you will need to follow for this method to work. Here, we like to take getting screenshots from YouTube as a case.
How to Take a High Resolution Screenshot from a YouTube Video
-
Open a YouTube video on your Chrome, Edge, or Firefox browser.
-
Right-click on the webpage and select “Inspect” to bring up Developer Tools.
-
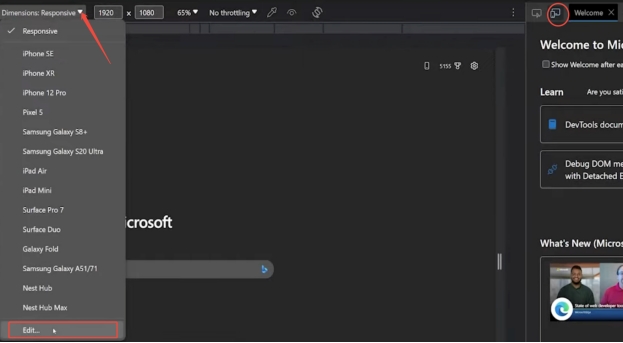
Now, you need to click the “Toggle Device Emulation” button at the upper right.
-
A new toolbar at the top will appear where you need to click “Dimensions Responsive”. Select “Edit” from the drop-down menu.

-
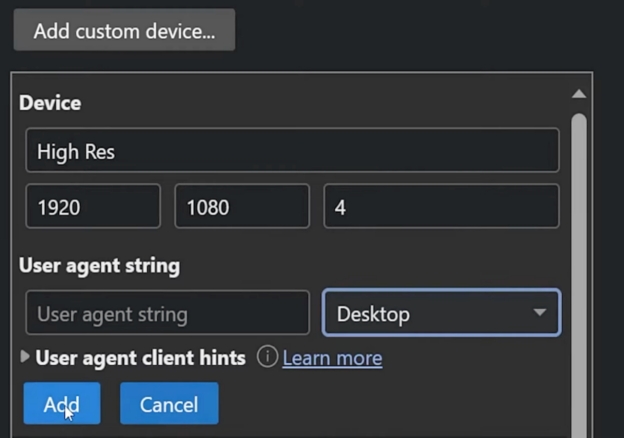
Here you need to write any name of your choice, such as “High Res” and set the resolution to “1920 x 1080” and the “Device Pixel Ratio” to 4. Select “Desktop” from the device dropdown and finish by clicking “Add”.

-
Once added, go back to a new tab, click "Dimensions Responsiveness" again and select the device that you just created.
-
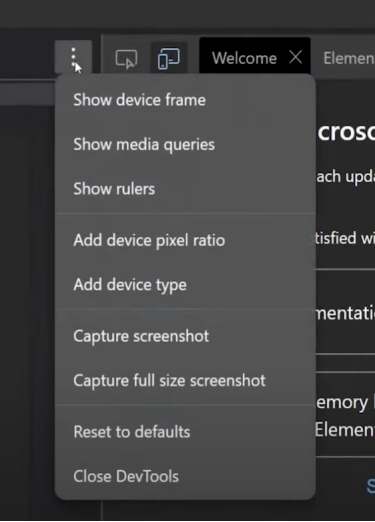
Now, and from the "3-dots" button on the top toolbar and select “Capture Screenshot” to take crystal clear screenshots.

It has the best result and resolution of photos. However, the whole setup and screenshot-capturing process is complex. It also takes screenshots of whole window contents.
2. Use Snipping Tool
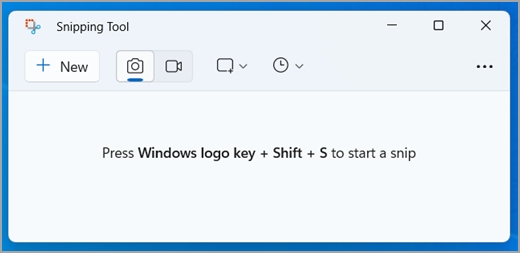
Windows has a built-in tool called the Snipping Tool, which lets you capture a screenshot, and save it in a customizable size. Here is how you can use this useful built-in utility on your computer:
-
Press “Win + R” and type “Snipping Tool” or Snip & Sketch and hit Enter.
-
Select the which snip type that you want; (Free-Form, Rectangular, Window, or Full-screen).
-
Save your screenshot with better quality with it being a PNG file instead of a JPG.

It doesn’t support advanced edits or automation for multiple captures, nor does it have an editor.
3. Use Snip & Sketch
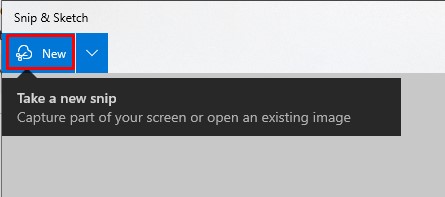
Snip & Sketch is a new, better version of the Snipping Tool that has better editing options and runs faster. Using it is very simple and easy and here is how it works,
-
To open Snip & Sketch, press Win + Shift + S. Choose a type and take a screenshot.
-
Once you've saved the image you like, use the in-app editing tools to make changes and then save.

Not even close to a professional-grade screenshot tool for advanced needs.
4. Use Print Screen Key
A simple, quick way to capture your whole screen in a high resolution screenshot is with the Print Screen (PrtScn) key. Below is the right way to use it,
To capture the whole screen press PrtScn.
-
Paste the screenshot by clicking on Ctrl + V in an image editor like Paint. Save your file as a PNG for more clarity.
This method captures a high quality screenshot of everything that lies on the screen and may need to be cropped and edited for specific reasons.
5. Keep Screenshot as PNG over JPG
In the end, the file format you choose impacts the quality of the screenshot. PNG files are lossless and offer greater detail for that. So, it is always a better choice to save your screenshots in PNG instead of JPG format. However, if you have already taken a screenshot and saved it in JPG format, you can convert it to PNG with the following steps:
Open the screenshot in any online or offline editing app.
Click “Save As” and select “PNG”
PNGs take up more space in storage.
6. Change Windows Display Settings
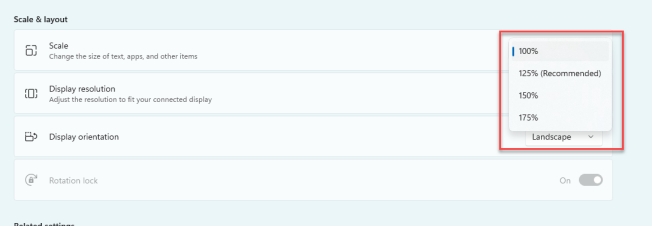
Another method to take high quality screenshots is by increasing the display scale. This method renders the image in better quality and bigger size. So, you do not need to capture and then zoom just to see distortion. Here is all you need to do to change the display settings:
Open your PC settings and go to "Display".
-
Now, scroll down to "Scale" and pick a high-scale option than the recommended one.
-
Take a screenshot and put the scale back to normal for efficiently using your computer.

Every time you need a screenshot, you will need to change display settings twice. Moreover, high upscaling may crop out some important content due to application incompatibility.
Part 3. How to Fix Blurry or Corrupted Screenshots with AI Tool
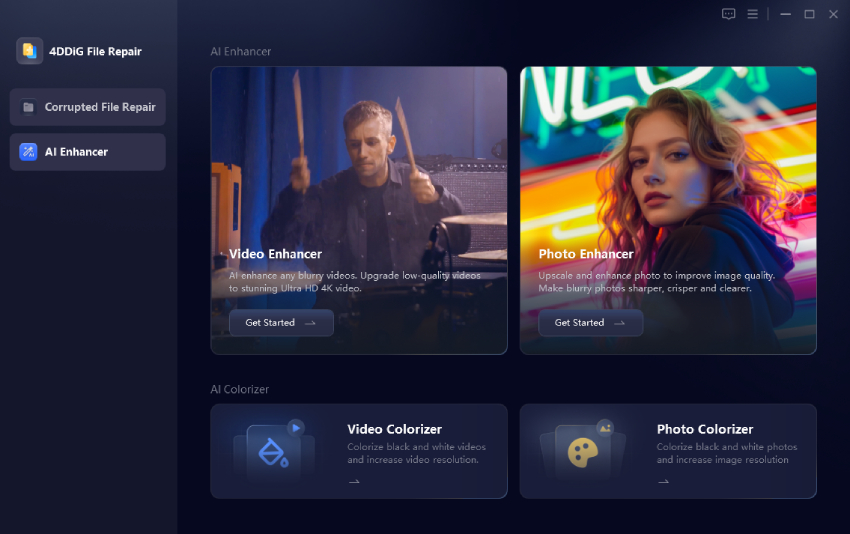
You can still get very blurry or very pixelated screenshots even with the best methods. In situations like this, 4DDiG AI Photo Enhancer is all you need. It is a professional upscaling tool that serves to enhance photo or live photo like GIF to 4K resolution (up to 8K) with high success rates.
Here are 4 AI models in this software: General, Face, Denoise, and Colorize. Specifically, its advanced AI technology help you sharpen fuzzy screenshots to improve clarity and can remove grain or noise from photos with the Denoise Model. Besides, it can retouch face photos such as portraits with the Face model and add color to black-and-white photos with Colorize Model. The General Model is suitable for any kinds of images.
Secure Download
Secure Download
Step-by-Step Guide to Fix Blurry Screenshots
Here is how you can use it to fix your images:
-
Launch 4DDiG File Repair on your PC. Tap “AI Enhance” and then go to “Photo Enhancer”

-
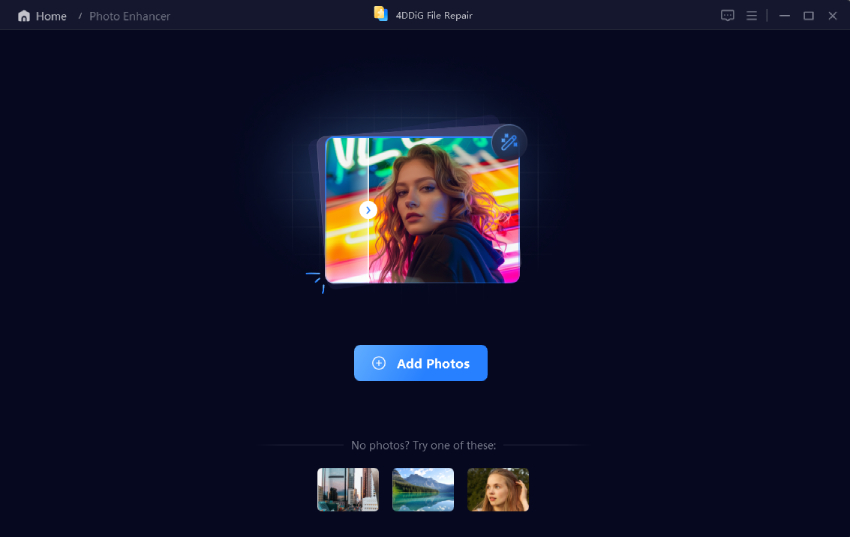
Click “Add Photos” and select the blurry screenshots you need to enhance quality.

-
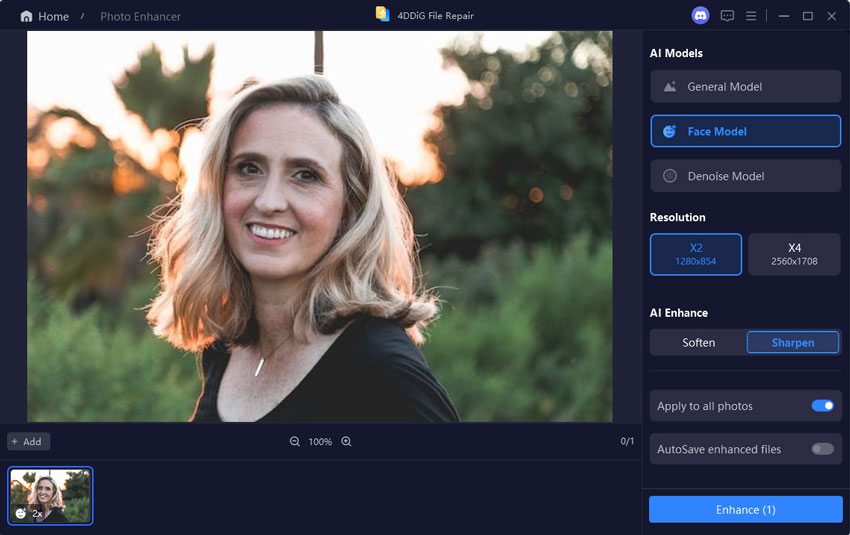
Select your desired “AI Model” and “Resolution” (X4 is encouraged) then click “Enhance” to get higher quality screenshots.

-
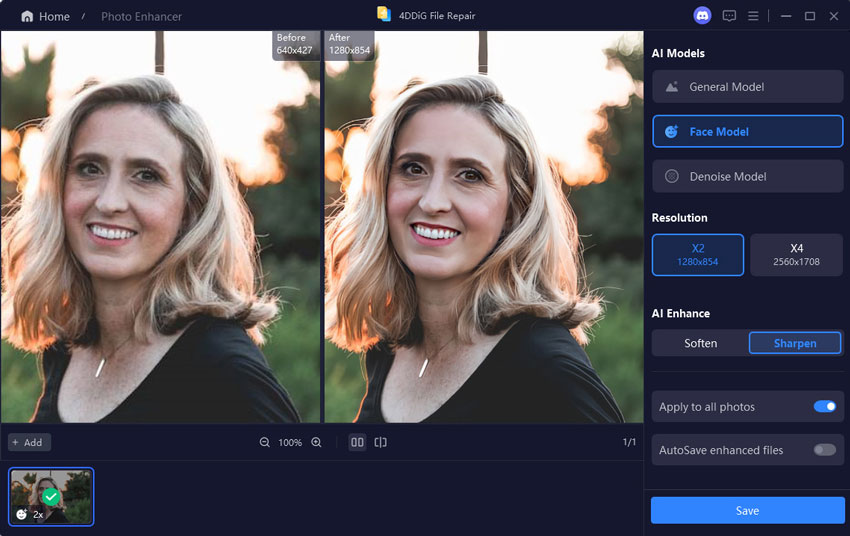
Once enhanced, you can save screenshot by clicking “Save”.

How to Make High Quality Valorant Thumbnail | Step-by-Step Guide
Part 4. People Also Ask about High Quality Screenshot
Q1: How to get high-quality Sims 2 Family Screenshots?
Change the game resolution to maximum and take screenshots using Snip & Sketch, or an external utility.
Q2: How do I take high quality screenshots on my iPhone or Android?
On iPhone, press + Volume with the power button; on Android, Press - Volume with the power button for high quality screenshots.
Q3: Why is my screenshot low quality?
Because screen resolution is low, scaling problems, or saving in a compressed format (JPEG) can all decrease the quality.
Q4: Which screenshot meets our quality standards?
High-resolution screenshots (with resolution enough to print out), saved as PNG files, meet professional quality standards.
Q5: Do you know any high-resolution screenshot Chrome extensions?
GoFullPage can take full-page resolution screenshots in Chrome.
Q6: How to take high resolution screenshots on Mac?
To capture a high-resolution screenshot, hit Shift + Command + 5.
✅ You May Also Like: Best 10 Image Downloader Extensions on Chrome for Photo Saving
Conclusion
To take a high quality screenshot one needs good tools, good settings, as well as good formats. Snip & Sketch, developer tools for 4K captures, and saving images as PNG will make your screenshots sharp and detailed. 4DDiG AI Photo Enhancer is great for polishing up blurry or corrupted images and your ability to improve the resolution up to 8K, makes it a crucial tool for both professionals and day-to-day users.
Secure Download
Secure Download
💡 Summarize with AI:
You May Also Like
- Home >>
- Photo Tips >>
- How to Take High Resolution Screenshots on Windows 11/10 as a Pro
 ChatGPT
 Perplexity
 Google AI Mode
 Grok
Grok

