How to Post High Quality Photos on Instagram 2026
In today's world where everything is a visual world, it is essential to post high quality photos to make you stand out. However, because of Instagram’s compression algorithms, users tend to have blurred or pixelated images. Don’t know how to post high resolution photos on Instagram? Read on, this guide will show you how to keep your uploads sharp and vivid on Instagram in 2025. We will consider the causes of quality loss and how they can be resolved effectively.
Part 1. Why Does Instagram Ruin Photo Quality?
Why does Instagram lower picture quality? In fact, Instagram compresses its files aggressively to keep them running quickly and efficiently. The downside is that this process often means photos are resized and reformatted, not quite bringing the same quality as the originals. Although beneficial for platform performance, it can be frustrating to users trying to highlight their work in high resolution.
Here are the typical problems users encounter when uploading photos to Instagram:
- During compression, fine details and textures usually get blurred.
- The colors of your photos may change when Instagram processes them.
- Pixelation results from low-resolution images due to improper resizing.
- Aspect ratios may be incorrect which may cause unwanted cropping or distortion.
- Upload quality varies, depending on what device and operating system are used.
The first step in preventing Instagram from killing your photo quality is understanding these issues.
Best Easy 2 Ways to Download REDnote Photos/Memes with No Watermark
Part 2. How to Post High Quality Photos on Instagram
If you are looking for ways to post high-quality pictures on Instagram, we have the right methods and tips for you.
Way 1. Enable Upload High Quality Instagram Settings
As mentioned above, Instagram has special settings that significantly improve your upload quality. Whether or not these settings are set up properly can substantially enhance the quality of your posts. With this turned on, Instagram will prioritize image quality when you upload, but may take a little longer. Steps to Enable High-Quality Settings on Mobile:
☞ How to Turn On High Quality Upload on Instagram
Here are the steps you can follow to allow high quality uploads on Instagram:
-
Open Instagram on any device and tap on your “Profile” icon. Now, go to “Settings” and “Privacy”.
-
Scroll down to the “Media Quality” option and turn on the option that says “Upload at highest quality”

☞ Other settings for high quality Instagram uploads
Apart from the Instagram settings, make sure that you are capturing media in the highest quality possible, no less than 4K. Moreover, it is important that your editing software supports high resolution processing and output. It helps ensure that the media quality is maintained.
This may keep image quality when uploading to Instagram. However, the only drawback is that the uploading process will take more time and data.
Way 2. Use the Right Dimensions Recommended Size by Instagram:
Instagram's recommended photo dimensions make it easy to upload photos, and have sizes optimized for the platform, without resizing or compression. In addition, you should save your images at the highest quality setting before uploading them. It reduces the amount of compression artifacts and the sharpness constant remains the same.
Recommended Dimensions for Instagram are:
- Square Photos: Pixels: 1080 x 1080 with the aspect ratio of 1:1
- Landscape Photos: Pixels: 1080 x 608 with the aspect ratio of 1.91:1
- Portrait Photos: Pixels: 1080 x 1350 with the aspect ratio: 4:5
Way 3. Export High Quality Images from Photoshop for Instagram
Preparing images for Instagram is an excellent use of Photoshop. Exporting your photos correctly means they'll keep color accuracy and bit depth and still look right to Instagram. With this method, you will never lose control over your image quality while exporting.
-
Click “File” and choose Export”. Here, you will click “Save” and choose “Save for Web”.
-
Next, choose “JPEG” as the format and set the quality to “100%”. Now, you can save the image by clicking “Save”.

One of the biggest drawbacks is that Photoshop is a paid tool that not everyone can afford. Even if you purchase it, editing here is not the easiest and it takes a lot of learning.
Way 4. Enhance Image Quality Before Uploading to Instagram
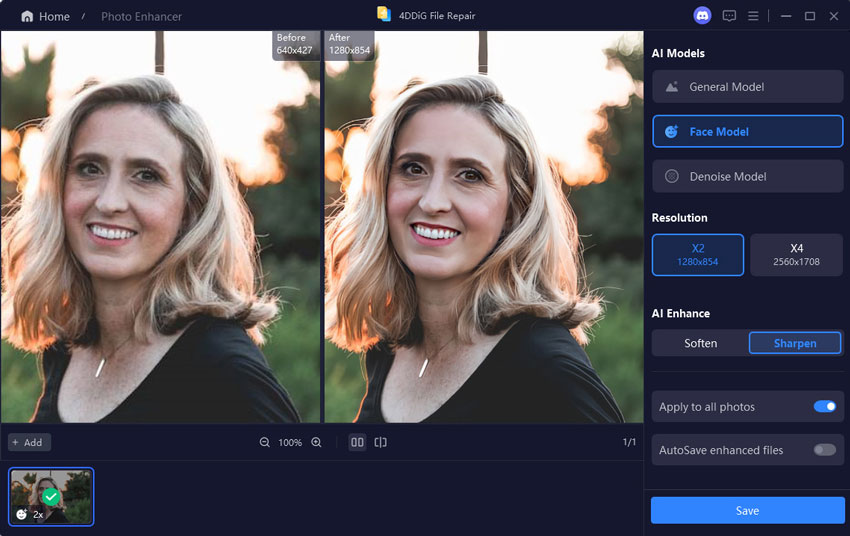
Are Instagram stories not uploading in high quality? To prepare them for upload, it's helpful to enhance the quality of images that don't have it or don't have enough of it. 4DDiG AI Photo Enhancer has tools that are specially designed for enhancing your images with AI's power. It is one of the best in class for all types of photo quality enhancement jobs and it provides a great experience with the following features:
Features of 4DDiG AI Photo Enhancer:
- 4K and beyond upscales without loss of quality.
- It improves color accuracy, sharpness, and detail.
- It supports JPEG, PNG, HEIC, WEBP, GIF, TIFF, and more file formats.
- A user-friendly interface that takes no learning curve
- A fast performance packed with batch processing.
- Sharpen image with AI and remove noise from photos
- Color black-and-white photos to restore old or faded images
Steps to Enhance Photos Using 4DDiG AI Photo Enhancer:
Below are the steps for you to follow to enhance your images with 4DDiG.
-
Run 4DDiG File Repair on your computer and go to “AI Enhancer” on the home interface, from where you will go into “Photo Enhancer”.

-
Tap the "Add Photos" button and add the photo that you want to enhance before uploading it to Instagram.

-
Select your desired AI M odel (such as General/Denoise/Face) and reset R esolution (X4 is the best) then click “Enhance” to proceed with photo improvement.

-
Once the AI model enhances your image, you can compare it side-by-side and click “Save” to save the image on your computer storage.

You can use photos before uploading to enhance them before uploading to make sure that they are sharp and vibrant on Instagram, even after compression.
5. Other Tips
Here are additional tips to ensure your photos look their best if you still don’t know how to post high quality photos on Instagram.
-
Refrain from over-editing your image as it will give a fake look and sometimes the image quality may degrade.
-
You get better results with a smartphone with an advanced camera or a DSLR.
-
There are better tools for desktop editing than for mobile apps so you must try them.
-
See how your photo will look on other devices on the preview.
Upload the original file and never use screenshots.
Although these tips will help in improving photo quality, having no proper solution to solve problems like corrupted files or improper resizing would leave you helpless. For such problems, 4DDiG is the best choice.
Part 3. People Also Ask about Instagram High Quality Uploads
Q1: Why is my photo quality so bad on the Instagram story?
When you upload a photo to your Instagram story, Instagram compresses it to save bandwidth. Stories must be in your recommended resolution of 1080 x 1920 pixels to avoid quality loss.
Q2: How do I stop Instagram from lowering photo quality?
In Instagram settings, you must enable High Quality Uploads, use the right dimensions, and don't over-edit.
Q3: Can you upload 4K to Instagram?
Though they don't officially support native 4K uploads, high-resolution pictures (up to 1080px wide) will stay crisp when prepped correctly.
Q4: What is the best way to upload high quality photos to Instagram?
Upload with Instagram’s recommended dimensions enabled and high-quality settings as well as using 4DDiG AI Photo Enhancer to improve your images.
Conclusion
You might be surprised, but finding out how to post high quality photos on Instagram doesn't have to be hard. Photo quality can be enhanced by using the right sizes, the best upload settings, employing 4DDiG AI Photo Enhancer for your images, and your photos will look great in every post.
No matter how much you’re using Instagram or those little moments that you do, it doesn’t matter. These are the methods you should be using to ensure your integrity through your visuals and make your Instagram experience a must-follow experience.
Secure Download
Secure Download


 ChatGPT
 Perplexity
 Google AI Mode
 Grok
Grok


