How to Fix Zsh Command Not Found Brew Error on Mac
You sit down at your Mac, ready to use Homebrew to install some new software. Opening the Terminal, you eagerly type "brew install..." and press enter. But instead of running as expected, you get the dreaded error message: "zsh: command not found: brew". Uh oh. Now what? Don't panic! This common error simply means your system can't find the Homebrew executable file to run commands. While frustrating, it's usually an easy fix. In this article, we'll walk through 5 straightforward troubleshooting tips to get Homebrew back up and running again.By the end, you'll have the confidence to troubleshoot it yourself should it ever show up again. Ready to resolve that error for good and get back to installing awesome software? Let's do this!

Part 1: What's Zsh Command Not Found Brew?
Homebrew, also known as brew, is an extremely useful free and open-source package manager for installing software on macOS. It lets you easily download, install, and manage apps, libraries, and other tools from the command line using simple brew commands.
However, you may encounter the error "zsh: command not found: brew" when trying to use brew in your Mac's Terminal app. This means zsh, the default shell in modern versions of macOS, can't find the Homebrew program itself to execute your brew command.
Essentially, your system doesn't know the location to launch Homebrew from. This common "zsh command not found: brew" error generally happens because:
- Homebrew is not installed or was installed incorrectly
- The path to the Homebrew executable is not set properly in environment variables
-
The symlinks associating brew with its executable path are broken

Now that you know what it signals, we can start troubleshooting why zsh can't find the brew command on your system.
Part 2: How to Recover Data when You Fix Zsh Command Not Found Brew?
Fixing that pesky "zsh command not found: brew" error unfortunately may cause accidental data loss or corruption. But don't panic! The excellent 4DDiG Mac Data Recovery software can help you restore lost files and salvage damaged data.This easy-to-use tool securely scans Mac hard drives and external devices to find recoverable photos, documents, videos, and more - over 2000 file types in total! Its high recovery success rate gives you the best chance to get your files back.
An added bonus - 4DDiG's special repair feature can fix corrupted photos and video files from digital cameras, drones, GoPros, and more by scanning and extracting the working data. So don't sweat data loss from that brew error. Just turn to the reliable file recovery capabilities of 4DDiG Mac Data Recovery. Here are the steps to use 4DDiG Mac Data Recovery to recover data:
Secure Download
Secure Download
-
Select Drive
Open 4DDiG Mac Data Recovery and select the drive or device that has corrupted or lost data due to a failed zsh brew fix. This will be a hard drive, external disk, memory card, etc.
-
Scan
Click the "Scan" button. 4DDiG will deeply scan the drive and show recoverable files when finished.
-
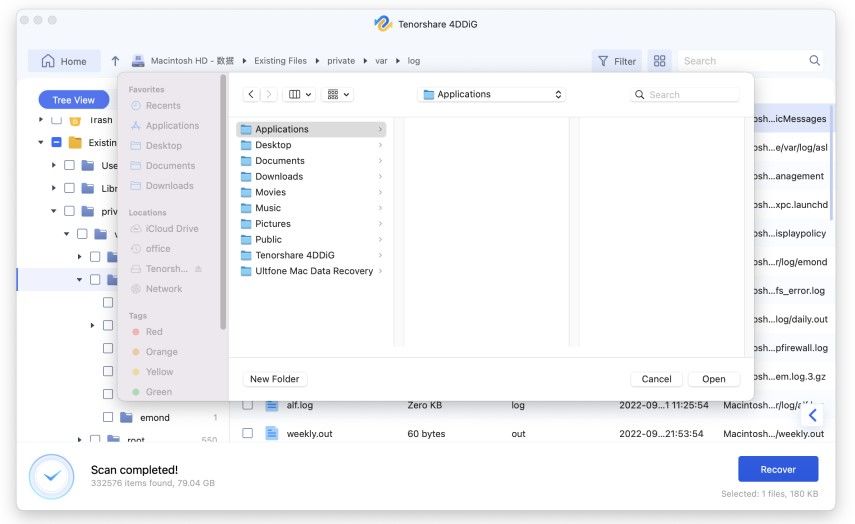
Recover Files
Preview found files if needed. Select the ones you want to recover. Click the "Recover" button to save files to a different safe storage drive.That's the basic 3-step process to recover and repair files with 4DDiG after botched Homebrew troubleshooting. It locates recoverable data on your device, letting you get back missing documents, photos, media, and more. Just 3 clicks!

Part 3: How to Fix Zsh Command Not Found Brew Error on Mac?
Now let's explore step-by-step solutions to tackle the annoying 'Zsh command not found' error on your Mac. Get ready to make your terminal troubles a thing of the past! Let's get started!
Way 1: Reinstall the Zsh Brew to Fix Zsh Command Not Found Brew
If the basic fixes don’t resolve the “brew command not found” error, taking more drastic steps like a full Homebrew reinstallation often does the trick. Here is a straightforward process to uninstall then re-add Homebrew:
-
In Terminal, run the official uninstall script:
/bin/bash -c "$(curl -fsSL https://raw.githubusercontent.com/Homebrew/install/HEAD/uninstall.sh)"
This removes Homebrew while keeping packages.
- Restart your Mac to fully clear out Homebrew.
-
In Terminal, run the latest install script:
/bin/bash -c "$(curl -fsSL https://raw.githubusercontent.com/Homebrew/install/HEAD/install.sh)"
This defaults to the updated Bash platform.
- Test with “brew —version” to check if the reinstall worked.
Reinstalling can fix path problems and configuration issues with Homebrew installations. While a bit time consuming, it often gets brew running again.
Way 2: Add Brew to the Path Variable
Occasionally the path environment variables get configured incorrectly when first installing Homebrew. You can manually fix this by adding brew back into the shell’s path. Just follow these quick steps:
-
Open Terminal and use this command for Bash:
$ echo 'export PATH="/usr/local/bin:$PATH"' >> ~/.bash_profile
Or this for Zsh:
echo 'export PATH="/usr/local/bin:$PATH"' >> $HOME/.zshrc
- Replace "/usr/local/bin" with your actual Homebrew install location if different.
-
Source the file to apply the new $PATH:
$ source ~/.zshrc
-
Check it worked:
$ brew –version
Adding the brew command location sets the path variable properly. Now zsh knows where to find brew executables when commands run. Quickly update the shell profile and correct the path issue causing "zsh command not found: brew".
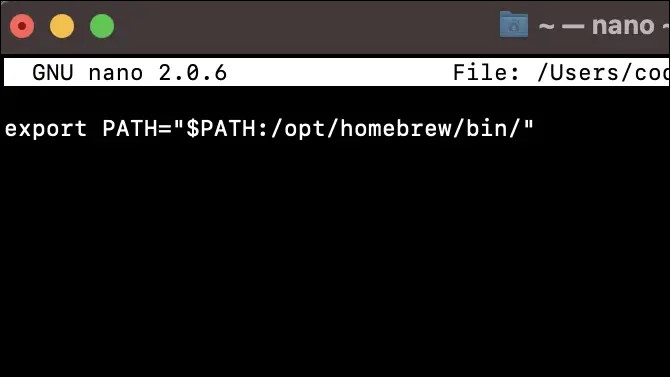
Way 3: Correct the Homebrew Installation
In some cases, the path to Homebrew remains misconfigured even after reinstalls. The key is to manually set the correct Homebrew install directory path yourself in the shell profile.
-
In Terminal, set the path for the current session:
export PATH="/opt/homebrew/bin:$PATH"
-
Make this permanent by appending to the zsh config file:
echo 'export PATH="/opt/homebrew/bin:$PATH"' >> $HOME/.zshrc
-
Test Homebrew now works:
brew help
-
If errors persist, uninstall and reinstall Homebrew under /opt/Homebrew using:
/bin/bash -c "$(curl -fsSL https://raw.githubusercontent.com/Homebrew/install/HEAD/install.sh)"
Be sure to read all output prompts after reinstalling under /opt. Manually fixing the path and reinstallation under an optimal location often resolves the "brew command not found" issue for good.
Way 4: Install Homebrew under /opt/Homebrew
Apple silicon Macs need special treatment when installing Homebrew to handle the differences between M1 and Intel chips. The key is using the optimal location.
-
Run the install script:
/bin/bash -c "$(curl -fsSL https://raw.githubusercontent.com/Homebrew/install/HEAD/install.sh)"
- Note the output prompt to add Homebrew to your PATH in .zprofile.
-
Edit .zprofile per the instructions:
echo 'eval $(/opt/homebrew/bin/brew shellenv)' >> /Users/yourname/.zprofile eval $(/opt/homebrew/bin/brew shellenv)
- Test with “brew help”.
The /opt location avoids issues between Intel and M1 software. By following the path setup instructions explicitly for M1 during installation, you can correctly configure Homebrew and eliminate the “zsh command not found” error.
Way 5: Install Xcode on Mac to Fix Zsh Command Not Found Brew
Homebrew utilizes some core libraries and command line tools from Xcode under the hood. If Xcode is missing, Homebrew itself may fail.
-
Check if Xcode is installed:
/usr/bin/xcodebuild -version
Look for output showing the Xcode version.
- If installed, open Xcode and enable Command Line Tools in Preferences.
- If Xcode isn't installed, get it from the App Store or Apple Developer site.
-
Once Xcode is set up, run:
/bin/bash -c "$(curl -fsSL https://raw.githubusercontent.com/Homebrew/install/HEAD/install.sh)"
This reinstalls Homebrew using the Xcode command line tools.

Many Brew issues arise from lacking dependencies. Confirm Xcode's presence and integration to enable command line functionality Homebrew requires. An Xcode install or reinstallation of Homebrew after verifying Xcode tools often resolves the root cause.
Part 4: Frequently Asked Questions
Q1: Why is brew command not found on Mac?
Ans: The "brew command not found" error appears because your Mac can't find the Homebrew install location. This happens if Homebrew is not properly installed or its executable path isn't set correctly.
Q2: How do I fix command not found on Mac?
Ans: To fix a command not found error, ensure the command exists on your system and add its install directory path to your shell profile PATH environment variable so the shell can locate executables.
Q3: Can I use zsh with Homebrew?
Ans: Yes, zsh is the default shell on modern MacOS versions and fully supports Homebrew. Fixes involve reinstalling Homebrew properly for zsh or correcting the zsh path variable.
Q: How to install brew on Mac command?
Ans: Follow these steps to install:
- Install Command Line Tools by running xcode-select --install
- Install Homebrew with:
/bin/bash -c "$(curl -fsSL https://raw.githubusercontent.com/Homebrew/install/HEAD/install.sh)"
Then follow the script prompts to configure PATH so zsh can locate brew. The xcode-select command handles dependencies, while the Homebrew script downloads brew, adds it to PATH, and sets up zsh integration.
Conclusion
Dealing with the "zsh: command not found: brew" error can be frustrating, stopping you from installing apps with Homebrew. But in this article, we covered 5 key troubleshooting fixes to get brew running properly again. With one or a combination of these solutions, you can banish that pesky error for good. Just be aware that botched attempts may cause data loss. This is where the brilliant 4DDiG Mac Data Recovery software comes in - easily restoring deleted or corrupted files in minutes. We encourage giving this handy utility a try alongside the brew fixes. No more frustration over a terminal blocking your Mac progress. Just identify the cause, apply the appropriate fix, verify brew runs properly again, and keep on coding, installing, and creating! You've got this.


 ChatGPT
 Perplexity
 Google AI Mode
 Grok
Grok

