How to Fix Mac Error Code 8072
Mac computers are renowned for their stability and performance, but users occasionally encounter errors that disrupt their seamless experience. One such hiccup is Mac Error Code 8072, which can be frustrating to deal with. In this comprehensive guide, we'll delve into the meaning of Error Code 8072 on mac, explore ways to recover deleted data using 4DDiG Mac Data Recovery, and provide five effective methods to fix this error. Whether you're a tech-savvy user or a Mac novice, this article aims to equip you with the knowledge to tackle Mac Error Code 8072 head-on.

Part 1: What Does Mac Error Code 8072 Mean?
Mac Error Code 8072, often encountered by users during file management tasks, is a specific error message that signals an interruption or failure in the file operations process. This error typically manifests when attempting to move or delete files and folders on a Mac system. Understanding the meaning of Mac Error Code 8072 is essential for effectively addressing and resolving the issue.
- One common trigger for Mac Error Code 8072 is inadequate permissions to perform the desired file operation. macOS enforces a system of permissions to control access and modification rights for files and folders. If the user attempting the operation lacks the necessary permissions, the system may throw this error.
- Errors within the disk structure, such as disk corruption or errors in the file allocation table, can lead to Mac Error Code 8072. These issues hinder the smooth execution of file management tasks and may result in the interruption of operations.
- The presence of corrupted files in the system can cause unexpected errors, including Error Code 8072. When the system attempts to interact with a damaged file, it may fail, triggering this particular error message.
Part 2: How to Recover Deleted Data on Mac
Accidentally delete important files? Fear not, as 4DDiG Mac Data Recovery comes to the rescue. This powerful tool is designed to retrieve lost data efficiently. The intuitive interface and advanced algorithms make it a reliable choice for Mac users. Whether your files were lost due to Error Code 8072 macbook or any other reason, 4DDiG Mac Data Recovery can help you get them back.
Secure Download
Secure Download
-
Select Location
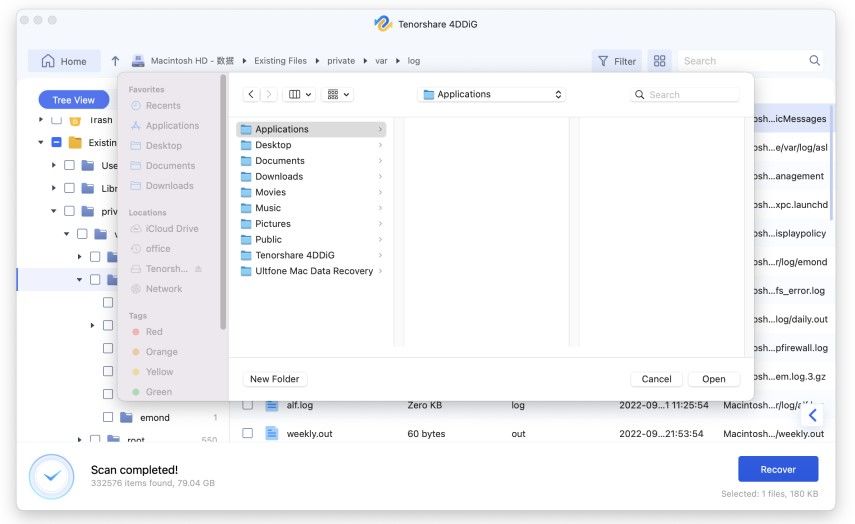
Launch 4DDiG-Mac, pick a location like your local drives and click "Scan" to start recovering lost files.
-
Scan and Preview
Wait for the program to scan deleted files. Once done, preview specific file types for details.
-
Recover Files
Click "Recover," choose a safe location to save files, avoiding the partition where data was lost to prevent permanent loss.
Part 3: How to Fix Error Code 8072 on Mac
Now that we've explored data recovery, let's shift our focus to resolving Mac Error Code 8072. Below are five effective ways to tackle this issue and restore your Mac's optimal functionality.
Way 1: Force Reboot Your Mac to Fix Mac Error Code 8072
When faced with the vexing Mac Error Code 8072, a simple yet effective solution is to force reboot your Mac. This method aims to clear temporary glitches or disruptions in the system that may be causing the error. Here's a step-by-step guide on how to perform a force reboot:
- Before initiating a force reboot, ensure that all applications are closed. Save any unsaved work to prevent data loss during the restart.
- Locate the power button on your Mac. Depending on your Mac model, it may be on the keyboard, on the back of the Mac, or the display. Press and hold the power button.
- Keep holding the power button until you see the screen go black and you hear the distinctive sound of the Mac shutting down. Release the power button once the shutdown process is complete.
- Allow your Mac to remain powered off for about 10-20 seconds. This brief interval ensures that the system completely resets.
- Press the power button again to turn on your Mac. Wait for the startup chime or other indicators that your Mac is booting up.
Way 2: Check the Permissions on Mac to Fix Mac Error Code 8072
Incorrect file permissions can be a common culprit behind Mac Error Code 8072. If the user attempting file operations does not have the necessary permissions, it can result in the interruption of tasks. Verifying and adjusting permissions is a crucial step in resolving this issue. Follow these steps to check and modify file permissions on your Mac:
- Identify the file or folder for which you are encountering macos error code 8072. Right-click on it and select "Get Info" from the context menu.
- In the Info panel, navigate to the "Sharing & Permissions" section. This section provides a list of users and their respective permissions for the selected file or folder.
- If the padlock icon in the bottom-right corner of the Info panel is locked, click on it and enter your administrator password to unlock permissions.
- Once unlocked, you can modify permissions by clicking on the "+" or "-" buttons to add or remove users. Ensure that the user attempting the file operation has the necessary read and write permissions.
- Click on the gear icon at the bottom of the Info panel and select "Apply to enclosed items." This action ensures that the permission changes are propagated to all items within the folder.
-
Close the Info panel and attempt to perform the file operation again.

Way 3: Use Mac Safe Mode to Fix Mac Error Code 8072
Booting your Mac in Safe Mode is a troubleshooting technique that can help identify and address issues related to startup processes, software conflicts, and system stability. By initiating your Mac in Safe Mode, you can isolate potential causes of windows error code 8072efe and facilitate a more stable environment for resolving the problem. Follow these steps to boot your Mac in Safe Mode:
- Ensure that all open applications are closed and your work is saved. Shut down your Mac using the Apple menu or the power button.
- Power on your Mac and immediately press and hold the "Shift" key. Continue holding the key until you see the Apple logo and a progress bar. This indicates that your Mac is starting up in Safe Mode.
- Once the startup process is complete, log in to your user account. You'll notice that the desktop background may look different, and "Safe Boot" will be displayed in the upper-right corner of the screen.
- In Safe Mode, attempt to perform the file operation that initially triggered Mac Error Code 8072. Safe Mode turns off unnecessary system extensions and performs a basic check on your startup disk, which may help bypass the error.
- After testing the file operation in Safe Mode, restart your Mac to exit Safe Mode. Simply choose "Restart" from the Apple menu.
Way 4: Run Disk Utility to Fix Mac Error Code 8072
Disk-related issues can contribute to the occurrence of powerpoint error code 8072. Running Disk Utility, a built-in macOS tool, can help identify and repair problems with your disk, potentially resolving the error. Follow these steps to run Disk Utility and address disk-related issues:
- Go to "Applications" > "Utilities" > "Disk Utility."
- Alternatively, you can use Spotlight Search (Command + Space) and type "Disk Utility" to launch the application.
- In Disk Utility, locate and select your startup disk from the list on the left. It is typically named "Macintosh HD" or a name you assigned.
- Click on the "First Aid" tab, located at the top of the Disk Utility window.
- Click on the "Run" button to initiate the First Aid process.
- Disk Utility will verify the disk for any errors. This process may take some time, so be patient.
- If Disk Utility identifies any issues during the verification process, it will prompt you to repair them.
- Click on the "Repair Disk" button to fix any detected problems.
-
Once the repair process is complete, restart your Mac.

Way 5: Resolve Mac Error Code 8072 via Using Terminal
For users comfortable with the command line, Terminal offers a powerful way to address mac unexpected error code 8072 by executing specific commands that can force-delete or move files, bypassing the error. Follow these steps to resolve the error using Terminal:
- Launch Terminal from the "Applications" > "Utilities" folder or use Spotlight Search (Command + Space) and type "Terminal."
- Use the cd command to navigate to the directory containing the file or folder causing the error. For example:
- cd ~/Desktop
- Use the rm command to force-delete the file or mv to move it to another location. Be cautious when using these commands, as they are powerful and irreversible. Replace "filename" with the actual name of the problematic file.
- Force-Delete:
- rm -f filename
- Move to Trash (for potential recovery):
- mv filename ~/.Trash/
- After executing the command, attempt to perform the file operation again and check if Mac Error Code 8072 persists. Terminal commands provide a direct and forceful approach to file management tasks.
-
If you moved the file to the Trash, open the Trash and empty it. Right-click on the Trash icon and select "Empty Trash."

Way 6: Fix Mac Error Code 8072 via Time Machine
If you have previously set up Time Machine, Apple's built-in backup solution, you can leverage it to restore your system to a state before encountering Mac Error Code 8072. Time Machine creates incremental backups of your files and system, allowing you to roll back to a point when the error did not exist. Follow these steps to fix Mac Error Code 8072 using Time Machine:
- Ensure that your Time Machine backup drive is connected to your Mac. It could be an external hard drive, a Time Capsule, or a network-attached storage (NAS) device.
- Click on the Time Machine icon in the menu bar or open Time Machine from "System Preferences."
- Use the timeline on the right side to navigate to a date before you encountered macbook air error code 8072.
- You can either select specific files or folders to restore or choose to restore the entire system to the selected date. To restore specific files, navigate to the desired location and use the "Restore" button. To restore the entire system, click "Restore All."
- Time Machine will guide you through the restoration process. Follow the on-screen prompts to complete the restoration.
-
After the restoration is complete, restart your Mac to apply the changes.

Part 4: FAQ
Q 1: How do I fix error code 8072 on my Macbook?
To fix Error Code 8072 on your MacBook, you can try to force rebooting, checking file permissions, using Safe Mode, running Disk Utility, using Terminal commands, or restoring from a Time Machine backup. The choice depends on your comfort level and the specific circumstances.
Q 2: Why can't I create a folder on my Mac desktop?
The inability to create a folder on your Mac desktop may be due to insufficient permissions, disk issues, or even a corrupted user profile. Check file permissions, run Disk Utility, and consider using Terminal commands to address the problem.
Q 3: Why can't I move files in Finder?
If you're unable to move files in Finder, it could be related to Error Code 8072. Refer to the solutions above, including force rebooting, checking permissions, using Safe Mode, running Disk Utility, employing Terminal commands, or restoring from a Time Machine backup.
Q 4: How do I fix error 36 on my Mac?
Error 36 on Mac often indicates issues with file copying. To fix it, you can try copying the files in Terminal, using Disk Utility to check for disk errors, or using specialized third-party tools designed to address this specific error.
Conclusion
Encountering Mac Error Code 8072 can be a frustrating experience, but with the right knowledge and tools, you can overcome it. From understanding the root cause to recovering lost data using 4DDiG Mac Data Recovery and implementing various fixes, this guide aims to provide a comprehensive solution.


 ChatGPT
 Perplexity
 Google AI Mode
 Grok
Grok


