Fix Windows Install Error 0xc1900201: 7 Proven Fixes That Actually Work
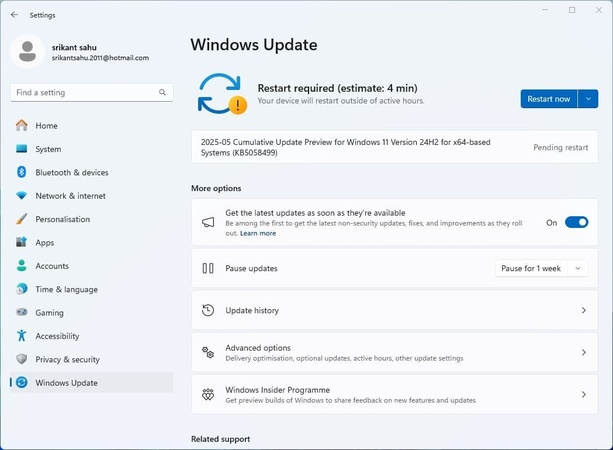
The install error -0xc1900201 is faced by many who upgrade to Windows 11 24H2 (or even its earlier editions like 22H2 and 23H2) on Windows 10, Windows 11, and Windows Server PCs. The install may fail with messages like "We couldn't update the system reserved partition" or "processor does not currently support Windows 11."
If you're struggling with a similar issue, this guide covers quick fixes, advanced steps, and a trusted tool to bypass hardware checks and resolve errors.

Part 1. What Is Error Code 0xc1900201 & Why Does It Appear?
ℹ️ Definition: Install error 0xc1900201 is a Windows update failure code stating that there is a problem with updating the System Reserved Partition, i.e., EFI or Recovery partition. Users can see messages such as:
- "Windows 11, version 24H2 is available. We couldn't install this update, but you can try again (0xc1900201)"
- “We failed to update the system reserved partition (error code: Windows 0xc1900201)”
🎬 Scenario: When performing upgrades to new features, such as Windows 11 23H2 or 24H2, the availability of space, font files, or BIOS image artifacts may prevent this.
🧐 Causes: The following items can be the culprits behind the Windows update error:
- Not enough free space on the System Reserved Partition to store the update files
- The Windows installer is facing conflicting information when upgrading Windows on an old PC system and operating in-place upgrades.
- Corrupt update components or the problem of remaining antivirus interference.
- Incorrect files, such as .ttf font files or similar old BIOS images in System Reserved.
It is important to identify the source of the problem to deploy the right solution to this tedious update impediment. Now, let’s move on to the feasible solutions for the install error.
Part 2. Quick Fixes First to Try to Solve Windows Update 0xc1900201 Error
Wondering how to fix a Windows Update that failed to install? This section covers 3 quick fixes that you can try:
1. Retry the Update
The first thing that you can do is retry the update.
-
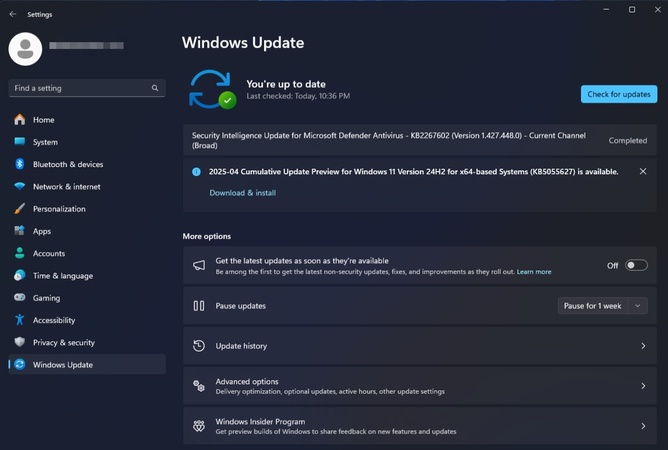
Go to “Settings” → “Update & Security” → “Windows Update”.
-
Click “Check for updates”, then “Download and install” to see if you fix the Windows 0xc1900201 error.

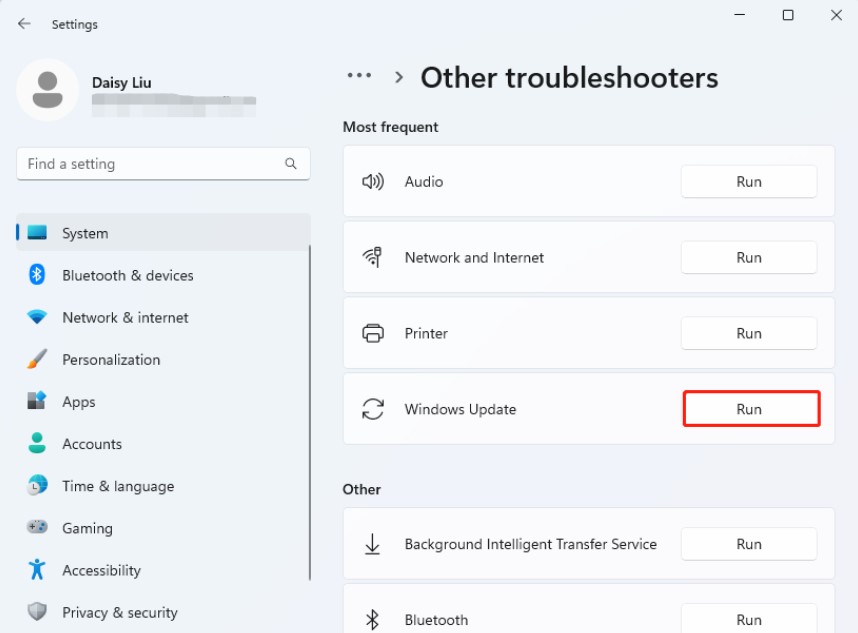
2. Run Windows Update Troubleshooter
If the first option does not work, your next resort will be trying the troubleshooter, since that usually helps in fixing errors.
-
Navigate to “Settings” then “Troubleshoot” and click "Other troubleshooters”.
-
Run the "Windows Update "troubleshooter, then follow the on-screen steps to try and fix Windows Update 0xc1900201.

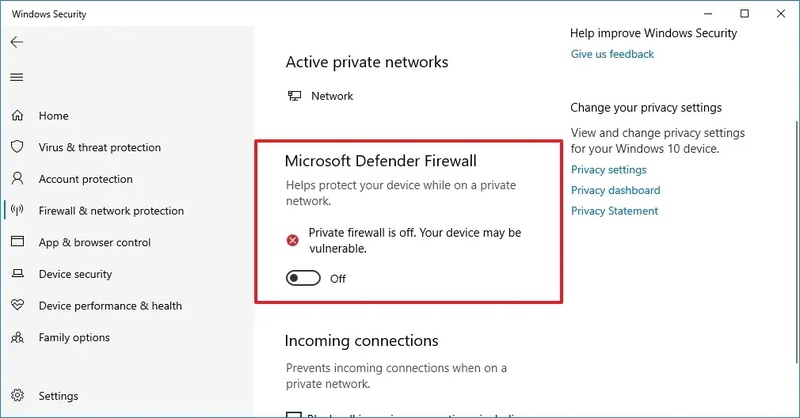
3. Temporarily Disable Antivirus/Firewall
If retrying for update and troubleshooting did not help, then chances are that your Antivirus is messing with update files. So, you can try temporarily disabling them.
Windows Firewall:
-
Go to "Settings" and open "Windows Security". Then Open “Firewall and Network Protection".
-
Turn off “Microsoft Defender Firewall” and retry the update to fix the 0xc1900201 Windows 11 error.

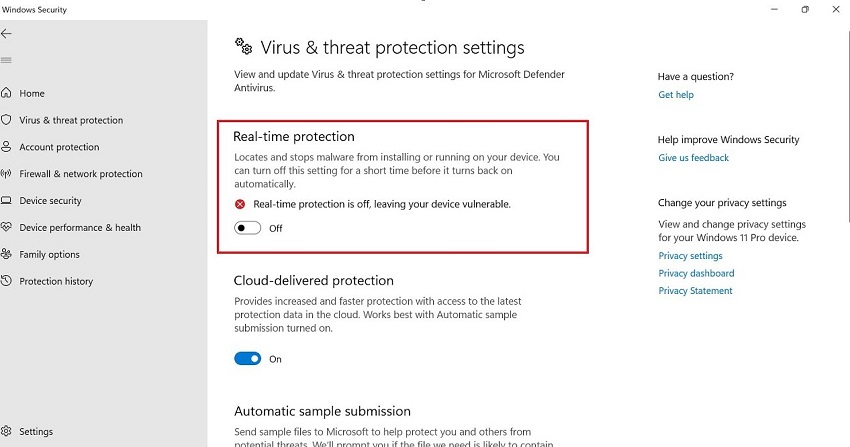
Windows Defender (Built-in):
-
Head to: Settings → Update & Security → Windows Security → Virus & threat protection.
-
Turn off “Real-time protection” (temporary).

Part 3. Advanced Solutions to Fix Install Error - 0xc1900201 on Windows 11/10
This error can be very annoying, knowing you are stuck on the older version of Windows. However, in this section, we will discuss 4 effective solutions to fix it with ease.
1. Delete Font Folders (.ttf) from System Partitions
The Windows Update error 0xc1900201 may be caused by corrupted or space-hogging font files. Deleting temporary or custom Font folders can help free up space on the system reserved partition.
This method involves modifying system files. Deleting the wrong folders may affect the appearance of Windows or system readability. Proceed carefully and always
-
Open command prompt, and type the following commands to assign the Recovery Partition as Drive Y:
diskpartlist diskselect disk 0list partition-
select partition X(→ Replace X with the number of the EFI or OEM partition) assign letter=bexit
Note:
If you are not familiar with Command Prompt and afraid of data loss accidentally, just follow instructions in: How to Change Drive Letter Windows without Losing Data?
-
Now, open File Explorer and navigate to the assigned drive letter (Y:). You'll see folders like EFI, Microsoft, Boot.
-
Look for Fonts folder or search for .ttf files and delete it individually.
-
Empty Recycle Bin to free space immediately, which can add more space for Windows Updates and fix 0xc1900201 Windows 11 error.
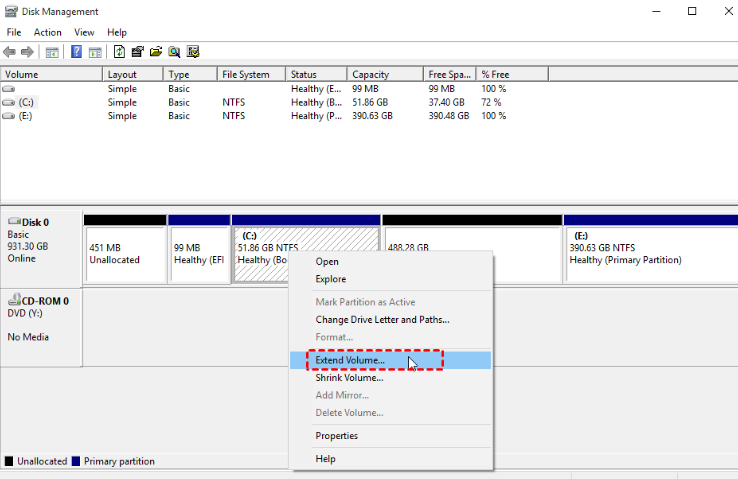
2. Extend System Reserved Partition (such as the EFI Partition) with Disk Management
Are you facing "install error – 0xc1900201, we couldn't update the system reserved partition"? Well, your system's reserved partition may not have enough space, and extending it will help.
Press Win + X and go to “Disk Management”
-
Right-click System Partition and choose "Extend Volume”.

-
Now, add as much space to this partition as you want. Although Windows 11 requires 15MB, keeping 100MB to 1GB will ensure seamless updates without install error – 0xc1900201.
Note:
It is always a good idea to extend the system reserved partition before trying an update. It adds more space to the EFI partition and allows for seamless updates. Here, you can also try an easier and more professional way to add additional space for the EFI partition with only one click. That is to use the 4DDiG Partition Manager software’s Extend/Shrink to add more unallocated space to the drive you want.
3. Reset Windows Update Components
Resetting Windows Update components ensures that there are no leftover system files. It is because those files can block updates. Below are the commands to use:
-
Open the command prompt as an admin by searching CMD in the search bar and using the "Run as Administrator" option in the right-click menu.
-
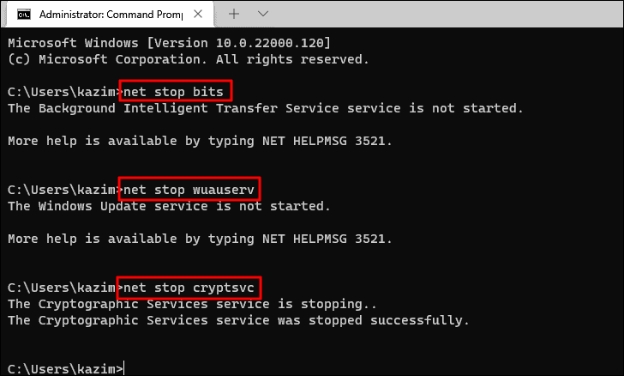
Run the following commands one by one to stop the Windows Update Service:
net stop wuauservnet stop cryptSvcnet stop bitsnet stop msiserver
-
Proceed with the commands below to rename Distribution Folders:
ren C:\Windows\SoftwareDistribution SoftwareDistribution.oldren C:\Windows\System32\catroot2 catroot2.old
-
Finally, type those commands to start restarting the Update Service:
net start wuauservnet start cryptSvcnet start bitsnet start msiserver
-
Restart PC and check if Windows Update works and if you fixed the Windows 0xc1900201 error.

4. Start the Windows Installer Service
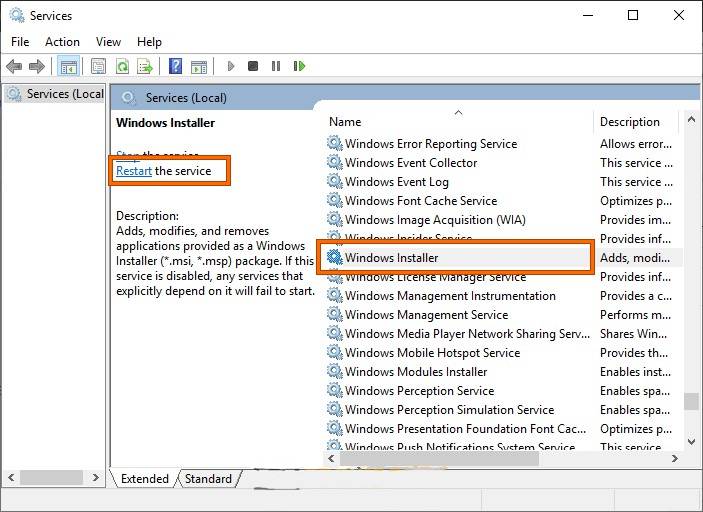
Your Windows update will not work, no matter what, if the installer service is not working. So try starting it:
-
Press Win+R, type “
services.msc”, then hit Enter. -
Find “Windows Installer”, set Startup type to "Manual”, then click “Start” and check if the Windows 0xc1900201 error is gone.

Part 4. How to Bypass Requirements and Install Windows 11 on an Incompatible PC
One common reason users encounter install error 0xc1900201 is that their PC doesn’t meet the minimum system requirements for Windows 11. Amid this, you might be prompted to say: “This processor does not currently support Windows 11". Or if your PC lacks TPM 2.0 or Secure Boot, it can block the upgrade, even if your device is otherwise capable of running Windows 11.
Fortunately, you don’t need to give up. With the right tool, you can bypass Windows 11 hardware checks and still enjoy the latest features and updates. The 4DDiG Partition Manager software is such a tool that you need to bypass Windows 11 requirements, which is powerful and easier to use than Rufus.
Secure Download
4DDiG Makes It Easy To:
- Bypass TPM 2.0, Secure Boot, and CPU compatibility checks
- Install the latest Windows 11 version on unsupported PCs
- Optimize disk partitions before or after installation
- Resizes or extends the System Reserved partition to add more space for installing Windows 11.
- Make a backup of system files prior to updating or fixing the installation error.
Steps to Bypass Win 11 Requirements and Install Updates with 4DDiG Partition Manager
-
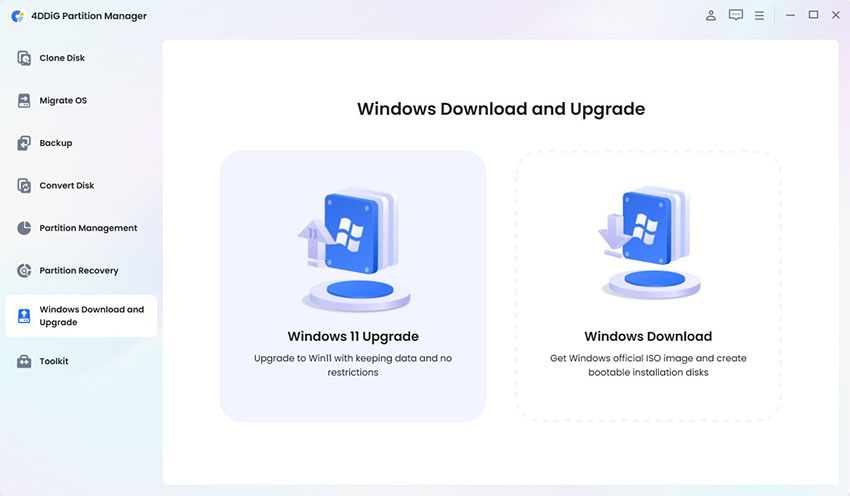
Run your 4DDiG Partition Manager software, and click the "Windows Download and Upgrade" option. Now, select "Windows 11 Upgrade".

-
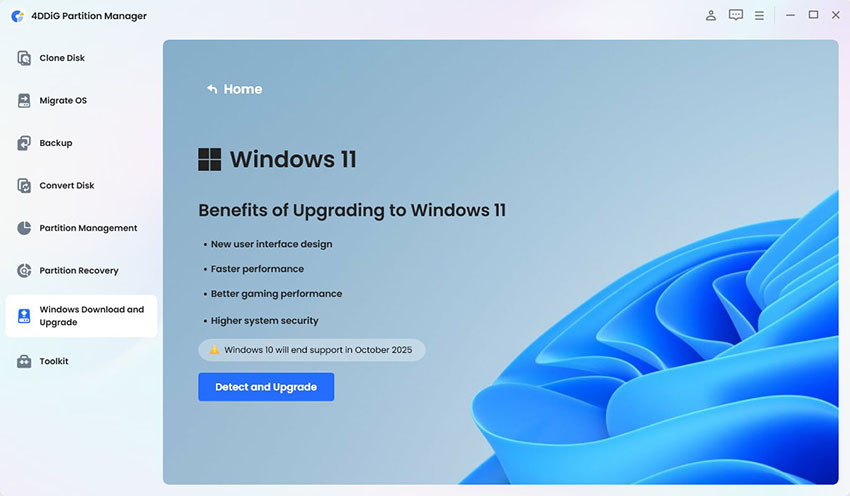
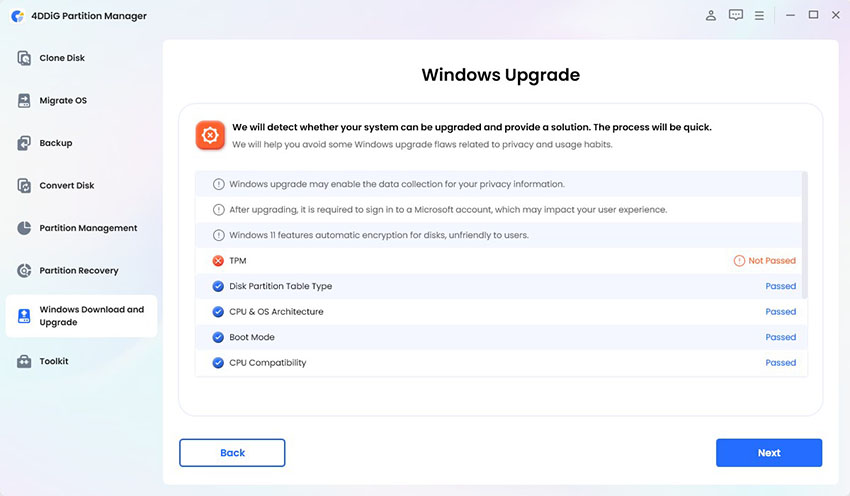
On the new screen, proceed with the "Detect and Upgrade" button to verify your computer’s specifications for Windows 11 upgrade.

-
4DDiG will show you if your PC does not meet any requirements. You can click “Next” to simply bypass them and fix errors like 0xc1900201 Windows 11.

-
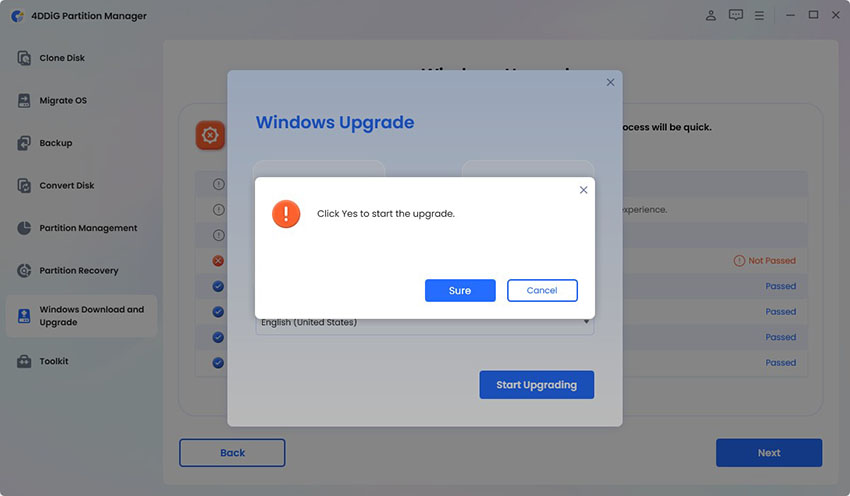
Now, you can choose Windows 11 and click “Start Upgrading” and “Sure".

-
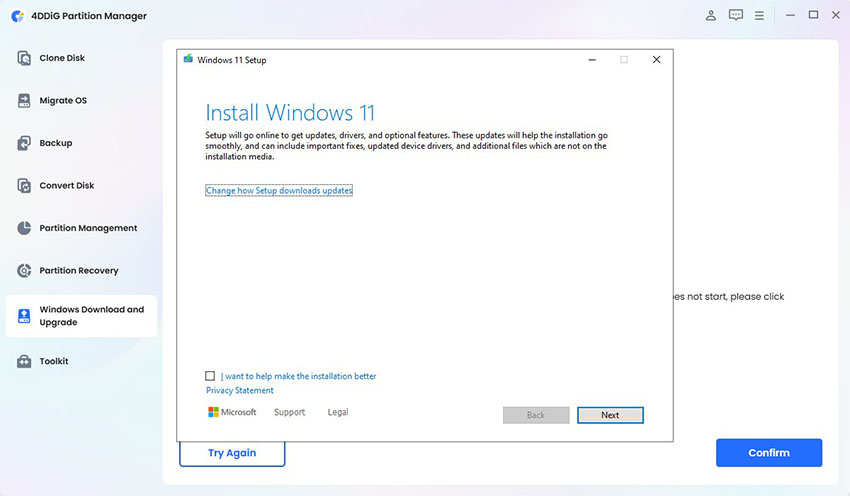
Shortly, 4DDiG will show you the Windows 11 installation screen. Click "Next" and begin with the Windows 11 installation process.

Part 5. Prevention Tips to Avoid Windows Update Errors
If you want to avoid Windows 24h2 install error - 0xc1900201 or future errors, follow the tips below:
- Keep around 1GB of space in the System Reserved partition
- Run the Windows Update troubleshooter before a significant update
- Run the SFC and DISM scans.
- Stop the antivirus or firewall before beginning updates
- Only update from settings and never install any unofficial updates after downloading from your browser
- Use 4DDiG Partition Manager to back up important files or the entire system for data protection.
You can prevent future frustration and enjoy seamless updates with these tips.
Conclusion
You know now what the install error- 0xc1900201 is and what causes it. This guide taught how to fix it with retries and complex tasks like partitioning. To carry out upgrades without problems, it is recommended to control EFI space, skip requirements, and protect your system with the help of 4DDiG Partition Manager before installation. Never miss an update and upgrade Windows 11 24H2 and never go through any annoying errors.
Secure Download
💡 Summarize with AI:
You May Also Like
- Home >>
- Windows Fix >>
- Fix Windows Install Error 0xc1900201: 7 Proven Fixes That Actually Work
 ChatGPT
 Perplexity
 Google AI Mode
 Grok
Grok


