How to Fix 'There Is No Connected Camera MacBook' Issue?
Looking for a solution to the 'there is no connected camera MacBook' issue? Check our complete guide with 8 effective methods and download 4DDiG Mac Data Recovery tool to recover lost data after reinstalling macOS.
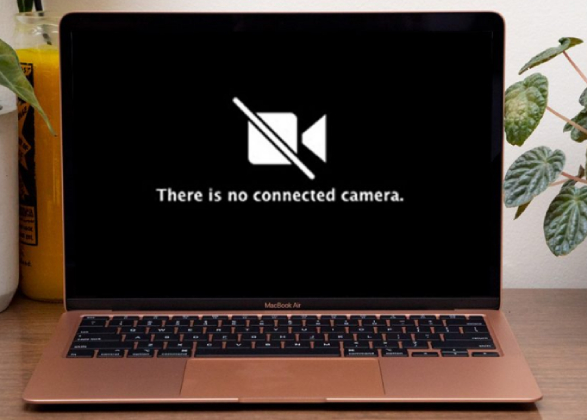
Are you continuously facing the dreaded "there is no connected camera MacBook" error? If you own a MacBook and have encountered this frustrating issue, you're certainly not alone. This error message can leave you feeling perplexed and hinder your ability to use your built-in or external camera for video calls, online meetings, or even taking photos and videos.
But fear not, as we've got your back. In this article, we'll walk you through the steps to resolve this annoying problem, ensuring that you can get back to using your MacBook's camera without any further disruptions.
So, let's get started.
Part 1: Why Is My Mac Camera Not Working?
If you have ever encountered the "there is no connected camera MacBook" error, you might be wondering why is my Mac camera not working. Understanding the underlying causes can be crucial in troubleshooting and finding an effective solution.
Let's discuss the reasons behind this problem.
- Software Conflicts: Sometimes, conflicts between software applications can result in your MacBook's camera not being recognized. This is especially common after software updates or when you have multiple applications that access the camera.
- Permissions: macOS has strict privacy settings, and if you haven't granted the necessary permissions for an application to access your camera, you might encounter this error.
- Hardware Issues: In some cases, the problem may be related to a hardware issue. A loose or damaged camera connection can cause your MacBook to not detect the camera.
- Corrupted Preferences: Corrupted preference files related to your camera can also lead to the "There is no connected camera" issue.
Now that we have explored the common reasons why your Mac camera might not be working, let's move on to the solutions to resolve the camera on Mac not working issue.
Part 2: How to Fix 'There Is No Connected Camera MacBook' Issue?
Here are different solutions to fix a Mac there is no connected camera.
Simple Methods
Method 1. Restart Your Mac
One of the simplest ways to resolve the "There is no connected camera" issue is to restart your MacBook. Sometimes, this error can occur due to temporary software glitches or conflicts. Restarting your Mac can effectively reset these issues and refresh the camera functionality.
Steps:
- Save your work and close all open applications.
-
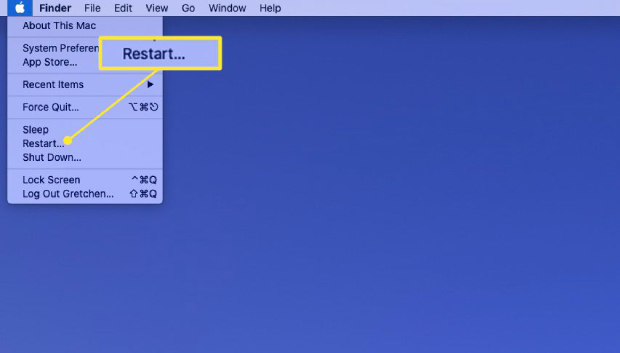
Click on the Apple logo in the top left corner and select "Restart."

- Wait for your MacBook to shut down and restart.
- After the restart, try accessing your camera to check if the issue is resolved.
Method 2. Check Camera Access Permission to Your Apps
Another common cause of the camera connectivity issue is the lack of permissions granted to applications. macOS has stringent privacy settings that require you to explicitly allow applications to access your camera.
Steps:
- Go to "System Preferences" from your Apple menu.
- Click on "Security & Privacy."
- Select the "Privacy" tab.
-
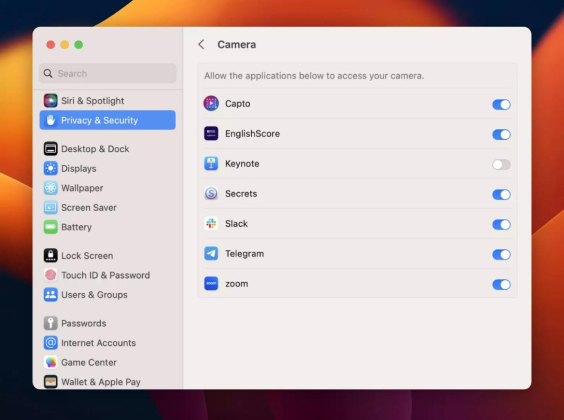
In the left sidebar, choose "Camera."

- Ensure that the applications requiring camera access have a checkmark next to them.
- If an app is not listed, you can add it by clicking the lock icon, entering your password, and then enabling the app's checkbox.
Method 3. Check Your Internet Connection
Sometimes, the "macOS camera not working" error can be misleading, and the issue might actually be related to your internet connection. Certain apps require a stable internet connection to access and utilize the camera.
Ensure that your Wi-Fi or Ethernet connection is working properly before troubleshooting the camera issue.
- For this, go to your browser and continue browsing any website. If your internet connection is working, you will face no issue browsing.
- However, if you are facing any difficulty browsing the website, this means there is a problem with your internet connection, and you will have to fix that first.
Method 4. Allow Only One App to Access the Camera Simultaneously
If multiple applications are trying to access your camera at the same time, conflicts can arise, leading to the error message. To resolve this, only allow one app to access your camera simultaneously. You will have to close other camera-dependent apps that you are not actively using.
Advanced Methods
Method 5. Verify If Your MacBook Is Capable of Accessing the Camera Hardware
Before delving into software solutions, it's important to ensure that your MacBook is capable of accessing the camera hardware.
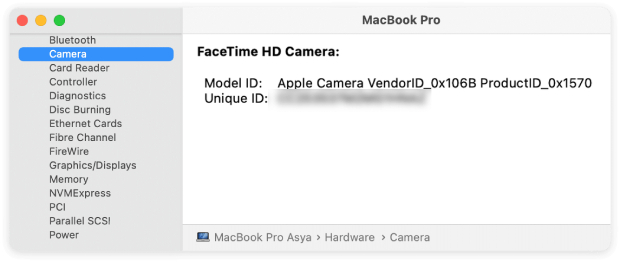
In System Information, you can find information about your Mac's camera hardware. If your MacBook is capable of accessing the camera, you'll see some information about it there. If you don't see any information, it might mean that your camera isn't connected properly to your computer, or there could be an issue with the camera itself.
Method 6. Update the App to the Latest Version
Outdated applications can sometimes cause camera issues. Ensure that the application you are trying to use is up-to-date. App updates often include bug fixes that can address camera-related problems.
Steps:
- Open the App Store.
-
Click on "Updates" in the sidebar.

- If an update is available for your app, click "Update" to install it.
Method 7. Reset the SMC
Resetting the SMC can help resolve various hardware and software issues, including problems with the camera. This method is more advanced and should be attempted if other solutions have failed.
Here’s how to do:
- Shut down your MacBook.
- Plug in the power adapter.
-
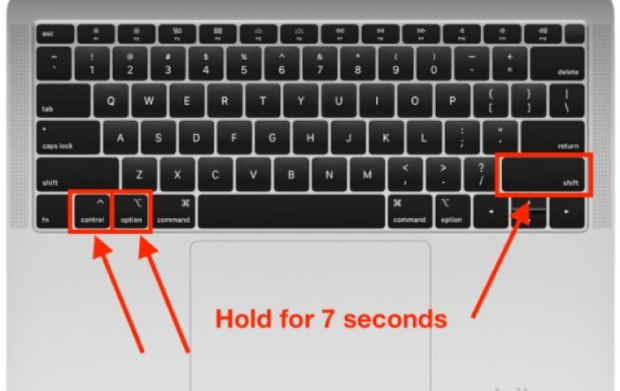
Press and hold the Shift, Control, and Option keys together for a few seconds and then the Power key on the left side for another few seconds.

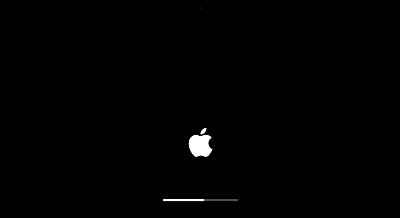
- Release all the keys and the power button when you see the Apple logo.
After performing an SMC reset, check if the camera issue is resolved.
Method 8. Reinstall macOS on Your MacBook
As a last resort, if all else fails, consider reinstalling macOS on your MacBook. This will revert your system to a clean state and can often resolve persistent camera problems.
Steps:
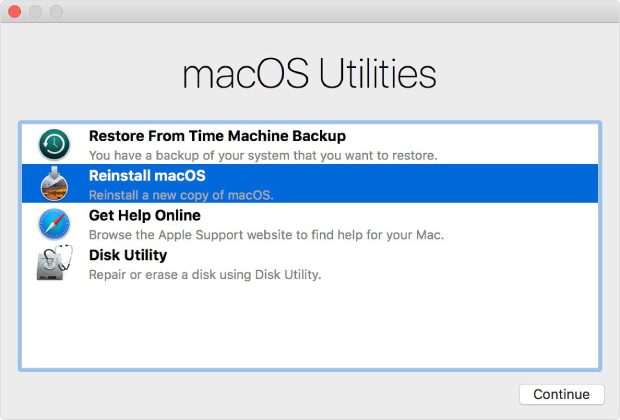
- Restart your MacBook and hold down Option + Command + R immediately after you hear the startup chime. Keep holding these keys until you see the Apple logo.
-
The macOS Utilities window will appear. Select "Reinstall macOS" from the available options and click "Continue."

- Follow the on-screen instructions to reinstall macOS. This process will take some time.
Helpful Tip: How to Recover Lost Data After Reinstalling macOS?
Reinstalling macOS is a drastic measure that can sometimes result in data loss. When you reinstall the operating system, it wipes the system's storage, including applications, settings, and personal files.
If you find yourself in a situation where you've lost important data after reinstalling macOS, don't panic. You can use data recovery software like 4DDiG Mac Data Recovery to help you retrieve your lost files.
Here are the key features of 4DDiG Mac Data Recovery:
- Comprehensive File Recovery: 4DDiG can recover over 1000 file types and formats, ensuring that you can retrieve a wide range of documents, images, videos, and more.
- User-Friendly Interface: The software is designed with a user-friendly interface, making it accessible even for those who aren't tech-savvy.
- Deep Scanning: It performs deep scans of your storage to locate and recover files that might have been lost or deleted.
- Preview Before Recovery: 4DDiG allows you to preview the recoverable files before restoring them so you can ensure you're recovering the right data.
- Selective Recovery: You can choose which specific files or folders you want to recover, saving you time and storage space.
Now, let's learn how to recover your lost files on Mac using the 4DDiG Mac Data Recovery tool.
-
First, install 4DDiG Mac Data Recovery on your computer and launch it. Now, take the mouse cursor on the local drive where you have lost the data, and a small Scan button will appear in the left corner. Hit that Scan button.
FREE DOWNLOADSecure Download
FREE DOWNLOADSecure Download

-
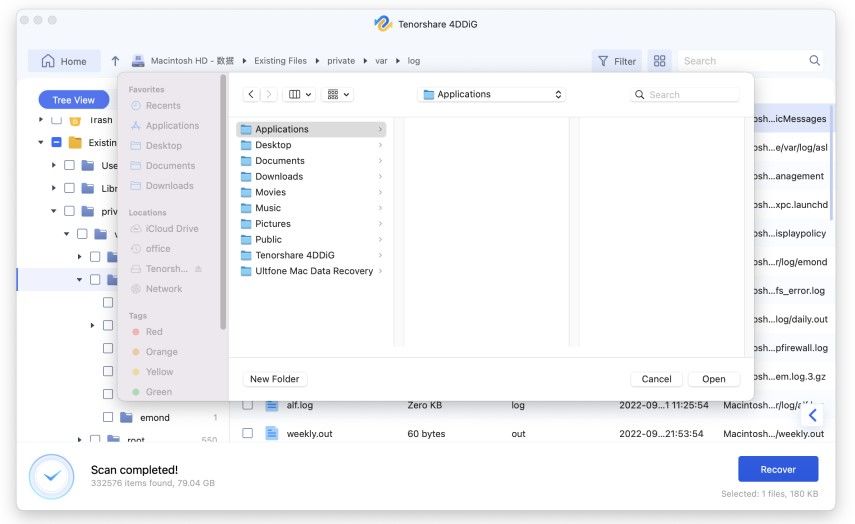
Now, the system will start scanning for your lost files. This process might take some time, so be patient. Once the process is finished, you can preview the files by going into their types in order to find the specific data or file.

-
Now select the files that you want to save on your Mac and hit the Recover button. The system will ask you to choose a location to save those files. It is advised for you to choose a different location to save those files.

Related FAQs
1. How do I enable my camera on my Mac?
To enable your camera on a Mac, access "System Preferences," navigate to "Security & Privacy" in the System Preferences window, and select "Camera" from the "Privacy" tab. Make sure the application you want to use with the camera has permission by enabling its checkbox. After this, the application should be able to access your Mac's camera.
2. Why is my MacBook camera not working on FaceTime?
If your MacBook camera isn't working on FaceTime, try these steps:
- Ensure FaceTime has camera access permission in "System Preferences"> "Security & Privacy"> "Camera."
- Restart the FaceTime application to resolve temporary glitches.
- Restart your Mac to address software-related issues.
- Keep macOS and FaceTime updated for potential bug fixes.
- Verify a stable internet connection for FaceTime functionality.
- If none of the above solutions work, consider hardware issues and consult Apple Support or visit an Apple Store for assistance.
Conclusion
To sum it up, by carefully following the steps outlined above, you can easily resolve the "there is no connected camera MacBook" issue and any other camera-related problems on your MacBook.
However, if none of these solutions work for you, the last resort might be to reinstall macOS. Please note that this process may result in data loss on your system. But don't worry; you can use the 4DDiG Mac Data Recovery tool to help restore your lost data.
Good luck!



 ChatGPT
 Perplexity
 Google AI Mode
 Grok
Grok

