How to Restore Windows from Backup [for Windows 10 & 11]
Losing important files or system crashes can be frustrating, especially if you don’t have a backup. But restoring Windows backup allows you to recover your system and files without hassle. Whether you need to restore Windows backup to new computer or fix a corrupted OS, Windows has built-in backup and restore options to help.
This article will cover different methods to restore Windows from backup for both Windows 10 and Windows 11 users. We’ll also introduce an easier alternative—4DDiG Partition Manager—which allows the whole process to be completed with just a few clicks.
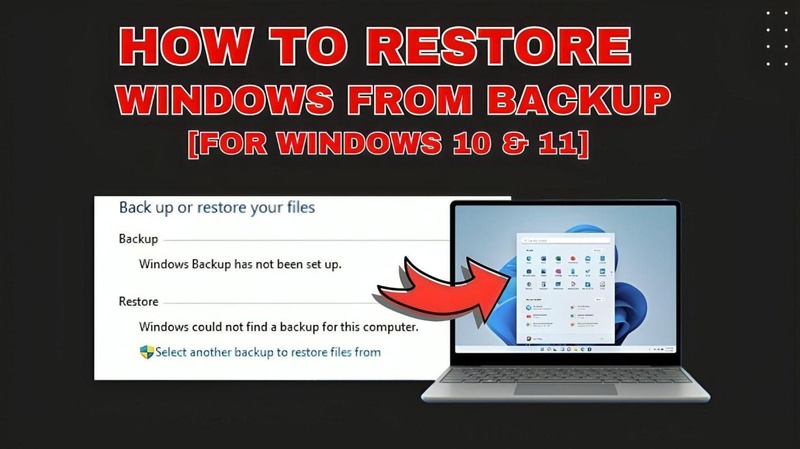
Part 1: What Is Windows Backup and Restore?
Windows Backup and Restore is a built-in feature in Windows that allows you to create backups of your files, system settings or entire disk images. It enables you to retrieve your data in case of system failures, accidental deletions or hardware issues. This tool has been available since Windows 7 and is still supported in later versions like Windows 10 and 11 as “Backup and Restore (Windows 7).”
Types of Windows Backups
Windows offers multiple backup options to protect your data and system.
Restore Windows Image Backup
A Windows Image Backup, also known as System Image Backup, makes a complete copy of the operating system, installed applications, and system settings. This is useful to recover a PC to its previous state after a major failure. Windows has a legacy tool called Backup and Restore (Windows 7) that allows you to create and restore system images.
Restore Windows Backup from an External Hard Drive or Network
Windows allows you to back up and retrieve your data from various storage locations:
- External Hard Drive: Backing up to an external drive provides an offline recovery option in case of system failure. You can restore Windows backup from an external hard drive using system recovery tools.
- Network Drive: Windows also supports backups to a network location, so you can store backups remotely for added security. In case of data loss, you can retrieve the system from network backup.
- USB Drive: Smaller backups can be stored on USB drives, which are portable and useful for recovering critical files quickly.
Each backup option provides different levels of protection, so you have multiple recovery options based on your needs.
Part 2: Preparing for Windows Restoration
Before you start Windows 11 restore from backup, you need to prepare properly to avoid errors and ensure a smooth recovery process.
- Check If You Have a Backup: Make sure you have a backup and that it’s up to date. An old backup may not have your latest files or settings, which could lead to data loss. Look at the backup’s date to confirm it includes your most recent data.
- Confirm Backup Location: Your backup should be stored somewhere accessible, such as an external hard drive, USB flash drive, network storage (NAS), or cloud service. Before restoring, check that your computer recognizes the backup device.
- Use an Administrator Account: Restoring Windows requires special permissions. Make sure you have access to an admin account. If you’re using a work or shared computer, you may need to ask the system admin for permission.
- Match the Windows Version: The backup should come from the same Windows version and edition as the one you’re restoring. Using a Windows 10 backup on Windows 11, for example, can cause issues. You can check your version by going to Settings, then System, and selecting About before starting the restoration.
Taking these preparatory steps will minimize potential issues and ensure a smooth Windows restoration process.
Part 3: How to Restore Windows from Backup [Step-by-Step]
If your Windows 10 or 11 system encounters issues like crashes, corruption or accidental file deletion, you can recover it using a previously created backup. Windows has multiple ways to recover your data, depending on the backup method you use. Below are two primary methods:
Method 1: Restore Windows 10 from Backup via File History
File History is a built-in Windows feature that allows you to recover lost, deleted or changed files from a backup. It allows you to restore previous versions of files and folders from your backup drive. If you’ve been using File History to back up your files, follow these steps to recover lost or previous versions of files.
-
Open the Windows search bar and type “Backup settings”. Click on the first result.
-
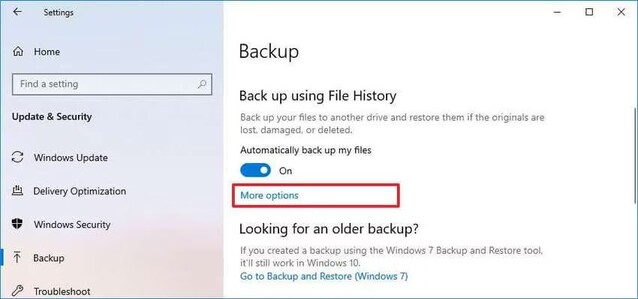
Click on “More options” under "Back up using File History."

-
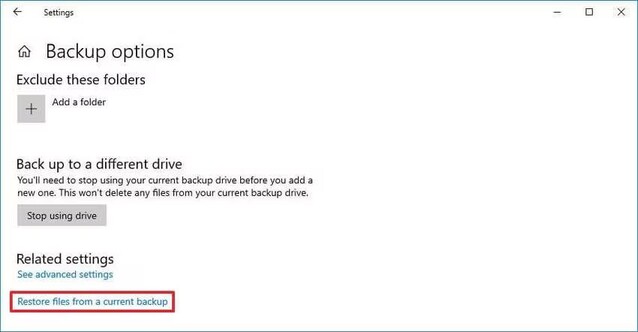
Scroll down to the “Related settings” section and click on “Restore files from a current backup”.

-
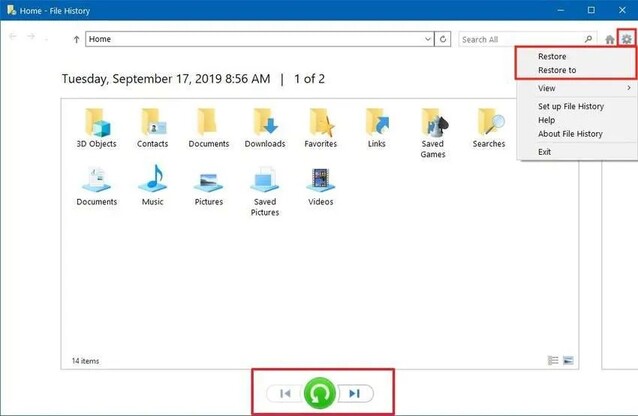
A window will open, displaying all backed-up files. Go to the file or folder you want to restore.
-
Select the file or folder and click on the “Restore” button (green icon with an arrow).

-
The file will be restored to its original location. If a file with the same name already exists, Windows will prompt you to replace, skip or compare versions.
File History is useful for recovering lost documents but doesn’t restore the full OS.
Method 2: Restore Windows from Backup Image
If you have created a System Image Backup, you can restore your entire system, including system settings, installed programs and personal files. The process varies based on whether the OS can boot normally or not.
A. When the OS Can Boot Normally
If your Windows system is still operational, you can restore it using the following steps:
-
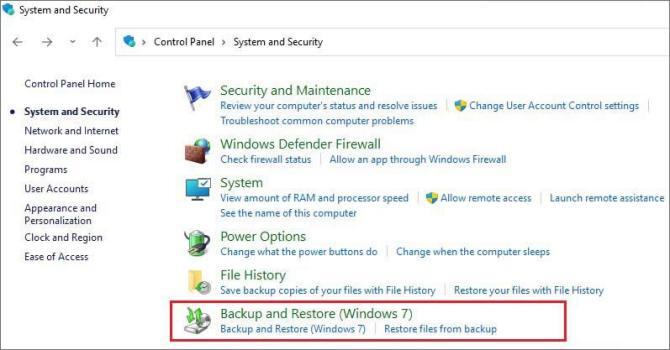
Open the Windows search bar, type Control Panel, and select it.
-
Click on “Backup and Restore (Windows 7)” under the “System and Security” category.

-
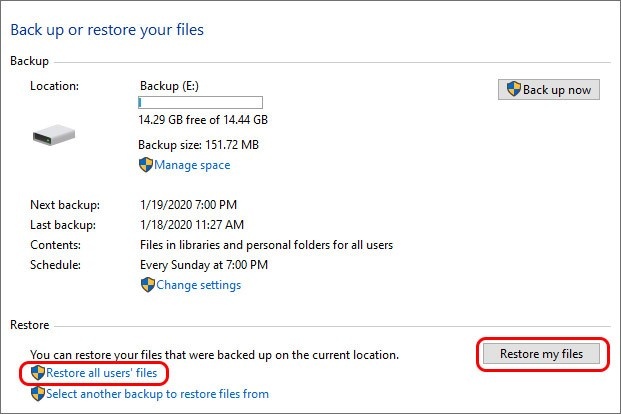
Click on “Restore my files” or “Restore all users' files” if restoring personal files.

-
Select “Browse for files” or “Browse for folders” to find the backup files you need to restore.
-
Choose a restore location (original location or a new location) and click “Restore”.
B. When the OS Fails to Boot
If your system cannot boot, you will need a recovery USB drive or other Windows installation media to perform the restoration. Here is how to make such a bootable installation media: How to Create a Bootable USB on Windows.
-
Plug in the external drive containing the system image. Insert the first backup DVD if applicable. Ensure network access if the backup is stored online.
-
Insert a system repair disc or recovery USB and boot from it. Select your preferred keyboard layout. Select “Troubleshoot” from the "Choose an option" screen.
-
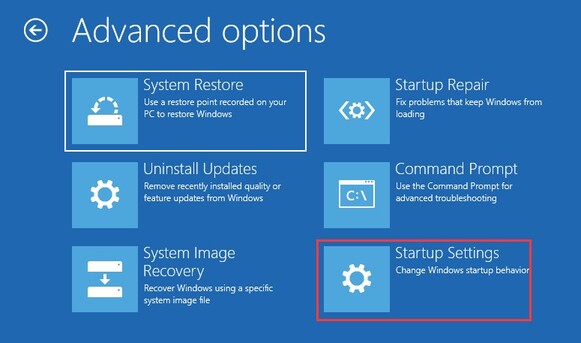
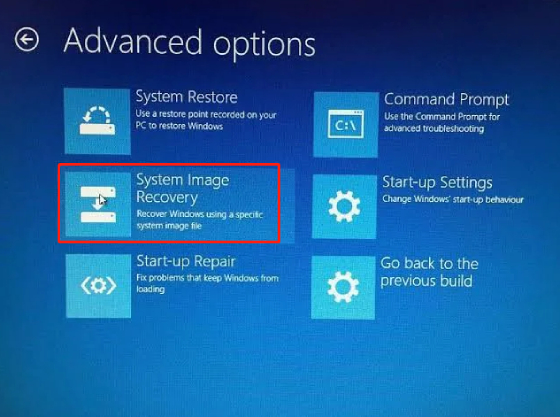
Go to “Advanced options” and select “System Image Recovery”.

-
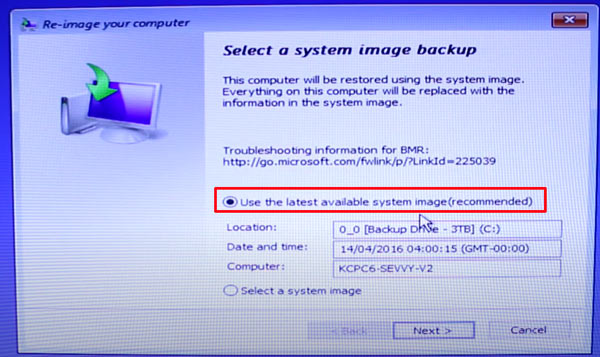
System Image Recovery detects available backups automatically. Select the latest system image and click “Next” to proceed. To use a different image, select Select a system image and locate it.

-
Choose restore options: Format and repartition disks (mandatory) or Exclude disks if needed. Install drivers if the recovery drive isn’t detected. Keep default settings for automatic restart and disk error check enabled. Click “Next”, review the summary and select Finish to start the restore.
-
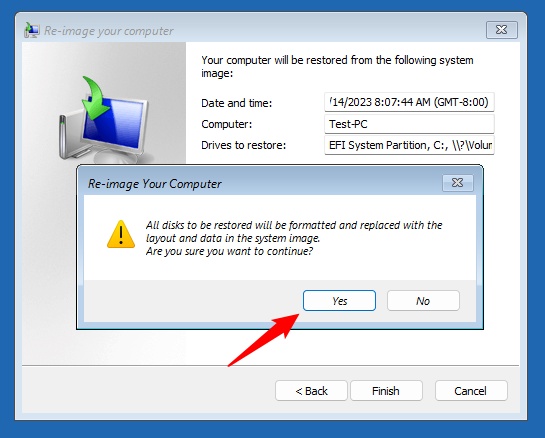
Click Yes to start the restore process. Wait for the recovery to complete. Once done, your PC will reboot and Windows will be restored to the backup state.

Backing up your Windows system is important to prevent data loss. If your OS is working fine, File History is a quick way to restore individual files. But if your system fails, using a system image backup will ensure full recovery. Be proactive and set up regular backups to avoid data loss.
Part 4: Easiest Way to Restore Windows Backup [Suitable for Beginners]
Restoring a Windows backup using the built-in tool can be complicated and time-consuming. It has multiple steps, and if something goes wrong, you might lose your data or get system errors. If you’re not tech-savvy, this process can be overwhelming.
Luckily, there’s an easier way to restore your backup without all the hassle—4DDiG Windows Backup. It comes with a built-in powerful Windows backup and restore function that lets you create backup tasks and recover your whole computer or system and specific partitions from them quickly. Unlike Windows’ built-in method, which has many steps, this tool makes the process smooth and easy for beginners.
Why Choose a 4DDiG Windows Backup?
- Easy to Use: Restore backups with just a few simple steps.
- Fast Recovery: No need to wait long—restore your system or files quickly.
- Safe and Reliable: Keeps your data protected while restoring.
How to Restore Your Backup with 4DDiG Windows Backup
A. Create System Backup on Windows
-
Install and activate the 4DDiG Windows Backup program. Create a backup task first.
FREE DOWNLOADSecure Download

-
The Windows system is selected by default, you can check which partitions you need to backup also.

-
Start backup and click "Confirm" to proceed. Wait for a while, 4DDiG Windows Backup will complete backup.

B. Restore from Windows Backup
-
If you restore the created a backup, you can also use 4DDiG Windows Backup to restore. Just select a backup task and click "Restore".

-
Choose an archive and select which partitions you want to restore, click "Next".

-
Wait for the process to complete, and click "Confirm" to restore system.

Once the backup is successflly restored, restart your computer to complete.

Part 5. People Also Ask About Windows Restore from Backup
Q1: How do I restore on a Mac?
Restore your Mac from a backup using Time Machine. Connect your backup disk, restart your Mac, and enter macOS Utilities to select Restore from Time Machine Backup.
Q2: How to restore from OneDrive?
OneDrive is good for file backups but doesn’t support full system restoration. If you need to restore lost files, log into your OneDrive account, find the missing files, and download them. However, for full system recovery, use built-in recovery options or third-party software to restore from backup Windows.
Q3: How do you restore factory settings on a PC?
Go to Settings, then Update & Security, then Recovery. Select Reset this PC to restore factory settings. This will delete all data unless you choose to keep files.
Q4: Can I back up and restore points in Windows 10?
Windows 10 doesn’t have an option to backup restore points, but you can use System Restore to create and manage them. For full recovery, use Windows backup restore software or restore Windows 10 from backup.
Conclusion
It is important to restore Windows from backup in order to recover lost data or fix system crashes. Whether you use File History, System Image Backup, or an external drive, Windows has multiple ways to recover your system. But these methods are complicated. For a simpler and faster way to restore Windows from backup, we recommend 4DDiG Windows Backup. With just a few clicks, it restores your system smoothly without technical hassle.
Secure Download


 ChatGPT
 Perplexity
 Google AI Mode
 Grok
Grok

