Hypervisor Error: Fix & Repair Hypervisor Error Windows 11/10 [2026 Guide]
“Question:”
My PC keeps crashing randomly, sometimes getting BSOD, sometimes not. It happens often while playing certain games; some seem immune to it. I've tried updating all the drivers, using different USB ports, removing the SSD, and lowering settings on the games that cause crashes. Hypervisor error is the most common message I get when the crash occurs, but I have no clue what to do anymore from
-from Microsoft Community
Windows has the built-in feature, Hyper V or Hypervisor, that can manage and create virtual machines effortlessly. Unfortunately, you can't consider that feature bug-free like other Windows features. Users tend to face the Hypervisor error a lot, as when this error occurs, the computer's functionality gets halted badly.
Regardless of the reasons that might prompt this unwanted issue, this guide will introduce some of the most reliable ways to fix the "Hypervisor error Windows 11/10" issue.
Part 1: What Is a Hypervisor Error
Facing the ''hypervisor-error blue screen'' and knowing about its credentials is crucial to dismantle it. Microsoft Windows helps users run different virtual machines as computers run on Linux or Android. The occurrence of the Hypervisor can result in a blue screen of death (BSOD) in Windows, promoting the pop up saying ''hypervisor-error blue screen''.
Part 2: How to Fix Hypervisor Error Windows 11/10
Despite the ''hypervisor-error blue screen'' issue being difficult to analyze, you can watch out for the brilliant methods below to fix this unwanted scare.
Fix 1: Make sure your system supports virtualization
The first thing you'll need to do to fix the ''BSOD Hypervisor_error'' issue is to ensure that your computer system is compatible with the virtualization.
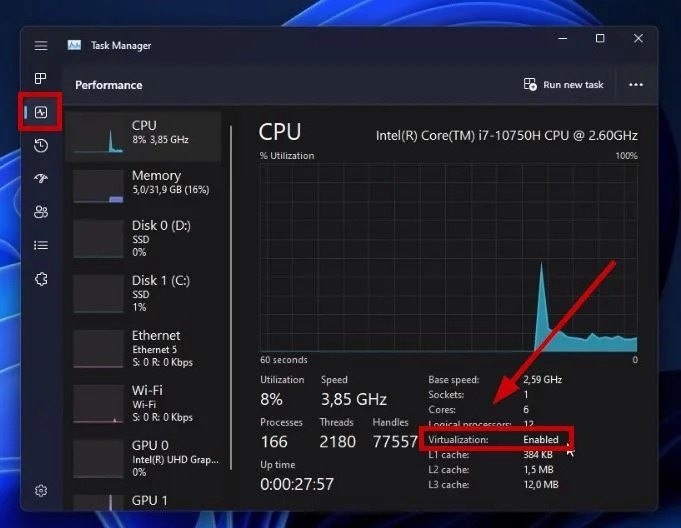
Right press the bottom taskbar and choose the Task Manager. Navigate to the Performance tab and select the CPU button. Now, you can check whether Virtualization is disabled or enabled on the computer.

- If you can't locate the Virtualization, your PC doesn't support it. You can verify this by visiting the manufacturer's website. You can enable Virtualization provided it is disabled.
Fix 2: Restart Hyper-V Virtual Machine Management Service
Hypervisor visor empowers you to manage the virtual machine, and when it fails to do so, restarting the Hyper-Virtual Machine can help you fix the ''Hypervisor_error blue screen'' issue.
Navigate to the Start menu before typing the Services. Launch the Services to begin the proceedings.

After locating the Hyper-V Virtual Machine Management, you'll need to double-click on it.

-
Press the Start button after hitting the Stop icon for a few moments. Press on the OK button, and this way, you'll be able to restart the Hypervisor.

✅You may also like: Disable Hyper-V Windows 11: Step-by-Step Guide.
Fix 3: Check Your Device Manager
Using outdated and old virtualization drivers might also be the main culprit behind the ''BSOD Hypervisor_errror'' issue. Thus, updating the Virtualization Drivers might enable you to fix the issue you're currently struggling with.
Here's how to update the virtualization Drivers.
Press the Win+X before choosing the Device Manager button.

-
In this phase, you must expand your System Devices category before pressing the Microsoft Hyper-V Virtualization Infrastructure driver right. Proceed ahead by selecting the ''Update driver'' button.

-
Follow the on screen instructions after hitting the ''Search automatically for drivers'' button.

Fix 4: Run Command Prompt
Running the command prompt is one of the most reliable and efficient ways to fix Windows-related issues. Hence, you can also run the command prompt to fix the Hypervisor error.
Here's how to run the command prompt.
- To begin with, you'll need to launch the Start menu before typing the cmd. Next, you'll need to select the command prompt as an administrator.
- Press the following command and hit the Enter button.
- bcdedit /set hypervisorlaunchtype auto
Restart the computer and check whether the issue you were having has been solved or not.

Fix 5: Update Your Windows
Despite acting upon all these, if the Hypervisor error persists, it might be due to outdated Windows. Hence, updating Windows could help you eliminate the ''Hypervisor error Windows 11'' issue.
Here's how to update the Windows.
-
Launch the settings and choose the Windows Update icon. Begin the preceding by hitting the ''Check for updates'' button.

-
If you see the new Windows update there, press on the Download & Install icon to get it installed. Once you're done updating the Windows, you can start the computer to see how it goes.

Bonus Tips: Dealing with Data Loss After Hypervisor Error
Continuously facing the Hypervisor errors might be due to the virtual machine image getting corrupted. This whole scenario could end up causing data loss, and you wouldn't want to lose the important information. Fortunately, 4DDiG Data Recovery software is there to help you regain lost data regardless of the situation that promoted the data loss.
With 4DDiG Data Recovery, you can get back the lost data types for 2000+, including photos, videos, documents, and audios, due to the Hypervisor error. What’s more, it doesn't affect the quality of data while recovering the lost data. Another thing to consider about the 4DDIG data recovery is that it offers the highest recovery rate and a fast scanning speed after hypervisor error.
Secure Download
Secure Download
Here's the step by step guide to retrieve the lost data on computer through 4DDiG Data Recovery software.
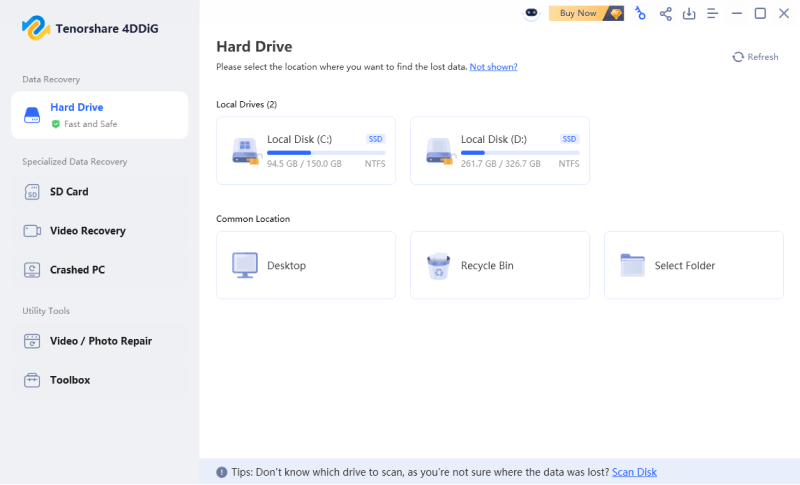
Download and install the software on the computer. Start the data recovery program software and visit the folder from which you've lost important data.

-
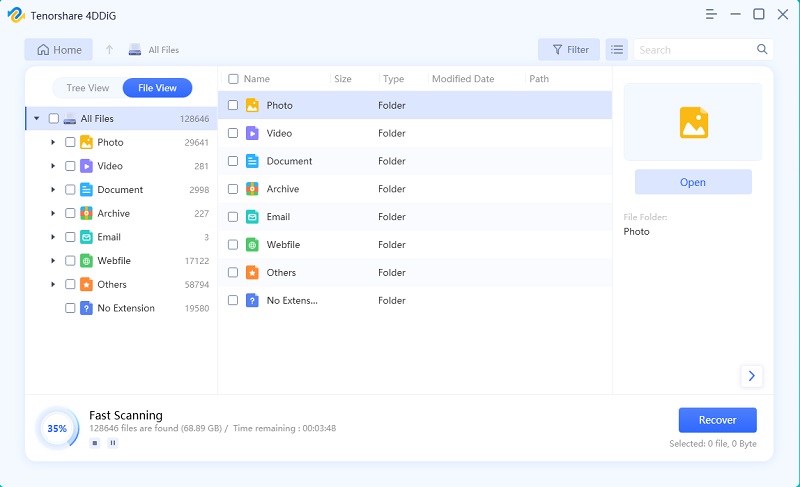
Click on the Scan button to begin scanning for the lost data. If you want to recover a specific data type, you can search for the data type or file name. 4DDiG Data Recovery software offers several categories to choose from, including Lost Locations, Deleted Files, RAW files, etc.

-
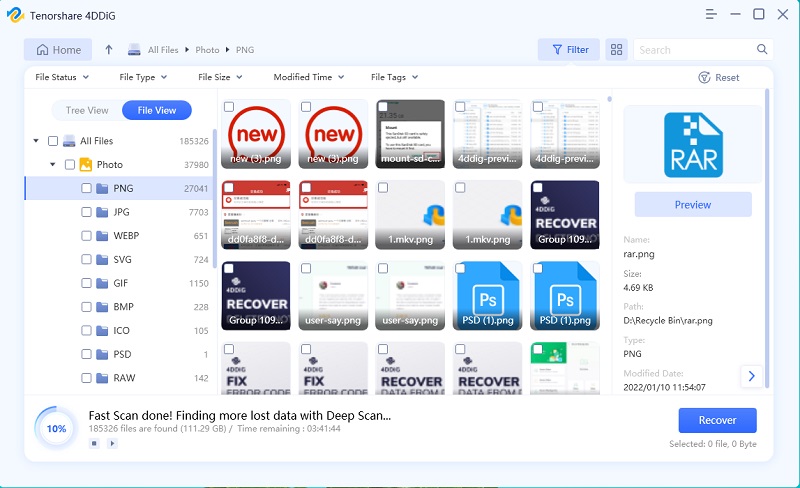
Once the scanning process is completed, you'll need to preview the data and hit the Recover icon to initiate recovery for the lost data.

Secure Download
Secure Download
Conclusion
Struggling to run the virtual machines and facing the Hypervisor error isn't a good sight. Fortunately, you can eliminate this unwanted issue as we've listed the brilliant methods to fix the ''Hypervisor error blue screen'' issue. If this unwanted error causes significant data loss, 4DDiG Data Recovery is the most recommended tool to regain the data with highest recovery rate, allowing you to recover 2000+ data types.
💡 Summarize with AI:
You May Also Like
- Home >>
- Windows Fix >>
- Hypervisor Error: Fix & Repair Hypervisor Error Windows 11/10 [2026 Guide]


 ChatGPT
 Perplexity
 Google AI Mode
 Grok
Grok
