How to Fix Secure Boot Can Be Enabled When System in User Mode
Are you stuck with the "Secure Boot Can Be Enabled When System in User Mode" error while setting up Secure Boot on your PC? No worries! Read this article, we will provide you 3 easy ways to solve this problem! Securing your computer with Secure Boot is super important in today's digital world. It is used as a security guard for your computer, making sure only safe and approved software gets to start up.
But, users face a tricky problem when they enable this feature on their system that is called the 'Secure Boot Can Be Enabled When System in User Mode.' This issue stops Secure Boot from working smoothly and even blocks you from playing certain games or installing windows. In this article, we'll explain what causes this problem and give you three simple ways to fix it. We'll also provide you with reliable software. In case you lose your important data during solving this error, you can recover your data with this powerful tool. So ready to solve this problem smoothly? Then keep reading to discover the solutions you need.
Part 1: What Cause Secure Boot Can Be Enabled When System in User Mode?
There are several reasons why the "Secure Boot Can Be Enabled When System in User Mode" error may occur. Here are some causes which we found after checking user reports and online sources:
- Corrupted Boot Configuration Data (BCD): Unexpected power issues, software problems, or malware can mess up the BCD, causing trouble when trying to activate Secure Boot.
- Incorrect BIOS/UEFI Setting: If your computer's settings aren't right for Secure Boot, it might end up turning on in user mode.
- Malware/Viruses: Persistent bad software can mess with your computer's files and settings, turning on Secure Boot without you knowing.
- User Mode Not Enabled: Secure Boot needs the system to be in User Mode to work. If it's not, you'll run into this problem.
- Unsupported Firmware: If your computer's firmware is old or doesn't work with Secure Boot, you'll need to update it.
- Incompatible Partition Table: Issues with the way your computer organizes its data can clash with Secure Boot.
- Incompatible BIOS Mode: If the BIOS mode doesn't match up, it can cause problems with Secure Boot.
- Enabled Compatibility Support Module (CSM): Having CSM turned on might get in the way of Secure Boot working.
Understanding these issues is crucial for fixing the 'Secure Boot Can Be Enabled When System in User Mode' problem. By dealing with these problems, you can make sure your computer starts up securely and smoothly.
Part 2: How to Fix Secure Boot Can Be Enabled When System in User Mode
As we uncover the reasons behind this issue, you'll be ready to tackle each solution. Let's explore these fixes step by step and regain control of your system. Now that we know what causes the problem, let's jump into the solutions. Let's get started!
Bonus Tip: Recover Lost Data After Fixing Secure Boot Issues
If you’ve resolved the "Secure Boot Can Be Enabled When System in User Mode" problem, your data may have been lost during troubleshooting the issue. Now, you may need a reliable solution to recover your lost data. Here's an extra lifesaver, 4DDiG Windows Data Recovery. This premier data recovery software is your go-to solution for retrieving lost files after resolving Secure Boot issues. Why choose 4DDiG Windows Data Recovery to reclaim your lost data post-Secure Boot resolution?
After fixing the Secure Boot problem, 4DDiG smoothly moves to get back your lost data. It works well, digging deep to bring back your deleted or messed-up files, like photos and videos. Whether files got deleted or pictures got messed up, 4DDiG can handle it all. Your data's security is prioritized with a 100% secure download. Here's how to use 4DDiG Windows Data Recovery in simple steps:
Secure
Download
Secure
Download
-
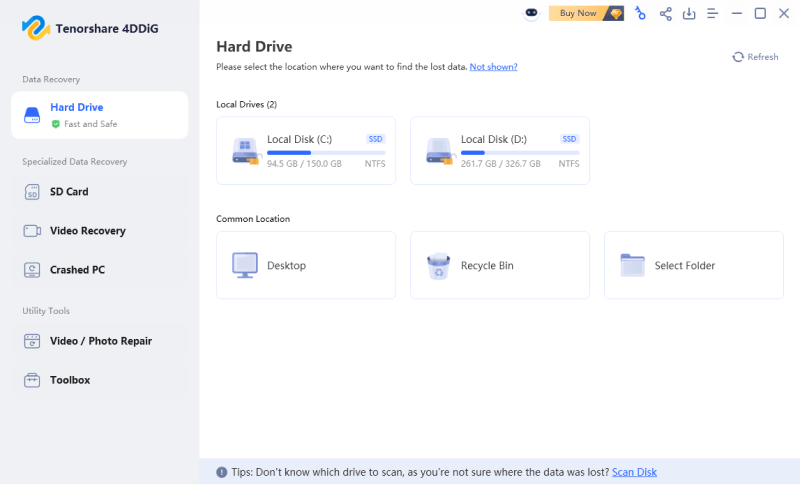
After installing and launching 4DDiG, choose the local disk where you encountered data loss due to Secure Boot issues.

-
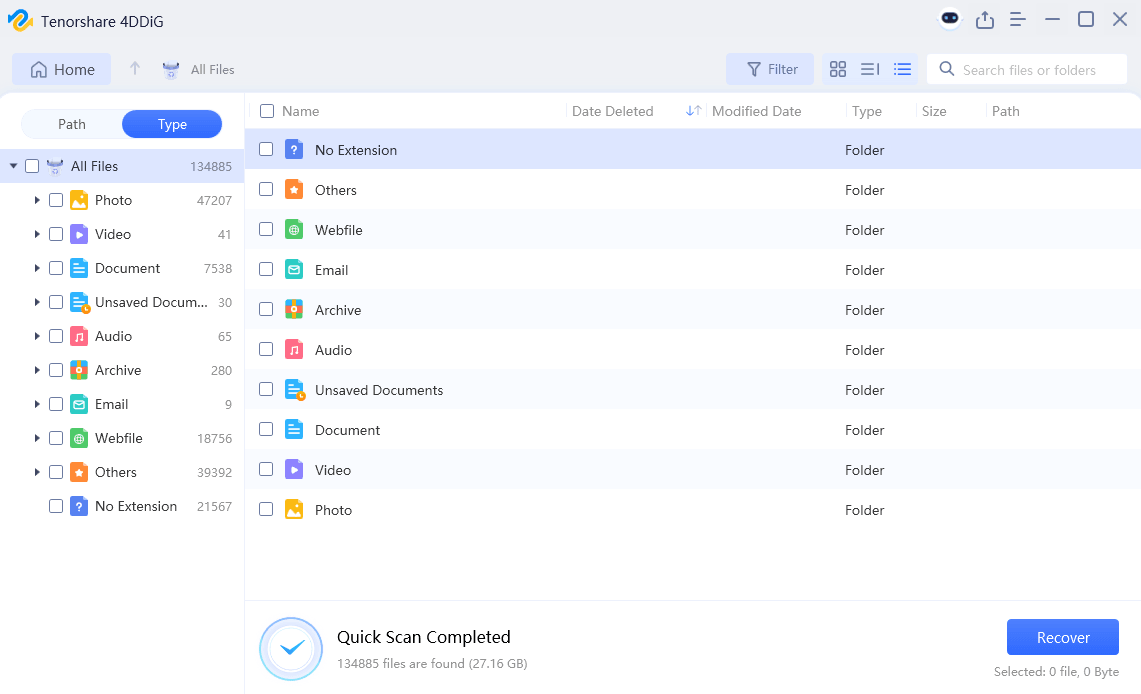
Let 4DDiG check the chosen disk thoroughly to find the missing files. You can stop or pause the search if you see the files you need.

-
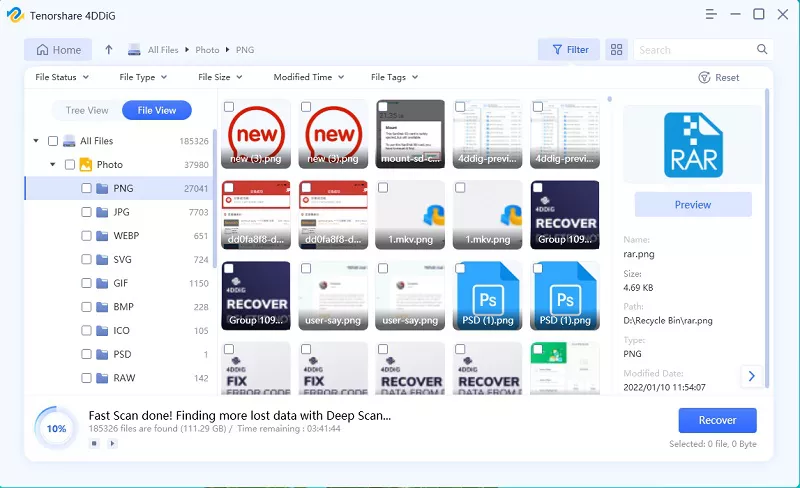
Once found, preview your files to be sure they're the right ones. No need to save them in the same spot. Click "Recover" to save your files in a secure place. Avoid saving them in the same spot to prevent data loss. That’s it. You've successfully reclaimed your lost data after resolving Secure Boot issues using 4DDiG Windows Data Recovery Pro.

How to Fix and Recover Data from Corrupted Hard Drive on Mac?
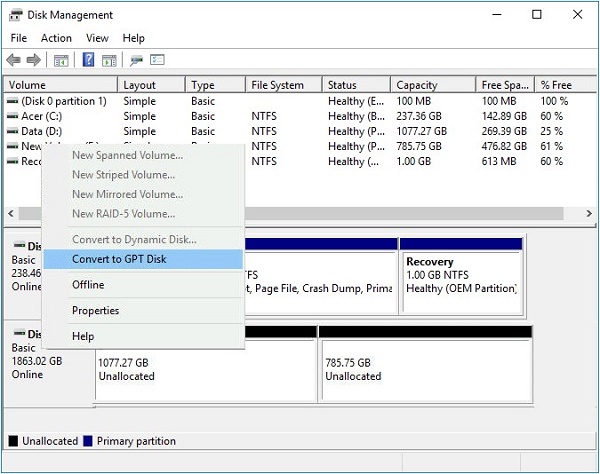
Way 1: Switch Your Partition Style from MBR to GPT
Windows 11 needs a GPT partition system to start up. If your PC doesn't have one, you must switch from MBR to GPT. Here is how you can do it:
- Press Windows+ "X" and select "Disk Management" from the menu.
- Locate "Disk 0" in Disk Management, right-click it, and choose "Properties."
-
In the "Volumes" tab, check the Partition style under Disk Information. If it says "Master Boot Record (MBR)," convert it to "GUID Partition Table (GPT)."

- To convert, back up your data and use tools like MBR2GPT or the built-in "mbr2gpt" command-line program.
Way 2: Access Windows Troubleshooter to Adjust UEFI Firmware Settings
If the previous method didn’t work you can utilize Windows Troubleshooter to tackle the "Secure Boot Can Be Enabled When System in User Mode" glitch. Follow these simple steps:
-
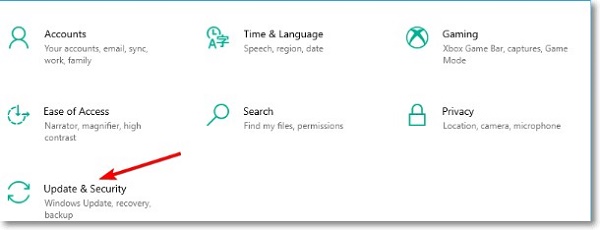
Access system settings by pressing the Windows key and "I" simultaneously. Click on "Update & Security."

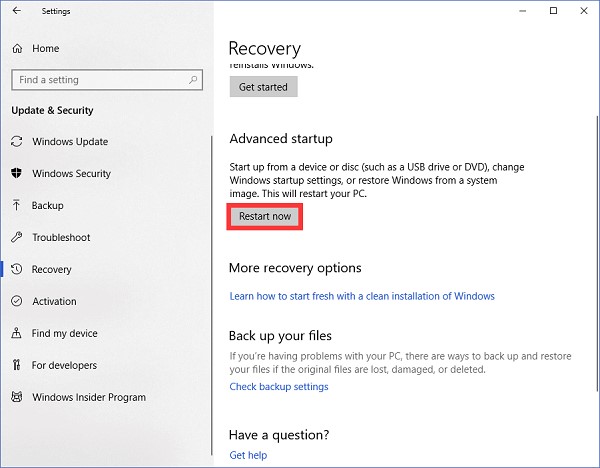
- In "Update & Security," select "Recovery" from the left panel.
-
Click "Restart now" under Advanced Startup. Your computer will reboot into Advanced starting options.

- Under "Choose an option," select "Troubleshoot."
- Further select "Advanced options."
-
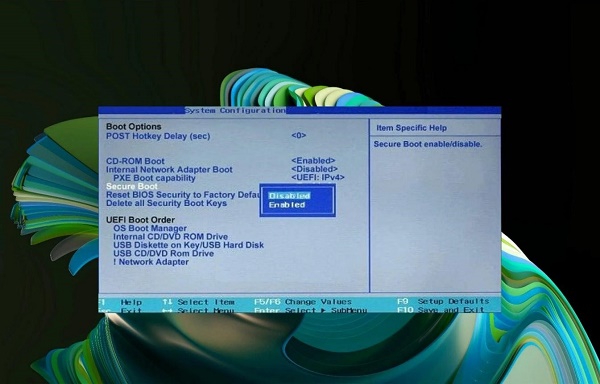
Click on "UEFI Firmware Settings." Restarting will bring you to UEFI settings.

- Locate Secure Boot in UEFI, typically under "Security" or "Boot."
-
Turn off Secure Boot, save changes, and exit UEFI settings. You've successfully adjusted your UEFI firmware settings to manage Secure Boot.

Way 3: Make CSM Inactive and Reinstall Windows
CSM stands for Compatibility Support Module, a part of the Boot option in the BIOS, found alongside Secure Boot. So, try turning off CSM and then reinstall Windows to see if that solves the problem.
Follow these easy steps:
- Go to the UEFI settings, like in Fix 1.
- Find CSM or Legacy Support in UEFI and turn it off.
- Save changes and exit UEFI settings.
-
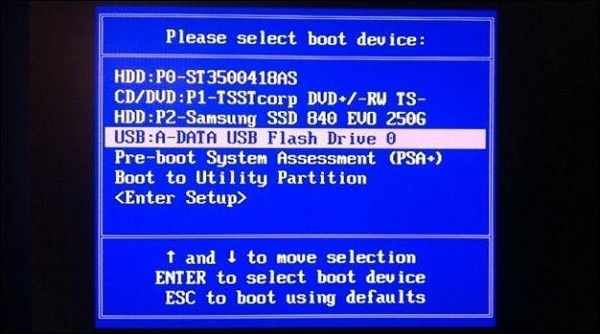
Boot Windows from a USB or DVD by choosing the installation media.

- Reinstall Windows, making sure to use GPT partitions when prompted.
- Finish the Windows installation by setting up your user account and preferences.
When you use this method to solve the problem, you may lose the important data because of this process, which includes the formatting of harddrives and deleting data. After the reinstall, you can effortlessly bring back your data with the 4DDiG Windows Data Recovery tool mentioned earlier.
Part 4: Frequently Asked Questions
Q1: How do I enable secure boot in user mode?
Ans: To enable Secure Boot in user mode, go to your system's UEFI settings. Locate the Secure Boot option and switch it on for enhanced system security.
Q2: How do I enable secure boot in system configuration?
Ans: To enable Secure Boot in system configuration, access the system settings. Look for the Secure Boot option and activate it to bolster your system's security measures.
Q3: Should secure boot Control be enabled?
Ans: Certainly, enabling Secure Boot Control is advisable for robust security. This setting ensures that only trusted software is loaded during system startup, preventing potential threats and unauthorized software.
Final Thoughts
Dealing with the 'Secure Boot Can Be Enabled When System in User Mode' problem can be frustrating. In this article, we've shared three easy solutions for issues like corrupted Boot Configuration Data or incorrect BIOS settings. But remember, fixing the problem might lead to data loss. That's where 4DDiG Windows Data Recovery comes in. It's your go-to tool with a 98% recovery rate and 16 years of experience. So, after solving the issue, use 4DDiG to get back your important files effortlessly. Secure your system, recover your data – it's a win-win. Use 4DDiG, get things fixed, and keep your digital world running smoothly.
You May Also Like
- Home >>
- Windows Fix >>
- How to Fix Secure Boot Can Be Enabled When System in User Mode
