Sometimes, having a corrupted hard drive may seem like the end of the world. But this is understandable because a hard drive is meant to be a haven for our valuable files which may include photos and videos of our loved ones, documents from work, research papers, etc. fortunately, we now live in a world where having such problems isn’t the end of it all as a corrupted hard drive on Mac can be fixed and its data can be retrieved. In this article, we will walk you through the processes and steps on how to fix corrupted mac hard drive. We will also go through the signs of a corrupt hard hard drive, as well as how to recover data from a corrupt Mac hard drive, and the preventive measures to take to avoid such problems in the future.
Part 1: What Signs Indicate a Corrupt Mac Hard Drive?
Being able to identify a corrupt hard drive is very essential when it comes to knowing how to fix a corrupted hard drive (Mac), this is because you can’t fix a problem if you fail to identify its presence. In most cases, a corrupt Mac hard drive is usually the cause of a malfunctioning Mac computer. At first, the symptoms may seem random and irrelevant, however, if left unchecked could result in serious problems that may even include the loss of valuable data. Below are the common signs that indicate a corrupt Mac hard drive.
- When your applications frequently force close.
- When your Mac computer becomes irresponsive to inputs.
- When a file won’t open after many attempts.
- When you begin to experience difficulties in transferring files from one folder to another.
- The worst-case scenario is when your Mac computer refuses to come on.
Fortunately, we live in a world where corrupt Mac hard drives can be fixed, and in this article you will find the most-effective methods of repairing corrupted hard drive on Mac
Part 2: How to Fix Corrupted Mac Hard Drive?
In this section, we will be walking you through the methods of fixing a corrupt hard drive on a Mac. Before proceeding, it would be in your best interest to make sure you recover and back up the data on the hard drive – More on this will be discussed later on in this article. After you must have recovered and backed up your data to a safe location, it is time to repair hard drive (Mac) your hard drive. Below you will find 4 efficient ways to do so – these methods are arranged in order of their complexity, and as usual, we will begin with the simplest and then advance to the more complex ones.
Way 1: Insert the External Hard Drive with Another Cable or Port
Sometimes your hard drive may not be the culprit, it could be the accessories linking it to your computer. This is very likely with external hard drives. So, whenever your external hard drive starts acting up, you can try connecting it with a different cable or make use of a different port on your computer. As easy as this fix sounds, it may be all you need. If an external drive is what you use, then you might want to try this out before any other fix.
Way 2: Repair Mac Corrupted Hard Drive with Disk Utility
For users without external hard drives and those who can’t seem to fix this problem with the first method, making use of the built-in repair tool (Disk Utility) in Mac computers may be all you need. Disk Utility is capable of resolving disk-related errors like when a Mac computer won’t boot, external devices fail to function properly, or when multiple apps force close unexpectedly. Trying to fix your hard drive with Disk Utility increases your chances of being successful, this is because the built-in repair tool was specifically designed for such problems. Below are the steps to follow repair HDD Mac drives.
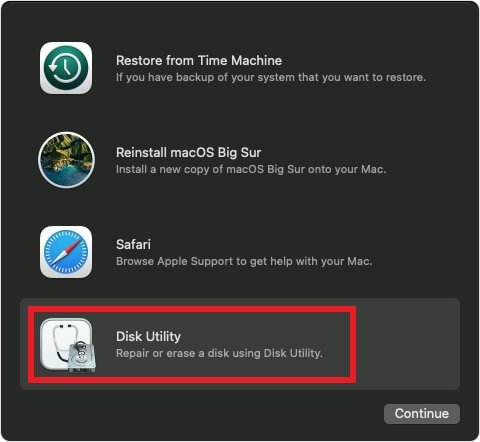
Step 1: Navigate to the “Utilities” folder to launch “Disk Utility”. In cases where your Mac computer won’t boot, “macOS Recovery” is where you can find “Disk Utility”. Proceed by first determining whether your Mac is of Intel Celeron or Apple Silicon operating system. An Intel Celeron user will have to immediately press Cmd + R keys after turning on the Mac to display the start options window. Whereas, an apple silicon user will have to continue holding the power button to display the options window. Click on “Continue” after clicking the “Options” button. Then select your user account, and then from the utility window, click on “Disk Utility”.
Step 2: Navigate to “Choose View” and then select “Show All Devices”. From here you can find all the storage or disk devices present in your Mac computer. You can also find the storage information of any disk you choose, including its container.
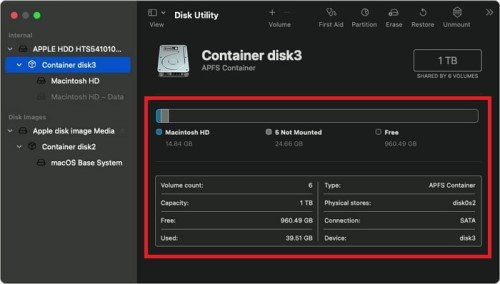
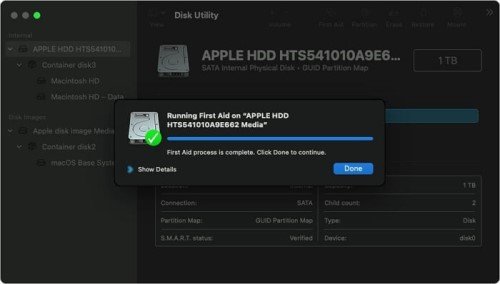
Step 3: After identifying the disk you wish to repair, click on the “First Aid” button after selecting its last volume. Next, check for the volume of errors by clicking on “Run”. Once the process is done, preview each volume, container, and then the whole disk.
Way 3: Fix Corrupted Hard Drive on Mac Via FSCK Command
If Disk Utility fails to repair your corrupt hard drive, you’d want to try using the FSCK command. To do so, follow the steps below.
For Mac Computers without Security Chips:
The older version of Mac computers does not come with any security chip like the ones we have today, and as such the method of accessing and operating the FSCK command varies.
Step 1: Proceed to repair your hard drive by pressing and holding Cmd + S keys to reboot your Mac computer into single-user mode.
Step 2: Open and type this command into your terminal; diskutil List. Hit the Enter key. You will be presented with a corrupt partition number, make sure you write it down somewhere or even on a piece of paper.

Step 3: Again, reboot your computer into single-user mode and type in this command into the terminal; /sbin/fsck_hfs –fy /dev/[partition number]. Make sure you replace “partition number” with the corrupt partition number gotten from the diskutil list in step two. Hit the Enter key. Immediately, the terminal will begin scanning for errors and will automatically fix them if it comes across any. If the process was successful then you will receive a message saying the file system was modified.
Step 4: For confirmation, input the command again. This time you will get a message saying “The volume Macintosh HD appears to be OK”. Restart your Mac computer to reach the login screen by typing “reboot” into the terminal.
For Mac computers with M1/T2 Chip:
If your Mac computer contains either an M1 or T2 security chip, follow the steps below to launch the recovery mode.
Recovery mode for M1 Mac computers:Step 1: From the Apple menu, turn off your Mac computer
Step 2: Turn your computer back on, but this time press and hold the power button until you can see the startup options.
Step 3: Proceed by clicking on “Continue” after clicking “Options”. If asked for administrator credentials, enter and then proceed by following the common steps.
Starting your T2 Mac computer in recovery mode is easy. Simply press and hold both “Cmd + R” keys on your computer when it restarts. Proceed by following the common steps below.
Step 1: Navigate to the “Utilities” folder and launch “Disk Utility”.
Step 2: Use the “Mount” command if necessary to select and mount the normal boot volume.
Step 3: Switch to “Terminal” from Disk Utility.
Step 4: Input the following command; diskutil repairVolume /Volumes/[Drive Name] into your Terminal. Hit enter.
Way 4: Try to Format the Disk
At this point, this problem should be a thing of the past. But if for some reason it persists, you’d want to consider how to format your hard disk. You can do so by making use of Disk Utility, however, some users may find the process intimidating and as such we will walk you through the steps involved. Note that, the method for formatting an internal drive with your operating system is slightly different from formatting an external drive. Below you will find the working steps for both scenarios.
How to format an external drive:Step 1: Open Disk Utility by navigating to Applications > Utilities.
Step 2: Click on the “Erase” button which can be seen at the upper-right corner of your screen and right next to “Partition”.
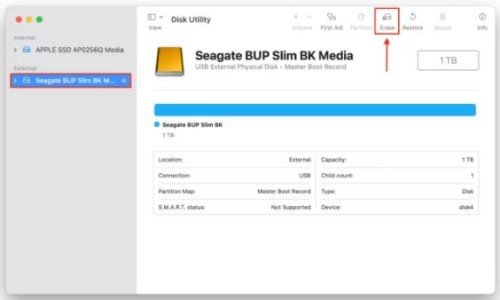
Step 3: After step two, you will be presented with a pop-up asking you to key in the name of your disk, select a format, and choose a partition scheme. Proceed by clicking on “Erase”.
How to format an internal drive:Step 1: For MacBook users with an Apple Silicon chip, turn off your computer and then turn it back on. But this time, press and hold the power button until you see the startup options displayed on your screen. For MacBook users with an Intel chip, restart your computer while pressing and holding Cmd + R keys on your keyboard to display the startup options.
Step 2: Choose Disk Utility from the list and then click “Continue” to proceed.
Step 3: Locate your disk by clicking on “View” and then “See All Devices”. Proceed by clicking on the dropdown arrow next to your disk. It is usually named “Macintosh HD” and can be seen in the left sidebar.
Step 4: At the top of the disk utility window, choose the data volume and then click on the minus (-) button.
Step 5: On the next pop-up that appears, click on “Erase Volume Group”.
Step 6: You will be presented with a pop-up asking you to key in the name of your new disk, select a format (select APFS), and choose a partition scheme. Proceed by clicking on “Erase”.
Bonus Tip: How to Recover Data from Corrupted Hard Drive on Mac?
Whenever it comes to repairing a corrupted hard drive on Mac, Disk Utility is always the go-to for such problems. But if you find yourself in a situation where repairing your corrupted hard drive is beyond your capacity, you may want to consider other options like seeking professional help. But before you do so, it would be in your best interest to restore and back up the data stored in your corrupted hard drive. Below are the methods by which data can be easily recovered from your corrupted hard drive.
Fix 1: Recover Corrupted Hard Drive Data with 4DDiG
The best and easiest way to recover lost files from a corrupted hard drive is with the use of third-party software, and 4DDiG Data Recovery Software is currently the best in the market. This is an easy-to-use software that’s capable of recovering any type of file from your external disk or Mac hard drive.
Below are some of the features of the Tenorshare 4DDiG Mac data recovery software:
- It is capable of recovering lost data from Mac computers and other Mac-based devices like digital cameras, SD cards, USBs, hard drives, etc.
- It is compatible with M1, M1 Max, M1 Pro, T2 chip, and macOS Ventura operating systems.
- It is trustworthy and has a high success rate.
- It is easy to use as it involves only three steps to recover lost data.
Follow the steps below to recover corrupted hard drive data with 4DDiG:
For PC
Secure Download
For MAC
Secure Download
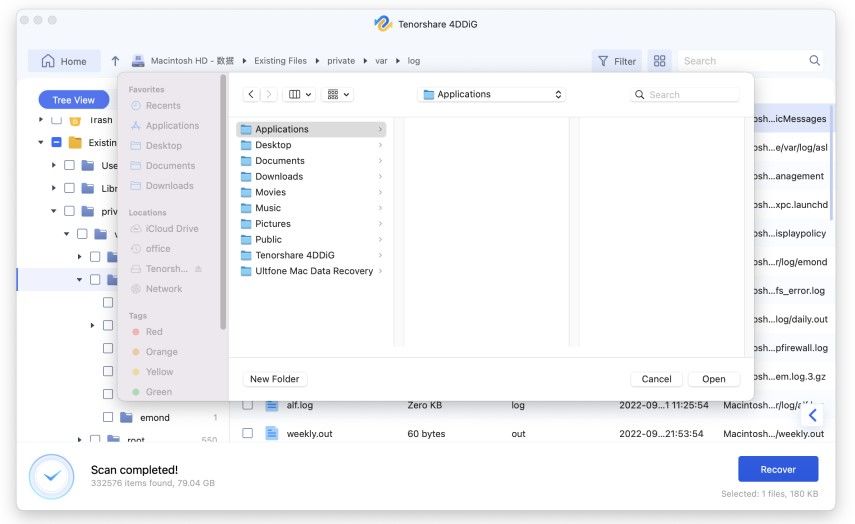
- After downloading and installing the Tenorshare 4DDiG Mac Data Recovery software, launch it and select the location you wish to recover files from. In this case, select your local drives to proceed. Move your mouse cursor over the drive to display the “Scan” icon, and click on it to proceed.
- Exercise some patience as the scanning process takes a while. Once the process is complete, preview the result for more details. You can click on specific file types to easily locate the files you want to recover.
- After identifying the files you wish to recover, click on “Recover” and then select a safe and secured location to save them. In this case, you can move the recovered files to an external storage device.


Fix 2: Retrieve Corrupted Hard Drive Data from Time Machine Backup Drive
The Time Machine Backup is always a lifesaver. If you’ve used it to back up your disk in the past and before it got corrupted, then you can always go back to it to get rid of the corrupted files. Here’s how to retrieve corrupted hard drive data from the Time Machine backup drive:
Step 1: If your Time Machine Backup isn’t connected to your computer, connect it and then navigate to the folder with your corrupted files on your drive.
Step 2: On the Menu Bar, click on the Time Machine icon and then select “Enter Time Machine”.
Step 3: On the right edge of your screen, identify and select the files you wish to recover and then click on “Restore”.
Part 3: How to Protect Data on Mac?
Due to unforeseen circumstances, even the most careful Mac user can experience drive failure at any time, which could lead to data loss. Therefore, protecting your data from such circumstances should be a top priority. As the adage says “prevention is better than cure”. The best way of protecting your data on a Mac is by backing it up. Doing this in real-time will make sure don’t have to worry about drive failure or corruption. As it should be, Apple has made it easy for Mac users to back up their data using the methods as seen below.
Use Time Machine to Backup Data
This is a free in-built backup feature in Mac computers. It can be used to back up videos, photos, and other file types on your computer. Once the Time Machine has been set up, it can back up your data at several intervals. Follow the steps below to set up the Time Machine on your Mac.
Step 1: Connect your external hard drive or SSD to your Mac computer.
Step 2: A message asking if you want to use the Time Machine with your drive will pop up.
Step 3: Proceed by selecting “Use as Backup Disk”. In cases where the message does not appear on your screen, make sure the drive is correctly formatted.
Step 4: Alternatively, you can navigate to “System Preferences” click on “Time Machine” and then select “Backup Disk”.
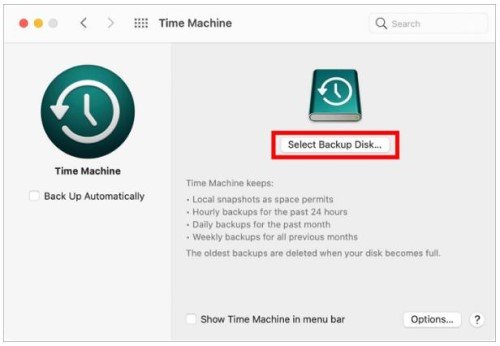
Step 5: Click “Use Disk” after selecting the storage device.
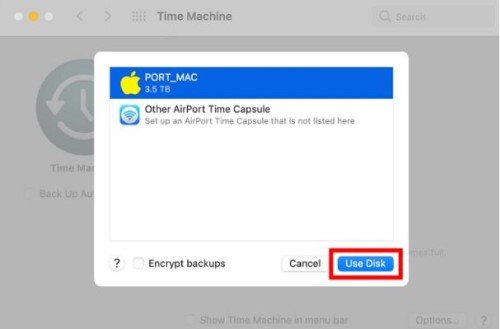
Step 6: Toggle the auto backup feature by ticking the box beside “Back Up Automatically”.
Back-Up Data with iCloud Drive
Backing up your Mac data with the iCloud drive is an alternative to using the Time Machine. You can toggle your backup settings to allow auto file upload to your iCloud drive. However, only 5GB of free storage space is available to users. If you want more storage you will have to opt for a paid iCloud membership. Follow the steps below to back up your data with iCloud drive.
Step 1: Navigate to “System Preference” and then click on “iCloud”.
Step 2: After successfully signing into your iCloud account, check the box next to “iCloud”.
Step 3: Click “Options” and then tick the boxes next to the items you want to upload to iCloud.
Step 4: Navigate to and open “Finder”. Select the iCloud Drive folder and then transfer other folders you wish to back up into it.
Use Other Third-party Storage Devices
Aside from the Time Machine and iCloud drive, there are other reliable third-party storage mediums you can use for backup; the likes of Google Drive and Dropbox, amongst others. Backing up your data on these platforms is easy as all that’s required is creating an account, selecting storage (free or paid), and uploading your files.
Part 4: How to Prevent a Corrupted Hard Drive on Mac
Frequently monitoring your system’s health is the best way to prevent a hard drive from corruption. Below are additional steps to take to prevent possible hard drive corruption problems in the future.
Safely Turn Off your Mac Computer
Always turn off your Mac computer properly by navigating to the Apple menu to do so. Avoid pressing and holding the power button to do so unless you have no other choice but to do so. If you need your computer to sleep while you take a break from work, you can also do so from the Apple menu.
Prevent Exposure and spills
Just like most electronics, Mac computers are allergic to liquids. If you can’t help but have a drink or two close to your computer, at least make sure it is in a closed container and will not spill over. Serious problems can occur if dust or food finds its way into your drive mechanism. The best way to prevent most of these problems is by working in a clean environment. Furthermore, it will go a long way in preserving your computer’s lifespan if you avoid storing it in an extremely cold or hot environment.
Always Pay Close Attention to your Storage Drive
Monitoring your storage drive for any unusual behavior could be all it may take to prevent it from corruption. You can always run a First Aid on your Mac computer whenever you feel something isn’t right. For users with older Mac versions, Disk Drill will allow you to monitor your S.M.A.R.T drive status. You can turn on S.M.A.R.T monitoring in preference and then choose the drive you wish to pay close attention to.
Always Back-up your Drive
You can either make use of the Time Machine or a third-party storage medium back up your drive by creating an image of it. It would be in your best interest to at least have a copy of your important files backed up.
FAQs:
Can You Fix A Corrupted Hard Drive?
Yes, a corrupted hard drive can be fixed. However, a user may have to recover his or her files before doing so.
How Do I Know If My Mac Hard Drive Is Corrupted?
As a user, you will begin to experience specific symptoms of a corrupt hard drive. These symptoms may include failed attempts to open some files when your PC becomes irresponsive to inputs, and in some severe cases, your computer may refuse to start.
How Do I Fix A Corrupted SSD Mac?
A corrupted SDD Mac can be fixed by running First Aid after selecting the disk or volume you wish to repair through the Disk Utility.
How Do You Uncorrupt An External Hard Drive on A Mac?
This can also be done by running First Aid through the Disk Utility window.
Conclusion
How to fix corrupted hard drive on Mac is quite easy and can be done by anyone even without the help of a professional. You can first begin the recovery process by making sure your drive peripherals such as cable and port are working before moving on to other fixes which require making use of Disk Utility, FSCK command, or formatting. If the above-mentioned fixes are beyond your capabilities, and at this point you still don’t know how to fix Mac hard drive corruption, you may need to send your hard drive to a professional. But before you do, make sure your files are recovered and backed up to avoid unforeseen circumstances which may result in data loss. The best and easiest way to do so is through the use of third-party software like 4DDiG Data Recovery Software.
 ChatGPT
 Perplexity
 Google AI Mode
 Grok
Grok
