How to Fix SSD Not Showing Up in BIOS
So, your SSD has started playing hide-and-seek in the BIOS, right? It’s time to tweak some settings of your computer! BIOS is basically your computer's behind-the-scenes manager before it boots up your operating system. It performs essential checks on your hardware (like keyboard, mouse, and of course, your SSD!) and ensures that everything is communicating properly before the operating system takes control.
Getting the “SSD not showing up in BIOS” error can be really frustrating since all of our important data usually resides in SSD for faster access. In this article, we’ll explore the methods to fix your SSD drive not showing up in BIOS. But before that, let’s explore what actually the SSD not showing up in BIOS error is.
Part 1: What's SSD Not Showing Up in BIOS
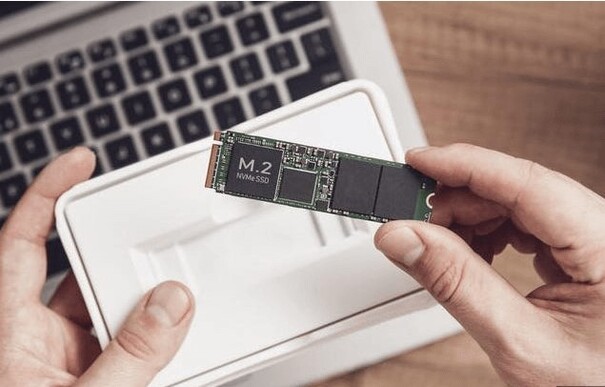
Experiencing SSD not showing up in BIOS error literally means that your computer can’t detect the attached SSD. It could be due to a loose connection, misconfigured BIOS settings, or even a faulty SSD itself. It is important to figure out the actual problem so that it is easy to fix your SSD drive not showing up in BIOS error.
Well, if you’re wondering “why is my M.2 SSD not showing up in BIOS”, rest assured, we got you covered with a one-click solution!
Part 2: How to Fix SSD Not Showing Up in BIOS
If you’re getting an M 2 SSD not showing up in BIOS error, don’t worry since 4DDiG Windows Data Recovery is here to provide you comprehensive support if things go south.
Whether it’s your SSD, HDD, or any other storage device, 4DDiG Windows Data Recovery software can easily retrieve your data to make sure it remains safe. When the BIOS can’t read your SSD, it is possible that there’s some underlying problems with your storage device, so it is highly recommended to recover your data before you permanently lose it. This is where Tenorshare 4DDiG Windows Data Recovery software comes in handy.
To recover your data from your SSD, all you have to do is to follow the steps mentioned below.
Secure
Download
Secure
Download
-
Select a Local Disk
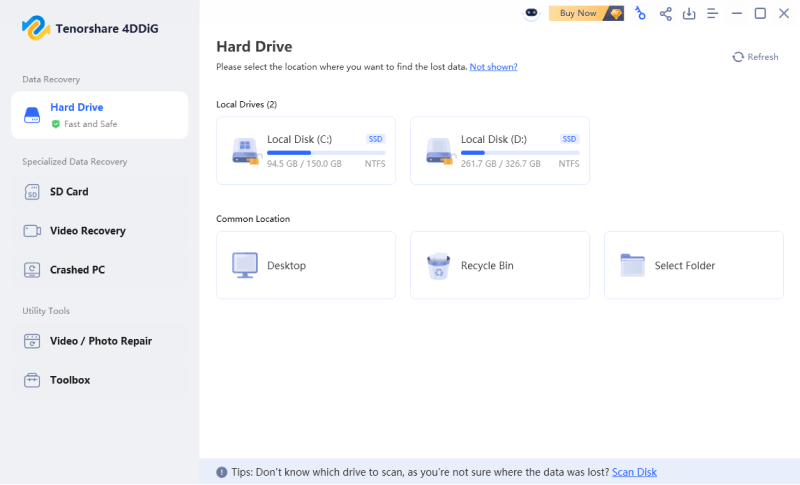
Download and install Tenorshare 4DDiG Windows Data Recovery on a healthy computer and make sure your SSD is connected and readable. Run the program and from the home interface, select the local disk which represents your SSD. Click Start to begin with the process. Moreover, you can also choose the target file types from the upper-right corner if you decide to recover specific file types.
-
Scan the Local Disk
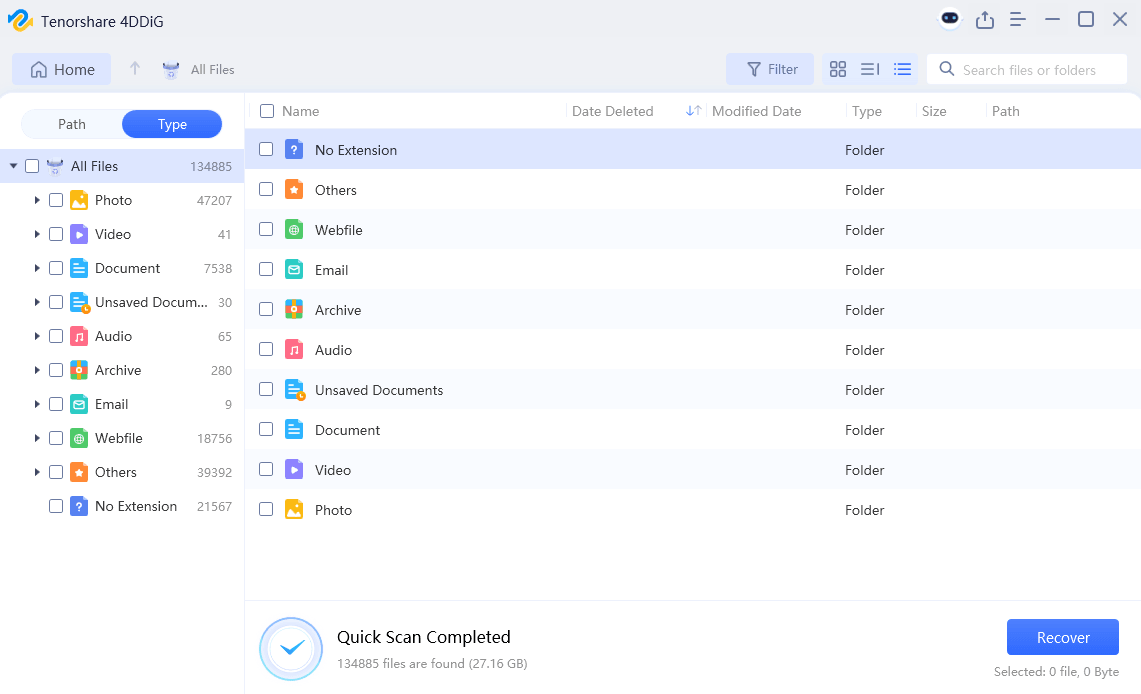
4DDiG will scan through your SSD and recover all of your data. Once the scan is done, you’ll be able to see your scanned data in Tree View or File View, whichever suits your fantasy. The File View allows you to check file types such as Photo, Video, Document, Email, Audio, and others. Under the Tree View, you’ll be presented with categories like Deleted Files, Existing Files, Lost Location, RAW Files, and Tag Files.
-
Preview and Recover Files from the Local Disk
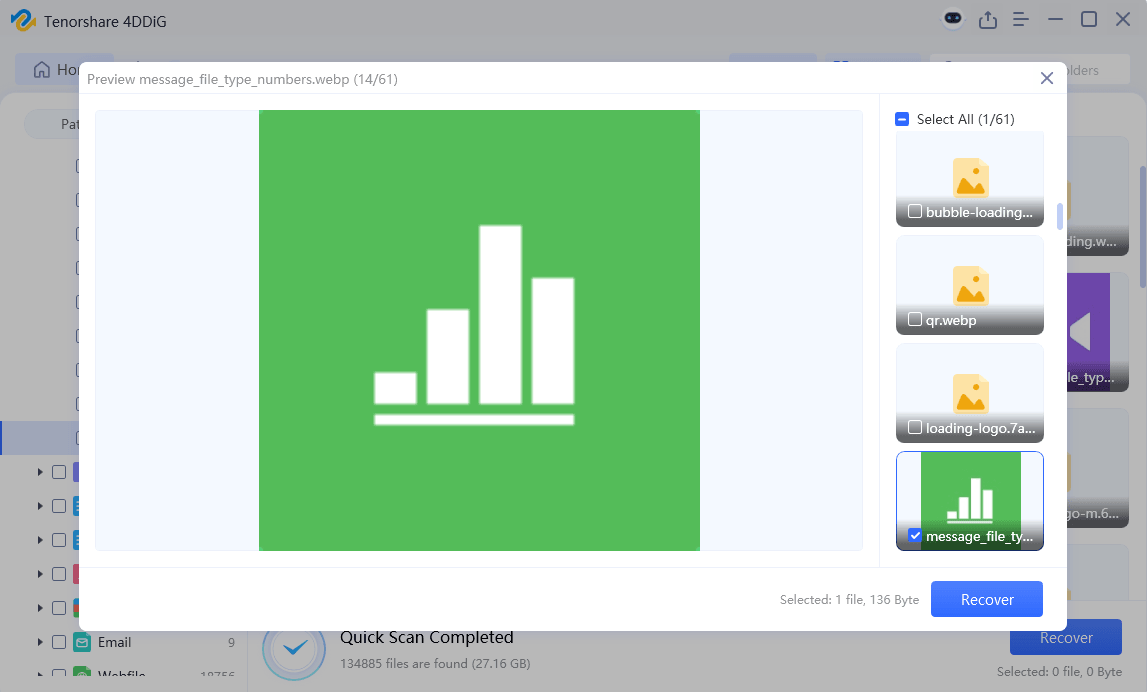
Once you’ve discovered your files from the SSD, preview and recover them to a secure location. It is recommended to choose a healthy storage device to save your recovered data and avoid overwriting it on the same SSD which might cause permanent data loss.
This is how easy it is to recover data from an SSD not showing up in BIOS.
How to Fix M.2 Drive Not Showing Up in BIOS/Disk Management?
Way 2: Check Hardware Faulty to Fix SSD Not Showing Up in BIOS
Many times, having a loose connection or broken wires can make your new SSD seem faulty. If your new SSD not showing up in BIOS error, it is better to check your cables and connection. Here’s how you do that:
- Turn off your computer and find the NVMe or SATA cable. Examine them carefully and see if you see any breakage or loose ends. Reconnect your SSD properly to make sure of the connection.
- Connect your SSD with SATA port.
- See if your SSD is readable by the BIOS.
If the BIOS doesn’t detect your SSD, try updating your BIOS version.
Way 3: Update Your BIOS Version
You might be running your SSD on an older BIOS. Make sure your BIOS is updated so it can properly communicate with your connected hardwares.
- Identify the manufacturer and model and download the latest version of BIOS.
- Create a bootable USB drive. Learn how to do it.
- Next, move your files to a bootable USB drive.
- Check if your SSD is readable by BIOS.
Learn more about how to update BIOS without USB.
Way 4: Disconnect Drives
If your new SSD not showing up in BIOS, it is highly possible that one of your drives isn’t compatible with it. Try removing all the connected drives and connect your SSD only and see if the BIOS reads it.
- Turn off your computer. Remove all the drives but keep your SSD connected.
- See if the BIOS reads it.
- If not, connect the drives one by one and check if they’re compatible with your SSD or not.
If the problem lies with the compatibility of one of your drives, your SSD should show up when the incompatible drive is disconnected.
Way 5: Use Hardware Troubleshooter
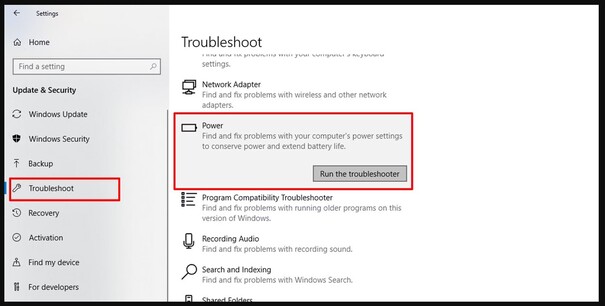
Windows comes with a built-in Troubleshooter that allows users to troubleshoot and fix any unknown connectivity issue with the hardware. Run the Troubleshooter to fix your SSD, it will most probably detect the issue and fix it too. Here’s how to do it.
- From the Start, go to Settings.
- Click Update & Security and select Troubleshoot.
-
Under Hardware & Devices, click Run the Troubleshooter.

- The Troubleshooter will scan and fix the problem with your SSD and will let you know if it was a successful troubleshoot or not.
There are, however, different opinions about the Windows Troubleshooter. Some users find it handy while others complain about its effectiveness when it comes to troubleshooting hardware. Anyways, it’s super useful when it comes to simple repairs and troubleshoots.
Way 6: Format SSD Drive to Fix SSD Not Showing Up in BIOS
If nothing works out and the data on your SSD is already backup or isn’t important, try formatting your SSD drive to fix SSD not showing up in BIOS. Sometimes, there are some malwares and viruses that are preventing your BIOS from accessing your SSD. Here’s how you format your SSD drive.
-
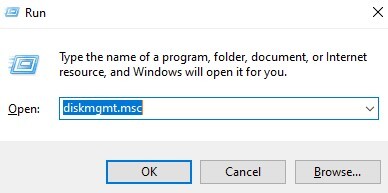
Open Start and type “Disk Management” and open the program.

-
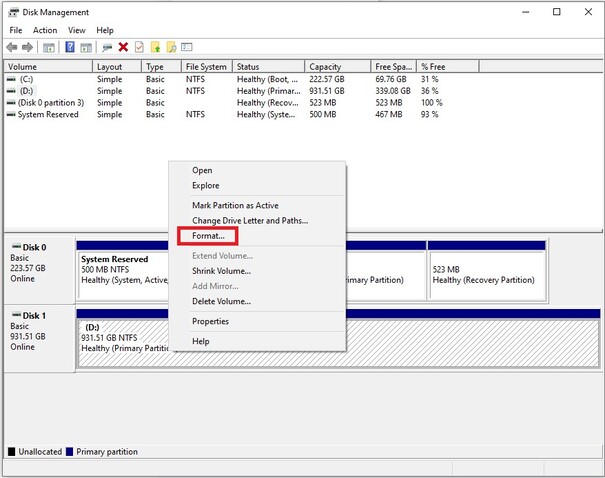
Right click on the SSD drive and click Format.

-
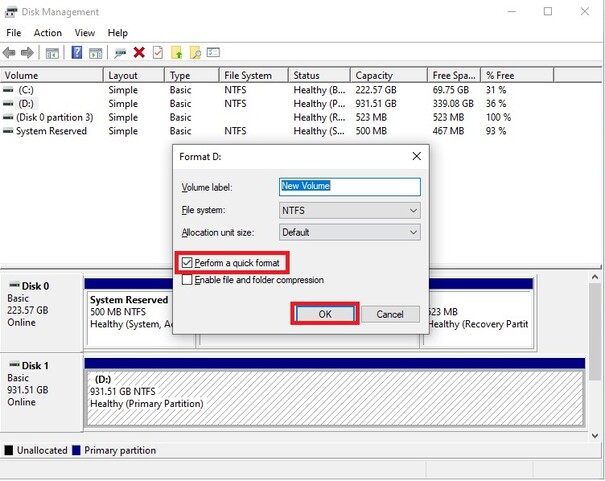
Check the Perform a quick format tab and hit OK. Keep File system andb Allocation unit sizeas default since for SSDs, the most common type of file system is NTFS.

Way 7: Try to Reset BIOS Settings to Default
It doesn’t usually happen but it is possible that your BIOS settings are changed. By default, your BIOS will detect and read your SSD but if your BIOS settings are tweaked, the BIOS might not properly communicate with your SSD.
In order to reset BIOS settings to default, here’s what you need to do:
- Restart your computer and the moment you see the pre-loading screen, keep pressing your BIOS key (usually F2, F9, Del, or any other key depending upon your machine model) until you see a BIOS pop-up.
-
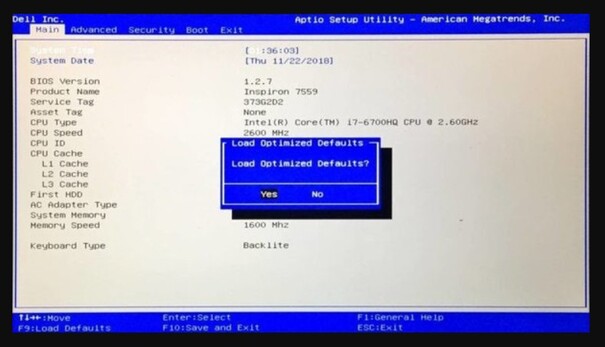
Look up for the “Load Setup Defaults?” or “Load Optimized Defaults”option.

- Select Yes or OK to continue.
- Save the changes and exit BIOS.
Way 8: Update Device Drivers
- Open Device Manager from the Start.
-
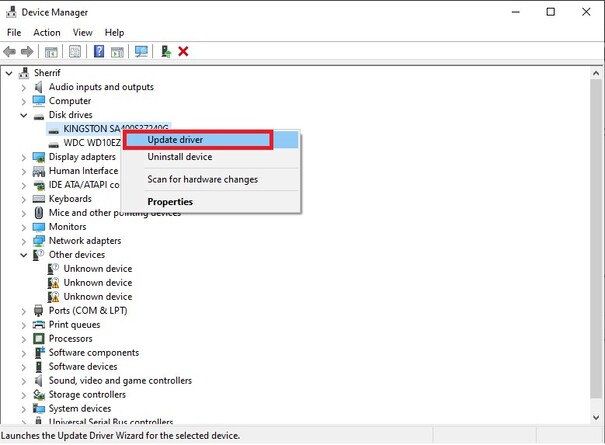
Under Disk drives, right click on your SSD and click on Update driver.

-
Click on Search automatically for drivers. Windows will search the latest drivers for your SSD from the internet and install it automatically.

Part 3: FAQ about SSD Not Showing Up in BIOS
Q 1: Why is my M.2 SSD not showing up in BIOS?
Having your M 2 SSD not showing up in BIOS can be due to a loose connection, broken data cable, or incompatibility of your SSD with the BIOS version. Not all computers can handle the newest SSDs, so it's important to check your BIOS compatibility with your SSD.
Q 2: How do I fix an undetected SSD?
An undetected SSD might be due to several reasons. It is recommended to troubleshoot the problem and try each fix mentioned in this article. Here’s a summary of what you can do to fix an undetected SSD.
- Check connections (data cables and mounts).
- Update BIOS and keep it on default settings.
- Format the SSD in Disk Management tool.
- Update SSD drivers.
Q 3: How do I enable SSD boot in BIOS?
Enabling SSD boot in BIOS usually involves similar steps for most of the computers.
- Restart your PC and enter BIOS (usually by pressing DEL, F2, F8, or F11).
- Locate "Boot" or "Boot Order" settings.
- Set your SSD (listed by brand/model) as the first boot device.
- Save changes and exit BIOS.
Q 4: How do I start my SSD in UEFI mode?
Enabling UEFI mode for SSD boot typically happens automatically if your BIOS supports UEFI and the SSD is compatible. You might not need to do anything specific. However, if you need manual control, consult your motherboard manual for specific instructions within the UEFI settings since every machine and model have different sets of instructions to start SSD in UEFI mode.
Conclusion
Getting an SSD not showing up in BIOS error can be frustrating especially when your data is important. In this article, we discussed different methods on how to fix SSD drive not showing up in BIOS. But if troubleshooting different methods doesn’t work well, always remember that your undetected SSD is still recoverable! For ultimate peace of mind, consider using Tenorshare 4DDiG Windows Data Recovery tool before attempting any fixes to create a backup of your precious data. So even if you lose your data permanently in the attempt of fixing the SSD not showing up in BIOS, you’ll still have a copy of your data. Download 4DDiG today and experience the power of data recovery!

 ChatGPT
 Perplexity
 Google AI Mode
 Grok
Grok


