Tired of a lagging computer, selling your old drive, or starting fresh on a new PC? Mastering how to format a hard drive unlocks speed and security in minutes! Dive into our ultimate guide: learn how to format a hard drive in Windows 10 using Disk Management, and how to format a hard drive for Mac with Disk Utility. Wipe data safely, pick the perfect file system, and reclaim your tech freedom today!
Part 1: How to Format a Hard Drive in Windows 10/11?
If you are using Windows 10 or windows 11, wondering how to format a drive, here are 2 different methods that you can use. Now, let's dive in!
Method 1. Formatting a Hard Drive with 4DDiG Partition ManagerHOT
If you think the above method is too troublesome, you can format your hard drive Windows 10 with a disk management tool--4DDiG Partition Manager.
The 4DDiG Partition Manager is a powerful all-in-one tool that can help you create or delete partitions and format the hard drive data. This is a beginner-friendly tool that you can use to format your hard drive.
Download and install 4DDiG Partition Manager on your Windows 10 computer or laptop. Now launch the tool and click on the Partition Management option on the left panel and choose the Format option.
FREE DOWNLOADFor PC
Secure Download

To proceed, please verify and click OK after resetting the partition's volume label, file system, and cluster size.

You can preview the effect of formatted partition in advance. If you find it satisfactory, proceed by clicking "Execute 1 Task(s)" and then OK to begin formatting the partition.

Here the process to format your hard drive will begin, and you will have to wait till the process is completed. Once the process is completed, your hard drive will be successfully formatted, and you will be able to use it for all purposes.

Method 2. Formatting a Hard Drive with Disk Management
This method suits people who want to format their internal or external hard drives containing only personal files. This means that you can only format those hard drives, internal or external, that don't have Windows OS installed into them.
For example, if you use two different internal hard drives, one is used for Windows installation, and the other is used to store your personal files. In this case, you will not be able to format that hard drive where Windows 10 have been installed (Local Dis: C), and you will be only allowed to format the other internal or external hard drive that contains your personal files.
So keep this in mind and choose the best method according to your situation.
Here are the steps to help you format your hard drive on Windows 10 using the Disk Management feature.
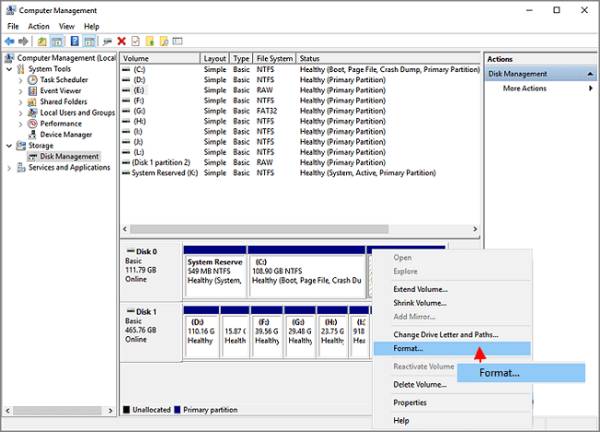
- Make sure your hard drive is connected to your computer, whether external or internal. Press the Windows key + X and select Disk Management from the list.
- Find the disk you want to format in the list of disks and right-click on it.
Select Format from the context menu.

- In the Format window, you can choose the file system for the new Partition. The recommended file system for Windows 10 is NTFS. And here you can follow this guide to covert file system from FAT32 to NTFS.
Choose a volume label for the Partition. This is the name that will be displayed when you access the Partition.

- Check the "Perform a quick format" box to do a quick format. This will erase all data on the drive and prepare it for use. Then click "OK" to start the formatting process.
Once the formatting process is complete, you can use the newly formatted hard drive to store your files or install programs.
Part 2: How to Format a Hard Drive for Mac?
If you are using a MacOS and want to learn how do I format hard drive for Mac, worry not. Here are steps that you can follow and format your hard drive.
- Connect the hard drive you want to format to your Mac using a USB cable.
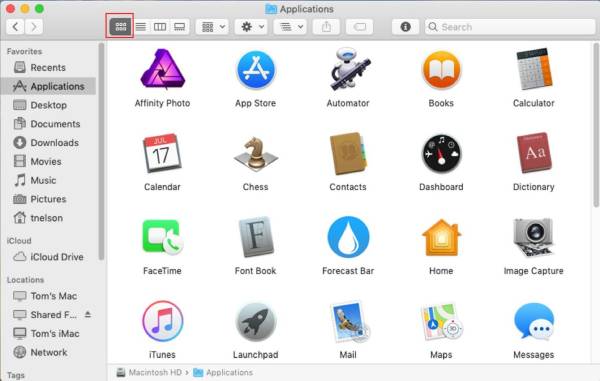
Open the Finder app from the Dock or the menu bar and click on the Applications folder in the sidebar of the Finder window.

- Open the Utilities folder and double-click on the "Disk Utility" app.
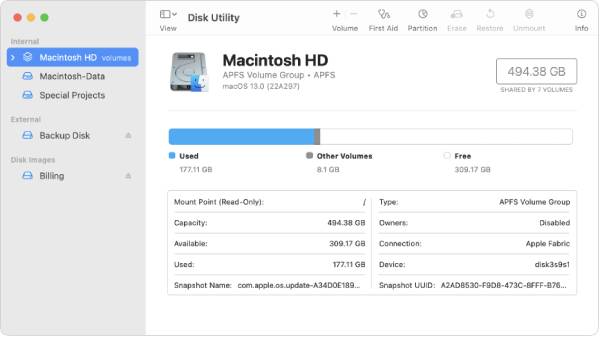
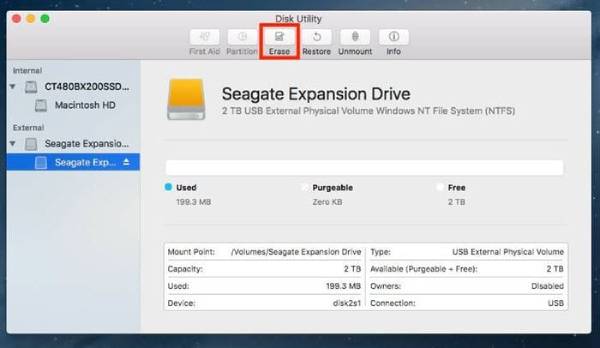
In the Disk Utility window, you will see a list of all the drives and volumes connected to your Mac. Select the drive that you want to format.

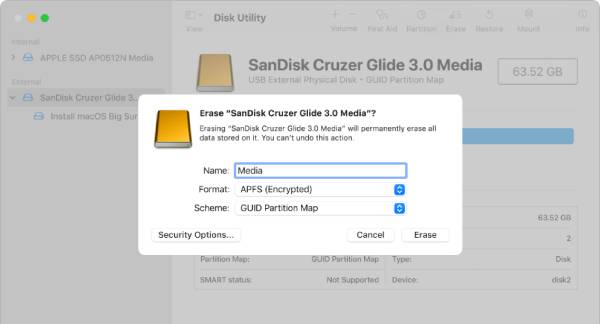
Click on the Erase button at the top of the window and in the Erase window, choose a name for the new drive in the "Name" field.

- Choose a file format for the drive. The recommended file format for Mac is APFS (Apple File System).
Choose a scheme for the drive. The recommended scheme for Mac is GUID Partition Map. And after that click on the "Erase" button to start the formatting process.

- Wait for the formatting process to complete. This may take a few minutes, depending on the drive size.
Once the formatting process is complete, the new drive will be available for use. You can now eject the drive by clicking the eject button next to the drive in the Disk Utility window.
Tips: How to Select an Appropriate File System?
When formatting a hard drive, selecting the appropriate file system for your needs is crucial. The file system determines how data is organized and stored on the hard drive and affects compatibility with different operating systems and devices. Here are the most commonly used file systems for Windows and Mac:
For Windows:
NTFS (New Technology File System) is the default file system for modern Windows computers. It offers advanced features such as file compression, encryption, and security permissions, making it suitable for large volumes and files.
FAT32 (File Allocation Table) is an older file system compatible with Windows, Mac, and many other devices. However, it has limited file size and volume capacity, making it less suitable for large files and drives.
exFAT (Extended File Allocation Table) is a newer file system that offers compatibility with Windows and Mac and supports large files and volumes. It's commonly used for external hard drives and USB drives.
For Mac:
APFS (Apple File System) is the default file system for modern macOS computers. It's optimized for solid-state drives (SSDs) and offers advanced encryption, snapshots, and cloning features. It's incompatible with older Macs and other operating systems, so check compatibility before formatting your hard drive.
Final Thoughts
Formatting a hard drive is a straightforward process that can help you optimize your storage and ensure data security. Whether you're using Windows 10 or Mac, you can follow the steps given above and learn how to format a hard drive.
All the methods written above are tested and good for you, but the best method is formatting a hard drive with 4DDiG Partition Manager. This tool provides that safe and reliable options to manage your hard drive while formatting it and it only takes 4 steps! So, don't hesitate to try it!
For PC
Secure Download



 ChatGPT
 Perplexity
 Google AI Mode
 Grok
Grok
