Struggling with unwanted partitions on your Windows 10 or 11 PC? Want to free up valuable disk space and simplify your storage management? You've come to the right place! In this guide, we'll walk you through the step-by-step process of using Diskpart, as well as other methods, to delete partitions on your system. Whether you're looking to reclaim space or just tidy up your storage, we will help you get the job done quickly and safely.
Part 1: Why Do You Need to Delete Partitions?
Understanding these reasons and the benefits that come with deleting partitions will help you make informed decisions about your disk management. Here are some key reasons to consider:
1. Reclaiming disk space:
Over time, your computer may accumulate unnecessary partitions, resulting in wasted disk space. By deleting unwanted partitions, you can regain valuable storage capacity, allowing for more efficient use of your hard drive and simplify the overall structure of your storage system, making it easier to organize and maintain.
2. Improving system performance:
Large numbers of partitions can impact your system's performance by increasing fragmentation and reducing overall disk efficiency. Deleting unnecessary partitions helps streamline your disk, resulting in faster access times and smoother operations.
3. Enhancing data security:
When you delete a partition, you ensure that any sensitive or confidential information contained within it is completely wiped out, reducing the risk of data breaches or unauthorized access.
Now, let's discuss how to delete a partition using Diskpart.
Part 2: How to Delete Partition with Diskpart on Windows 11/10?
Here are the simple and easy-to-follow steps that can help you delete partition with Diskpart.
Method 1. Delete Partition with Diskpart
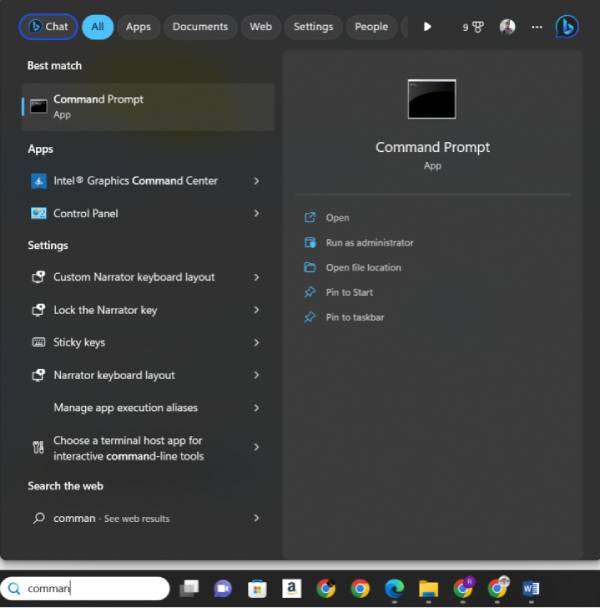
Press the Windows key on your keyboard and type "Command Prompt" (or "CMD"). Right-click on "Command Prompt" in the search results and select "Run as administrator." This will open the Command Prompt with administrative privileges.

In the Command Prompt window, type Diskpart and press Enter. This will launch the Diskpart utility.

Once you're inside Diskpart, type list volume, and press Enter. This command will display a list of all the volumes (partitions) on your computer. Identify the volume number associated with the partition you want to delete.

- To select the volume you wish to delete, type select volume X and press Enter. Replace "X" with the volume number of the partition you want to delete.
- Finally, to delete the selected partition, type delete volume and press Enter. Diskpart will prompt you with a warning message indicating that all data on the selected partition will be lost. Make sure you have backed up any important data before proceeding. Type Y and press Enter to confirm the deletion.
- Once the partition is deleted, you can exit the Diskpart utility by typing exit and pressing Enter.
This is how you can delete partition with Diskpart on your Windows 10 or 11. However, there are some pros and cons of using this method and you should know about them in order to use this feature.
Pros
- Built-in utility in Windows.
- Available for both Windows 11 and Windows 10.
- Allows for precise control over partition deletion.
- Supports advanced disk management features such as merging, extending and shrinking partitions.
Cons
- Commands can be complex and require precise execution.
- Possible risk of data loss if commands go wrong.
- No graphical interface.
- Lack of undo functionality.
Method 2. Delete Partition with Disk Management
Another alternative method to delete partitions on your Windows is using the Disk Management feature. It is a built-in utility in Windows 11/10 that allows you to manage disk partitions.
Here are the steps to delete a partition using Disk Management:
Press the Windows key on your keyboard, type "Disk Management” and click on the first result.

In the Disk Management window, locate the partition you want to delete. Right-click on the partition and select "Delete Volume" from the context menu.

- A warning message will pop up, informing you that deleting the volume will erase all data stored on it. Make sure you have backed up any important data from the partition. Click "Yes" to confirm the deletion.
- Disk Management will proceed to delete the partition. The process may take a few moments.
- Once the partition is deleted, the space previously occupied by the partition will be displayed as unallocated.
Similar to the other methods in this article, deleting partitions using the Disk Management feature also has some pros and cons.
Pros
- Built-in utility in Windows 11/10.
- Allows basic partition management, including partition deletion.
- Can manage multiple disks and partitions from a single interface.
Cons
- Limited advanced features compared to third-party disk management tools.
- No option to preview changes before applying them.
A Must-Do Before Delete Partition: Backup Your Data with 4DDiG
Before proceeding with partition deletion, it's essential to ensure that all your important data is backed up. 4DDiG Partition Manager not only helps you backup partitions effortlessly but also provides other powerful features, allowing you to securely back up an entire disk or specific partitions before making any changes.
Here's how you can use 4DDiG Partition Manager to backup partitions on Windows 11/10:
Open 4DDiG Partition Manager and go to the Backup section. Select Disk/Partition Backup, then choose the partitions or disk you wish to back up and click Next.
FREE DOWNLOADFor PC
Secure Download

-
Verify the selected source partitions or disk and the destination path. If it's not correct, click Change. Once confirmed, click Start and wait for the process to complete.

After the backup is finished, click OK to finish the process.

Pros
- User-friendly interface with intuitive partition management features.
- Provides a visual representation of disk partitions, making it easy to identify and select the partition to delete.
- Allows you to preview changes before applying them, reducing the risk of accidental data loss.
- Supports various disk management operations, including resize, merge, and format partitions.
- Provides comprehensive partition recovery and data backup options for added data protection.
Cons
- 4DDiG Partition Manager is a third-party software that requires installation.
FAQs Related to Diskpart Delete Partition
1. How do I force delete a partition?
To force delete a partition, we recommend using 4DDiG Partition Manager. It is a powerful and user-friendly tool that provides advanced partition management features, including the ability to delete partitions.
2. Why is Diskpart not letting me delete the partition?
Diskpart may not allow you to delete a partition due to reasons such as the partition being in use, insufficient permissions, or it being a system/boot partition. Consider using alternative disk management tools like 4DDiG Partition Manager to overcome these limitations.
Conclusion
So this is how to delete a partition using Diskpart. All you have to do is carefully follow the steps and successfully delete any extra partitions on your hard drive. However, there are some disadvantages to using the Diskpart feature to delete the partition and that is why we recommend you use 4DDiG Partition Manager and safely backup the partition without data loss.


 ChatGPT
 Perplexity
 Google AI Mode
 Grok
Grok
