How to Format C Drive? Step-By-Step Guide
Learning how to format C drive in Windows 10 or 11 can be a challenging task at first, but it is a crucial skill for users to optimize their system's performance or troubleshoot issues. If you are looking to start fresh or resolve disk errors, understanding how to format the C drive is essential. This article will explore how to format drive C in 4 effective ways on your Windows 10 or 11 system, ensuring you have the knowledge and tools to execute this task confidently. After understanding each method, you will gain expertise how to format c drive from command prompt effectively.
Part 1: Preparation Before Formatting C Drive
Before learning how to format c drive in Windows 10/11, it's essential to be ready and ensure a risk-free process. This preparation involves backing up your Windows operating system and essential data, enabling you to restore your system seamlessly after the format. Thus, migrating your operating system to another hard drive not only preserves your valuable data but also provides a reliable fallback option in case anything goes awry during the formatting process.
One highly effective tool for migrating your Windows OS and managing partitions is the 4DDiG Partition Manager. This versatile software is equipped with a range of features that make it an ideal choice for users preparing to format their C drive. By choosing 4DDiG Partition Manager, you gain access to a comprehensive toolset that simplifies the preparation phase before formatting the C drive. The ability to migrate your Windows OS to another hard drive with ease adds an extra layer of security to your data.
Follow the critical features of 4DDiG Partition Manager:
- User-Friendly Interface: 4DDiG Partition Manager has an intuitive and user-friendly interface, making it accessible to users with varying technical expertise. Partition Management
- Data Backup and Recovery: 4DDiG Partition Manager offers data backup and recovery, which is an ideal solution for safeguarding your Windows OS before formatting the C drive. It allows you to create a full backup of your system, ensuring that your crucial files and settings are preserved.
- Migrate OS to Another Hard Drive: 4DDiG Partition Manager can migrate the operating system to another hard drive. This is a critical function for users looking to back up their Windows OS before understanding how to format C drive in Windows 11. The software streamlines this process, ensuring a seamless transition of your operating system to a designated backup drive.
Follow the below steps that can help how to use 4DDiG Partition Manager to migrate OS:
-
Connect your new drive once 4DDiG Partition Manager has been downloaded and installed on your computer. After that, open the application, go to Clone OS Disk, choose the new drive to be the target disk, and press "Next" to proceed.
FREE DOWNLOADSecure Download

-
You will receive a pop-up window warning you that files and partitions on the target disk will be overwritten during system migration. Click "Sure" to initiate the system migration to move on to the next step.

-
Depending on the size of the drives, system migration will now start under 4DDiG Partition Manager and take some time to finish. You can see data about migration, including elapsed time, speed, and other metrics.

Part 2: How to Format C Drive in Windows 10/11?
Now that you've successfully backed up your Windows OS using 4DDiG Partition Manager, it's time to explore how to format C drive in Windows 11 or 10.
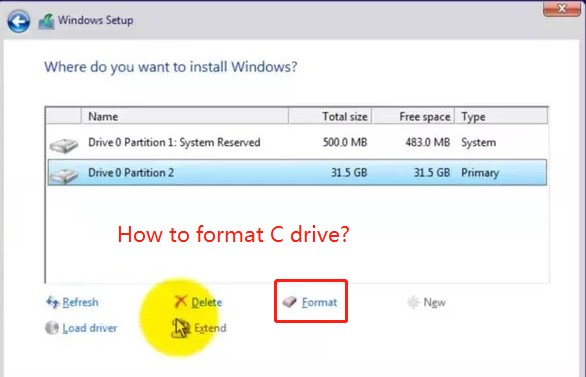
Method 1: Format C Drive Using Windows Setup or External Storage Media
This method can help how to format the C drive using Windows setup or external storage media. This method is beneficial when you want to perform a clean installation of the operating system or when other methods are not accessible. Follow the below steps:
- Use the Windows Setup Disc to boot up. After inserting the CD into the optical hard drive, proceed as directed.
- After choosing your preferred language, click "Next."
- Press "Install Now" and give it time to finish. This process does not actually install the Windows OS.
- After agreeing to the terms and conditions, click "Next."
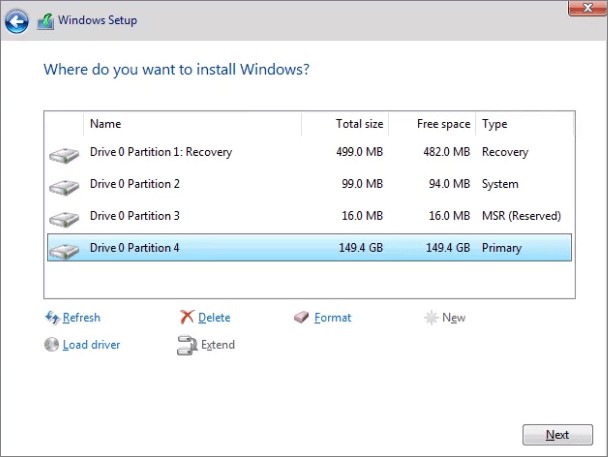
- Select the Advanced (Custom) option. A list of every drive that is currently in use will appear. Select "Drive options (advanced)."
-
Choose "Format." At this point, Windows will begin formatting your drive.

Method 2: Format C Drive From a System Repair Disc
This method can help how to format C drive using command prompt after creating a system repair disc. Creating a System Repair Disc allows you to access advanced recovery options, including the ability to format the C drive. Follow the below steps:
- Click Start, and then choose All Programs. After that, select Maintenance.
- Choose the location to burn this to by selecting Create a System Repair Disc. Either before or during this process, insert the CD into the optical drive. Then, follow the instructions displayed on the screen.
- Use the disc to boot after it has been created. Place the disc into the optical drive and turn on your computer again. To boot from the CD, you will see a prompt telling you to press any key.
- Wait until the installation is finished, select your preferred language, and continue.
- You'll be directed to the System Recovery page. Select the Use Recovery Tools and proceed.
-
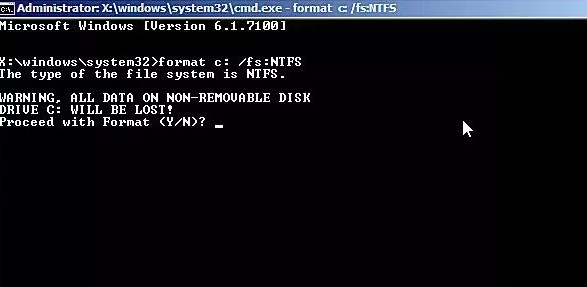
Access the Command Prompt and enter the following command: format c: /fs:NTFS

- The volume level will be requested from you, so enter the label.
- Enter Y to move on to the format and press Enter.
- Enter the Volume Label after the format is complete.
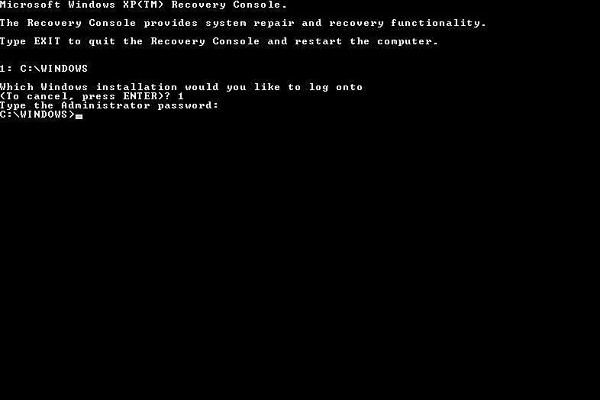
Method 3: Format C Drive Using Recovery Console
You can use this method for how to format C drive from command prompt. Most versions of Windows OS come with a built-in tool called Recovery Console that lets users resolve system problems. It uses commands to fix all of the errors. In addition to using Windows XP, or at the very least having it installed on your computer, you can use this with the Windows XP Setup CD. If you are not using one of the more recent versions of Windows, this might be the best option.
Method 4: Format C Drive Using a Diagnostic and Repair Utility
Now, you can utilize a diagnostic and repair utility tool that can help how you format C drive from Bios effectively. This method is beneficial for users seeking a user-friendly, automated solution that simplifies the formatting process. Various third-party utilities are available, but we will use a data destruction program to wipe all your drive data easily.
Part 3: Benefits of Formatting C Drive
Now, you have learned how to format the C drive. Let's explore the key advantages of formatting C drive.
- Improved System Performance: A computer's C drive may have unnecessary files, temporary data, and fragmented information over time. This can result in decreased system performance as the operating system struggles to locate and access essential files. By formatting the C drive, you can improve your system performance efficiently.
- Increased Storage Space: As you use your computer, the C drive may become filled with applications, files, and system-related data. Over time, this can lead to a shortage of storage space, impacting your ability to install new software or save additional files. Formatting the C drive removes all existing data on the partition, effectively regaining the storage space.
- Removal of Viruses and Malware: System files may have viruses, malware, and other malicious software, and it can be challenging to remove them completely. Formatting the C drive serves as a powerful solution to remove these threats. By wiping the drive and reinstalling the operating system, you can eliminate any malicious software that may jeopardize your system.
Conclusion
In short, learning how to format C drive in Windows 10 or 11 is an essential skill that can help users optimize system performance and troubleshoot existing issues effectively. Indeed, this guide has explained the four effective methods that can help how to format C drive to remove all the existing data. Before formatting the C drive, you should perform a system backup to safeguard your valuable data. We recommend utilizing the 4DDiG Partition Manager for the migration of Windows OS from one device to another.


 ChatGPT
 Perplexity
 Google AI Mode
 Grok
Grok

