The hard drive is an important part of your computer, and you should protect it. If the hard drive is damaged, it can cause major problems with your system. You may also experience other issues if the hard drive isn't properly functioning. In either case, troubleshooting these issues can be difficult and time-consuming. If you're like most Windows 10 users, you're probably familiar with the "Hard Drive Not Showing Full Capacity" error. This message appears when the disk space on your hard drive is less than the amount of data the system thinks is there. This warning indicates that the hard drive may not be able to store the data that you want it to. There are several reasons why this might happen, and your best bet is to take action. This article will discuss troubleshooting and solving the hard drive showing wrong capacity windows 10 issue.
- Part 1: Reasons for Hard Drive Capacity Display Error
-
Part 2: How to Fix “Hard Drive Not Showing Full Capacity in Windows 10”?
- Solution 1: Delete All Restore Points from the OS Drive
- Solution 2: Run System Maintenance Troubleshooting in Windows 10
- Solution 3: Delete the Trash-bin folder
- Solution 4: Update Hard Drivers
- Solution 5: Back Up and Initialize Hard Drives with Disk Management
- Solution 6: Check for Physical Bad Sectors or Replace The Disk
- Solution 7: Reformat External or Internal Hard Drive via Command Prompt
- Bonus Tip: How to Recover Permanently Deleted Files on Windows 11/10/8/7?HOT
- FAQs about External Hard Drive Showing Wrong Capacity
Part 1: Reasons for Hard Drive Capacity Display Error
There could be a lot of reasons why the "Hard Drive Not Showing Full Capacity" error might occur. A few of them are:
- There could be a problem with the hard drive itself. If the disk is damaged, it may not be able to store data properly. This can cause problems with your system, including "Hard Drive Not Showing Full Capacity" error messages. You may need to replace the hard drive to resolve these issues.
- It is not user-friendly.
- You might have insufficient space on your computer's hard drive for the data you're attempting to store/access. Make sure you have enough free storage on your computer to access all your files and programs.
- There could be a problem with the file system on your computer's hard drive. This complex structure stores information about the files and folders on your hard drive. If there's an issue with this file system, it may not be able to store data properly or access it. Sometimes, you'll need to reformat your hard drive to resolve these issues.
- Windows 10 might have been configured incorrectly regarding how much space is allocated for user files and programs (i.e., C:\Users\yourusername). You need to take steps to fix.
Part 2: How to Fix “Hard Drive Not Showing Full Capacity in Windows 10”?
If you are facing a hard drive showing wrong capacity windows 10 error, then there could be a lot of solutions to fix the problem. Let's try some of them one by one.
Solution 1: Delete All Restore Points from the OS Drive
Using System Restore Points in Windows, users can revert their computer state to a previous point in time, which can be helpful when the system malfunctions or other problems arise. However, System Restore also consumes a significant amount of hard disk space when you examine its usage. If this scenario applies, your OS drive can be fixed by deleting all restore points. System Restore Points previously blocked space so that this process will free it. Just follow the steps below:
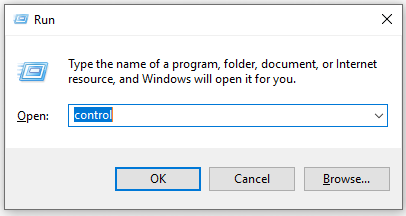
Step 1: Open the Run dialog box by pressing Win + R. To open the classic Control Panel interface, enter control in the box and hit Enter.
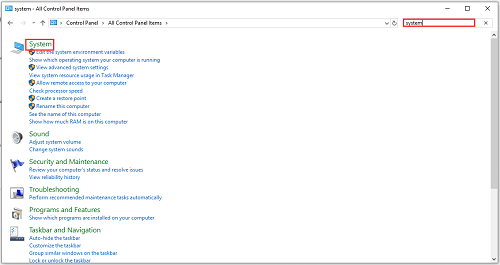
Step 2: The control panel has many items so you can find it quickly by typing System at the top of the screen. Select System from the results list and double-click it.
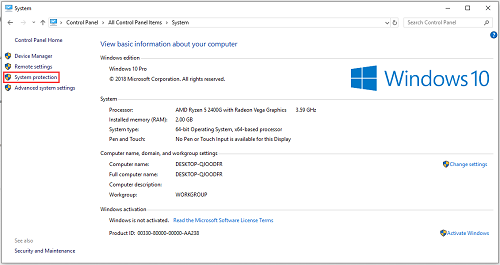
Step 3: From the left panel, select System Protection from the System menu.
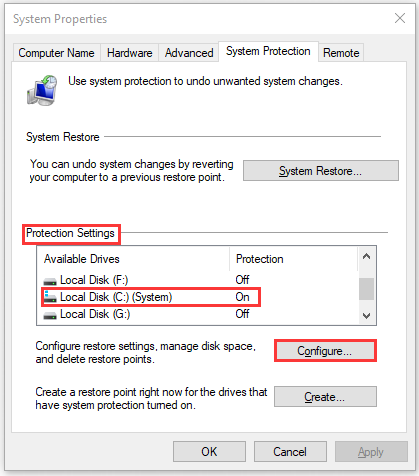
Step 4: Select the System Protection tab from the pop-up System Properties window. Click on the Configure button below the Protection Settings section, then locate your Windows System drive.
Step 5: The Disk Space Usage section will appear in the new pop-up window. Set the maximum usage to 10% by dragging the blue handle rightward. One TB of HDD is more than enough.
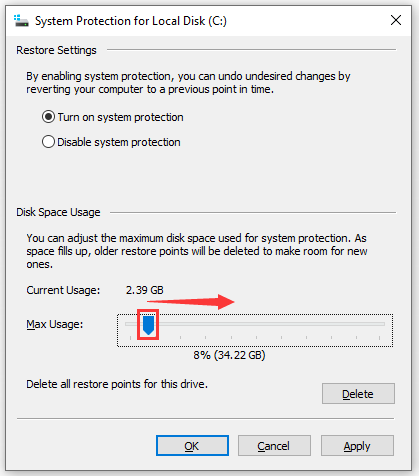
Step 6: To save the current configuration, click on Apply and then click Delete for the system drive.
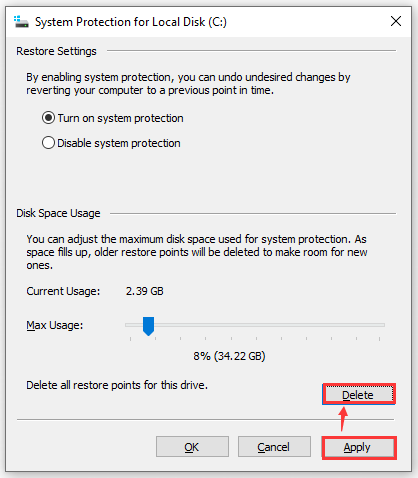
Step 7: Once this is done, you will receive a reminder that the restore points, as well as older system image backups, will be deleted. You just need to click Continue.
Solution 2: Run System Maintenance Troubleshooting in Windows 10
The troubleshooter should detect and fix inconsistencies in hard drive free space in Windows 10 resulting from Windows failures. The following is a complete guide for you to follow:
Step 1: Type Control Panel into the Windows search box to open the classic Control Panel.
Step 2: On the screen, hover over Troubleshooter and double-click it.
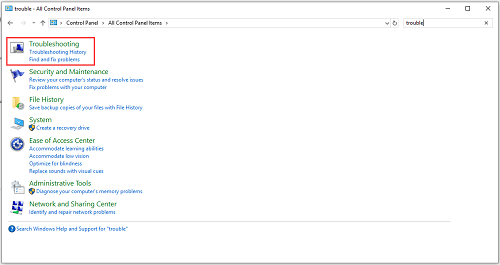
Step 3: To access System & Security, navigate to the right and click it twice.
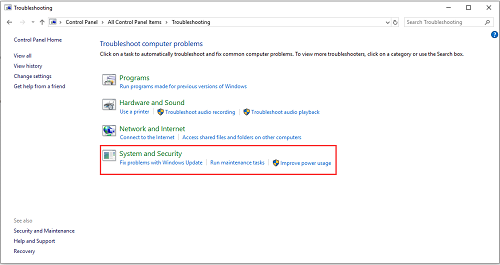
Step 4: To run System Maintenance as an administrator, double-click the System and Security menu. By doing so, you will be able to resolve more issues that require administrator access.
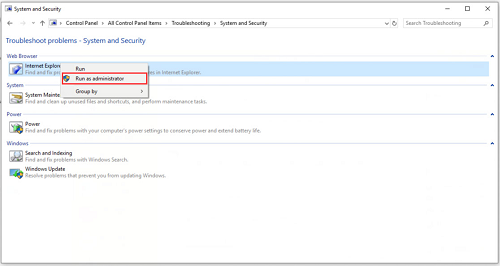
Step 5: To apply repairs automatically, click Advanced in the pop-up window. Please click Next to go to the next step.
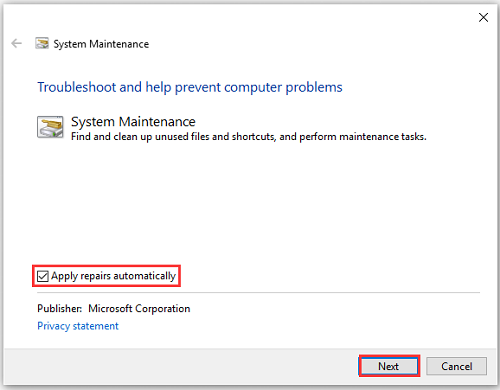
Step 6: Until this utility completes its analysis of free space inconsistencies, you will need to wait. At the next prompt, click Apply if a fix is recommended and wait until the repair is completed.
Step 7: Restart your computer after this process is complete, and check if this issue has been resolved.
Solution 3: Delete the Trash-bin folder
A rouged trash bin folder can also cause the wrong amount of free space on your hard drive. In order to alleviate this problem, you can delete the trash bin folders, which will make Windows OS create a new, more compact folder that won't take up much space.
Step 1: The dialog box will appear when you press Win + R. To open an elevated command prompt, press Ctrl + Shift + Enter.
Step 2: To delete the trash bin folders, type rd /S "$RECYCLE.BIN in the elevated Command Prompt and hit Enter.
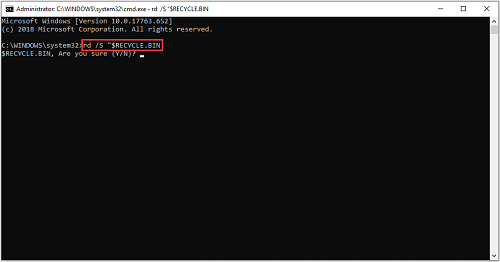
Step 3: You can exit the elevated command prompt after completing these steps. Restart your computer to see if your missing free space is available after the changes have been made.
Solution 4: Update Hard Drivers
There is a high chance that the external hard drive's driver is out of date if its capacity is incorrect on your system. It is likely that the external hard drive will malfunction if that is the case. The faulty external hard drive driver can be updated in that case. Using a driver updater utility is a simple way to do this. For other manual methods of updating device drivers, see the image below.

Solution 5: Back Up and Initialize Hard Drives with Disk Management
As a prerequisite, we suggest creating a backup of the data on the drive you want to initialize before proceeding. Every now and then, it is a good idea to back up the data on your computer. When my hard drive doesn't show full capacity, how can initializing the drive help me? In such cases, initializing the hard drive can resolve the issue since MBR and GPT header errors can lead to disk size errors. In order to accomplish that, you must:
Step 1: Start up Microsoft Management Console by pressing Windows + R and typing msc.
Step 2: Choose the drive you wish to initialize, either a hard drive or an SSD.
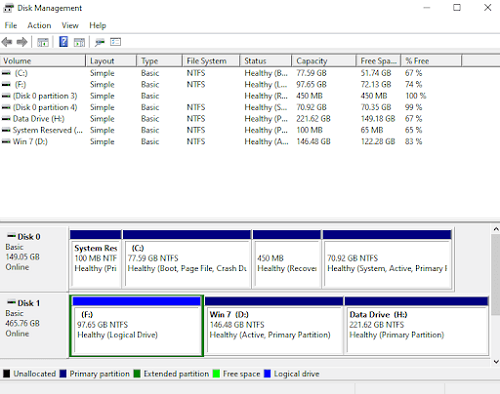
Step 3: You can initialize the disk by right-clicking on it. You need to right-click on the disk and choose Online if it appears Offline.
Step 4: Click on OK to initialize the selected disk. Moreover, you can choose whether you want MBR or GPT as the partition style for your hard drive.
Solution 6: Check for Physical Bad Sectors or Replace The Disk
Using the Command Prompt, you can check the S.M.A.R.T. status of your drive manually. In the search box, type "cmd.". Type the following in the dial-up box: "wmic disk drive get model, status". Depending on whether your driver is good or bad, it will return "Pred Fail" or "OK".
Solution 7: Reformat External or Internal Hard Drive via Command Prompt
Step 1: Enter "cmd" in the search box after clicking the "Start" button. Run the Command Prompt as an administrator by right-clicking it.
Step 2: Select and delete everything in the “hosts” file. Choose “All Files” and “Save” the file.
Step 3: You can run it by typing "list disk" and pressing run. You will see a list of all the disk drives on your computer. External drives connected to your computer will be included in the list.
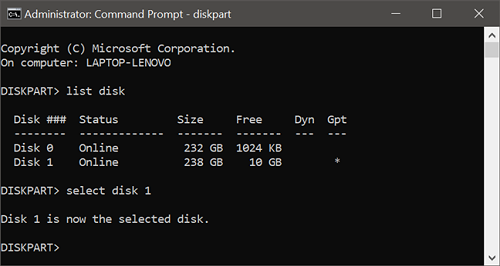
Step 4: If the hard drive shows the wrong capacity, check the number. Press the enter key after selecting the disk and the disk number. In this case, selecting disk 1 will format disk 1.
Step 5: All files and folders on the selected hard drive will be cleaned up when you type clean.
Step 6: Press "Enter" to create the partition primary.
Step 7: Select "Enter" after typing format fs=ntfs or format fs=exfat. As a result, the drive will be formatted with a file system by the disk part.
Step 8: To assign a drive letter to the newly created partition, type "assign".
Bonus Tip: How to Recover Permanently Deleted Files on Windows 11/10/8/7?
If files are lost due to formatting the hard drive,Tenorshare 4DDiG data recovery software can recover the lost files. It is Windows software that can help users recover permanently deleted files from formatted disks, USB flash drives, and SD cards. The software is very easy to use, even for computer novices. It has plenty of useful features, such as scanning for lost files, previewing them, and restoring them. To use Tenorshare 4DDiG, follow the steps below:
For PC
Secure Download
For MAC
Secure Download
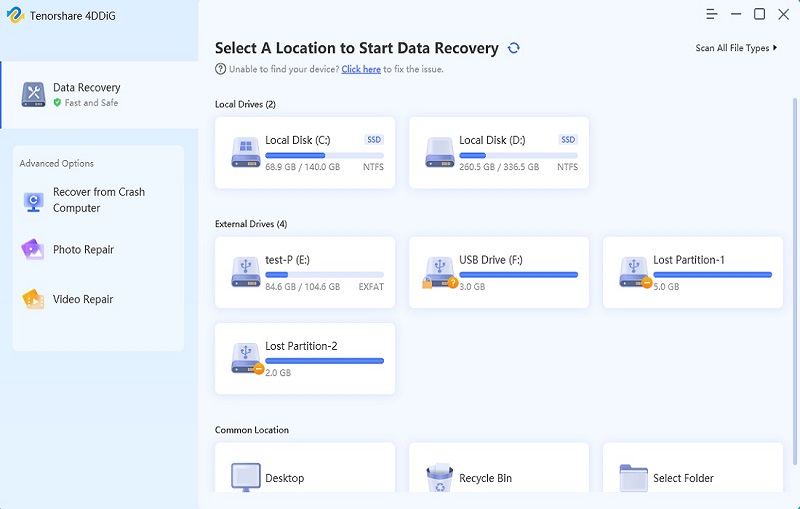
- The screenshot below shows the home interface provided by Tenorshare 4DDiG Windows Data Recovery following installation and launch. To get started, select the local disk where you lost your data from a list of hard drives and click Start. The upper-right corner of the window allows you to select target file types before scanning.
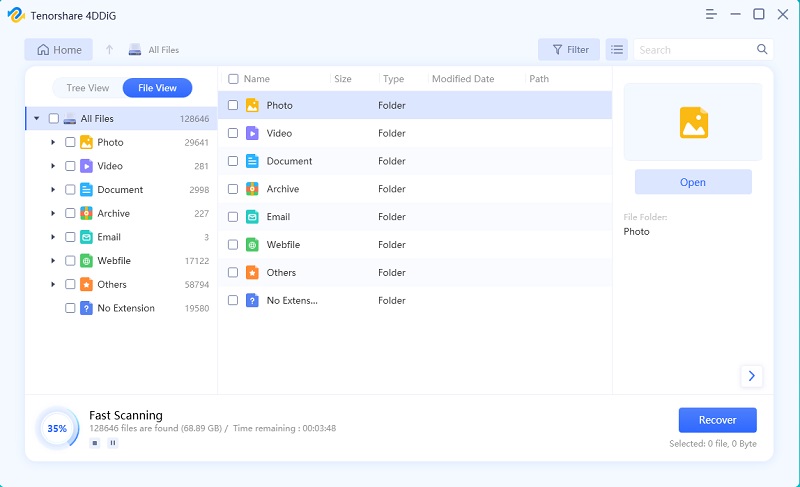
- After identifying the files you wish to recover, 4DDiG immediately searches the selected drive all around for missing data. You may pause or stop the search at any time. In the Tree View, you can find categories such as Deleted Files, Existing Files, Lost Locations, RAW Files, and Tag Files. Alternatively, you can switch to File View to view files such as Photos, Videos, Documents, Audio, and Emails. As well as searching for target files, you can use Filter on the right side of the panel to narrow down your search.
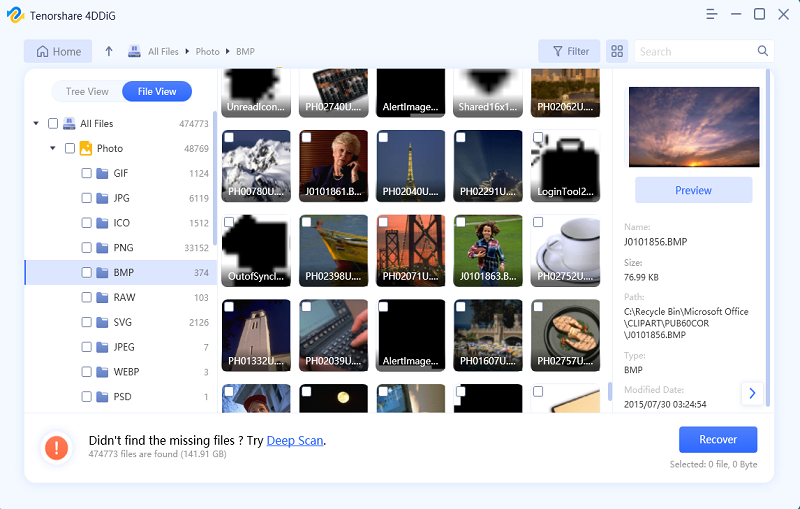
- Once the target files are discovered, you can preview and recover them. Save your data away from the partition where you lost it to prevent data overwriting and permanent data loss.
FAQs about External Hard Drive Showing Wrong Capacity
1. How Do I Fix My Hard Drive Showing the Wrong Size?
There are a few things you can do to fix your hard drive size showing wrong according to Windows. We have listed a lot of methods above. Give a try to all of them one by one and we are sure that one of these solutions might work for you.
2. Why Is My Hard Drive Not Showing Its Full Capacity?
One common reason why a hard drive may not be displaying its full capacity according to Windows is improper formatting. To fix this, you will need to format your hard drive. But formatting this operation can easily lead to data loss, you can use Tenorshare 4DDiG to recover the data lost due to formatting your hard drive.
3. Why Is My Drive Showing Less Space Than Actual?
There could be many reasons why a hard drive may seem to have less space than it actually does, including invalid data, disk fragmentation, and software installation errors. In most cases, resolving these issues will require the deletion of specific files or the installation of new software.4. Why Is My 2TB Hard Drive Not Showing Up?
This could be due to a problem with your drive itself or your computer's storage space limitations. First, check to see if the drive is actually connected and working properly by plugging it into another computer and verifying that Windows recognizes it as a valid device. If the problem lies within your computer, you may need to install additional drivers or updates from the manufacturer in order to make sure the hard disk is compatible with your system.
✅ You May Also Like: Hard Drive Full and Video Corrupted? Here's How to Fix & Prevent It
Bottom Line
Now that you know how to fix the issue of the hard drive showing wrong capacity in Windows 10 or external hard drive not showing space, you can happily use it for storing your important files. We recommend you to try Tenorshare 4DDiG data recovery software to easily resolve hard drive-related issues and recover the deleted data from the hard drives.
 ChatGPT
 Perplexity
 Google AI Mode
 Grok
Grok
