How to Fix Cloned SSD Won't Boot?
After you've successfully cloned the original Windows 10 hard drive to the SSD, it's time to boot your Windows PC from the SSD to take advantage of the faster and more fluid OS environment. When you try to load up your PC after cloning your HDD to an SSD, your heart may skip a beat. However, you should not be alarmed if cloned SSD won't boot Windows 10. You may be unable to benefit from the improved user experience if the cloned SSD fails to run, rendering the disc clone useless. What are your options at this point? Simply relax and follow the steps outlined below to properly resolve the SSD not booting after the clone issue.
Part 1: Why Does Cloned SSD Won’t Boot?
Before we dig out how to make cloned ssd bootable, let's first find out why cloned SSD won't boot. There are a variety of reasons why the SSD won't boot after cloning. We've included some of the most prevalent explanations below:
- Wrong BIOS/UEFI Boot Order: After cloning, your BIOS/UEFI is still configured to boot from the old hard drive, USB stick, or network first. The false order can result in cloned drive won't boot.
- Legacy vs UEFI Mode Mismatch (GPT/MBR Incompatibility): This is one of the most frequent reasons why your cloned disk won't boot. Old disk was MBR (Legacy) and the new cloned ssd won't bootis trying to boot in UEFI mode (or vice versa), the system will fail to find the boot loader. Then, new cloned ssd won't boot.
- Corrupted or Missing Boot Configuration Data (BCD): If the MBR or the Boot Configuration Data (BCD) are not fully and accurately copied to the target SSD, the system fails to locate the necessary files to start Windows. You will likely encounter the error inaccessible boot device after cloning.
- Drive Letter Reassignment: After cloning, Windows sometimes assigns a new letter to the system reserved partition. But if BCD still points to the old letter, the Windows won't boot from cloned SSD.
Part 2: How to Fix Cloned SSD Won't Boot Windows 10?
Method 1: Correctly Install the Cloned SSD with a SATA Cable
Instead of using a USB connector, connect the cloned SSD to your computer with a SATA cable. When using a SATA cable to connect their PC to a cloned SSD, some Windows 10 users were able to get their PC to boot from it.
Method 2: Change Boot Order in BIOS and Make SSD Bootable as BootDisk
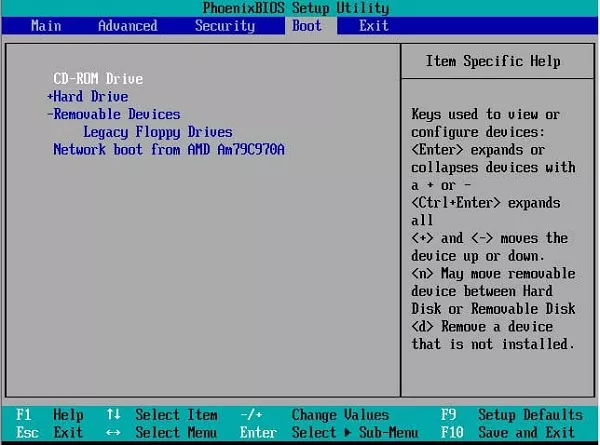
Until the cloned SSD is configured as the primary boot option in BIOS, macrium reflect clone drive won't boot from it. In this situation, all you have to do is modify the boot order in BIOS and choose the SSD as the first boot option.
-
Restart your computer. When the startup screen shows, press the hotkey repeatedly to bring up the BIOS settings menu. F2, F8, F12, or Del are the most common hotkeys.
Quick Notes:
Please enter BIOS using the appropriate hotkey for your PC's brand: Acer: F2 or DEL; ASUS: F2 or DEL; Dell: F2 or F12; HP: ESC or F10; Lenovo: F2 or Fn + F2; MSI: DEL.
- After entering BIOS, select the Boot tap with the arrow keys and select the SSD as the first boot option.
-
To save the adjustments, press F10. After that, restart your computer.

Method 3: Setting BIOS to boot from UEFI or Legacy
MBR and GPT are the two sorts of partition styles. The startup mode Legacy is used by MBR. GPT is also compatible with UEFI. The cloned SSD will not boot if the partition style is incompatible with the boot mode. As a result, we must additionally enter BIOS and select the appropriate boot mode for your selected partition style otherwise cloned drive won't boot.
- Enter the BIOS utility.
- Select "UEFI/ BIOS Boot Mode" from the "Boot" tap with the arrow keys. Enter the code. Then, depending on your chosen partition style, choose "Legacy" or "UEFI."
-
To save the adjustments, press F10. After that, restart your computer.

Method 4: Re-Clone HDD to SSD with the Best Disk Cloning Software
Failure to complete the cloning process or a failed clone can result in the cloned SSD won't boot issue. Additionally, if the boot partition was not cloned, the cloned hard drive will also not be able to boot.
In this case, one of the best solution is to re-clone HDD to SSD using the best disk cloning software-4DDiG Partition Manager. This powerful tool can easily help you clone HDD to SSD without facing cloned SSD won't boot issue. Here's how to do:
-
Connect the new SSD to your computer after downloading and installing 4DDiG Partition Manager. Next, open the software and choose "Clone OS Disk."
FREE DOWNLOADSecure Download

-
After choosing a target disk (the new SSD) to receive the data copied from the source disk, click the Next button.

-
Keep in mind that the cloning process will overwrite all data on the target disk. Once you have confirmed that all settings are correct, click on the "Sure" button to proceed.

-
Next, a preview interface will appear, showing the expected result of the cloned disk. Once you have confirmed that everything is correct, click on the Start button to begin the cloning process.

-
Please be patient as the disk cloning process may take some time, depending on the size of the source disk. It is important not to interrupt the operation or perform other tasks while the cloning is in progress.

Method 5: Set System Partition as an Active Partition
The active partition should, in most cases, be the primary partition. The operating system's boot files are located in the primary partition. After cloning to SSD, Windows 10 computer won't boot from cloned SSD if the system partition is not designated as an active partition. Using Command Prompt, we could change the active partition.
- Boot from the old hard drive because the cloned SSD won't boot. Then, in the hard drive enclosure, place the SSD and attach the case to the PC.
- Once you've booted from the old hard drive, hit "Win" + "R" to open the Run box, then type diskpart into it. Enter the code.
-
In the Command Prompt, type the commands below once a window appears. Each time you input a command, please press Enter.
- List disk
- Select disk XX ( Here “XX” is disk ID of SSD)
- List partition
- Select partition XXX (Note: “XXX” refers to the partition ID of your SSD)
- Active

- After performing the following tasks, restart the computer.
Method 6: Run Bootrec.exe
If Windows Startup Repair fails, try Bootrec.exe to fix a cloned SSD that won't boot in Windows 11/10/8/7.
- Start the computer by booting from the Windows installation CD.
-
Select Troubleshoot > Advanced Options > Command Prompt from the Troubleshoot menu. Type the bootrec.exe command in the pop-up command prompt to activate this program and cure the Windows 10/11 fails to boot problem with the commands below:
- bootrec.exe /fixmbr
- bootrec.exe /fixboot
- bootrec.exe /scanos
- bootrec.exe /rebuildbcd

Method 7: Repair Windows Startup from Windows RE
After cloning SSD won't boot on Windows 10/11, you may need to enter the Windows recovery environment (Windows RE) to repair Windows Startup. The Windows Startup Repair tool will correct several issues and assist you in effectively booting.
- Start your computer by booting from the Windows installation CD. Choose the option to repair your computer.
-
Select Troubleshoot -> Advanced Options -> Startup Repair (Windows 11/10/8) from the Advanced options menu. Then it will begin to fix the startup issue.

More FAQs about cloned drive won't boot
1.Why is my SSD recognized but not booting?
Your SSD appears in BIOS and Disk Management, but the system partition is not set as Active and the boot flag is missing. Windows can see the drive but cannot find the bootloader, so you get a blinking cursor or “no bootable device” message.
2.What is 0xc000000e after cloning SSD?
Error 0xc000000e means Windows needed a device that is missing or inaccessible. After cloning, the Boot Configuration Data (BCD) is damaged, points to the wrong drive letter, or the bootloader files were not copied correctly.
3.Why won't Windows 7 boot after cloning hard drive?
Windows 7 requires MBR partitioning and Legacy BIOS mode. Most modern cloning tools create GPT disks for UEFI by default, which breaks compatibility. The partition also needs to be marked Active in Legacy mode, otherwise Windows 7 simply refuses to start.
4. Is cloning bad for SSD?
First and foremost, cloning is not a bad thing:) in most cases, it is extremely beneficial and convenient. But you should bear in mind that cloning gives you exact replica of your system and if the present system installation currently has flaws, you'll encounter the same problems after shifting to a new disk.
Conclusion
In conclusion, a cloned drive that won't boot is almost always fixed by adjusting BIOS boot order, switching UEFI/Legacy mode, or marking the partition active. This article provides multiple effective solutions for making a cloned drive bootable in Windows 11/10/8/7, follow the steps above and your SSD will boot perfectly. And we highly recommend you use 4DDiG Partition Manager to help you fix cloned SSD won't boot issue in no time!
Secure Download


 ChatGPT
 Perplexity
 Google AI Mode
 Grok
Grok


