How to Change Size of Boot Camp Partition [No Need to Delete Windows]
Changing the size of your Boot Camp partition can be a crucial task if you find yourself running out of space or if you have allocated too much space to Windows and need to reclaim some for macOS. However, many users are concerned about losing their data or having to go through the hassle of reinstalling Windows.
Fortunately, there are methods available that allow you to change Bootcamp partition size without deleting Windows. In this guide, we will explore how to change size of Boot Camp partition without the need to remove your existing Windows installation, ensuring a smoother and more efficient process.
Part 1: What Is Bootcamp?
Bootcamp is a utility developed by Apple Inc. that allows users to install and run Microsoft Windows operating systems on Intel-based Mac computers. It provides a way for Mac users to access Windows applications and games that may not be available or perform as well on macOS.
Key Features of Bootcamp:
- Dual-Boot Capability: Bootcamp sets up a dual-boot environment, enabling users to choose between macOS and Windows at startup.
- Partition Creation: The utility helps users create a separate partition on their Mac's hard drive or SSD for the Windows installation, ensuring that macOS and Windows are kept isolated.
- Driver Support: Bootcamp includes drivers that optimize Windows performance on Mac hardware, ensuring that components like the keyboard, trackpad, graphics, and network interfaces work correctly.
- Ease of Use: The Bootcamp Assistant guides users through the installation process, simplifying tasks such as partitioning the drive and creating a bootable Windows USB installer.
Overall, Bootcamp provides a powerful solution for users who need the flexibility and capabilities of both macOS and Windows on a single machine.
Part 2: Why You Want to Change Boot Camp Partition Size?
There are several reasons why you might want to change the Boot Camp partition size on your Mac. Adjusting the partition size can help you better allocate disk space based on your usage patterns and requirements. Here are some common reasons:
- Running Out of Space
If you initially allocated too little space to your Boot Camp partition, you might find that you are running out of storage for your Windows applications, files, or updates. Expanding the partition can provide the additional space you need. - Underutilized Space
Conversely, if you allocated too much space to the Boot Camp partition and find that you are not using much of it, you might want to shrink the partition to free up space for macOS. - Changing Usage Needs
Your usage patterns might change over time. For example, if you start using more Windows-based software for work or gaming, you might need to increase the Boot Camp partition size to accommodate these new needs. - Installing New Software
Some Windows applications or games require a significant amount of disk space. If you plan to install new, large applications, you might need to increase the Boot Camp partition size to ensure you have enough room.
Part 3: How to Change Size of Boot Camp Partition?
Changing the size of the Boot Camp partition on your Mac can be a bit tricky, as macOS does not natively support resizing Boot Camp partitions once they are created. However, there are several methods you can use to achieve this. Here’s a step-by-step guide on how to change the size of your Boot Camp partition:
Method 1: Using Disk Utility and BootCamp Assistant (Reinstall Windows)
- Backup Your Data: Before making any changes, ensure you have backed up all important data from both macOS and Windows. You can use Time Machine for macOS and a tool like Macrium Reflect or Windows Backup for your Windows data.
-
Remove the Existing BootCamp Partition:
- Open Boot Camp Assistant from the Utilities folder in Applications.
- Select the option to Remove or Restore the Boot Camp Partition.
-
Follow the prompts to erase the Windows partition and restore the space to macOS.

-
Create a New BootCamp Partition:
- Once the partition has been removed, open Boot Camp Assistant again.
- Create a new Boot Camp partition with the desired size.
- Follow the prompts to reinstall Windows.
- Reinstall Windows: Use your Windows installation media to reinstall Windows on the new Boot Camp partition. Restore your Windows data from the backup you created earlier.
Method 2. Change BootCamp Partition Size without Deleting Windows
When a Mac user wants to change the size of their BootCamp partition, it is often desirable to do so without having to reinstall Windows. This method demonstrates a technique to efficiently resize BootCamp using 4DDiG Partition Manager. This process can be done without removing Windows and preserves existing data.
Here’s how to do:
-
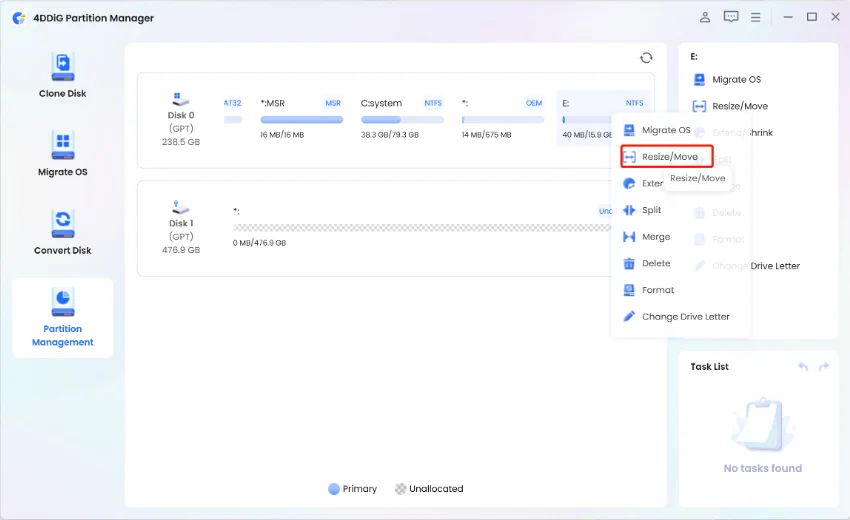
Install and launch 4DDiG Partition Manager. Navigate to the "Partition Management" section in the left sidebar. Right-click on the partition you wish to resize and choose "Resize/Move" from the drop-down menu.
FREE DOWNLOADSecure Download

-
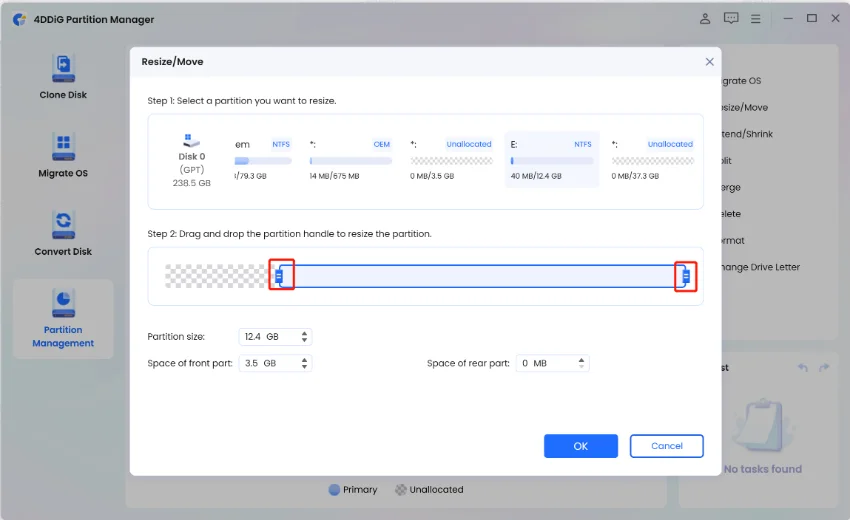
In the pop-up window, adjust the size of the selected partition by dragging its borders. Alternatively, you can enter the desired partition size in GB. Once you've set the partition size, you can preview the changes. If you are satisfied with the result, click OK to queue the operation.

-
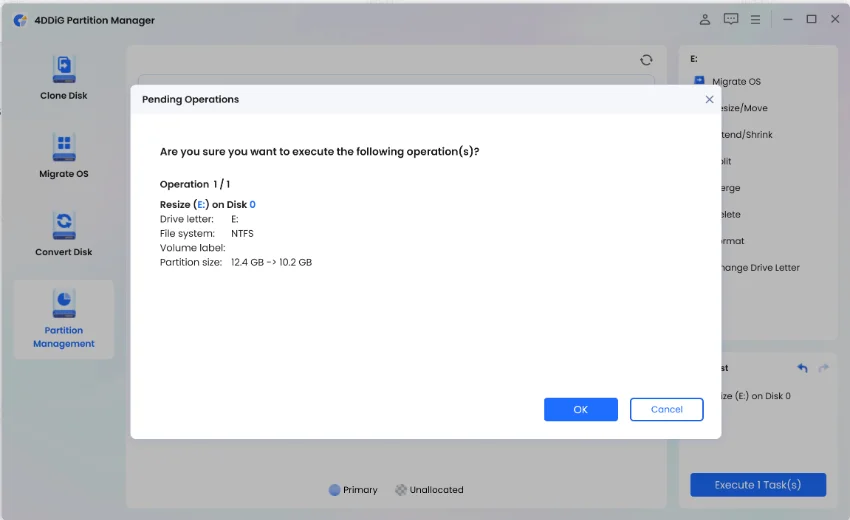
The queued resizing operation is shown in the Task List. Click Execute 1 Task(s) and click OK to commit the operation.

-
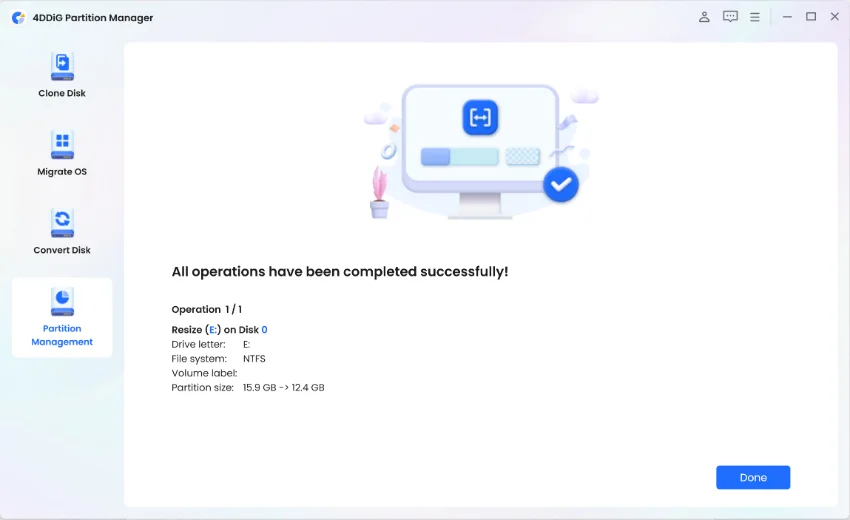
Wait until the partition size is adjusted as expected and click Done.

Get 1 Month License Instantly!
Conclusion
Through this article, you have learned how to resize BootCamp and how to use 4DDiG Partition Manager to make the process easier. Now you can effectively solve BootCamp partition resize and BootCamp insufficient capacity issues. Get the most out of BootCamp and work comfortably in both Mac and Windows environments.
Secure Download
💡 Summarize with AI:
You May Also Like
- Home >>
- Hard Drive >>
- How to Change Size of Boot Camp Partition [No Need to Delete Windows]


 ChatGPT
 Perplexity
 Google AI Mode
 Grok
Grok

