What to Do After Installing New SSD? A Full List For Your!
What to do after installing new SSD? If you are asking this question, you must have just upgraded to a shiny new SSD, and now you are wondering what the next steps are.
Well, upgrading your hard drive can be exciting, but it also brings a bit of confusion—especially if you're not tech-savvy. But fear not as this article is here to guide you through the essential steps to take after SSD installation.
From configuring your settings to optimizing performance, we have got you covered. By the end, you will feel confident and know exactly what to do after installing new NVMe SSD.
Let's get started.
What to Do After Installing New SSD?
Well, there are a bunch of things that you need to do right after installing a new SSD.
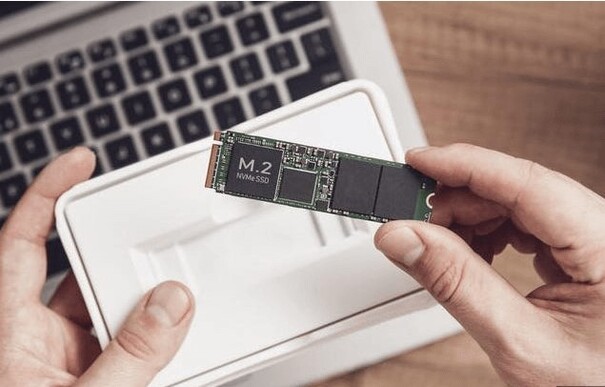
Let's discuss what to do after installing a new M.2 SSD in detail.
Step 1. Verify SSD detection
First of all, after installing your new SSD, it's crucial to ensure that your system detects it properly. This step is fundamental because, without proper detection, you won't be able to use your SSD for any further operations, such as migrating your OS or setting it as the primary boot disk.
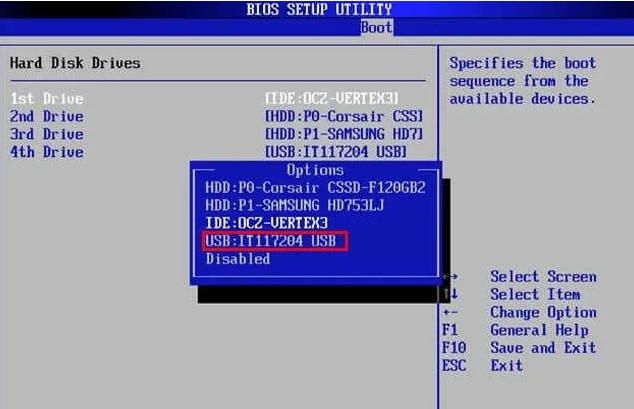
To verify SSD detection, start by rebooting your computer. During the startup process, you'll need to enter the BIOS/UEFI setup. Once inside the BIOS/UEFI, navigate to the storage or boot section. Here, you should see a list of all connected storage devices. Look for your new SSD in this list.
Seeing your SSD listed confirms that the installation was successful and that your system recognizes the new hardware. If your SSD doesn't appear, double-check the physical connections and ensure the drive is properly seated in its slot.
This verification step is essential before moving on to other steps. Proper detection sets the foundation for a smooth transition to using your new SSD.
Step 2. Migrate OS to SSD
Once you have verified the SSD installation, it's time to migrate your operating system to this new SSD. For that, you will need a reliable tool, and we highly recommend using 4DDiG Partition Manager. This software simplifies the migration process and ensures your data remains safe and intact.
4DDiG Partition Manager is an all-encompassing disk partition management tool designed to cater to a variety of needs on Windows operating systems. It stands out for its one-click OS migration feature, which allows users to transfer their Windows operating system to an SSD without the hassle of reinstalling the entire system.
This feature is particularly beneficial for those looking to enhance their computer's performance by upgrading to a faster SSD.
Key Features:
- One-click Windows OS migration to SSD/HDD
- Disk and partition cloning for data backup and system upgrades
- Flexible partition management to resize, split, create, delete, and format partitions
- Partition recovery to restore lost or damaged partitions
- • MBR/GPT disk conversion without data loss
- User-friendly interface for ease of use
How to Use 4DDiG Partition Manager to Migrate OS?
-
Install and launch 4DDiG Partition Manager on your computer. On the main interface, go to Clone OS Disk, select the new SSD, and hit the Next button.
FREE DOWNLOADSecure Download

-
A pop-up notification will appear warning you about the process. Read it carefully and hit the Sure button to continue.

-
The system migration will be started and you will have to wait for the process to be completed. Once the process is finished, hit the Finish button.

Step 3. Set SSD as the Primary Boot Disk
After migrating your OS to the new SSD, the next crucial step is to set it as the primary boot disk. This ensures that your computer will start up using the SSD, taking advantage of its faster read and write speeds.
Setting the SSD as the primary boot disk is a simple process done through your computer's BIOS/UEFI settings:
- Reboot your computer and press the designated key (usually F2, Del, or Esc) to enter the BIOS/UEFI setup.
-
Once in the BIOS/UEFI menu, find the Boot menu, which is typically under "Boot" or "Advanced Settings".

- Change the boot order to set your new SSD as the primary boot device.
- Save your changes and exit the BIOS/UEFI setup. Your computer will now boot from the SSD.
Step 4. Install the latest drivers and software
To ensure your new SSD and the overall system run smoothly, it's important to install the latest drivers and software. Updated drivers improve hardware performance and compatibility, and new software versions often include enhancements and bug fixes.
Check the manufacturer's website for each component of your system, download the latest drivers, and install them.
Step 5. Disable Unnecessary Services and Startup Programs
Disabling unnecessary services and startup programs can significantly improve your system's boot time and overall performance. Many programs automatically start when Windows boots, consuming valuable system resources and slowing down your computer.
Here's how you can disable unnecessary services and programs:
- Press Ctrl+Shift+Esc to open Task Manager.
-
Click on the "Startup" tab to see a list of all programs that start with Windows.

- Right-click on any programs you don't need at startup and select "Disable".
Step 6. Enable TRIM
Enabling TRIM on your SSD is crucial for maintaining its performance over time. TRIM helps the SSD manage unused data and optimizes write operations, which prolongs the lifespan of the drive.
Enabling TRIM is a straightforward process that can be done via the Command Prompt:
- Type "cmd" in the search bar, right-click on Command Prompt, and select "Run as administrator".
-
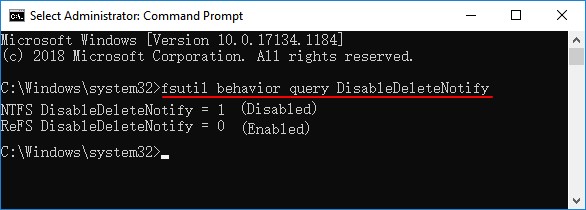
Type fsutil behavior query DisableDeleteNotify and press Enter.

- This will enable TRIM.
So that's what to do after installing new M.2 SSD. By following these steps, you can ensure that your new SSD operates efficiently and maintains high performance throughout its lifespan.
Conclusion
Now you know exactly what to do after installing a new SSD. From verifying that your system detects the new drive to migrating your operating system with the help of 4DDiG Partition Manager, these steps ensure a seamless transition and optimal performance.
By following this comprehensive guide, you'll fully enjoy the speed and efficiency benefits of your new SSD, with 4DDiG Partition Manager making the process easier and more reliable.
Secure Download


 ChatGPT
 Perplexity
 Google AI Mode
 Grok
Grok


