MBR2GPT Disk Layout Validation Failed for Disk: Why & How to Convert MBR to GPT Without Data Loss
Tried to run Microsoft"s MBR2GPT tool but encountered the frustrating error "MBR2GPT disk layout validation failed for disk 0 (or 1, 2, 3, etc)"? Currently, this error is a hotly discussed question. Many Windows users run into this issue when attempting to convert their system disk from MBR (Master Boot Record) to GPT (GUID Partition Table).
This error typically prevents successful conversion and may leave you stuck, especially if you want to upgrade to Windows 11 or enable UEFI boot mode. Fortunately, this problem can be fixed. This article explains why the MBR2GPT validation failed error occurs, how to fix it, and a smarter alternative for conversion.
Part 1. What Does the "MBR2GPT Disk Layout Validation Failed for Disk 0/1/2/3" Error Mean?
The MBR2GPT utility is a command-line tool introduced by Microsoft in Windows 10 (version 1703 and later). It allows users to convert a system disk from MBR (Master Boot Record) to GPT (GUID Partition Table) without having to format the drive.
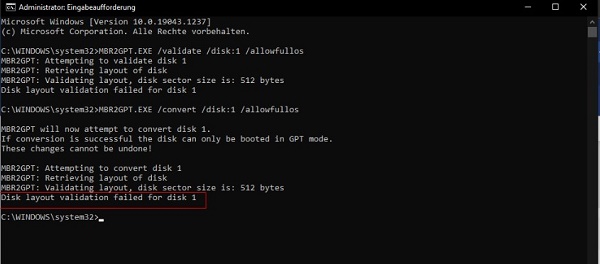
When running commands such as:
mbr2gpt /validate /disk:0 /allowFullOS or
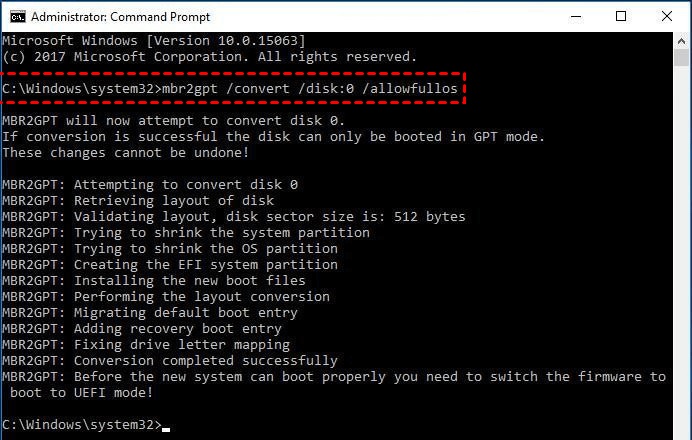
mbr2gpt /convert /disk:0 /allowFullOS, you might encounter an error:
-
"MBR2GPT Disk Layout Validation Failed for Disk 0" (or other disk number - disk 1, 2, 3, ../)
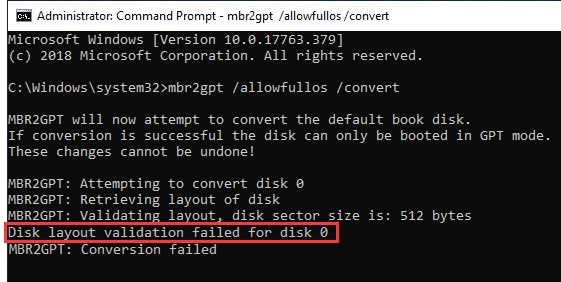
This simply means the validation process detected that your current disk layout does not meet the requirements for conversion. In other words, the mbr2gpt conversion failed because the partition structure is not compatible with GPT.
Part 2. What Causes MBR2GPT Validation Failed Error [Common Causes]
Before we get to the solutions, let"s understand the root cause of this error. Here are the main reasons:
-
Too Many Primary Partitions: MBR supports up to four primary partitions, while GPT requires space for new system partitions (like EFI). If your disk already has four primary partitions, MBR2GPT cannot create the new ones required.
-
Insufficient Space for EFI System Partition (ESP): Conversion requires a small chunk of unallocated space at the beginning or end of the disk for the EFI System Partition. If none exists, validation fails.
-
Incompatible Partition Types: Some non-standard or third-party recovery partitions prevent validation.
-
Wrong Sector Size: Sometimes the tool flags issues such as "mbr2gpt validating layout disk sector size is 512 bytes" if it detects inconsistencies with sector alignment or unsupported sector sizes.
-
Missing or Inactive System Partition: Another common issue is "MBR2GPT validation failed cannot find os", which means the tool could not locate the active system partition.
-
Corrupted Partition Table: If your MBR structure is damaged, MBR2GPT may reject it.
Part 3. How to Convert MBR to GPT Without Data Loss
Generally, MBR2GPT.exe comes with a command-line interface that requires technical requirements, which is tricky for newbies. Meanwhile, if you are not familiar with commands, you may lose your valuable data. Thus, amid this, 4DDiG Partition Manager becomes a safer, easier alternative.
Unlike MBR2GPT, 4DDiG Partition Manager provides a user-friendly interface and eliminates the risk of data loss. It can convert MBR to GPT in just a few clicks, while also allowing you to back up your entire system, partitions, or files beforehand. This ensures your data remains protected during the conversion. Additionally, if needed, you can restore partitions or system backups anytime.
Secure Download
Why Choose 4DDiG Partition Manager?
- Easier than MBR2GPT, no complicated commands or manual fixes.
- Able to convert disk style between MBR and GPT without formatting or deleting partitions.
- Additional features: Backup files, disks, and even the whole system; Restore Windows or files from backups anytime
- All-in-one tool that can manage partitions, resize volumes, migrate OS, and more.
- Beginner-friendly with a modern UI makes disk management accessible to everyone.
How to Convert MBR to GPT with 4DDiG Partition Manager
-
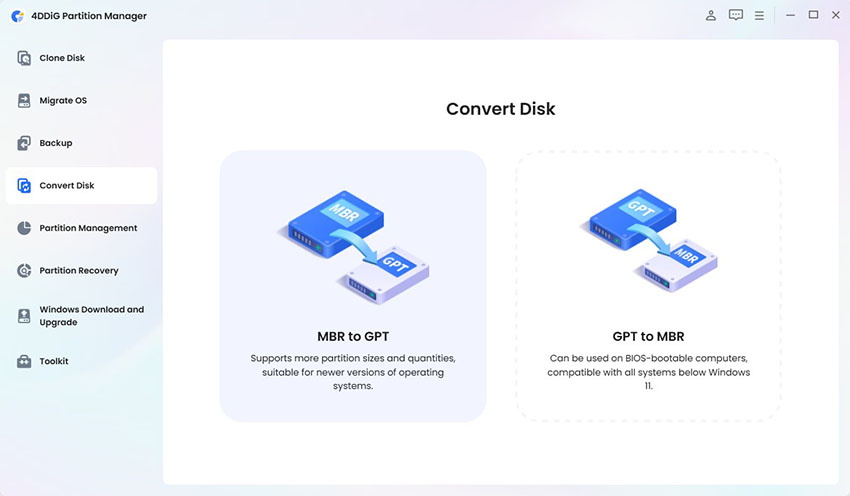
First, install the 4DDiG Partition Manager on your PC. Open it, go to "Convert Disk", and select "MBR to GPT" to start.

-
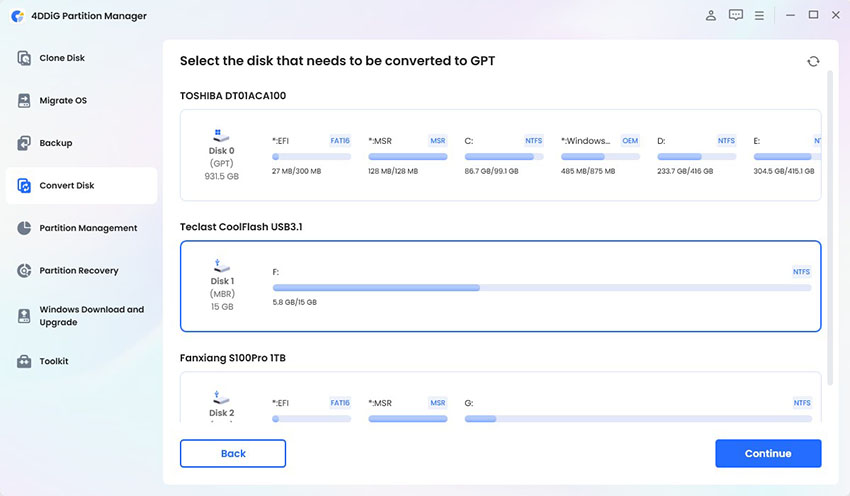
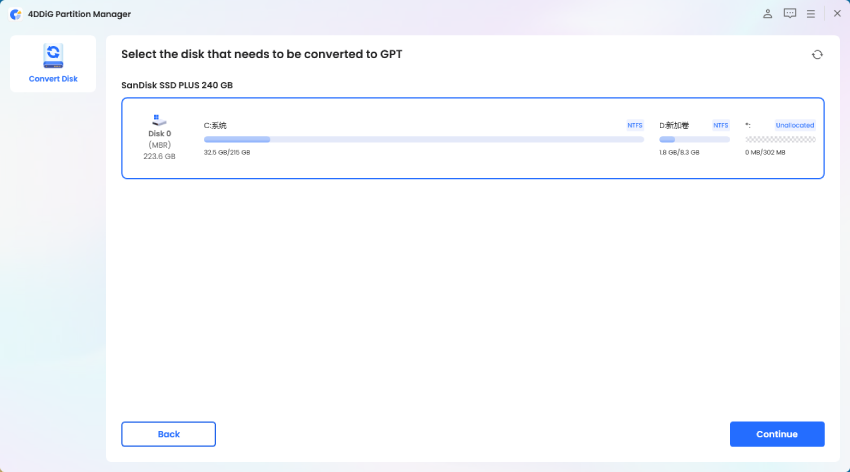
Select the MBR-style disk you want to convert to GPT, then click "Continue." If it"s a system disk, the software will download the PE component.

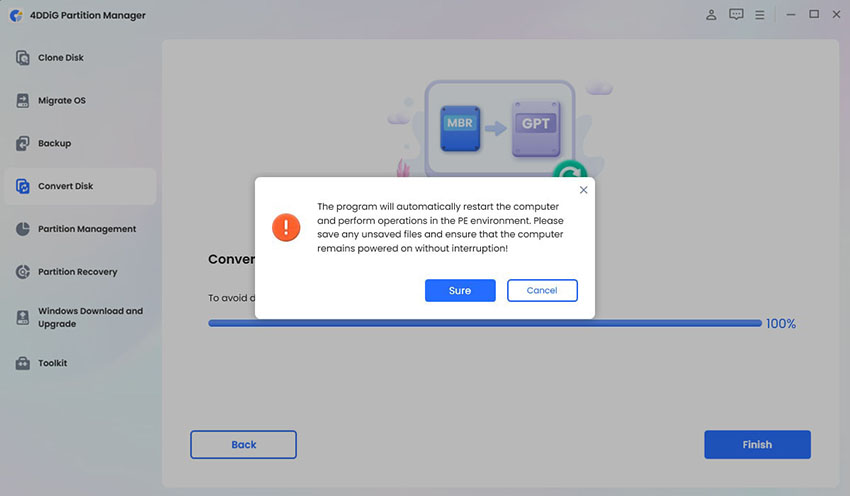
In this step, please make sure files are saved and the power is stable, then click "Sure" to reboot into the PE environment.

-
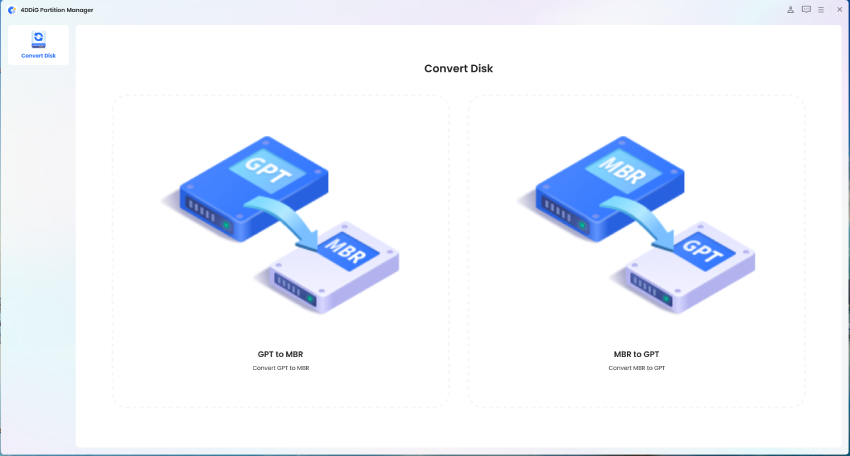
After restarting, the program will open in the PE environment. Select "Convert MBR to GPT" again to proceed with the conversion.

-
Subsequently, choose the required disk again, click "Continue", and confirm. Remember, in the PE mode, only the system disk is visible.

-
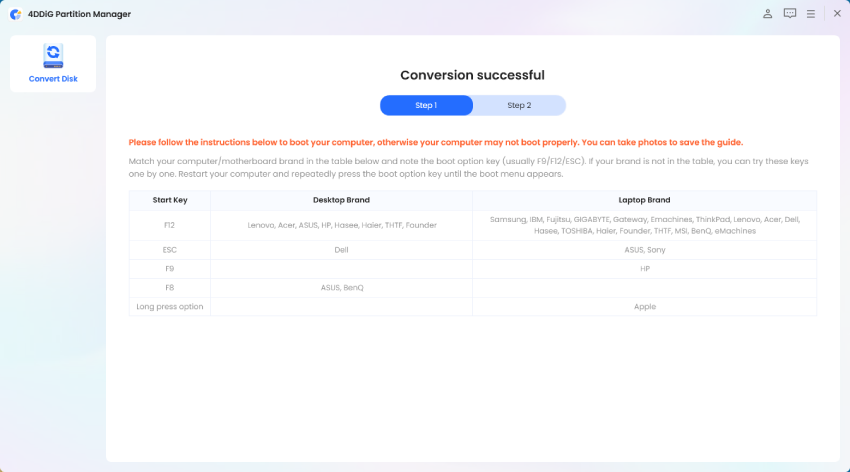
Now, the 4DDiG Partition Manager will begin converting MBR to GPT. The duration depends on the partitions on the disk. Once done, you"ll see "Conversion Successful". When finished, follow the on-screen boot-up guidance carefully, or your PC may not start properly.

Part 4. Common Steps to Fix "MBR2GPT Disk Layout Validation Failed for Disk" Error
If you still prefer to use Microsoft"s tool, here are detailed troubleshooting steps.
Step 1. Check Disk Partition Layout
The most common reason for this error is too many primary partitions (more than 3) or not enough space for the EFI System Partition (ESP). Before doing anything else, check your disk"s partition layout is MBR or GPT, alongside the amount of partitions.
-
Press Windows + R > type
cmd> press Enter to open the Command Prompt. -
Then type the following commands and touch the Enter ketword to check disk partition layout step-by-step:
diskpart-- To launch the DiskPart utilitylist disk-- To display all disks-
select disk X-- ReplaceXwith your target disk number, e.g., 0 and press Enter -
list partition-- view the partition layout. Check for an EFI System Partition (labeled as "System" or with a 100-300 MB size). Also, confirm there are no more than three primary partitions.
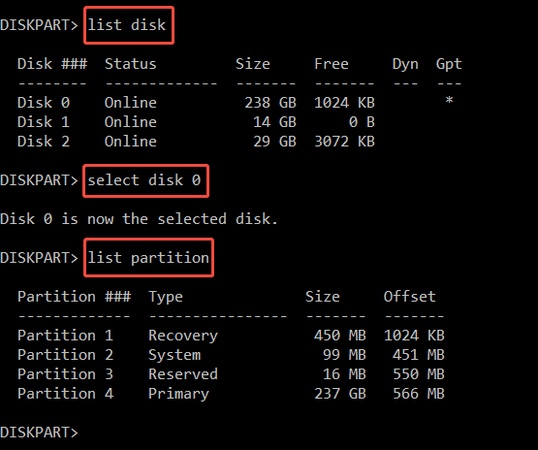
3 or fewer primary partitions are required for MBR to GPT conversion. If there are 4 primary partitions, MBR2GPT cannot create the extra ESP and MSR it needs for GPT. Also, if validation doesn"t work, take a look at
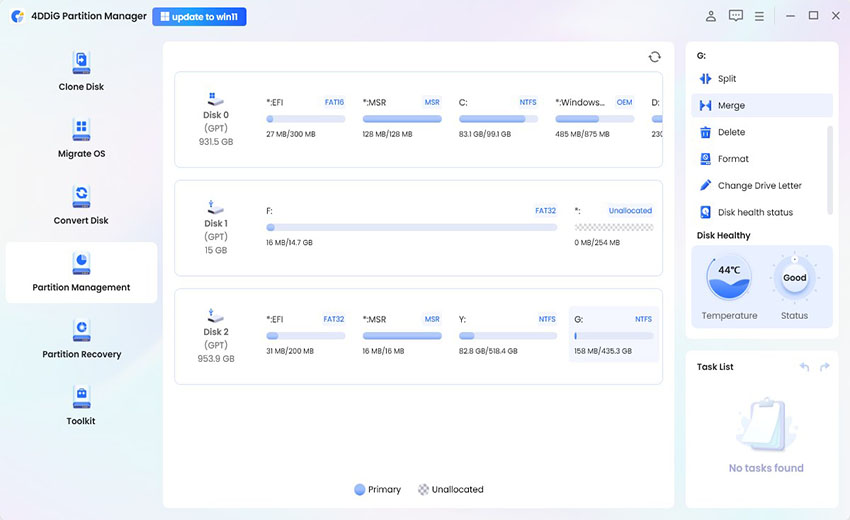
What to do if you have 4 primaries? You"ll need to either delete one partition or merge two partitions using 4DDiG Partition Manager to reduce the number. Be careful: deleting removes data. Always back up before making changes.
Step 2. Delete/Shrink Primary Partition to Free Up Space
MBR2GPT still requires at least ~300 MB of unallocated space (260 MB for ESP, 16 MB for MSR, plus some buffer). If you have more than 3 partitions or there is not enough unallocated space at the beginning and end of the disk, the disk layout validation error will occur. Amid this, you"ll need to shrink or delete partitions to meet these requirements to avoid the conversion failure.
Option A: Shrink the OS Partition (non-destructive):
-
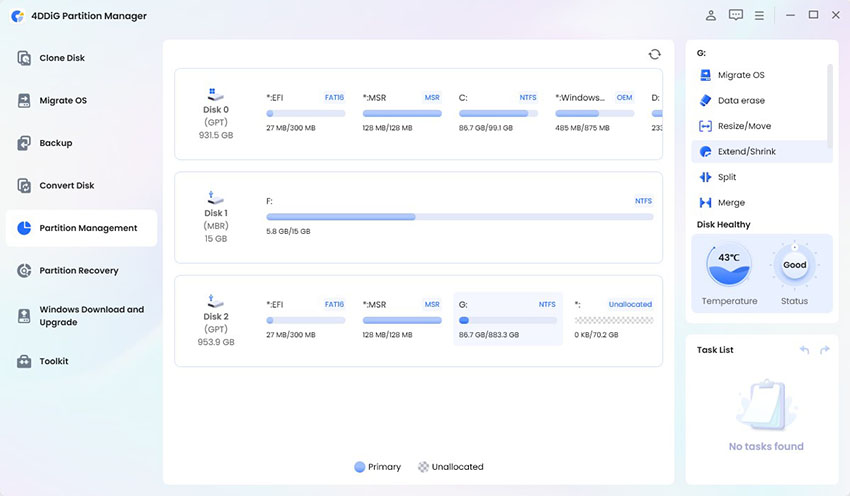
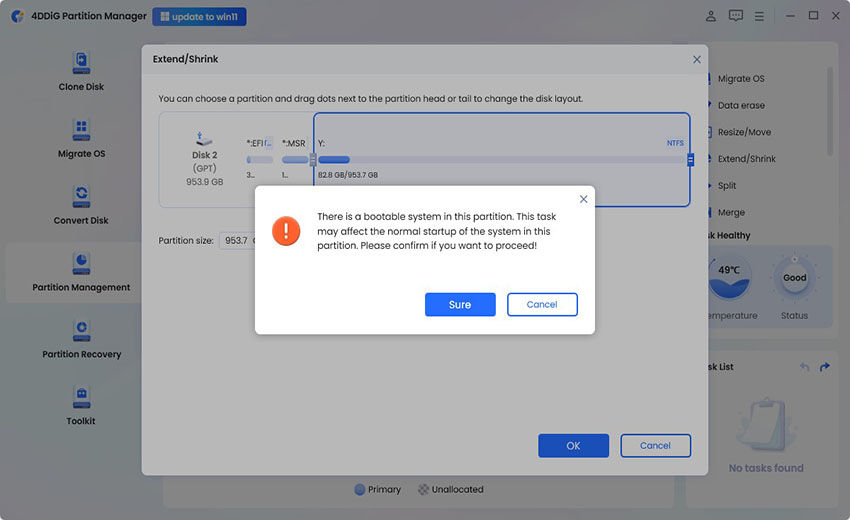
On 4DDiG Partition Manager, tap on the left "Partition Management" tab. Then select the target OS partition you want to shrink to leave more space for UFI partition. Once selected, click "Extend/Shrink" from the right panel.

-
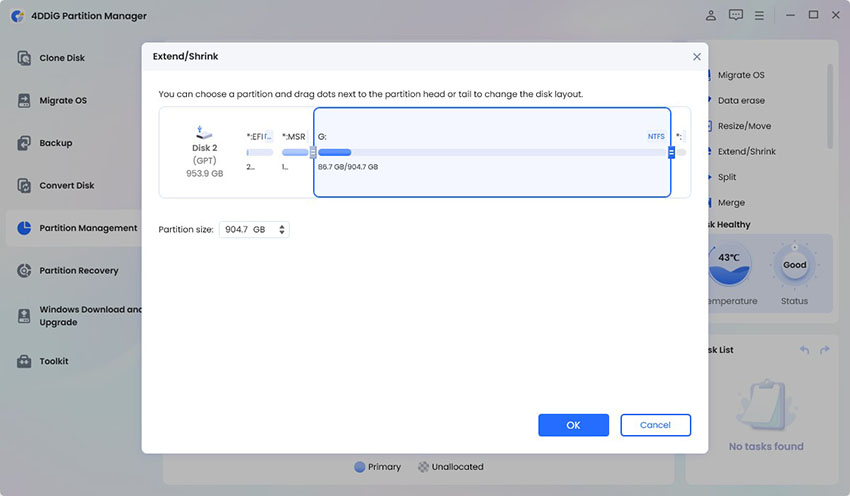
In the "Extend/Shrink" dialog, drag the slider of the selected OS partition to left in order to shrink its size. When finished, tap the bottom-right "OK" button to add the shrink task.

Note:
If a bootable system is in the selected OS partition, the system startup will be affected. Please confirm you want to proceed and tap Sure.

-
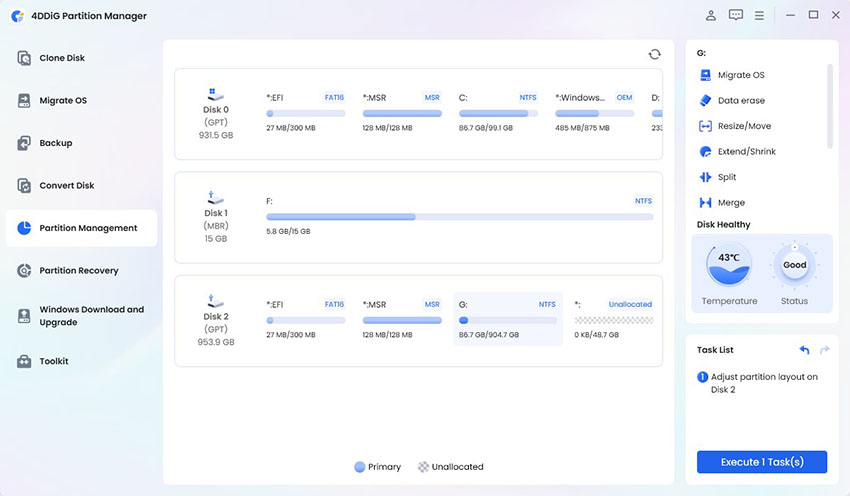
Now the shrink task is added. Please hit the "Execute 1 Task(s)" in the bottom-right Task List section to start shrinking partition. When a prompt pops up, select "OK" to continue the task.

-
Wait the software to complete the task patiently. Meanwhile, to avoid data loss, please never close the 4DDiG program till the task is finished.

Option B: Delete a Partition:
-
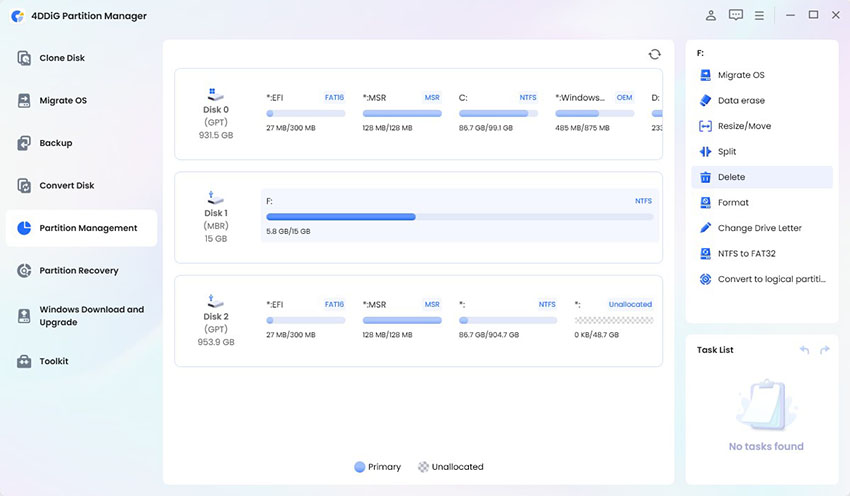
Fire up 4DDiG Partition Manager and select "Partition Management".

-
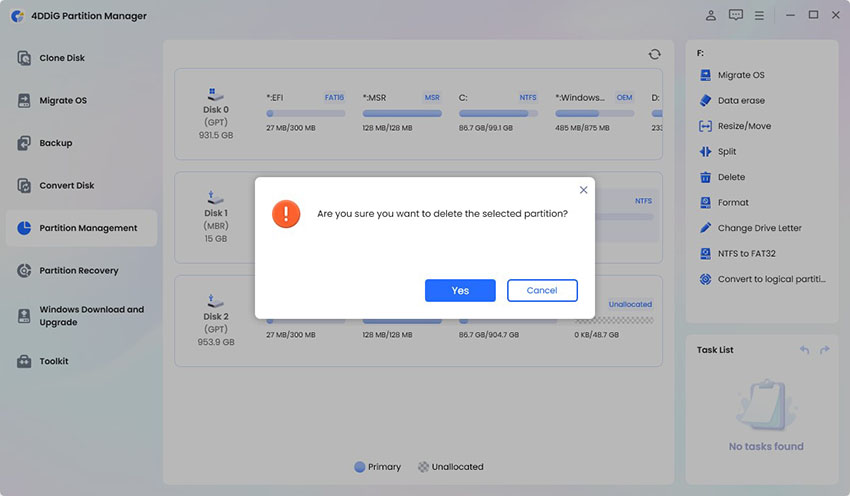
Later, choose the target disk partition you want to delete to free up space. Once selected, tap on "Delete" from the right panel. When a prompt pop-up, please select "Yes" if you confirmed.

-
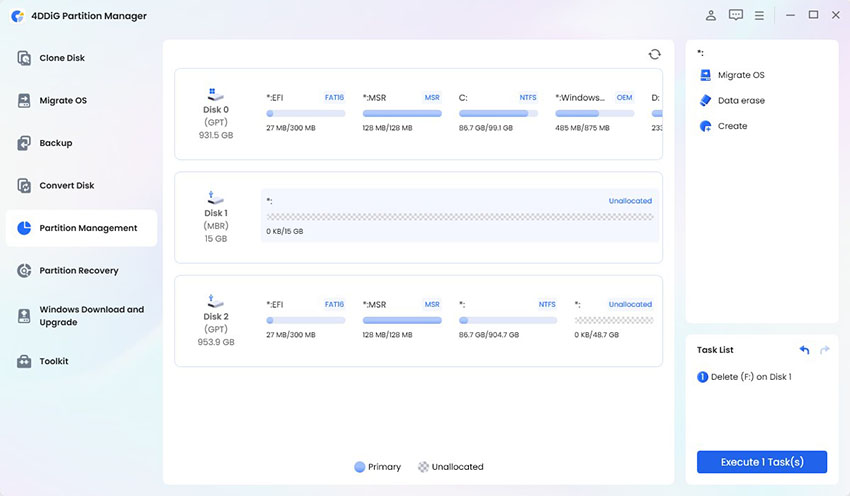
Once done, a Delete task will be displayed in the bottom-right "Task List" section. Just click "Execute Task(s)" to proceed.

-
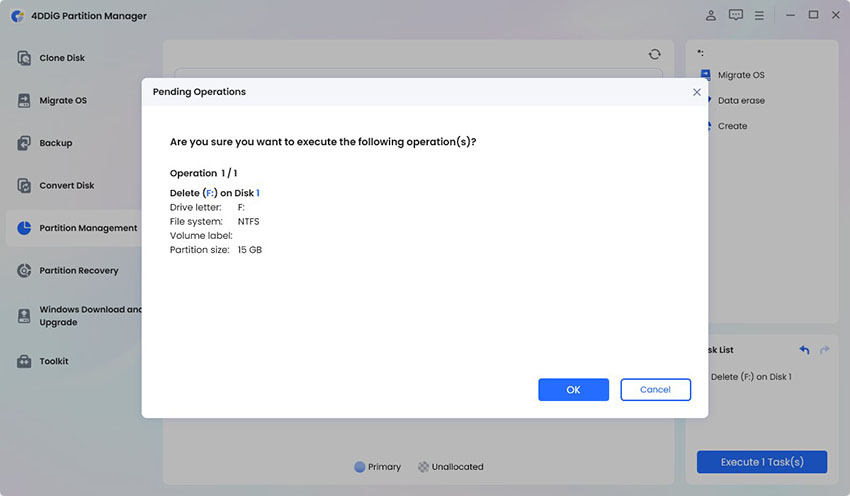
When the Pending Operations window pops up, preview the details of the Delete task and click "OK" if everything is satisfied.

-
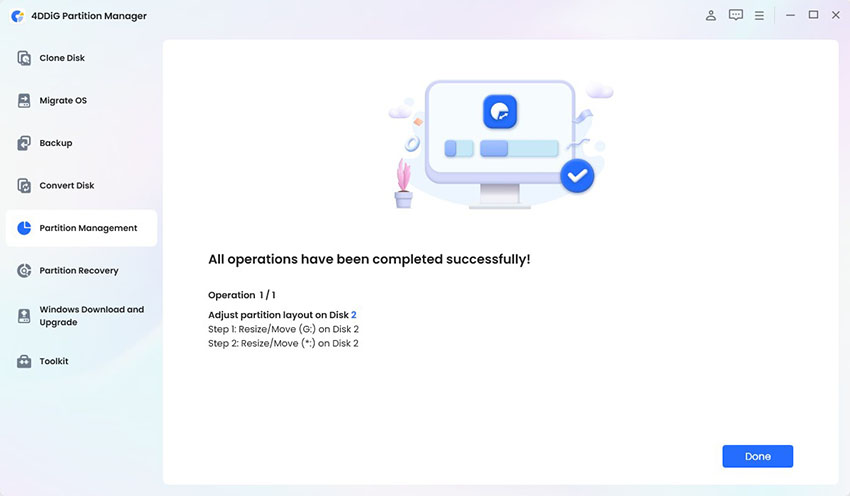
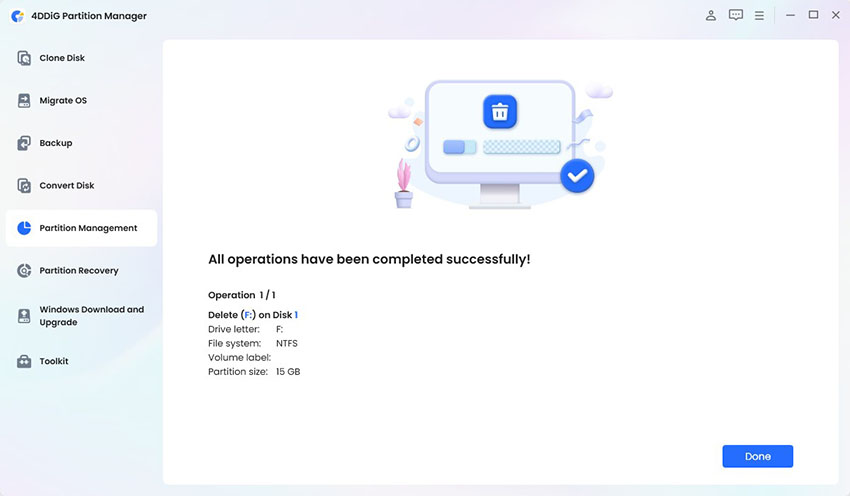
Wait for a while. When the delete process is finished, click "Done".

The unallocated space should be positioned next to the OS partition. If it"s far away, MBR2GPT won"t be able to use it.
Step 3. Validate Disk Sector Size & Check Its Compatibility
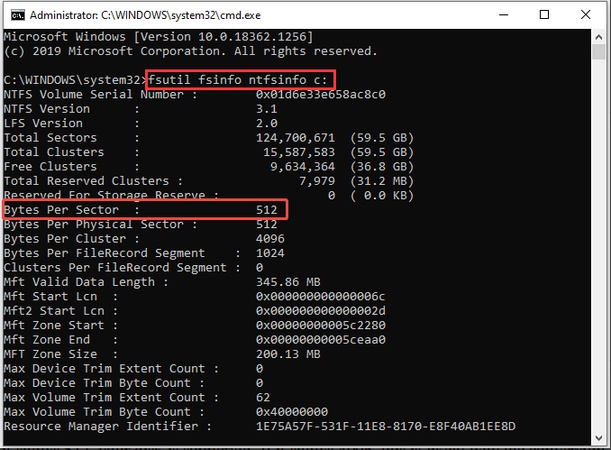
Another common issue is that some disks use an unsupported logical sector size. MBR2GPT primarily supports 512-byte sector drives (512n or 512e). If your disk is 4K (4096 bytes logical sector), the tool will fail. Here is how to check the disk sector size and compatibility.
Steps:
-
Open Command Prompt as an administrator by pressing Win+R, entering cmd, and pressing Enter.
-
Run the following in Command Prompt: fsutil fsinfo sectorinfo C:
Check the line "Bytes Per Sector":
-
If it shows 512, your disk is supported. If it shows 4096, this is likely why the conversion fails.

What to do if your disk is 4Kn (4096)? Some enterprise/NVMe drives only support 4Kn. MBR2GPT can"t handle these. The workaround is to clone your data to a 512e disk or use 4DDiG Partition Manager to convert the disk.
Step 4. Check If the System Partition Is Active
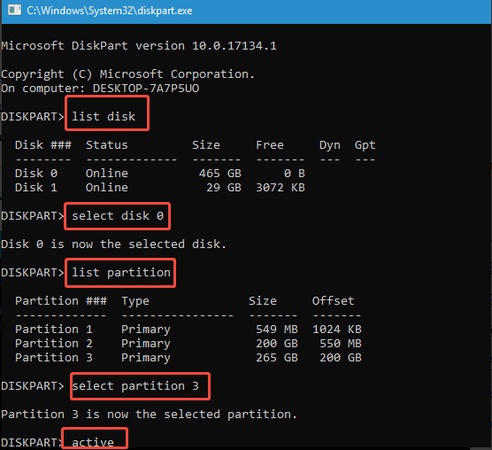
If the Windows partition or System Reserved partition is not marked Active, you will also get the error "MBR2GPT validation failed: cannot find OS". Setting the correct partition as active ensures the operating system is recognized during conversion.
Steps to Fix:
-
Open Diskpart by running the diskpart command in Command Prompt.
-
Type
list diskand press Enter to view all available disks. -
Type
select disk 0and press Enter. -
Enter
list partitionand press "Enter" to see all partitions. -
Enter "
select partition Y", substituting Y with the partition number, then press Enter. -
Type
activeand press Enter to set the chosen partition as active.
-
Exit
DiskPartand reboot your computer.
This tells BIOS to recognize the Windows boot partition so MBR2GPT can proceed.
Step 5. Run MBR2GPT Command Again
Once you"ve adjusted partitions, freed space, checked sector size and ensured the correct partition is Active, try again.
-
Run Validation First: mbr2gpt.exe /validate /disk:0 /allowFullOS
- If validation succeeds, proceed.
- If it still fails, review setupact.log for precise reasons.
-
Run Conversion: mbr2gpt.exe /convert /disk:0 /allowFullOS

After Conversion:
- Reboot your PC.
- Enter BIOS/UEFI firmware settings (usually Del or F2 at startup).
- Change boot mode from Legacy/CSM to UEFI.
- Save change and restart.
Windows should now boot in UEFI mode with GPT.
Conclusion
When you see "MBR2GPT disk layout validation failed for disk 0 (or other disk numbers, like 1, 2, 3...)", don"t worry. It"s usually due to incompatible partitions or sector sizes. By checking partition count, freeing up EFI space, checking sector size is 512 and marking the system partition Active, you can often fix it manually. But manual fixes are risky and complicated. The most reliable way to convert MBR to GPT without data loss is 4DDiG Partition Manager. It bypasses technical errors, protects your files and does it all in a few clicks.
Secure Download
💡 Summarize with AI:
You May Also Like
- Home >>
- Hard Drive >>
- MBR2GPT Disk Layout Validation Failed for Disk: Why & How to Convert MBR to GPT Without Data Loss
 ChatGPT
 Perplexity
 Google AI Mode
 Grok
Grok

