Screen Recording Failed to Save: Why & How to Fix (OBS & Other Recorders)
Imagine recording an important webinar or gameplay, only for your screen recording to fail to save. There is no file that you can see, and you are frustrated. The trouble can be permission settings, storage issues, or wrong settings. This guide will offer the reasons why screen recording does not save and how it can be avoided. You will also learn how corrupt files and files at the wrong time can be salvaged, so you never lose recordings again.
Part 1. Why Did My Screen Recording Not Save? [Common Reasons]
If you are trying to capture your screen but you are consistently facing the screen recording not saved issue, there could be several reasons behind it. Here we have compiled all the possible reasons why you are facing the issue:
- Permission access issues with Photos or storage can stop saving your screen recording.
- Insufficient storage space means recordings fail when your device is full.
- Content restrictions or Screen Recording disallowed cause screen recording failed to save due to -5831 error.
- Buffer errors in OBS replay buffer result in screen recording failed due to buffer problems.
- Asset writer failures in iOS. Known as screen recording failed to save due to asset writer issues.
- Codec or format conflicts. OBS recordings stuck as MKV may not save correctly via MP4 remux.
- High CPU usage or NVENC encoder errors. OBS may crash or drop file writing with a codec error.
Part 2. How to Fix Screen Recording Failing to Save on iPhone/Android/Mac/PC
If you are using the built-in screen recording solutions on your device, then the solution to this problem will be easy. Below we have listed the detailed steps you need to follow on your device:
1. Restart Your Device
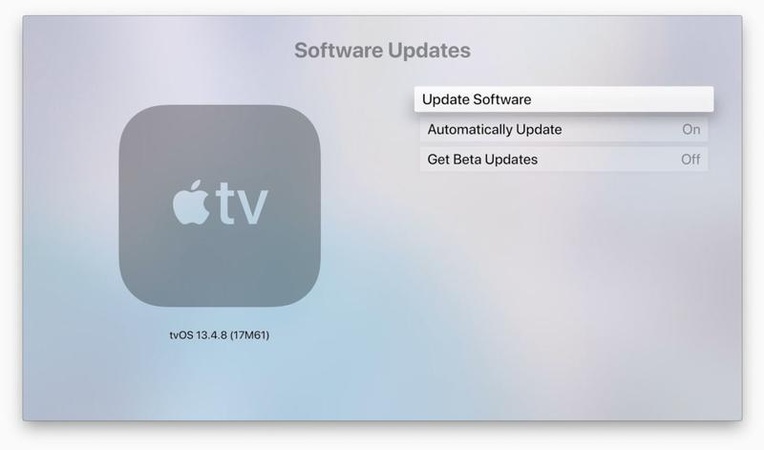
Minor software issues that affect screen recording can be solved by rebooting your device. This is one basic, but it can be an effective first measure when recordings do not get saved when you think they should have. The steps below are for macOS, Windows, Android, and iOS to fix glitches causing screen recording not saved. And these may vary for other devices.
-
📲 iPhone: Press and hold the Side/Power button (or with Volume button on newer models) until the power-off slider appears. Slide to shut down, then press the Side/Power button to restart.
-
📲 Android: Press and hold the Power button, select “Restart”, or power off and on again.
-
💻 Windows PC: Click “Start” button and choose “Power” > “Restart”.
-
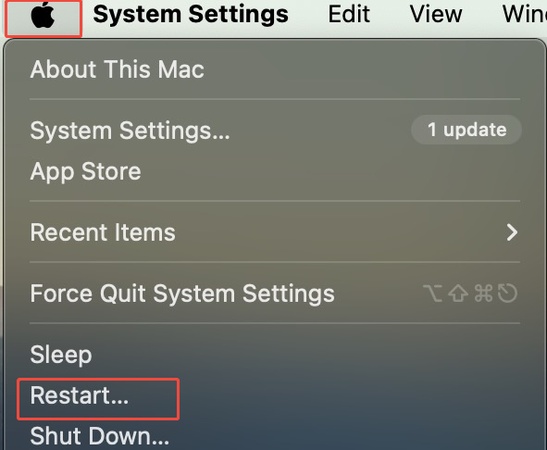
💻 Mac: Click the “Apple menu” > “Restart”.

For all devices: Power off completely, wait 10-15 seconds, then power back on before attempting to record again.
2. Enable Photos Permission for Screen Recording
Sometimes your screen recording is not saving to the Photos app. There is a likelihood of the issue being related to permission. Allowing the desired access to your privacy settings can fix the screen recording failed to save due to photo failure issue in your normal saving behavior.
-
📲 iPhone: Go to “Settings” > “Privacy” > “Photos”. Select Screen Recording app and allow “Full Access”.
-
📲 Android: Go to “Settings” > “Apps” > [Screen Recording App]. Then tap “Permissions” and enable access to Storage or Media.
-
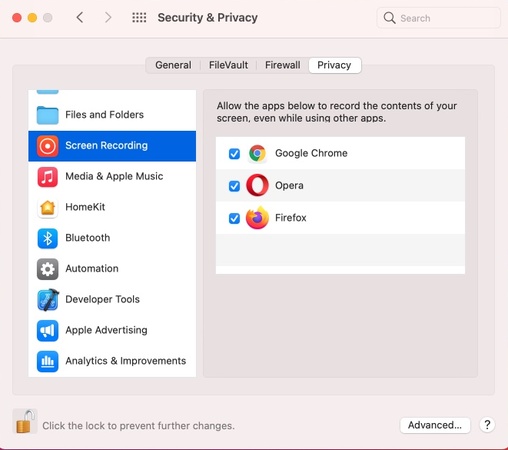
💻 Mac: Go to “System Settings” > “Privacy & Security” > “Screen Recording”. Then enable screen recording for your chosen app. Also, check “Camera” and “Microphone” permissions if needed.

-
💻 Windows: Go to “Settings” > “Privacy” > “Camera” (or Microphone). Ensure the recording app has necessary permissions and check Storage permissions in app settings
3. Free Up Storage Space on Your Device
Screen recordings take up space on a computer and use up all the memory to the extent that recording may stop. It is advisable to make at least 1 GB of space free to make the video easily.
-
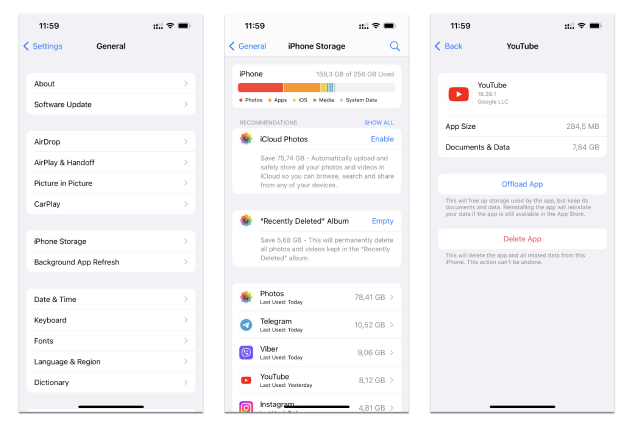
📲 iPhone: Settings → General → iPhone Storage. Offload or delete large unused apps or media.

-
📲 Android: Settings → Storage. Clear app cache and remove large files.
-
💻 Mac: Apple menu → About This Mac → Storage. Remove unused files or use “Optimize Storage” to make more available space for saving screen recordings.
-
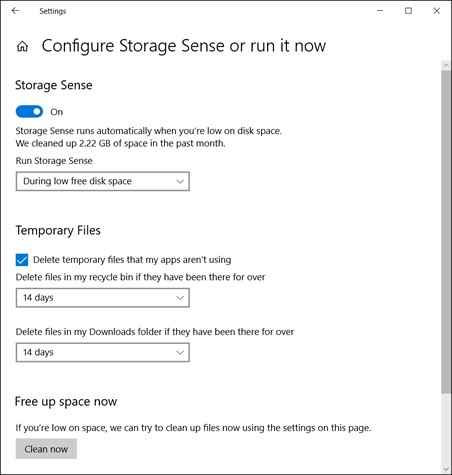
💻 Windows: Settings → System → Storage. Use “Storage Sense” to automatically free up space. Or, tap the “Clean now” button under “Free up space now”.

4. Check Screen Content Restrictions & Allow Screen Recording
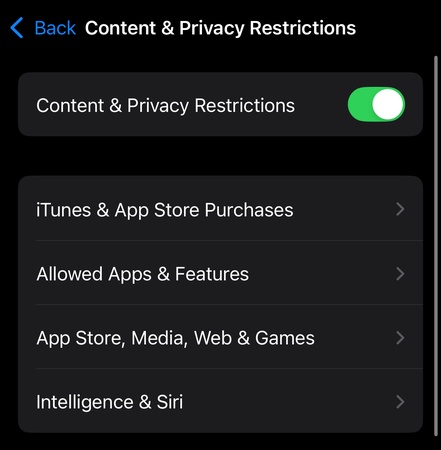
Within the Screen Time content restrictions option on iPhones, any screen recording functions could be blocked. Allowing recording on the desired app will guarantee the functionality of saving the recorded clip on your device. This is is quite useful for fixing the screen recording failed to save due to -5831 issue.
📲 On iPhone:
-
Go to Screen Time Settings, locate "Content and Privacy Restrictions", and turn it ON.
Choose "Allowed Apps and Features”.
-
Enable permission for the screen recording app, and your problem is fixed.

📲 On Android:
-
Go to “Settings” > “Digital Wellbeing & Parental Controls” (or equivalent).
-
Disable restrictions or allow screen recording in the app’s permissions.
💻 On Mac:
-
Go to “System Settings” > “Screen Time” > “Content & Privacy”.
-
Turn off restrictions or allow QuickTime Player/screen recording.
💻 On Windows:
Windows does not have a global screen recording restriction, but some apps may block recording. Make sure your recording software (Xbox Game Bar, OBS, etc.) has necessary permissions.
-
Check Group Policy (Windows Pro/Enterprise): Run gpedit.msc, navigate to User Configuration > Administrative Templates > System, and ensure no policies block recording.
-
For Game Bar, go to “Settings” > “Gaming” > “Xbox Game Bar” and enable it.
5. Turn off the Microphone & Disable Audio Recording on the Device
In certain cases, the use of audio may result in failure of a recording because of recording bugs related to audio or system constraints. The errors with the asset writer can be successfully resolved by disabling the microphone. Thus, saving the video-only recording. It is proven useful to solve the screen recording that failed to save due to the asset writer failing to save issue.
📲 On iPhone:
-
Start a screen recording (Control Center > Screen Recording icon).
-
Long-press the Screen Recording icon and toggle off the microphone.
📲 On Android:
Open the screen recording feature (Quick Settings or app).
-
Disable “Record Audio” or “Microphone” in the recording settings.
💻 On Mac:
-
Open QuickTime Player, select File > New Screen Recording.
-
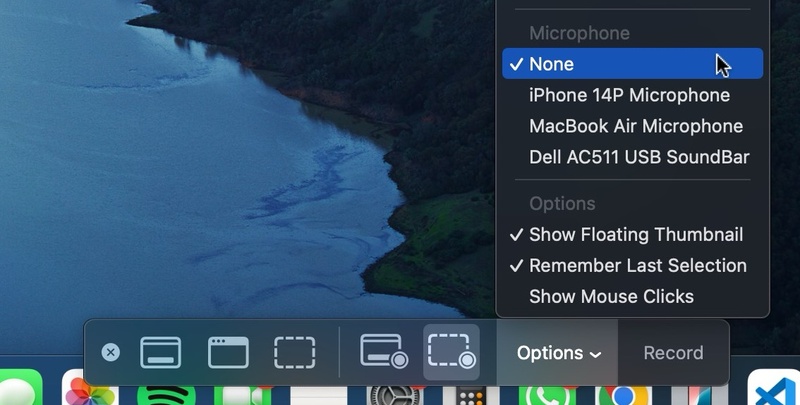
In the recording bar, set the microphone to “None.”

💻 On Windows:
-
For Game Bar, press Win + G, click the microphone icon to disable audio.
-
For third-party apps, check audio settings and disable microphone input.
Part 3. App-Specific Solutions: How to Fix OBS Not Saving Recordings
If you are not using the built-in tools and using the third-party app OBS instead, this section covers the different solutions you can try for OBS.
1. Change OBS Saving Format to MKV/MP4 via Remux
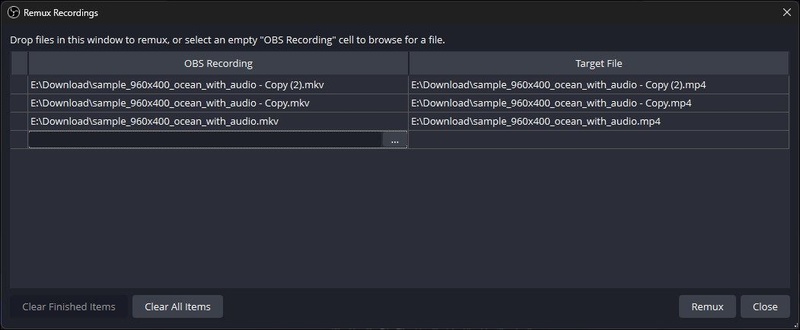
MKV is the saving format of OBS, and it might not be compatible with your system or media players. When you use the Remux feature, you can change MKV to MP4, which is more compatible and less likely to cause save errors.
-
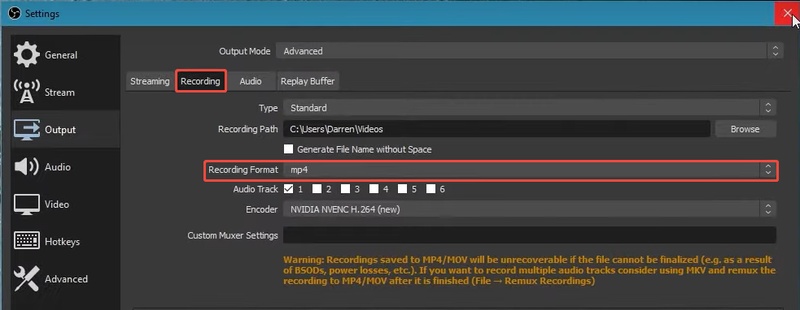
Open OBS Studio, go to “File” > “Settings” > “Output”. Switch to “Recording” tab.
-
Under Recording Format, select “MKV” (safer for incomplete recordings) or “MP4”.

After recording, go to “File” > “Remux Recordings”.
-
Select the MKV file, choose a destination, and click “Remux” to convert recordings to MP4. Finally, check if the MP4 file saves and plays correctly.

2. Enable Auto-Save Replay Buffer
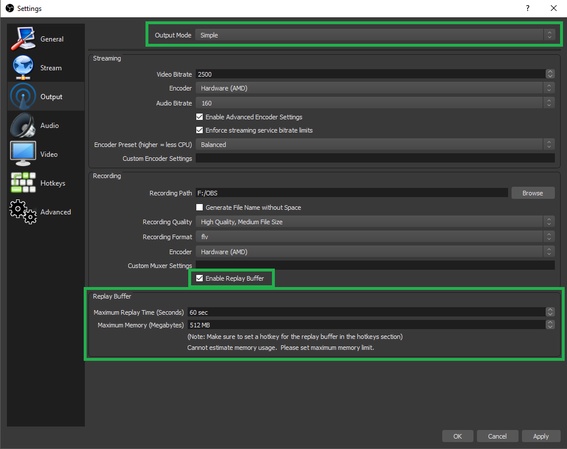
When OBS cannot save the content in the replay buffer, one can use auto-save to save the recordings. This environment makes it possible to save video without manual intervention.
-
In OBS, go to “Settings” and “Output”, then set the output mode to "Simple"
-
Enable the “Replay Buffer” option and set a duration (e.g., 30 seconds) in the “Maximum Replay Time” section.
-
Click “Apply” to solve recording failure due to buffer issue.

3. Stop Using CPU for Encoding (Fix OBS NVENC Codec Error)
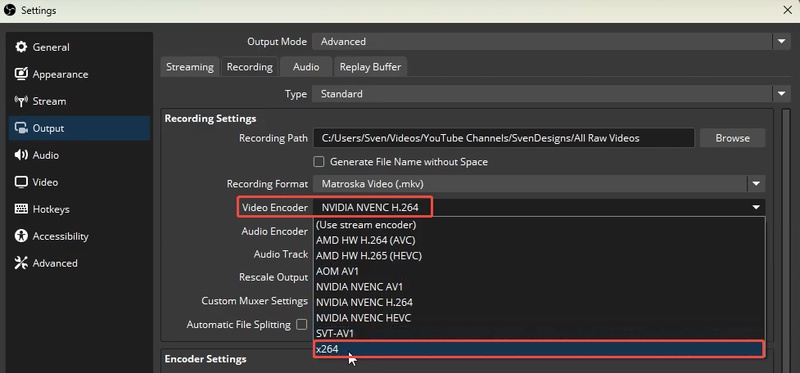
OBS recordings may crash or fail to save due to high processor usage or conflict with encoders. The problem can be eliminated by switching to a hardware encoder or modifying the encoder settings.
-
Open OBS settings and go to “Output”. Set Output Mode to “Simple” or “Advanced”.
-
Under “Video Encoder”, change from “NVENC H.264” to “Software (x264)”.

-
Click "Apply" to fix OBS failed to save video after recording NVENC error.
Part 4. Advanced Tips: Repair Corrupted Video While Screen Recording
When screen recordings fail to save fully, resulting in corrupted files, then video repair software is able to salvage the damaged files. 4DDiG Video Repair is an AI-powered tool designed to address these issues effectively. It repairs corrupted or unplayable video files (MP4, MOV, etc.) caused by screen recording interruptions, software crashes, or codec errors. It is quite suitable to repair corrupted videos due to screen recording not saving the full video (such as OBS not saving the full recording).
Secure Download
Secure Download
✅ Multiple Features of 4DDiG Video Repair:
- Fixes videos that are choppy, jerky, or fail to play due to incomplete saving.
- Repairs multiple videos simultaneously, ideal for bulk screen recording issues.
- Restores video integrity with advanced algorithms, ensuring smooth playback.
- Supports videos from various devices (e.g., iPhones, Androids, cameras, drones, dashcams) and screen recording tools like OBS.
- Allows previewing repaired videos before saving to ensure quality.
✅ Steps to Repair Corrupted Screen Recordings Due to Not Saved Using 4DDiG:
-
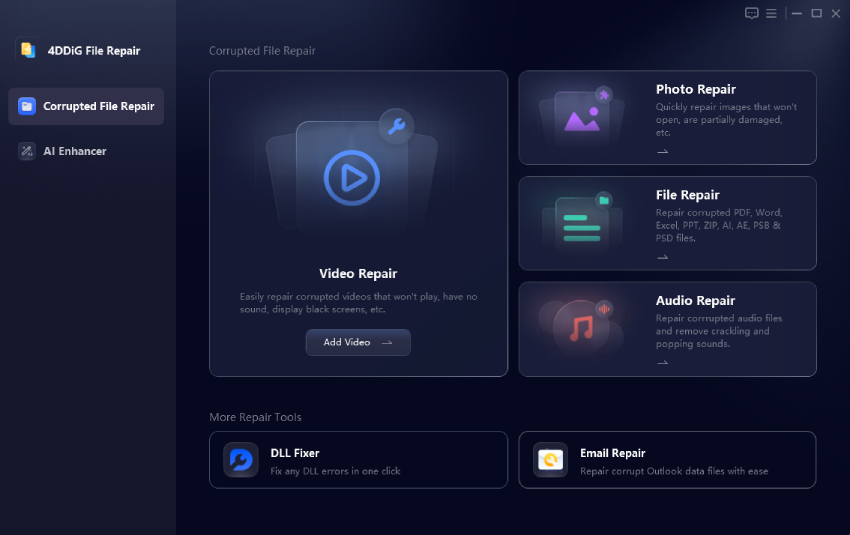
Open 4DDiG File Repair tool and click the "Corrupted File Repair" option. Now select "Video Repair".

-
Click the "Add Video" button to add the corrupted screen recordings due to recorders not saving the whole video. Also, you can drag and drop those video files to 4DDiG in batch for repair.

-
After adding all the screen recordings, you can click “Repair All” and wait for a few seconds.

-
Now, all your videos are repaired, and you can save them by clicking “Save All”. Check results before saving by clicking the "Preview" button.

People Also Ask about Screen Recording Failed to Save
Q1: How to recover screen recording video?
Repair corrupted recordings with issues using 4DDiG Video Repair. It works instantly and provides great results without much manual effort.
Q2: How do I save my OBS recording
To save your OBS recording, you need to change saving format OBS. Maintain the right default save path, Settings Output, and for added reliability remux MKV to MP4.
Q3: Where to find unsaved screen recordings on iPhone
Open the Check Photos app in Recent or the Screen Recording album, which is temporarily created. In case of a blank folder, permission problems may have taken place.
Q4: Why is OBS not recording 1080p?
Make sure you have the proper settings in OBS and recording resolution on the Video and Output tab, and the encoding bitrate.
Q5: Does OBS save recordings if it crashes
Yes, if you are using the MKV format for recordings, then OBS will always save them, even in case of a crash. However, this feature is not available for the MP4 format.
Q6: Why did my OBS recording disappear
Probably with an incorrect save folder, unrecoverable disk permission, e.g., or codec mix-up. Simply repair by remux or change the storage path to solve the screen recording not saving.
Conclusion
When your screen recording failed to save either on mobile or OBS, it might have been caused by permissions, storage-related, or buffer/config-related issues. Use every device-specific solution, enable Photos access and free space, change OBS settings and formats.
In the case of partially saved recordings, the 4DDiG Video Repair offers a professional recovery that degrades none of the qualities. Try it today and make sure that every screen capture you get is made available to you and not lost when you need it.
Secure Download
Secure Download
💡 Summarize with AI:
You May Also Like
- Home >>
- Video Error >>
- Screen Recording Failed to Save: Why & How to Fix (OBS & Other Recorders)


 ChatGPT
 Perplexity
 Google AI Mode
 Grok
Grok

