Can water damaged photos be repaired?“My old photos get damaged due to water, how to repair them?”
Photos are a great way to capture and keep precious memories alive for years. But due to some external environmental factors, many people often encounter the problem of water damage photos. Before you give up on restoring these photos, know that some digital tools are available to help you fix water damaged photos. In this article, we will discuss some of the best digital tools so you can easily repair your water damage photos and keep those moments alive forever. Whether an old-school printed photograph or a digital one, you can restore them easily with the right techniques and tools. So, keep reading!
Part 1: What Leads to Water Damage Photos?
There are several reasons why photos may get damaged due to water. Here are some of the most common causes:
- Humid environments: Photos stored in humid conditions can quickly become warped, discolored, and dirty due to water damage.
- Your home's central heating and cooling system: This can cause your photos to stick together and create smudges on the surface, making them difficult to repair.
- Incorrect storage: Photos stored in plastic bags or boxes can become water damaged if the containers are not properly sealed.
- Spilled drinks: This is a common cause of damage for all kinds of photos, from digital shots to printed photographs.
- Mold growth: If a photo is stored in damp or humid conditions, then it can become covered with mold and mildew.
- Long-term display in a glass frame: If you display photos in a glass frame for an extended period of time, then the moisture levels can cause serious damage to them.
Part 2: How to Repair Water Damage Photos Using Digital Tools?
Can water damaged photos be repaired? The answer is yes! The water damage photos can be scanned and digitally fixed. You can use ScanCafe, DigMyPics and ScanMyPhotos to physically scan and digitize your water damage photos. After you have successfully scanned and uploaded the photos to your device, you can use the three digital tools described below to restore your water damage photos.
Tool 1. 4DDiG File RepairHOT
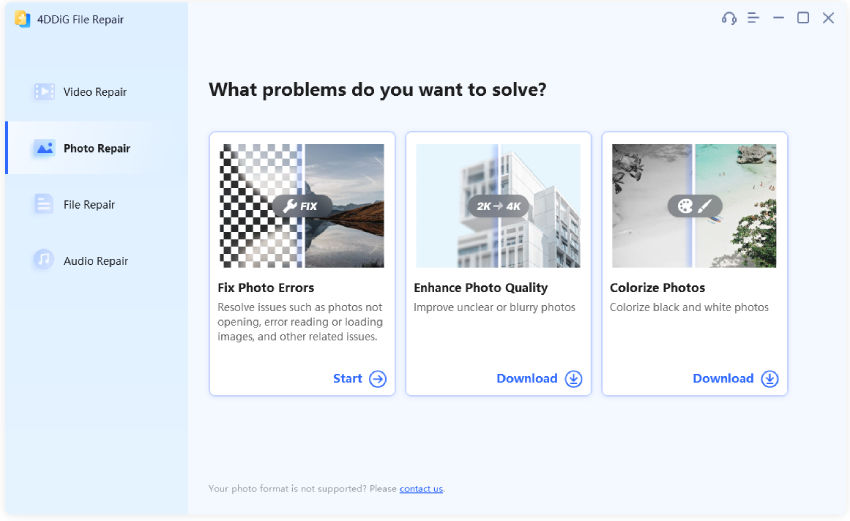
Get ready to restore all your precious memories with 4DDiG File Repair! Whether it's your old family photos or recent vacation pictures, this software is your go-to solution for photo restoration. Here are some top features of this digital tool:
- Easily restore and repair photos in various formats with one click
- Quickly repair up to 3000 photos at once
- Keep your images safe and secure with fast repairs
- Renew old, scratched photos
- Enjoy quality results with no manual labor needed
It is worth noting that 4DDiG File Repair only takes 3 steps to fix water damaged photos. Here’s how:
Download and install 4DDiG File Repair on your computer. Choose the photo repair option.
FREE DOWNLOADFor PC
Secure Download
FREE DOWNLOADFor MAC
Secure Download

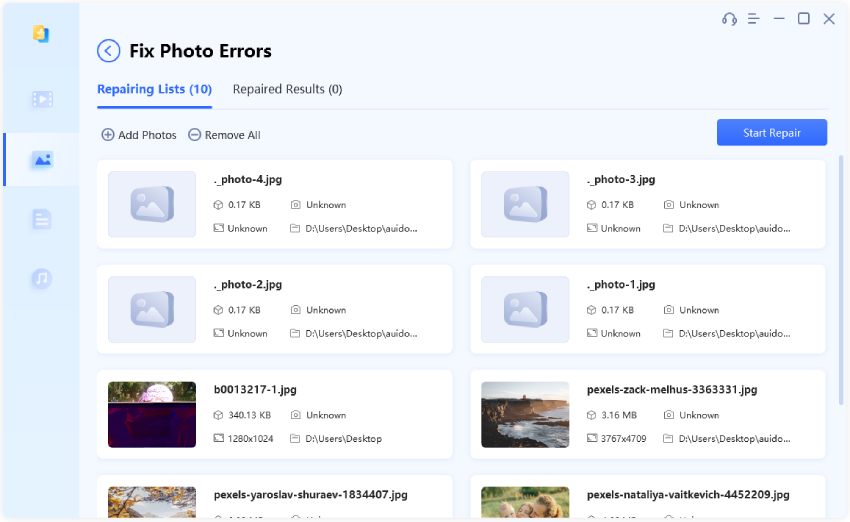
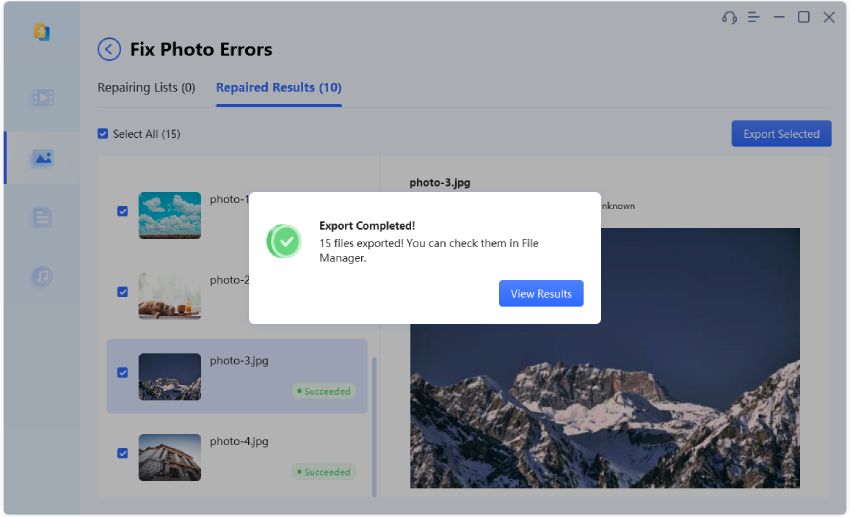
Upload the water damage photos you want to fix and then click on the Start Repair button.

You can select photos to preview after repairs, and then hit Export to save them.

With just a few simple steps, you can easily save your precious memories for years to come. Hurry up and try it!
Tool 2. Phowd
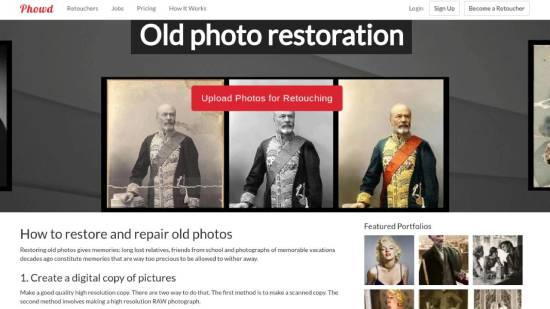
Photo restoration can be a tricky task, but with the help of Phowd, it has become a lot easier. This amazing tool allows you to bring back life to your old photos by removing unwanted bends, scratches, and even tears. Not all photos have the luxury of being stored in the best possible conditions, but with Phowd, you can now preserve treasured memories of the past.
If you're interested in using this software, you can easily follow the steps outlined below:
Step 1: Upload Your Photo
Register for a free account and upload your RAW or JPG images to get started. You can then choose to start an open retouching contest, allowing multiple retouchers to submit modifications or invite retouchers to work confidentially.

Step 2: Professional Photo Editing
As your photo is being edited, you can see the changes as they emerge, leave comments, and request modifications, whether you're working in a contest or a private order.
Step 3: Choose Your Best Image
Once you're happy with the edits, you can select the best version of your photo. After your approval, the edited photo will be made available for download, and an independent retoucher will be added to your team.
Step 4: Work with Your Retoucher Team
If you want to continue working with the Phowd retouchers you selected, you can do so via private orders. You can keep track of the work, monitor progress, and only pay for what you approve and like.
Tool 3. Inpaint
Tired of dealing with water damage photos that have been smudged or discolored? Don't worry, Inpaint can help you out. This powerful tool is a great way to improve your photos' overall look and feel. It can remove dust, blemishes, spots, wrinkles, and other imperfections in just minutes. Plus, it's incredibly easy to use.
Steps to use the Inpaint software:
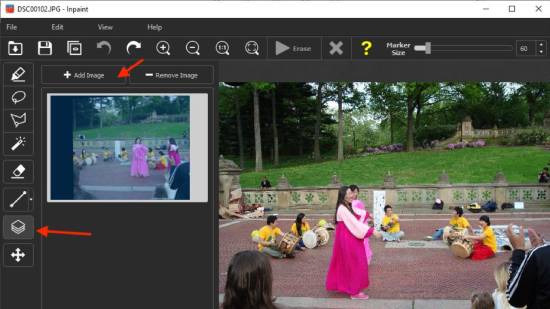
Scan the damaged photo to your computer. Then, open the photo in Inpaint and select the areas that require attention.

- Use the Magic Wand or another selection tool to choose all the defective areas on your photo.
- Finally, run the Erase Process from the toolbar. Inpaint will remove the defects and restore your damaged photo to its former glory.
Above we have introduced three digital tools that can help you repair water damage photos, and you don't have to worry about it anymore.
Part 3: Tips For Repairing Water Damage Photos
1. Keep the pictures from drying out!If the pictures dry out too quickly, the colors can bleed, and the paper can crack. Therefore, keeping the water damage photos wet is essential until you're ready to start repairing them. You can store them in a zip-lock bag with moist towels or immerse them in clean, cold water until you're ready to start the restoration process. Remember that every second counts, so act quickly to prevent further damage.
2. Start working as soon as you canOnce you've gathered the materials to work on the photos, start right away. The longer you wait, the more damage will be done and the tougher it will be to repair.
3. Keep your images in a container filled with cold, fresh tap water when you work on themThis will prevent the photos from drying out and make it much easier to manipulate them. Cold water will also reduce the chances of your photos' early fading or discoloration.
4. Remove pictures from the water carefullyBe gentle when removing the photos from the water. The last thing you want is for them to tear or rip. The best way to do this is by using tweezers and lifting them up slowly.
5. Hang-dry prints and negatives from a clotheslineOnce you've done the restoration process, hang-dry your prints and negatives from a clothesline. This prevents them from wrinkling as they dry out. Also, make sure to keep them away from direct sunlight and any other source of heat.
Summary
Repairing water damage photos can be tough, but it is definitely possible. You can restore a beloved photo by researching preventative measures and utilizing one of the repair methods discussed. Whether taking preventative precautions or utilizing something like the 4DDiG File Repair service, you now have the resources to repair and preserve your photos for future enjoyment. Going forward, take extra care when handling your photos; water damage is no joke!
 ChatGPT
 Perplexity
 Google AI Mode
 Grok
Grok

