Are you tired of encountering video playback issues on your MacBook, where your videos refuse to play due to corruption? It's a common problem that can make you feel helpless and leave you worried that your precious videos are gone forever. But fret not! We're here to help you overcome the video corruption issue by providing a comprehensive guide to Mac video repair.
We will walk you through the process of repairing corrupted videos on your MacBook in a clear and concise manner. Whether you're a tech expert or a casual user, you will have the necessary knowledge and tools to restore your cherished memories. So, let's get started.
Part 1. What Causes Video Corruption on Mac?
Corruption in videos on your MacBook can be caused by various factors. Let's discuss them in detail help you find the corresponding solutions.
Grain in photography refers to the presence of small, visible specks or dots that appear in an image, often resulting in a loss of sharpness and clarity. These specks are more prominent in low-light conditions or when using high ISO settings. However, there are multiple reasons behind it. Let's discuss them in detail.
- Incomplete Downloads or Transfer: An interrupted or incomplete video download or transfer is another major reason for videos getting corruption on your Mac.
- Malware or Virus Infections: Mac systems, though generally more secure, can still be susceptible to malware or virus infections. If your Mac gets infected, it can cause video files to become corrupted or inaccessible.
- Hardware Issues: Faulty hardware components, such as a failing hard drive or faulty RAM, can contribute to video corruption.
- Power Outages or System Crashes: Sudden power outages or system crashes while recording or saving videos can cause corruption as well.
- Corrupt Storage Device: If the storage device where your video is saved, such as an SD card, external hard drive, or internal storage, becomes corrupted or unreadable, it can lead to video file corruption.
Part 2. How to Repair Corrupted Video Files on Mac?
To help you effectively restore corrupted video files on your Mac, we have found some tools that will work for Mac video repair. Let's explore these handy tools in detail and learn how to use them to restore your damaged videos to their original state.
Method 1: Use 4DDiG File Repair to Fix Corrupted VideosHOT
4DDiG File Repair is a Mac video repair tool that you can use to quickly repair damaged video files. This tool is specifically designed to address various video corruption issues. Whether you're facing a black screen when playing videos, encountering audio problems, or dealing with videos error code, 4DDiG File Repair has got you covered.
Let's explore the exceptional features that makes 4DDiG File Repair stands out as the best video repair software for Mac:
- Work with popular video formats including MP4, MOV, M4V, 3G2, 3GP, and MKV files.
- Use advanced algorithms to analyze and reconstruct damaged videos, ensuring high success rate.
- Fix multiple videos simultaneously, regardless of whether they have the same or different formats.
- Support the preview of repaired videos before saving them to the preferred location.
- Enhance video quality, fix blurry videos and upscale video resolution [Windows PC only].
- Compatible with macOS and Windows systems.
Now follow the steps below to repair damaged video files mac and restore them to a playable state.
Download and install 4DDiG File Repair on your MacBook.
FREE DOWNLOADFor PC
Secure Download
FREE DOWNLOADFor MAC
Secure Download
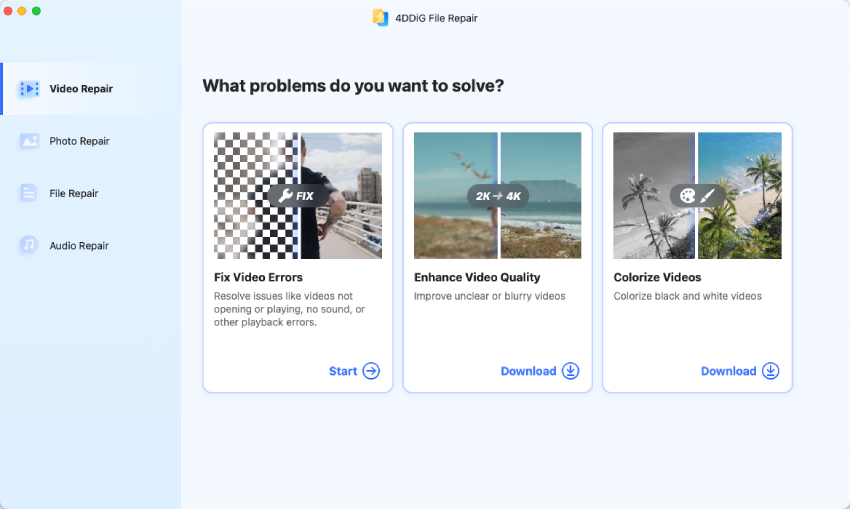
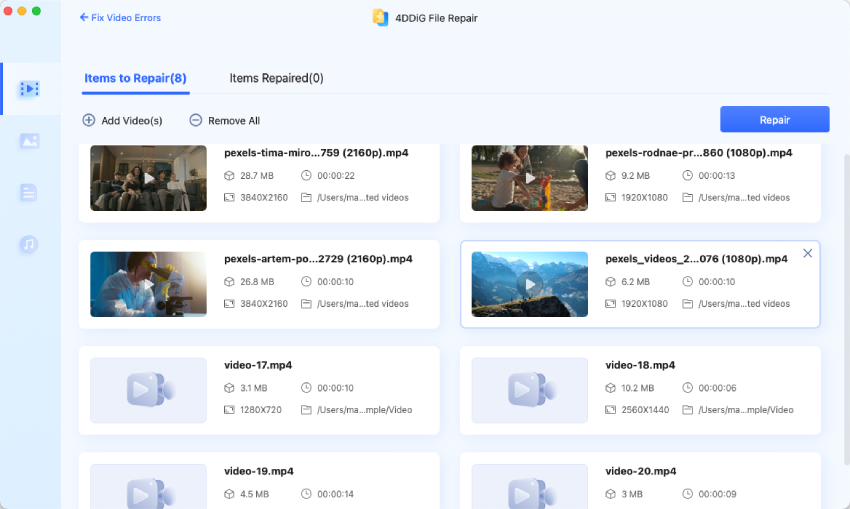
Launch the tool and select the Fix Video Video Errors option. Click on "Start" and upload the corrupted video or batch of damaged videos that you need to repair.
![how to use video repair software for mac-step 1]()
Once the corrupted videos are uploaded into the tool, you need to click on the Repair button in the upper right corner. This will quickly start the repair process.

Wait patiently until the process is completed. You will see a pop-up message, so click on View Results and preview the repaired videos.

Finally, choose the repaired videos that meet your expectation and hit the Export Selected button on the upper right corner of the screen to save them to your MacBook.

Video Tutorial on How to Repair Corrupted Video Files on Mac
Method 2. Use VLC to Repair Corrupted MP4/MOV Files on Mac
VLC Media Player, a popular multimedia player available on both Mac and Windows PC, also offers a feature to repair corrupted videos. If you're dealing with corrupted videos on Mac, and don't want to install any third-party Mac video repair tool on your system, you can utilize VLC's built-in repair functionality.
Here's a step-by-step guide on how to repair MP4/MOV file on mac using VLC:
- Download and install VLC Media Player if you don't have a VLC media player installed on your Mac and launch it.
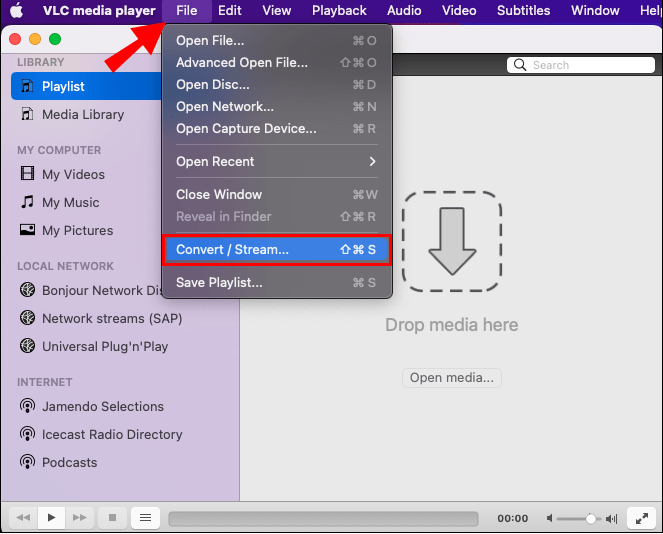
Click on the File menu at the top and select Convert / Stream...

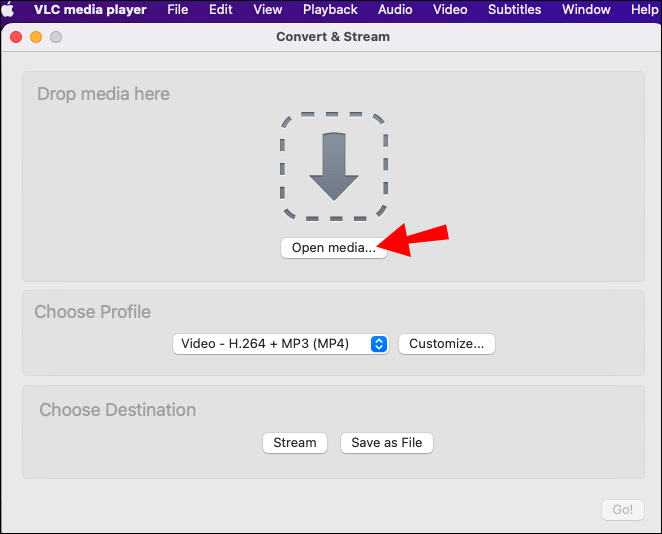
Click the "Open Media" button to import your corrupt MP4/MOV file.

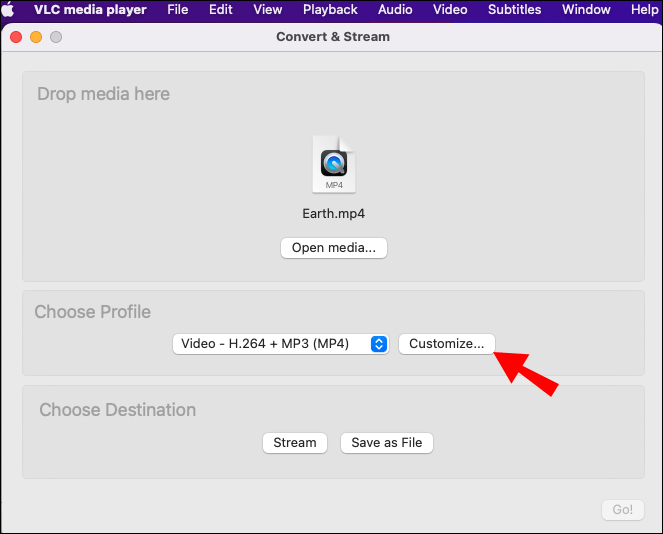
Once the file has been added, click the “Customize” button next to the file and convert it into .avi format. Once done, save the converted video file to your Mac.

Now relaunch VLC and navigate to Preferences > Input/Codecs tab.


Next to the Repair AVI Files section, locate the Repair AVI Files section, select Always fix and click Save to apply the changes.

- Finally, play the AVI file you saved just now with VLC media player. VLC will attempt to repair the minor issues in your corrupted video file while playing it.
Method 3. Repair Corrupted Videos on Mac Using FFmpeg
The third tool available for repairing corrupted video files on Mac is FFmpeg. Widely known as a powerful command-line tool for video manipulation, conversion and streaming, FFmpeg also includes built-in features for repairing damaged videos. While it could be a little tricky for beginner to get familiar with the command-line interface, we will show you how to repair MOV files on Mac with FFmpeg.
- Download and install FFmpeg on your MacBook and move the corrupt video file to the desktop.
- Launch the Terminal application on your Mac. You can find it in the "Utilities" folder within the "Applications" directory.
- Use the "cd" command in Terminal to navigate to the directory where the corrupted video is located. Since you've moved the video to your desktop, type the command: cd Desktop.
- Now, from the left-hand pane, select the Stream Output option.
- Once you're in the directory containing the video file, run the following FFmpeg command in Terminal:
- FFmpeg will start repairing the video file. The time it takes depends on the size and complexity of the video. You'll see a progress bar indicating the repair process.
- Once the repair process is complete, you can verify the repaired video by opening it with a media player on your Mac. Check if the video plays without any issues and if the corruption is resolved.
ffmpeg -i input.mp4 -c copy output.mp4
Part 3. Tips to Prevent MP4/MOV File Corruption on Mac
So now you know how to repair MOV files on Mac, you must be wondering how you can prevent MP4/MOV file corruption. Here are some general tips that will help you in this regard.
- Make Regular Backups: Regularly back up your important video files to an external storage device or cloud storage. This ensures that even if the files get corrupted, you have a backup copy to restore from.
- Use Reliable Download Sources: When downloading MP4/MOV files from the internet, ensure that you are using reputable and trustworthy sources. Avoid downloading files from suspicious or unverified websites, as they may contain corrupted or malicious files.
- Avoid Abrupt Shutdowns: Avoid abrupt shutdowns or power failures while working with MP4/MOV files. Connect your computer to a stable power source and consider using an uninterruptible power supply (UPS) to protect against sudden power outages.
- Safely Eject External Devices: When disconnecting external storage devices like USB drives or external hard drives, always use the proper "eject" or "safely remove" option to avoid data corruption.
By following these tips, you can minimize the risk of video file corruption on Mac and ensure the safety and integrity of your video files.
FAQs Related to Mac Video Repair
Q1. How do I know if a video is corrupted on my Mac?
If your video is corrupted on Mac, you may encounter issues such as video playback errors, distorted visuals, audio problems, or the file refusing to open. Additionally, you might receive error messages indicating file corruption or unsupported format. These are signs that your video is likely corrupted.
Q2. Can QuickTime Player Repair Corrupt MOV & MP4 Videos?
QuickTime Player itself does not have built-in capabilities to repair corrupt MOV or MP4 videos. It is primarily a media player and not designed for video repair. However, you can try using third-party video repair software like 4DDiG File Repair to fix corrupted MOV and MP4 files on Mac.
Q3. Are there any free video repair software options for Macs?
Yes, there are free video repair software options available for Mac. However, it's important to note that free versions may have certain limitations compared to their paid counterparts, such as limited features, lower success rates, or restrictions on file size and number of repairs. While there are several free options available, it is recommended to use reliable paid software like 4DDiG File Repair for a more comprehensive and effective video repair solution on Mac.
The Bottom Line
So, we've covered all you need to know about video repair for Mac. While all the methods mentioned above are effective, one tool stands out as particularly handy: 4DDiG File Repair. Its ability to handle multiple videos, comprehensive format support, and user-friendly interface make it an ideal choice for repairing damaged videos on your MacBook.




 ChatGPT
 Perplexity
 Google AI Mode
 Grok
Grok

