Question“I recorded a screen with Quicktime on my Mac, but I didn't save it before I stopped recording. Is it possible to retrieve Quicktime recordings that haven't been saved?”
QuickTime Player is a fantastic free tool for making our music and video, and certain YouTube stars even use it to make instructive videos. QuickTime allows you to record your screen activity and store it in the QuickTime folder. That, however, is not as simple as it appears. If your QuickTime software crashes or shuts down improperly, you may lose the current recording and any unsaved QuickTime recordings. Is there a method to restore an unsaved or even destroyed QuickTime recording if QuickTime has an autosave feature? You can find all about recover unsaved quicktime recording in this article.

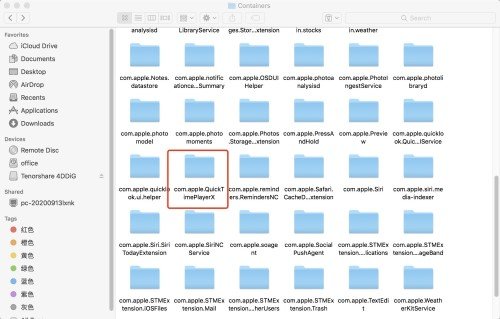
Part 1: Where are QuickTime Recordings Stored on Mac?
QuickTime may save your recordings to the following folders: Library/Containers/com.apple.QuickTimePlayerX/Data/Library/Autosave Information As long as the recording files are not saved by selecting Save as follows, the recordings will be saved in the AutoSave location.
Part 2: How to Recover Unsaved QuickTime Recordings on Mac?
Unsaved QuickTime recordings can be caused by various factors, including unexpected power outages, program crashes, etc. Although there are two techniques to recover an unsaved QuickTime screen, audio or movie recordings, the recovery is still a question of chance since it is dependent on several elements, which we will refer to as luck. They're worth a go because they won't exacerbate the problem or harm your Mac.
Solution 1: Recover Unsaved QuickTime Screen or Audio Recordings from AutoSave Folder
One of the most valuable features of macOS is the AutoSave function, which automatically saves your files before you hit the Save button in various macOS programs such as Preview and QuickTime Player. If you can locate the QuickTime Player files' AutoSave location, we might be able to retrieve a QuickTime recording didn't save.
Here is how to Use AutoSave to recover unsaved/deleted quicktime recording:
Step 1: Go to Folder by clicking on the Apple icon>Go>Go to Folder.
Step 2: Then, copy and paste Library/Containers/com.apple.QuickTimePlayerX/Data/Library/Autosave Information/" Now you can discover the QuickTime screen or audio recording files' AutoSave Location.
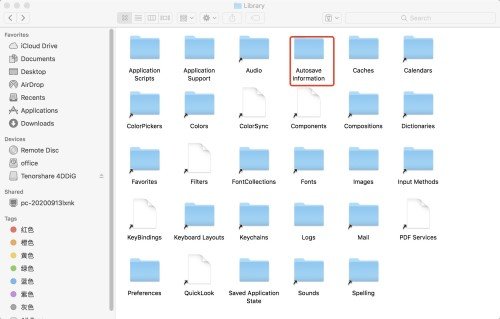
Step 3: Open With>QuickTime Player by right-clicking on the recorded File.
Step 4: 4.Save by going to File>Save As.
Step 5: To save the unsaved QuickTime screen or audio recordings to your Mac, rename the QuickTime recording file and click Save.
Solution 2: Recover Unsaved QuickTime Screen or Audio Recordings from Temporary Folder
How to restore quicktime on mac? Another way to restore unsaved QuickTime recordings is to use Temporary folders; it's a question of luck, but you should give it a shot based on my previous success in recovering unsaved files.
Recovering Unsaved QuickTime Screen or Audio Recordings from the Temporary Folder:
Step 1: Run Terminal from Finder>Application.
Step 2: Then, to execute the command line, type "open $TMPDIR" and press Enter.
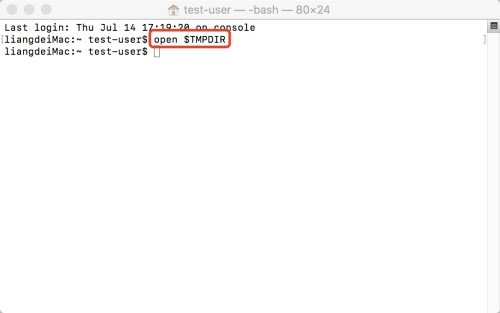
Step 3: You'll be sent to the Temporary Folder, where you may look for your unsaved QuickTime screen or audio recording by going to Temporary Items. Save to a selected folder after opening using QuickTime Player.
Part 3: How to Recover Deleted QuickTime Recordings on Mac?
Use the following procedures if your QuickTime screen recording disappeared or erased and you wish to recover them.
Solution 1: Recover Deleted QuickTime Screen or Audio Recordings from Trash
Another alternative on how to recover quicktime recording is to look through your Trash on your Mac. If you recall removing it, there's a chance the screen recording is still in the Trash folder. This approach will not work for you if you've configured Trash to automatically destroy files from it after 30 days, and you're confident that more time has gone since you deleted the screen recording.
Here's how to get deleted recordings back from your Mac's Trash:
Step 1: To open it, click the Trash symbol on the Dock. Then take a look at the files.
Step 2: When you've identified the required screen recording, right-click it to bring up a drop-down selection.
Step 3: Select Put Back from the drop-down menu.
Step 4: The recovered File will be placed back in the same Folder as before.
Solution 2: Recover Deleted QuickTime Screen or Audio Recordings with Time Machine
On Macs, Time Machine is a built-in backup utility for saving data. Once activated and configured, this application backs up all of the data on your computer at a predetermined interval (once a day, once a week, etc.).
Here's a ply to recover unsaved quicktime recordings on mac:
Step 1: Start the Time Machine. Using the timeline on the right side of the screen, select the required backup version.
Step 2: Select the Folder containing the destroyed screen recording from the sidebar.
Step 3: Select the File you want to restore and click the Restore button at the bottom.
Step 4: The restored File should be saved in the same Folder before it was deleted.
Solution 3: Recover Deleted or Lost QuickTime Screen or Audio Recordings with Data Recovery Tool
Tenorshare 4DDiG can help you recover lost QuickTime recordings that have vanished from Trash. It can not only recover and fix faulty QuickTime recordings but also discover and recover deleted recordings. Let's look at the essential features of Tenorshare 4DDiG Recovery.
- Data may be recovered from a laptop/PC, internal and external hard drives, USB flash drives, SD cards, and other storage devices.
- 1000+ file kinds may be recovered, including images, movies, documents, and audio.
- Recover data deleted by mistake, formatting, partition loss, corruption, system crash, malware assault, etc.
- No need to disable SIP for data recovery on Mac
Secure Download
Secure Download
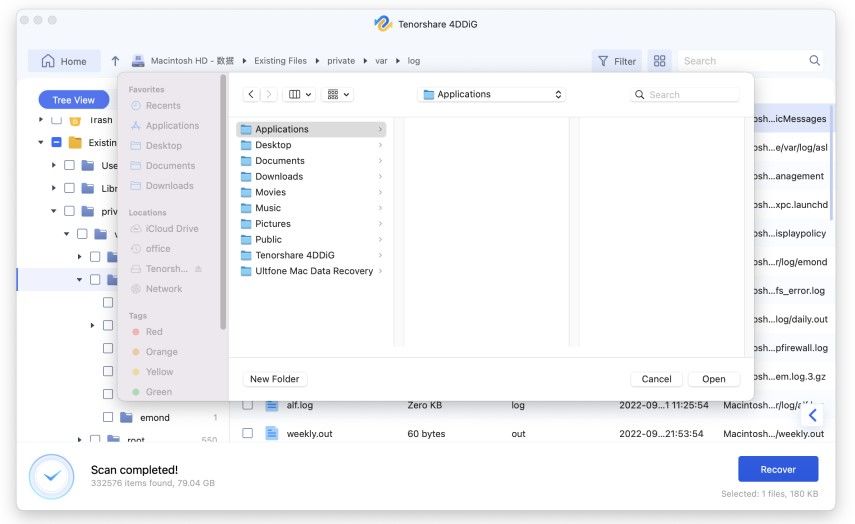
Below are the steps on how to recover deleted QuickTime recordings on Mac:
- After installation, launch 4DDiG-Mac and choose a destination for Mac data recovery, such as your hard drive. Then press the "Scan" button to hunt for all missing files.
- Select a place to save the files discovered by clicking the "Recover" button. It's not good to store the recovered data in the same partition where they went missing. It might result in irreversible data loss.
- Once you found the files you want, select a location to save the MP4 & MOV files you find by clicking the "Recover" button. Saving the recovered MP4 & MOV Files to the partition where you originally lost them is not advised. Permanent data loss might result from this.


✅ You May Also Like: How to Fix "Screen Recording Failed to Save" Error
Part 4: How to Prevent QuickTime Recording Data Loss?
How can I make sure that my QuickTime recording is saved? Here are some suggestions that you should consider and act on based on your needs.
1. Make sure you're using the most up-to-date version of QuickTime Player on your Mac.
When macOS and its programs release new versions, it's usually advised that we upgrade to the current version, although this isn't always necessary, especially for iMovie and QuickTime Player. According to many Mac users, there is usually an issue while updating the current version, but everything works well again following a downgrade.
2. Make sure your Mac has adequate room for the recordings you've made.
Because a QuickTime recording is never tiny, we must allow enough room for a freshly produced recorded video, or the software would crash abruptly. It also demonstrates the need to maintain a healthy routine of mac cleanliness, file backup, etc.
3. Uninstall any apps that consume a lot of CPU power.
When one or more heavy apps run on your Mac and consume a significant CPU, it becomes more difficult for other applications to function correctly. Your Mac reacts slowly, and some programs stop operating. As a result, before beginning a QuickTime recording, we should close as many apps that require a lot of CPU as feasible.
4. Put an end to any QuickTime tasks that aren't necessary.
QuickTime Player may execute numerous activities simultaneously, such as playing or recording videos. Still, if you want to prevent having unsaved QuickTime recordings, you should concentrate on one action at a time to prepare your QuickTime player for the present recording task.
FAQs:
1. Do QuickTime recordings automatically save?
You can review your recording on your screen. If you're happy with the result and want to save the recording, select File> Save. On your video, a pop-over will display; name it and select "Save."
2. Where do unsaved screen recordings go on Mac?
Unsaved QuickTime recordings are kept in an autosave folder.
3. Can you recover the unsaved screen recording Mac?
You can recover the unsaved screen recording MAC by following Part 2> Solution 1.
Conclusion
When it comes to unsaved file recovery, the macOS AutoSave function makes things easier. It is also true for unsaved quicktime player document and screen recording recovery, albeit it is a question of luck we must attempt. It would be easier to recover deleted QuickTime recording data now that we have tools like Tenorshare 4DDiG to help us.
 ChatGPT
 Perplexity
 Google AI Mode
 Grok
Grok
