How to Fix PowerPoint Cannot Insert a Video from the Selected File Error in 2026
Inserting videos in a PowerPoint presentation is a good way to provide visual aids to support your message and illustrate complex concepts. This way, your presentation can be more interactive and engaging. However, sometimes you might have come across those "PowerPoint cannot insert a video from the selected file" error messages when you are trying to embed a video into your presentation.
Different reasons play roles in those PowerPoint unable to insert videos error, which sounds complicated. But don't fret! You can certainly solve such issues if you follow the 7 solutions we presented in this detailed guide, whether you are using PowerPoint 2012, 2013, or 2016. Now, let's begin.
- Part 1. What Causes This PowerPoint Error?
- Part 2. How to Fix "PowerPoint Cannot Insert a Video from the Selected File" 🔥
- 1. Verify the Video File and Path
- 2. Rename MP4 to WMV
- 3. Install a Third-Party Video Codec
- 4. Install the Latest Version of Apple QuickTime Player
- 5. Optimize Media Compatibility Feature in PowerPoint
- 6. Apply the Windows Media Player Control into PowerPoint
- 7. Restart Your Computer or Microsoft PowerPoint
- Part 3. How to Fix Damaged Video Unable to Insert into PowerPoint 💡
- Part 4. Best Practices for Successful Video Insertion in PowerPoint
Part 1. Possible Reasons Behind the Unable to Insert Video in PowerPoint Error
First of all, it is necessary to make a further understanding of the culprits behind this problem. Thus, we can take the correct actions to solve it before you embed videos including embedding YouTube videos in PowerPoint.
➤ Common Scenarios of This Error
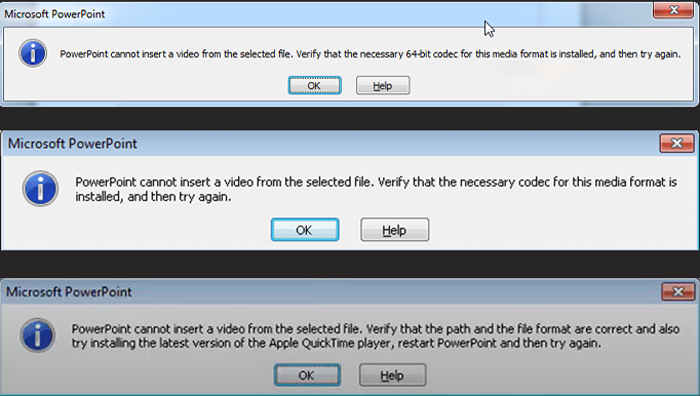
Here are some error messages related to the "PowerPoint cannot insert a video from the selected file" you might receive:
☞ On 64-bit Office System:
◾ "PowerPoint cannot insert a video from the selected file. Verify that the necessary 64-bit codec for this media format is installed, and then try again."
◾ "PowerPoint cannot insert a video from the selected file. Verify that the path and the file format are correct and also try installing the latest version of the Apple QuickTime player, restart PowerPoint and then try again."
☞ On 32-bit Office System:
◾ "PowerPoint cannot insert a video from the selected file. Verify that the necessary codec for this media format is installed, and then try again."
➤ Potential Reasons Behind This Error
You may receive those above frustrating error messages on account of the underlying causes below:
- The video format or codec are not supported by PowerPoint
- The video file you embed into PowerPoint are corrupted
- The video file is missing or relocated (lead to the wrong file path)
- The supported codec such as 64-bit/32-bit is missing
- Outdated QuickTime player on computer
- Disabled necessary features in PowerPoint, such as Media Compatibility feature
Part 2. What to Do When PowerPoint Cannot Insert a Video from the Selected File? 🔥
Now we can take relevant solutions to work the problem around according to those potential reasons.
🎥 Video Guide:
Solution 1. Verify the Video File and Path
When you receive the error message, you can follow the prompts in it and try to check if the video file you intent to insert in PPT is missing or moved.
Just open the File Explorer app (or Finder on Mac) and navigate to the folder where the video file is located.
Right-click the video file and select "Properties" (on Windows) or "Get Info" (on Mac) to view the full path.
-
You can copy the video file to a safe location and try to embed it into the presentation again.
Solution 2. Rename MP4 to WMV Format
To troubleshoot the "PowerPoint cannot insert a video from the selected file MP4" issue when trying to place an MP4 file into the presentation, simply convert the video format to the one that is compatible with PowerPoint. Here we recommend you change the original video to a WMV file format as WMV is considered as one of the best video formats to embed in PowerPoint.
Here's how you can rename your MP4 video into a WMP file extension in File Explorer directly if you have installed the VLC Media Player.
Go to the folder contains the MP4 video.
-
Find the video file and double-click on it. Then change the ".mp4" extension to ".wmv". Once done, press Enter.
Then the MP4 video file is converted to WMV format successfully.
-
Try to embed the converted WMV file into your presentation. You should be able to insert it successfully this time.
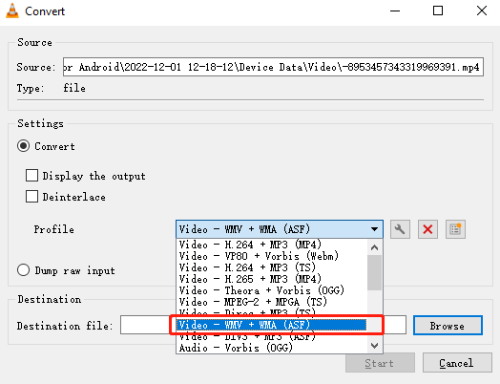
To convert MP4 to WMV, you can also go to VLC to complete the process. On VLC, choose "Media" > "Convert/Save", and click "Add" from the new pane to upload your MP4 video file that cannot to be embeded into PowerPoint. Then go to the "Profile" section and select the WMV format from its drawdown box.
Solution 3. Install a Third-Party Video Codec
Also, PowerPoint relies on the codecs installed on your computer to play the video being inputted. You probably face the "PowerPoint cannot insert a video from the selected file. Verify that the necessary (64-bit) codec for this media format is installed, and then try again." error even though the video is in the format that works with PowerPoint. Chances are that the required codec for the video to play is missing or incompatible. In this case, installing a third-party video codec can help you out.
You can install K-Lite Codec Pack, which is a comprehensive collection of audio and video codecs that ensure you to play nearly any media with differnt media players. Downloading and installing the latest version of this codec pack will help PowerPoint recognizes the video and embed it successfully into the presentation.
Download the Standard version of K-Lite Codec Pack.
-
Once downloaded, double-click on the "K-Lite_Codec_Pack_1752_Standard.exe” file to run the installation. Select "Normal mode" and click Next.

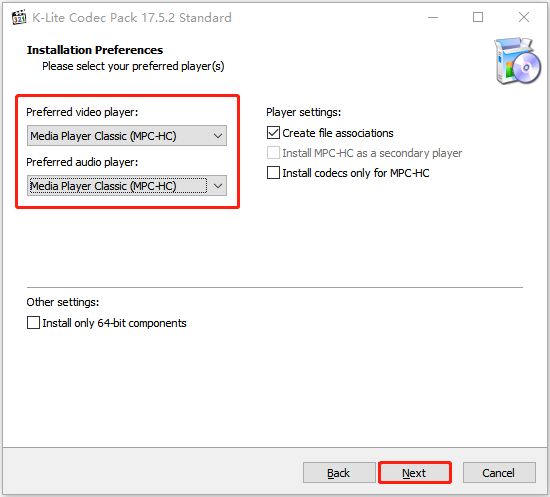
Choose your preferred player as the default video and audio player. Then click on "Next."

Leave all options in its default settings and keep cliking on "Next".
On the “MPC-HC configuration” window, press “Next.” Then, place all the checkmarks under “Hardware Acceleration” next to the Decoding Method.

Next, keep everything in its default settings for the follwing windows. When you're asked to install additional software. Decline that request.

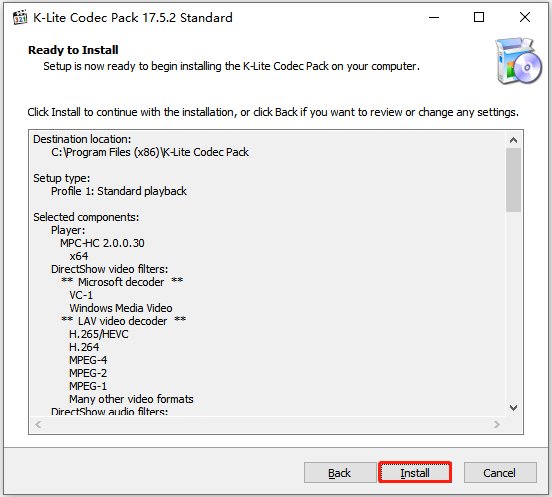
Press "Install" on the "Ready to Install" window. Once the codec pack is installed, restart your PC and try to insert the video into your PowerPoint presentation again.

Solution 4. Install the Latest Version of QuickTime Player
If you get the error message prompting you to verify file or path and install the latest version of Apple QuickTime Player, just follow its instruction to update this player.
Just install the Apple QuickTime player from a trusted source.

Once installed, press the "Win+R" keys to launch the command and enter "powerpnt / safe" to run the PowerPoint in safe mode.
Go to "Imsert" > "Video" > "Video from File" to embed your video to the presentation again.
Solution 5. Optimize Media Compatibility in PowerPoint
Another easy way to eliminate the "cannot insert video in PowerPoint" issue is by using the Optimize Media Compatibility feature in PowerPoint. This will ensure all video files you want to embed into PowerPoint can play on all the devices you’ll be using for your presentation.
- Open your PowerPoint presentation. Choose "File" and then select "Info."
Press the "Optimize Media Compatibility" option which will appear when there is indeed a compatiblity issue.

- Wait for the PowerPoint to optimize the video files. Once it’s done, check whether the issue is resolved.
Solution 6. Apply the Windows Media Player Control into PowerPoint
Enabling Windows Media Player controls in PowerPoint can also fix the “PowerPoint cannot insert video from the selected file” error. Windows Media Player has a wide range of codecs built-in. By utilizing the Windows Media Player control in PowerPoint, you will be possible to add and play videos.
Follow the steps below to apply the Windows Media Player control into PowerPoint:
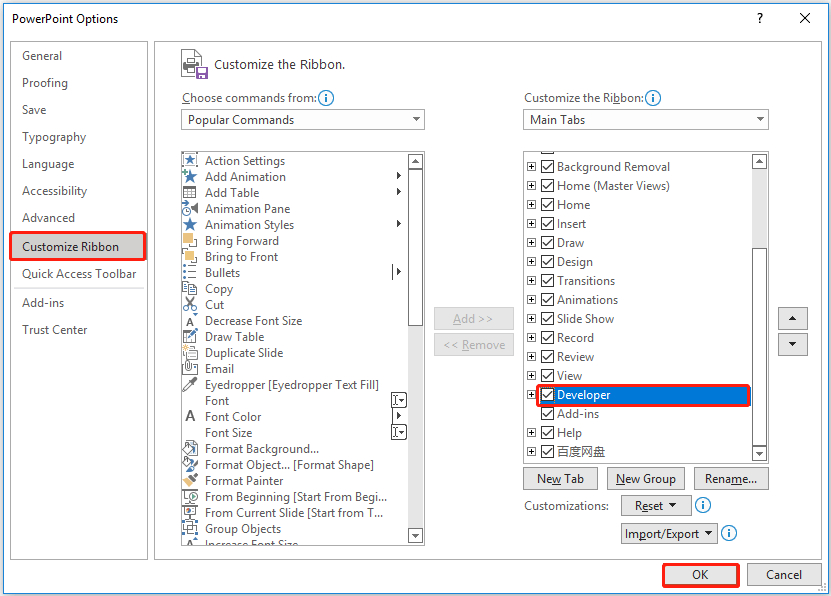
- Open PowerPoint. Choose "File" and then "Options."
Select "Customize Ribbon" from the left navigation menu. In the list of main tabs, check Developer and then click OK.

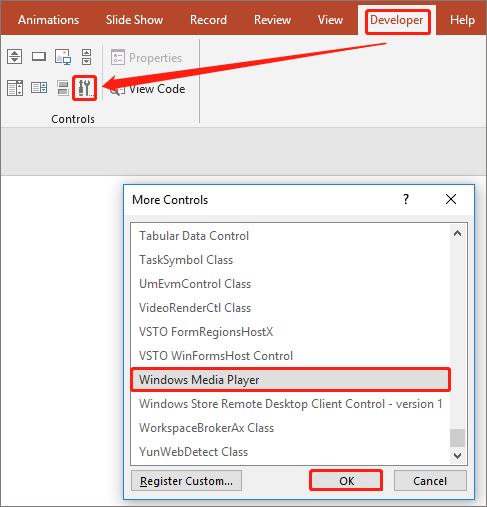
From the "Developer" tab and "Controls," choose "More Control." Then select "Windows Media Player" from the available list and click "OK."

☞ What To Do If QuickTime Player Not Available in PowerPoint
Solution 7. Restart Your Computer or Microsoft PowerPoint
Besides of the following specific solutions, you can also try the common troubleshoot step to restart your computer or the PowerPoint app. It is useful especially when there are bugs or glitches on the desktop or the app.
Part 3. What To Do If PowerPoint Cannot Insert Damaged Videos 💡
Apart from the reasons mentioned earlier in Part 1, those videos that are damaged and unplayable also cannot be embeded into the PowerPoint successfully. Thus, the problem may persist even though you test the above methods. But never fret! It is never an issue that won't be solved if you take measures in time. And the troubleshoot is very easy: Just utilize a reliable video repairing tool.
Amid this, 4DDiG Video Repair is a great shot I used and would like to introduce for its superb AI algorithm. It's an AI-powered gadget adept in fixing any video-related error and correcting damaged, grainy, distored, or fuzzy videos precisely. Since it supports an extensive array of video formats and comes with high success rates, it is popular aomong many users.
✨ What 4DDiG AI Video Repair Can Do for You:
- Repair videos for PowerPoint, such as MP4, WMV, MKV, MOV, and much more.
- Apply cutting-edge AI technology
- Fix corrupted, damaged, fuzzy, grainy, and choppy videos.
- Compatible with all storage media devices like hard disks, USBs, SD cards, and digital cameras.
- Support batch repair of multiple video formats simultaneously.
- Fast repair speed and high success rate.
✨ How to Fix Corrupted Video Files Using 4DDiG Video Repair
If you encounter the "PowerPoint embedded video not playing", it is considered that the video file is corrupted, too. To address this, the following steps are still available.
- Choose Video Repair & Add Corrupted Video
Download and launch the 4DDiG Vide Repair tool (it will be downloaded as 4DDiG File Repair.exe). Then on it, pick "Video Repair" and click "Add Videos" to upload the corrupted video you are unable to insert into a PowerPoint presentation.
FREE DOWNLOADSecure Download
FREE DOWNLOADSecure Download

- Start Video Repair
When all videos are loaded, touch the "Repair All" tab at the lower-right corner to commence the repair progress.

- Export Repaired Video
Once the video file is repaired, tap the "Preview" tab to check the fixed results. And click the "Save" or "Save All" button next to it and save it to a secure storage media.

After that, you can try inserting the repaired video into your PowerPoint. The issue should hopefully be fixed.
Part 4. Additional Tips for Successful Video Insertion
We'd better take some preparatory practices to avoid such PowerPoint videos issues.
⭕ Use the PowerPoint-recommended video and audio formats: Video (MPEG-4 AVC: MP4 encoded with H.264); Audio (M4A encoded with AAC)
⭕ Keep software and Microsoft components updated
⭕ Tested videos before presentations
⭕ Embed online videos to PowerPoint
Conclusion
There can be many reasons behind the “PowerPoint cannot insert a video from the selected file” error. However, with the above multiple solutions, you can easily fix this issue.
If none of them works, your video file must be corrupted. In such a case, 4DDiG Video Repair offers an excellent solution to fix all kinds of damaged and corrupted video files with a high success rate. So, try 4DDiG File Repair today, embed the repaired video seamlessly into PowerPoint, and deliver an engaging and impactful presentation. Also, if you have any good questions, welcome to leavce you words below!
Secure Download
Secure Download
💡 Summarize with AI:
You May Also Like
- Home >>
- Video Error >>
- How to Fix PowerPoint Cannot Insert a Video from the Selected File Error in 2026







 ChatGPT
 Perplexity
 Google AI Mode
 Grok
Grok


