How to Fix Blurry Pictures on Facebook [2026 Latest]
Learn how to fix blurry pictures on Facebook if your high-resolution pictures turn extremely blurry after upload. Check out these 6 ways and restore the photo solution instantly.
“Why are my pictures blurry on Facebook?”
“Hello, I have uploaded some pictures to Facebook from the app, but all the photos turn out to be blurry as if it's trying to load but it never does. It stays blurry. What seems to be the problem?”
It is quite frustrating when your HD photos get uploaded on your Facebook profile blurry. Those blurry photos look like you have taken the photos with a low-quality camera. Blurriness destroys the essence and details of a photo. Naturally, your blurry photos will not get the traction you are looking for on your social media profile. If the original photo is not blurry, several reasons could be responsible. We will explore what causes Facebook pictures to be blurry and show you how to fix blurry pictures on Facebook.
Part 1. Why Are My Pictures Blurry on Facebook?
When you upload any photo on Facebook now look blurry, the quality of the photo degrades instead of staying the same as the original. That’s one of the main reasons why you get facebook pictures blurry. But there could be other causes responsible for blurry Facebook pictures.
- Data Saver mode is turned on which makes Facebook pictures blurry.
- Your photo file format is not optimized for high quality upload on Facebook.
- Your photo is not enhanced for optimized brightness and sharpness.
- Issue with the cache data of the app or browser you use to upload photos.
- The original photo is blurry and out of focus when shot with the camera.
☞ How to Download REDnote Funny Memes and Photos without Watermark
Part 2. Effective Ways to Fix Blurry Pictures on Facebook
Before diving into the following methods, ensure that your internet connection is stable and the speed is high. When your internet connection is poor, Facebook lowers the photo quality to upload the photo faster on its platform. If the internet connection is perfect, try out the following solutions to fix Facebook pictures blurry.
Way 1. Upload Higher-Quality Photos on Facebook
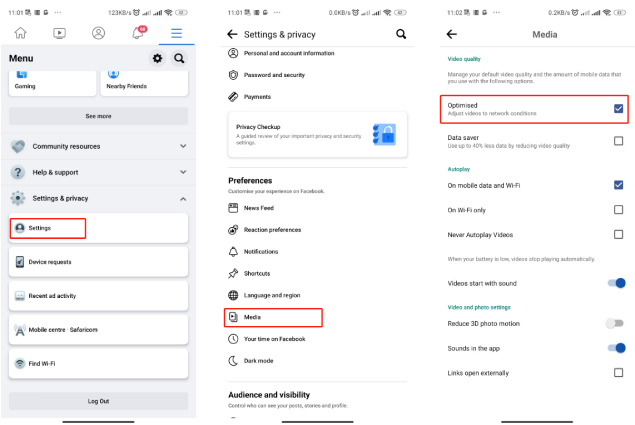
If Data Saver option is enabled instead of the Optimized option on Facebook, Facebook will compressing images or reducing their quality to some extent, thus causing high-resolution images to appear blurry. To fix this, make sure to upload photos on Facebook through the Optimized mode.
Upload HD Photos on Facebook for Android:
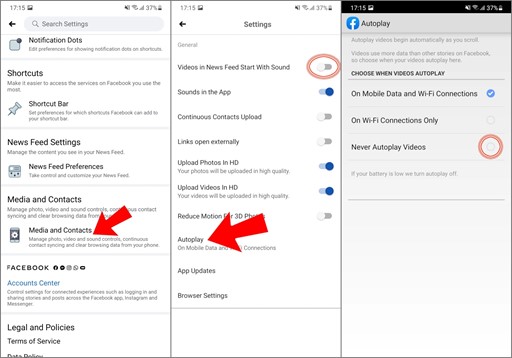
- Launch the Facebook app. Tap on the three-dash icon at the upper-right corner.
- Expand the Settings and Privacy option and tap on the Settings option.
- Under the Preferences section, tap on the Media option.
-
Turn on the Optimized option so that your high-quality photos get uploaded in optimized resolution.

Upload HD Photos on Facebook for iOS:
- Launch the Facebook app. Tap on the three-dash icon at the bottom-right corner.
- Expand the Settings and Privacy option. Tap on the Settings option.
- Tap on the Media option under the Preferences section.
-
Tap on the Optimized option to turn it on.

Way 2. Use the Right File Format
If your photos are not in the correct file format, they can get blurry when you upload them to Facebook. Facebook recommends the JPEG file format for uploading photos on its platform so that the uploaded photo can have an optimized resolution. Though PNG file format is also suitable, many users have reported that even photos in PNG file format get blurry after uploading on Facebook.
If you have photos in any other file format, you should first convert them to JPEG using any online photo converter. But make sure that the converted JPEG photos have the same resolution as the original photos. Upload high-quality JPEG photos to avoid pictures on Facebook blurry.
Way 3. Enhance Picture Quality with AI Photo Enhancer
If you notice your previously uploaded pictures on Facebook appear blurry, you should check the photos to determine if you need to enhance the picture quality. Facebook has discontinued its built-in photo editor, and hence, you need to use an AI Photo Enhancer to turn your blurry Facebook pictures into clear and sharp images..
4DDiG AI Photo Enhancer is one of the most popular photo quality enhancers that can fix and enhance any blurry pictures magically using artificial intelligence. It comes with several well-trained AI enhancement models tailored to diverse user needs. Be it a Whether it's a scenic landscape, a portrait, or even an aged and damaged family photo, 4DDiG Photo Enhancer helps restore and enhance image quality. Here are more features of this image upscaler.
- Repair any blurry or distorted photos instantly.
- Fix any pixelated and faded photos perfectly.
- Repair RAW photo files from popular camera brands.
- Preview the repaired and enhanced photos before saving them.
- Enhance and Repair photos in bulk to save time.
- Available for Windows and macOS users.
- Super intuitive user interface and completely secure.
Now let’s go through how to improve picture quality on Facebook via 4DDiG Photo Enhancer.
-
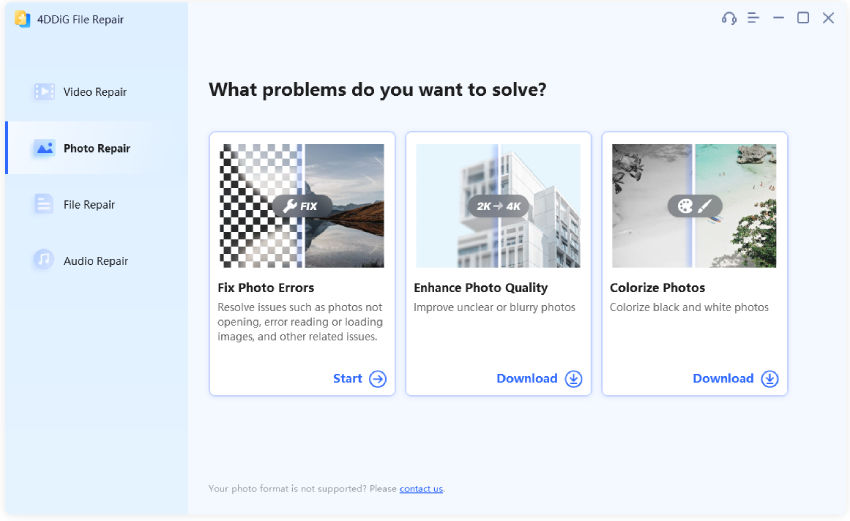
Download and install the 4DDiG File Repair executable (covering 4DDiG AI Photo Enhancer). Launch the application and click the Photo Enhancer option from the AI Enhancer menu.
FREE DOWNLOADSecure Download
FREE DOWNLOADSecure Download

-
Save the blurry Facebook pictures on your computer, and then upload them to this image upscaler by clicking the Add Photos button.

-
You can see three AI Models on your right side. Select one of them as per your preference, choose the resolution as per your requirements, and click Enhance.

-
Wail for the tool to enhance your blutty images. This may take a while.

-
Click the Save button to keep the enhanced photos on your storage device.

Way 4. Disable Data Saving Mode
If the Data Saving mode is turned on your phone, Facebook will reduce the resolution of a photo so that minimum amount of data is used to upload the photo on its platform. Therefore, your high-quality photo will be uploaded in low resolution. You need to turn off the Data Saving mode so that the resolution of your photo does not get reduced to low by any chance. Here are the steps to avoid uploading blurry Facebook photos by disabling Data Saving mode.
On Android:
- Open the Settings app. Tap on the Network & Internet option.
- Tap on the Data Saver option.
-
You need to toggle off the Data Saver option.

Alternatively, you can find the Data Saver icon from Quick Settings and turn it off.
On iOS:
For Wi-Fi connection –
- Open the Settings app and tap on the Wi-Fi option.
- Tap on the Wi-Fi network you are connected to.
-
Scroll down and turn off the Low Data Mode option.

For cellular connection –
- Open the Settings app and tap on the Cellular option.
- Tap the Cellular Data Options or Data Mode option.
-
Scroll down and turn off the Low Data Mode option.

Way 5. Clear App and Browser Cache
If you found Facebook profile picture blurry, you need to clear the app data. The app cache data stored on your smartphone can get corrupted, and this leads to Facebook app malfunction. Clearing the app cache can fix blurry profile picture as well as profile picture updating issue issue on Facebook. Here are the steps on how to fix blurry profile picture on Facebook by clearing the app cache.
On Android/iOS:
- Open the Facebook app. Tap on the three-dash icon located in the top-right corner.
- Expand the Settings & Privacy option and tap on the Settings option.
- Go to the Permissions section and tap on the Browser section.
-
Tap on the Clear option against the Your Browsing Data option.

If you use Facebook through your web browser on your computer, you need to clear your browser cache. This can fix the problem of not being able to update profile picture on Facebook or blurry photo getting uploaded. Here are the steps to clear the browser’s cache.
On Google Chrome:
- Open Google Chrome. Click the three-dot icon that you will find in the top-right corner.
- Navigate to the More Tools options from the menu. Click the Clear Browsing Data option.
-
Select the cache option and click the Clear Data button.

Part 3. FAQs about Blurry Facebook Pictures
Q1: How do I improve the quality of a photo on Facebook?
To enhance the quality of a photo on Facebook, consider using AI photo enhancers like 4DDiG Photo Enhancer tool. These tools can intelligently enhance and repair images to improve their overall quality before uploading to Facebook.
Q2: How do I upload pictures to Facebook without losing quality?
To upload pictures to Facebook without losing quality, it's recommended to upload high-resolution images directly without compressing them. Use file formats like JPEG or PNG for better quality preservation. You can also opt for the "Optimized" option when uploading photos to Facebook to prevent the default reduction in quality.
Q3: Why does Facebook make my photos bad quality?
To upload pictures to Facebook without losing quality, it's recommended to upload high-resolution images directly without compressing them. Use file formats like JPEG or PNG for better quality preservation.
Final Words
Pictures getting blurry after uploading on Facebook have become a common issue. We have explained why Facebook users face blurry photo issues. We have illustrated all the ways on how to fix blurry pictures on Facebook. If your photos are of low quality, you can use 4DDiG AI Photo Enhancer to enhance the photo quality and upload them to Facebook for a better outcome.
Secure Download
Secure Download


 ChatGPT
 Perplexity
 Google AI Mode
 Grok
Grok

