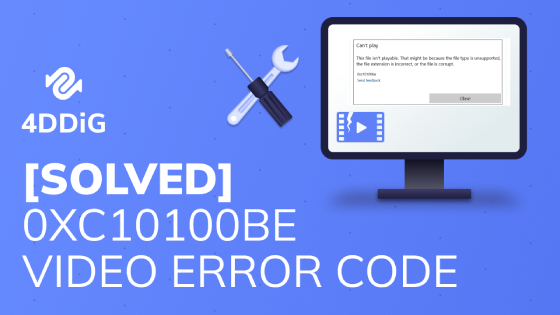
Question: How do I fix this file isn't playable 0xc10100be?"Whenever I try to open my favorite MP4 video file on my Windows 10 computer, I see the error showing ‘can't play this file isn't playable 0xc10100be’. How can I fix this video playback error?"
If you’ve encountered the 0xc10100be error code while trying to play a video file on Windows 10/11, you’re not alone. This video playback issue is quite common among Windows users. But thankfully, there are several ways to fix it and get your video playing again. In this article, we’ll figure out the common reasons behind the 0xc10100be error code and show you how to fix it. So read on to enjoy your videos hassle-free.
- Part 1: Common Reasons for Getting the 0xc10100be Error Code
- Part 2: Possible Ways to Fix 0xc10100be Video Error Windows 10/11
- 0xc10100be Fix 1. Convert the Video File Format
- 0xc10100be Fix 2. Install the Missing Codec on Windows Media Player
- 0xc10100be Fix 3. Disable Copy Protection Feature in Windows Media Player
- 0xc10100be Fix 4. Use VLC Media Player to Fix Corrupted Video Files
- 0xc10100be Fix 5. Try Using Another Media Player
- Part 3: The Ultimate Way to Fix 0xc10100be Error in Windows 10/11HOT
Part 1: Common Reasons for Getting the 0xc10100be Error Code
The error code 0xc10100be usually appears when you try to open an video file that has recently been transferred and save to the computer. It can be related to the video file itself or issues with the media player. Below we’ve summarized the common reasons why you get the 0xc10100be error code.
- The file format is not supported by the video player.
- The file extension of the video is incorrect.
- The video file gets corrupted during transferring.
- The codec that your computer uses to decode and play is missing or incompatible.
- The media player or video driver are outdated.
Part 2: Possible Ways to Fix 0xc10100be Video Error Windows 10/11
Encountering the 0xc10100be Windows 10/Windows 11 error can be frustrating. But after you have identified the root causes, you can put measures in place to get the video playback issue resolved. Here’s how to fix 0xc10100be with five proven ways and get your video playback on track.
0xc10100be Fix 1. Convert the Video File Format
If you’ve seen the 0xc10100be error while trying to play a video on the VLC media player, you can convert the format of the video file that generated the error and change its file extension. This can easily fix 0xc10100be caused by unsupported format and incorrect file extension.
Here’s the 0xc10100be fix by converting the video format to a compatible one.
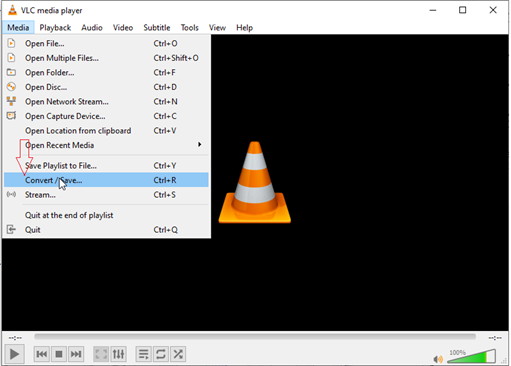
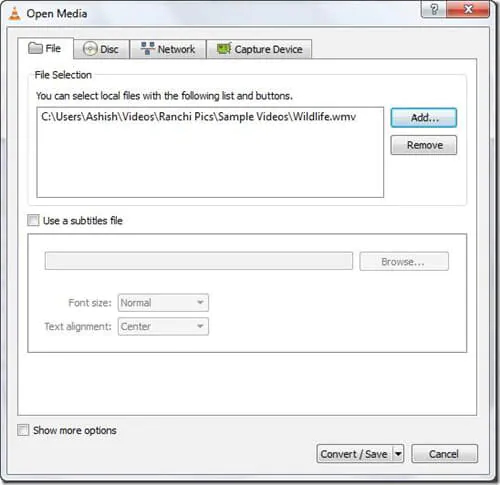
- Launch the VLC media player and choose “Media” from the top menu.
Locate and select “Convert / Save...”.

Add the video generating the error to the selection panel. Then click “Convert / Save” at the bottom.

- In the “Convert” wizard, select your desired target file type from the Profile section. Here we recommend the MP4 video file format with AAC-LC audio Codec and H.264 video Codec. Once set, choose a destination where the converted file will be saved and specify the file name and extension.
Finally, hit the “Start” button to convert the video format.

Once the video format is successfully converted, open it with your media player and check if the 0xc10100be error persists.
0xc10100be Fix 2. Install the Missing Codec on Windows Media Player
If the above method didn’t work out in your favor and you still get the “can't play 0xc10100be” error, try to install the missing codec to play video files on Windows Media player. For that, simply follow the steps to configure WMP to download and update video codecs automatically.
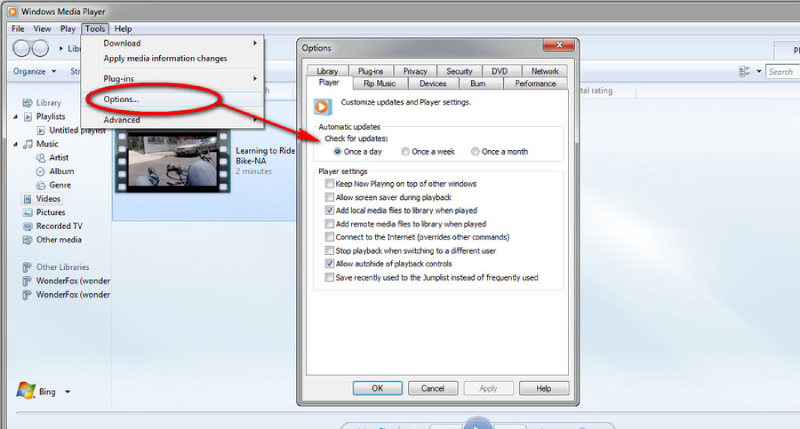
- Open Windows Media player and choose “Tools” on the top menu bar. If you can’t find the option, right click on the top blank area and select Show menu bar.
- Select“Option” from the drop-down list and locate the “Player” tab.
- Select Once a day under Automatic updates. If you can find the “Download codes automatically” option, tick the option as well.
Now, click OK to update Windows Media Player codecs.

Play the video file that generated the 0xc10100be error again. When prompted to install the codec, simply press install.
0xc10100be Fix 3. Disable Copy Protection Feature in Windows Media Player
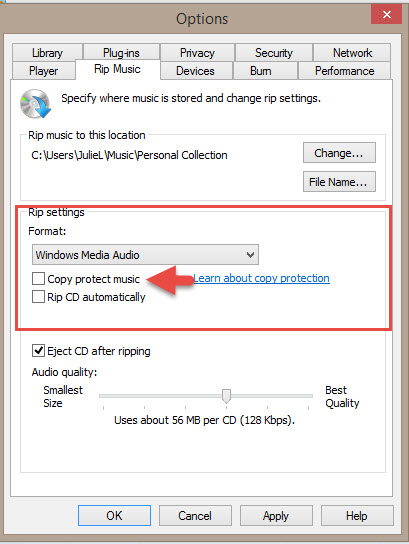
You may get an 0xc10100be error if the copy protection feature in the Windows media player is enabled. Follow the steps below to resolve this error by turning off copy protection feature.
- Open Windows Media player.
- Choose “Tools” from the top menu and select “Options”.
- Next, select the Rip Music tab and uncheck “Copy protect music”.
Click Apply and then OK to make the change take effect.

- Now check if the video file is playable or not. If it’s not working, move to the next solution.
0xc10100be Fix 4: Use VLC Media Player to Fix Corrupted Video Files
Other than changing the file format with the VLC media player, you can also use it to fix the 0xc10100be error in case that the error is caused by video corruption. Here’s how to repair the corrupted video with VLC Media Player.
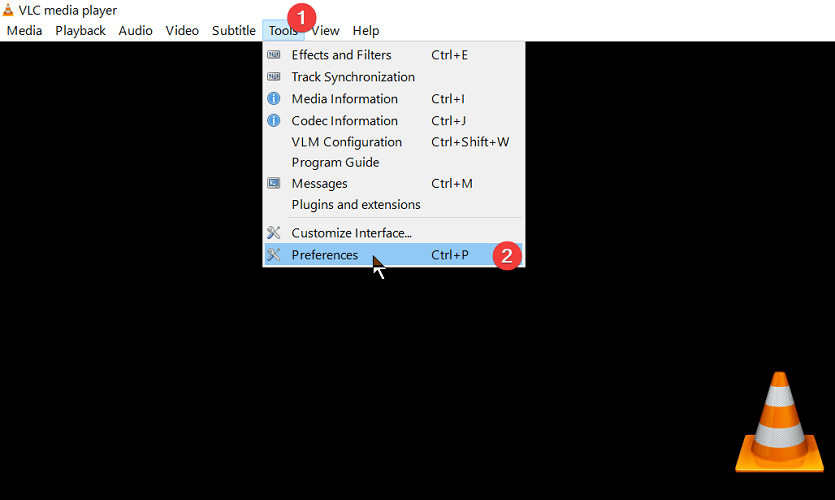
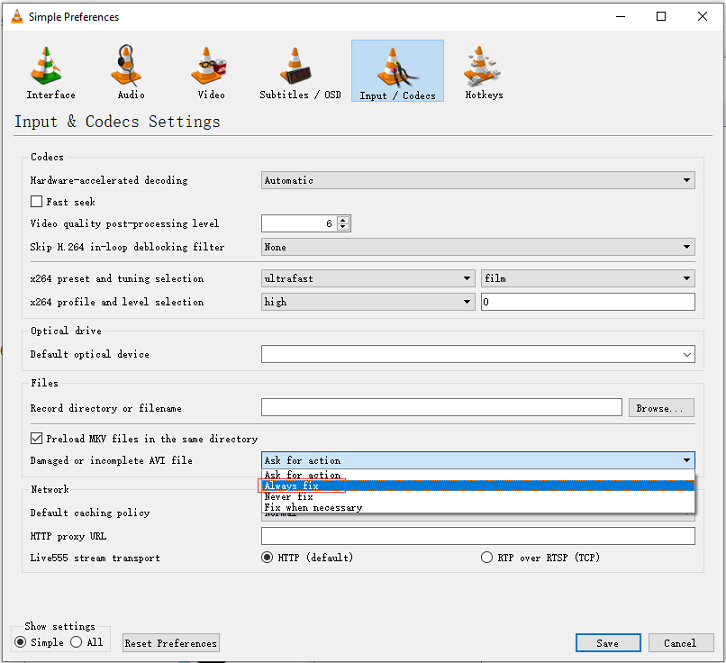
Launch VLC media player, click “Tools” on the top menu bar and select “Preferences”.

- Choose “Input/Codecs”.
- Locate the “Damaged or incomplete AVI file” section. Select “Always Fix” next to it.
Afterwards, click “Save” to save the change.

- Now open your error-getting video file with VLC media player, it will get the damaged video file repaired.
Fix 5. Try Using Another Media Player
If you still encounter the video playback error 0xc10100be, the video player you use to open the file may be the culprit. Sometimes, a single video player may not support playing all the video files due to incompatible file formats. To sort the issue out, check the video format of the file displaying the error and play it with another media player supporting that file’s format.
Part 3: The Ultimate Way to Fix 0xc10100be Error in Windows 10/11HOT
If none of the above methods works to resolve the video file corrupt error 0xc10100be, chance are that your video file is severely corrupted. In this case, the best and ultimate way to repair the corrupted or damaged file is with the help of the Tenorshare 4DDiG Video Repair tool. It can fix all kinds of "video not playing" issue. Here's what 4DDiG Video Repair offers:
- Repair fuzzy, grainy, corrupted, distorted, and jerky video playbacks.
- Restore corrupted video in various formats like MOV, MP4, FLV, MKV, M4V, 3GP, and much more.
- Compatible with Windows 10 and 11-based storage media such as SD cards, USBs, hard disks, and digital cameras.
- Support batch video repair for various video file formats at once.
- High success rate and fast video repair process.
Follow the steps below to remove the 0xc10100be error and restore your video file with the help of 4DDiG Video Repair:
- Choose Fix Video Errors
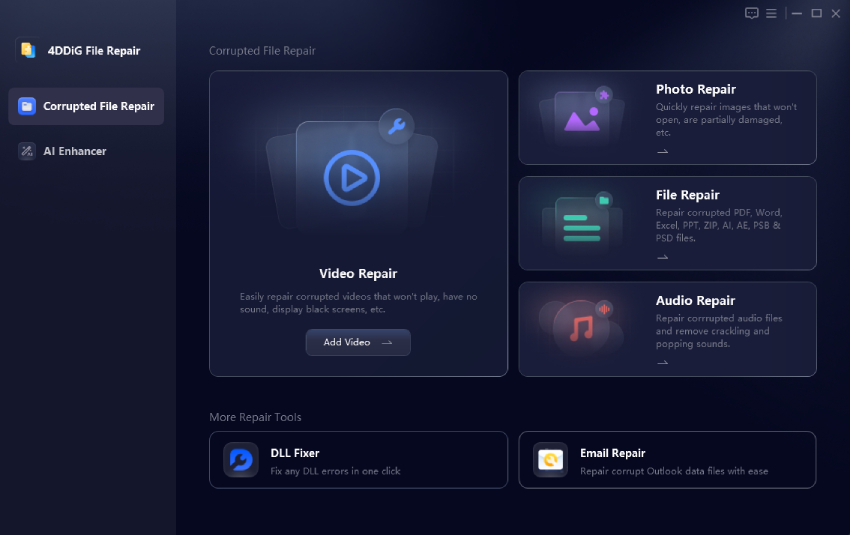
Install and launch the 4DDiG Video Repair tool on your computer. Choose the "Corrupted File Repair" menu from the main interface and click on the "Video Repair" box.
FREE DOWNLOADFor PC
Secure Download
FREE DOWNLOADFor MAC
Secure Download

- Add the Corrupted Videos
Click "Add Videos" and browse and choose the video file generating the 0xc10100be error. Or, drag those videos to this repair tool directly.

- Start Corrupted Video Repair
Once the video has been imported, click "Repair All" at the bottom right.

- Preview and Save the Repaired Videos
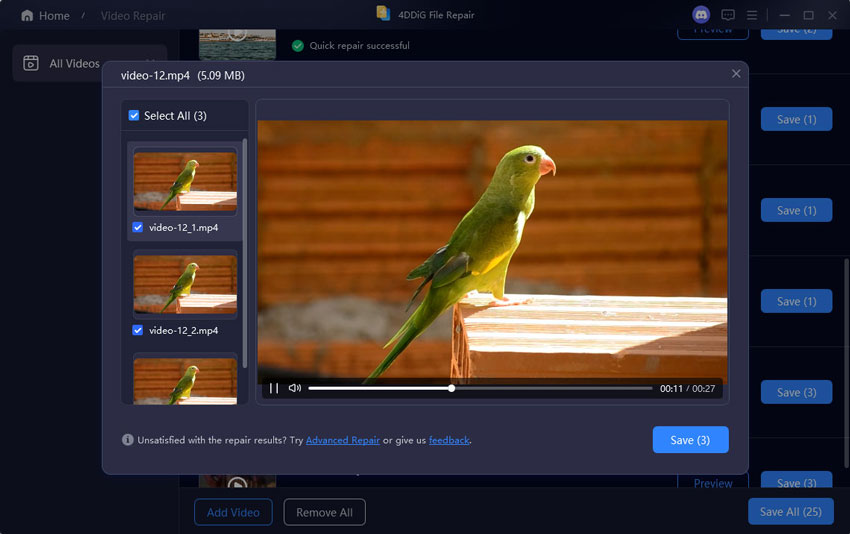
Wait for the corrupted video files to be repaired by 4DDiG Video Repair. When the repair is finished, choose “Export” to save them in a secure location on the disk.

Final Thoughts
While trying to play a video file, many Windows 10/11 users encounter the 0xc10100be video error. It can be a frustrating experience. However, fixing it is possible. From installing the missing codec to disabling the copy protection or converting the file format, there are many ways to resolve this issue.
But if you’re looking for a reliable and effective solution to batch repair your videos quickly, we highly recommend the Tenorshare 4DDiG Video Repair software. Its simple interface and advanced repair algorithm offer an easy solution to remove the 0xc10100be error from all popular video formats. So why wait? Download the 4DDiG tool today and say goodbye to the 0xc10100be error for good!



 ChatGPT
 Perplexity
 Google AI Mode
 Grok
Grok
