How to Fix Bad Quality Picture Effectively
Have you ever taken a photo only to realize it turned into a bad quality picture? Whether it’s due to poor lighting, shaky hands, or compression issues, low quality images can ruin memories, social media posts, or even professional projects. The good news is that you don’t have to delete those precious photos. With the right tools and techniques, you can transform low quality photos into sharp, clear masterpieces. This article explores multiple solutions to fix fuzzy pictures effectively.
Part 1: What Causes Low Quality Images?
A bad quality picture doesn’t happen by accident. There are several technical and environmental factors that lead to bad quality photos. Understanding these causes helps you avoid them in the future and makes it easier to fix when issues arise.
Here are the main causes of bad quality images:
- Poor Lighting: Dim lighting introduces grain and noise.
- Camera Shake: Movement while pressing the shutter button causes blur.
- Low Camera Resolution: Older devices or webcams produce bad quality images.
- Over-Compression: Uploading to social media or saving multiple times reduces clarity.
- Motion Blur: Shaky hands or fast moving subjects create unclear photos.
- Digital Zoom: Unlike optical zoom, digital zoom enlarges pixels and reduces sharpness.
- Streaming & Upload Settings: Platforms like Facebook and Instagram compress content, making the Facebook picture quality bad.
- Wrong Focus: Incorrect ISO, focus or shutter speed causes distorted images.
- Screenshots & Resaving: Taking screenshots or saving compressed files degrades image clarity.
Part 2: Best & Easiest AI to Fix Bad Quality Pictures with One Click
Manually fixing a bad-quality picture with Photoshop or other editing software takes time and requires professional skills. Modern AI tools are designed to do the heavy lifting for you. That’s exactly what 4DDiG AI Photo Enhancer does.
4DDiG AI Photo Enhancer is an AI-powered tool to make low-quality images high-quality, restore colors, sharpen blurry details, and bring new life to your photos. Whether you need to restore old black and white family photos, enhance social media images, or upscale a project photo to 4K, 4DDiG has got you covered.
Secure Download
Secure Download
Key Features of 4DDiG AI Photo Enhancer
- AI Upscaling to 4K: Increase resolution and sharpen blurry details instantly.
- Noise Reduction & Blur Correction: For low light or shaky photos.
- Color Enhancement: Fix dull tones and create vivid natural colors.
- Face Retouching: Remove face blemishes, enhance clarity and restore natural beauty.
- One-Click Enhancement: Automatically upgrade any low quality image to high quality with smart AI algorithms.
- Old Photo Restoration & Colorization: Bring historical or black and white images back to life.
- AI Outpainting: Expand photos and fill in missing sections seamlessly.
- Batch Processing: Improve many images at the same time to save time
- Broad Format Support: Works with JPG, JPEG, PNG, BMP, HEIC, TIFF, WEBP and more.
These features make it the best and easiest way to fix bad quality pictures without needing expert editing knowledge.
How to Fix Fuzzy Pictures Using 4DDiG
-
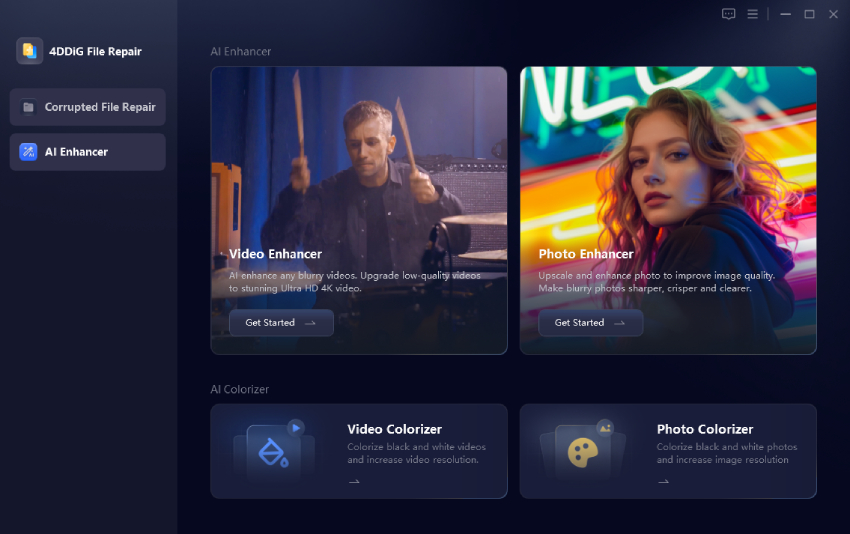
Launch the 4DDiG File Repair program and choose “AI Enhancer” and then “Photo Enhancer”.

-
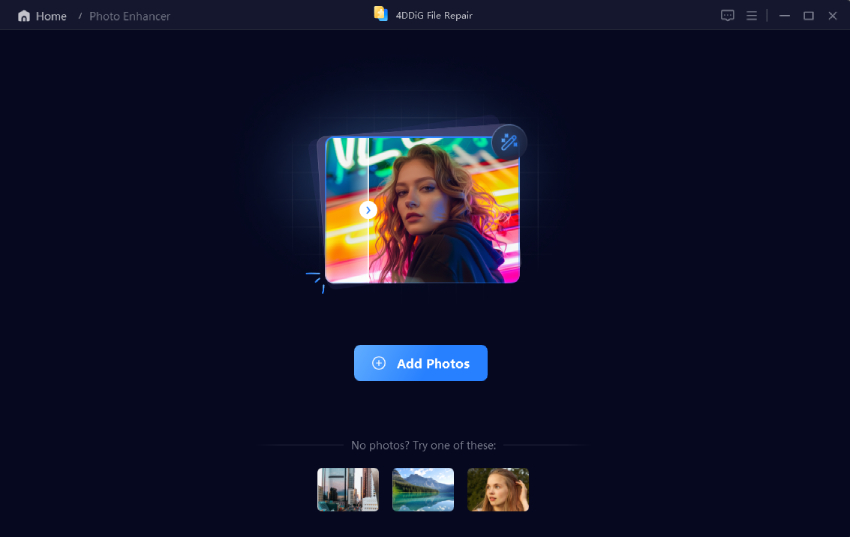
Click “Add Photos” and select the fuzzy images you want to improve. You can enhance single images or process multiple bad-quality pictures at once.

-
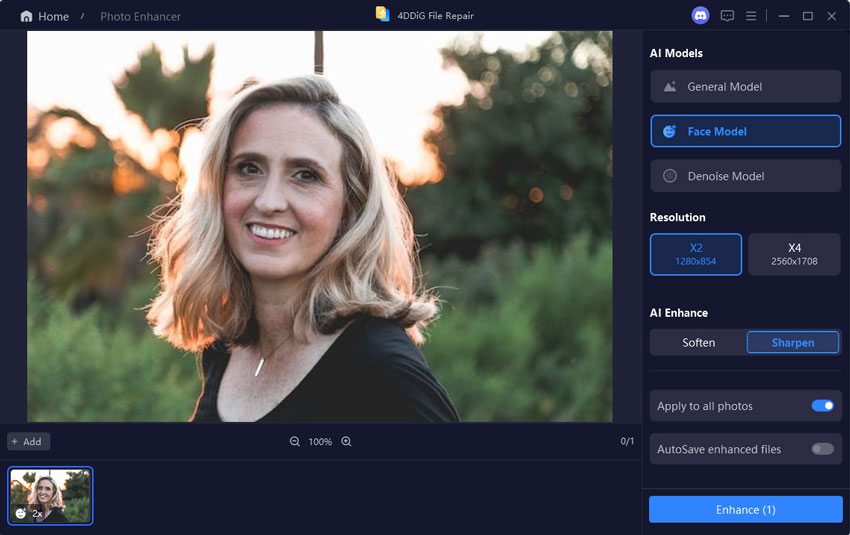
Select the right enhancement option, such as sharpening blur, reducing noise, or upscaling to 4K. Press “Enhance” and let the AI automatically transform your low quality image to high quality.

-
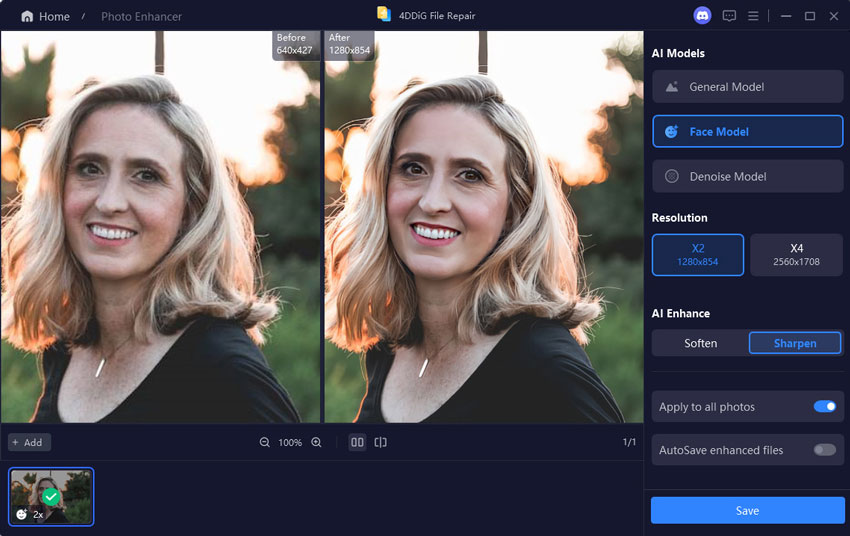
Once processing is complete, preview the enhanced images to compare the before and after versions. Finally, save your improved photos.

With these easy steps, 4DDiG AI Photo Enhancer makes it effortless to restore clarity and vibrancy to any picture. Whether you’re editing travel shots, portraits, or old family photos, you can confidently turn low quality images into high quality masterpieces.
Part 3: How to Fix Low Quality Pictures [2 Common Ways]
Sometimes you capture a moment and find out it’s grainy, pixelated or blurry afterwards. Don’t worry, a bad quality picture doesn’t mean it’s beyond saving. With the right tools and techniques, you can make a bad quality picture better in just a few steps. Here are two ways to fix bad picture quality:
1. Fix Bad Quality Pictures in Photoshop
If you’re dealing with bad picture quality, Photoshop has professional tools like Blur, Sharpen and Unsharp Mask to make details clearer. It’s ideal when you want to make a bad quality picture better with precise editing, advanced color correction and nondestructive adjustments. Photoshop is for those who want total control over every detail.
Steps:
-
Open your image in Photoshop. Go to the top menu, click "Filter", and then choose "Blur".
-
Select "Gaussian Blur" and adjust the slider until the edges look smoother. Click "OK".
-
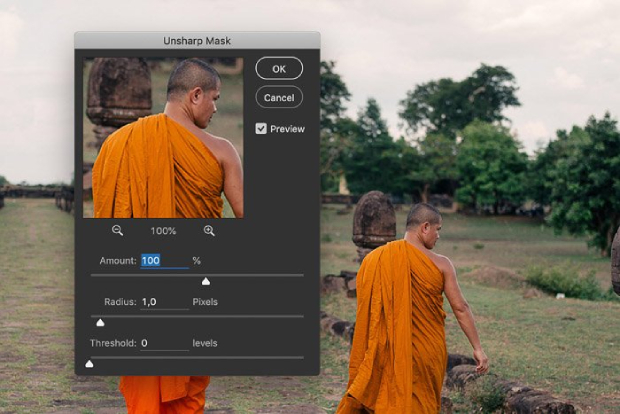
Go back to the Filter menu, select "Sharpen", and then choose "Unsharp Mask".
-
Adjust the "Amount" and "Radius" sliders until the photo looks crisper without over-sharpening.

Review the changes in the preview window.
-
Once satisfied, go to File, select "Save As", and export your improved image.
Use Smart Sharpen instead of Unsharp Mask if you want more control over shadow and highlight sharpening. This is when you want to make a bad quality picture better without adding noise.
2. Fix Poor Quality Photos Online
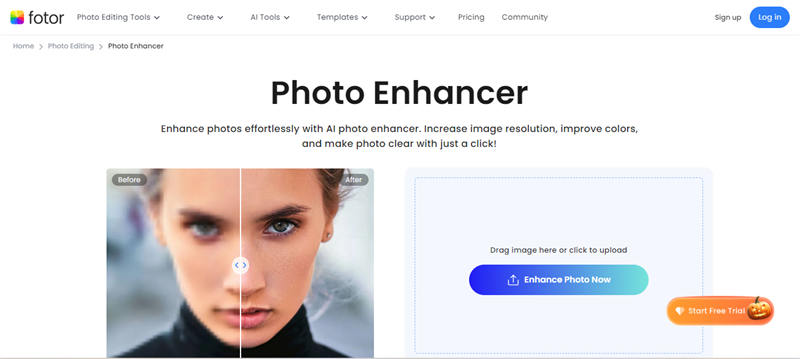
If Photoshop is too much, Fotor is a user-friendly online alternative. It automatically sharpens details, enhances colors, removes noise and even upscales resolution to 4K. Whether it’s product photos, portraits or old scanned images, this AI image enhancer intelligently restores clarity and vibrancy. It’s free to use online so it’s an easy way to make a bad quality picture better without advanced editing skills.
Steps:
-
Visit Fotor and click “Upscale Image Now" to upload your photo (supports JPG, PNG, etc.).

-
Select the upscale factor, like 2x, which is free, while 4x or 8x requires a premium plan.
Wait for the AI to process the image.
-
Use the before/after slider to check improvements. Download the improved version of your photo.
While useful, free versions may leave watermarks or limit resolution upgrades. Compared to them, 4DDiG gives more professional results.
Part 4. How to Fix Low Quality Photos Across Different Scenarios [Platform-Specific Solutions]
Even with the best tools, photos and videos can still lose clarity depending on the platform or device you’re using. Whether you’re taking low quality selfies, streaming a movie, or posting to social media, different situations require tailored fixes. Here are practical platform-specific solutions.
1. Smartphones: Fix iPhone/Android Bad Picture Quality
Smartphones often struggle with lighting, storage compression or camera settings which can lead to bad quality images. Here are a few ways to improve them:
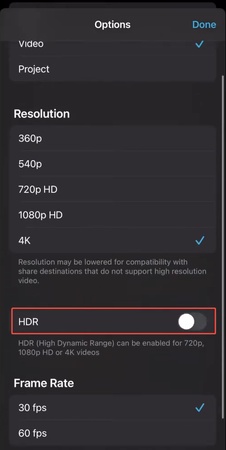
1) Adjust Camera Settings: On iPhone and Android, switch to the highest resolution and HDR mode to reduce graininess.
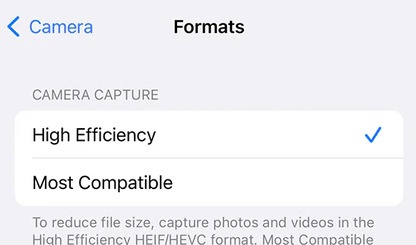
Go to “Settings", then “Camera", and select “Formats".
-
Switch to “High Efficiency” for better storage handling without losing clarity.

-
Ensure HDR and Live Photo are enabled for richer details.

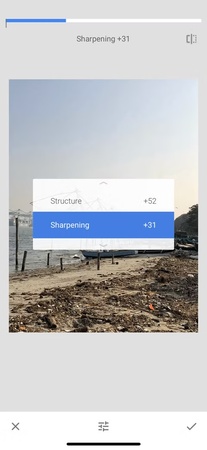
2) Use Photo Editing Apps: Tools like Snapseed or Lightroom can sharpen details, correct colors, and make your photos look professional.
Steps:
-
Open Snapseed and select your blurry photo from the gallery.
Go to "Tools" and choose "Details".
Swipe right to increase Structure and bring out clarity.
-
Tap the settings icon, select "Sharpening", then swipe right to enhance sharpness (keep it subtle).
-
Click the "check mark" to save your edits.

2. Streaming Services: Fix Apple TV / Amazon Prime / Netflix Bad Picture Quality
When you notice bad picture quality meme reactions about blurry or pixelated movies, it’s usually a settings or connection issue. Try these fixes:
1) Check Internet Speed: Most platforms require 5–25 Mbps for HD/4K. Slow speeds automatically lower quality.Steps:
-
You can test Netflix streaming speed using
Fast.com or the FAST Speed Test app (works on Android, iPhone, and iPad). -
Open
Fast.com in a browser or download the app. -
The test starts automatically. Wait a few seconds for the results.
Run the test multiple times to get an average speed.
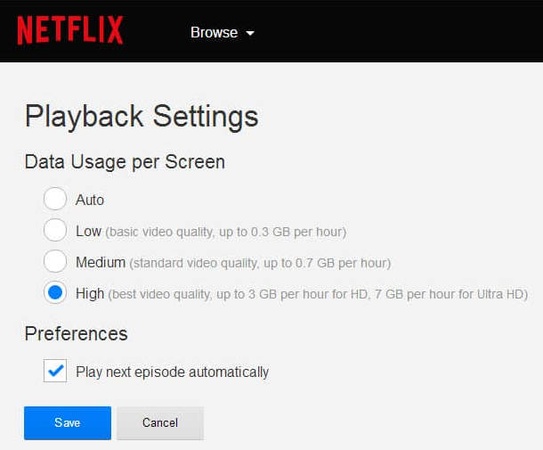
2) Update Streaming Quality Settings: In Netflix, Prime, or Apple TV, ensure “High” or “Best Available” is selected under playback quality.
Steps:
-
Visit Netflix.com and log in to your account.
Choose your profile.
Open Account from the menu.
Under My Profile, select "Playback Settings".
-
In Data usage per screen, choose "High" to enable the best streaming quality.
-
Click "Save" to apply the changes.

3. Social Media Platforms: Fix Bad Quality Pictures on Instagram/Facebook
Uploading a bad quality picture meme or high-res selfie only to see it get compressed is frustrating. Instagram reduces resolution to save bandwidth, but you can minimize this.
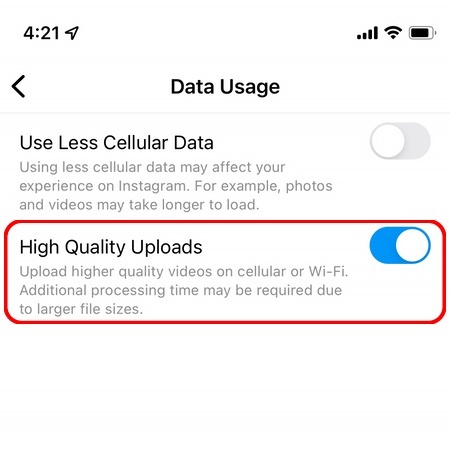
1) Turn On High-Quality Uploads: Enable this in Instagram’s settings or Facebook’s upload options.
Steps:
Open the "Instagram app"
Tap on your "profile icon" at the bottom of the screen.
-
Tap the "three horizontal lines" in the top right corner to open the menu.
Choose "Settings" from the menu options.
Go to "Account", then select "Data Usage".
-
Turn on the switch for "High Quality Uploads".

2) Upload in Correct Dimensions: Stick to Instagram’s 1080px or Facebook’s recommended sizes to avoid unnecessary resizing.
- Instagram: Upload images at 1080 x 1350 px (portrait) or 1080 x 1080 px (square).
- Facebook: Use 2048 px width for the highest quality.
- Always export photos in JPEG high quality or PNG.
With these fixes, you can adapt to different platforms and prevent your images or videos from losing clarity in the first place.
Part 5: Practical Tips to Make an Image Not Low Quality
The best solution is prevention. Here are practical tips to ensure your pictures remain clear and sharp:
-
Use Good Lighting: Natural light improves photo quality.
-
Stabilize Your Camera: Tripods reduce motion blur.
-
Shoot in High Resolution: Always choose max settings.
-
Avoid Over-Editing: Too many filters can turn good photos into bad quality pictures.
-
Keep Originals: Save uncompressed files before resizing.
These strategies will help you make bad quality pictures look better right from the start.
People Also Ask About Bad Quality Pictures
Q1: Are live photos lower quality?
Live photos aren’t lower quality. They’re just video and still frames combined which can slightly reduce sharpness and detail compared to regular photos.
Q2: Why is Instagram uploading bad quality photos?
Instagram compresses photos to save bandwidth and storage which often reduces clarity and sharpness. To avoid this, turn on HD upload in settings and use strong Wi-Fi when posting.
Q3: Do you know any apps to fix bad quality pictures?
Yes, 4DDiG Photo Enhancer is one of the best apps to restore details and make low quality images high quality. Remini or Fotor also work.
Q4: How do I caption a low quality picture?
Use humor or meme-style captions to turn the flaw into fun, like “Expectation vs Reality".
Q5: What is a low quality picture called?
A low quality picture is called a poor quality photo, pixelated image or blurry picture.
Conclusion
A bad quality picture doesn’t have to be that way. Whether it’s poor lighting, compression or shaky hands, there are ways to restore clarity. From professional tools like Photoshop to quick online fixes, you have many options. But for the easiest and most effective solution, 4DDiG Photo Enhancer is your tool. With one click, you can turn any bad quality picture into a clear high quality photo. Try it today and bring your memories back to life.
Secure Download
Secure Download
 ChatGPT
 Perplexity
 Google AI Mode
 Grok
Grok

