The Ultimate Guide to Photo Noise Reduction Techniques
Photo noise is a factor that poses a significant impact on quality of images. It is often seen as grain or noise patterns That give interferences to the clarity of the pictures. This guide will give you brief knowledge of photo noise reduction software, what is noise, why it occurs and how to get better result with photo noise reduction software. From using high ISO images to shooting at night, the following exposure tips and techniques will assist in getting better image quality.
Part 1. What Is Photo Noise?
⭕ Definition of Photo Noise
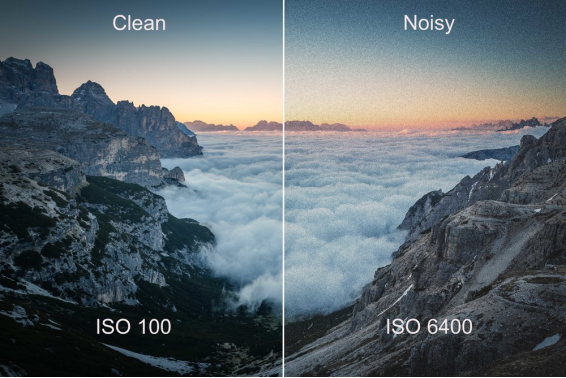
Photo noise refers to unwanted distortions or graininess in a digital image. This typically appears as tiny, random variations in color and brightness that make a photo look blurry or pixelated. It’s often most noticeable in areas of solid color or shadows.
⭕ Types of Noise
There are two main types of photo noise: luminance noise and chrominance noise.
Luminance noise: This appears as random variations in brightness
and gives the image a grainy, textured look. It's more common in low-light
situations and can affect the overall sharpness of the image.
Chrominance noise: This type of noise appears as color distortions,
where pixels change color randomly. It's most visible in areas of solid
color and can cause unnatural hues in your photos.
⭕ Common Causes of Noise in Photos
Photo noise can occur for several reasons, including:
- Low light: When there's not enough light in your environment, your camera's sensor struggles to capture clean images, resulting in noise.
- High ISO settings: Increasing ISO helps capture more light, but it can also introduce more noise.
- Long exposure times: Extended exposure, especially in darker conditions, can lead to noise.
- Small camera sensors: Cameras with smaller sensors are more prone to noise, particularly in low-light conditions.
Part 2. What Can Noise Reduction Do in Photos?
⚡ Explanation of the Noise Reduction Process
➤ Summary: Noise reduction involves using software or techniques to
remove or reduce the unwanted noise in a photo.
➤ Process: This is done by detecting and smoothing out the areas where
noise appears, preserving the details and textures of the image while
removing distractions.
➤ Purpose: Enhance the overall clarity and quality of the image without
losing fine details.
⚡ Benefits of Reducing Noise for Overall Image Quality
Reducing noise improves the visual appeal of your photos by making them appear clearer, sharper, and more professional. It helps maintain the integrity of fine details, colors, and textures, particularly in low-light shots or high-ISO images. This results in a more polished and high-quality photograph.
Part 3. Preparatory Denoising Image Methods
1. In-Camera Settings: Tips for Minimizing Noise During Shooting
To reduce noise in your photos, you can take steps to minimize it while shooting, including:
-
Use a tripod: For long exposures, use a tripod to avoid shaking and reduce the need for high ISO.
-
Shoot in RAW: RAW images retain more information and allow for better post-processing, including noise reduction.
-
Use proper exposure: Make sure your exposure is balanced to avoid underexposed areas that are more likely to show noise.
-
Lower ISO settings: Always use the lowest possible ISO for the lighting conditions. Higher ISO settings increase the likelihood of noise.

2. Post-Processing Techniques
Once you’ve taken your photos, the next step is post-processing. This is where noise reduction software comes into play. By using specific tools and techniques, you can reduce noise and enhance the quality of your image after the shot has been taken.
If you are tech savvies that are familiar with Adobe Photoshop, please follow this guide to reduce noise in the PS: How to Reduce Noise in Photoshop? Step-by-Step Guide. Otherwise, you can try the following AI tools.
Part 4. Use Professional AI Photo Noise Reduction Software
Artificial intelligence (AI) has revolutionized photo editing, and AI-powered photo noise reduction software is no exception. AI-based tools analyze your image and automatically detect noise, distinguishing it from the finer details. They intelligently remove noise while preserving important image features.
One popular tool for photo noise reduction is 4DDiG AI Photo Enhancer. This software uses advanced AI algorithms to remove noise from various types of photos, including night-time or high-ISO shots. It can help you improve the clarity of your photos without losing important details. This AI-powered gadget makes it much easier to reduce noise from photos precisely and naturally.
✨ Features of 4DDiG AI Photo Enhancer for Noise Removal:
- Noise reduction for night photos: It is designed to handle images taken in low-light conditions, removing the grainy effect typical of nighttime photography.
- Effective for high-ISO images: The software works efficiently with photos taken at high ISO, where noise is often more noticeable.
- Detail preservation: AI technology ensures that the finer details of the image, such as textures, edges, and patterns, are kept intact while the noise is removed.
- Automatic enhancement: It automatically detects and enhances various aspects of the image, making the process easy for users.
- Additional Features: Colorize B&W photos, 4K/8K enhancement, sharpen images with AI, 4 AI models, fix distored photos
✨ How to Remove Noise from Photos Using 4DDiG AI Photo Enhancer
-
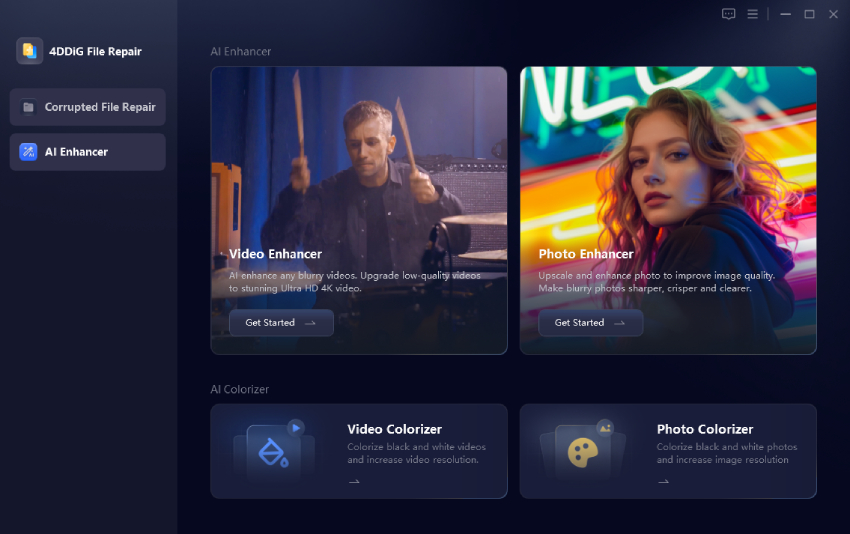
Install and run the 4DDiG Photo Enhancer program (aka 4DDiG File Repair). On its left panel, head to “AI Enhancer” and them choose “Photo Enhancer” to proceed.

-
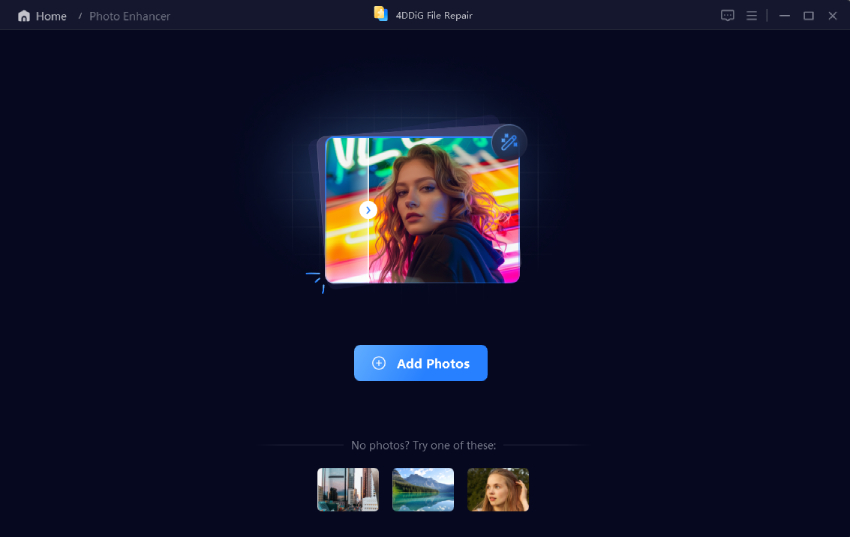
Upload all your grainy and noise photos to this AI tool by dragging them or clicking “Add Photos”.

-
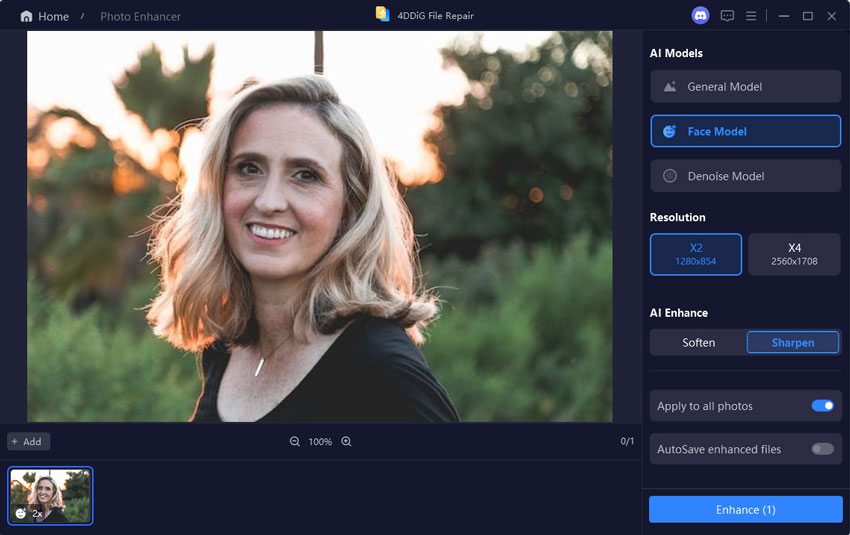
Upon adding, pick an AI model based on the photo style, such as General Model, Denoise Model, Face Model, etc. Then customize the resolution as “X4” and hit “Enhance” to initiate the photo noise reduction.

-
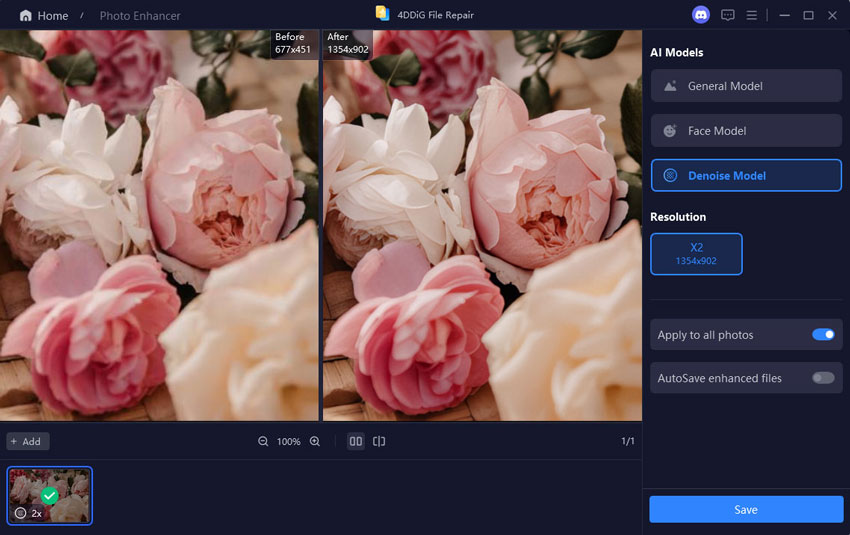
Then the software will automatically analyze and process this noise images in a short time. When finished, compare the photos before and after noise removal. Finally, click “Save” to export it.

Part 5. Free Popular Noise Reduction Software Online
1. Fotor
Fotor offers a free online tool for noise reduction. It allows users to adjust the noise levels in their photos quickly and efficiently. Whether you are dealing with luminance or chrominance noise, Fotor’s tool helps enhance your image quality.
⭐ Features of Fotor Image Denoiser
- Utilizes advanced AI to remove noise while keeping image details.
- An intuitive design is friendly for users without technical expertise.
- Allows users to denoise multiple images at once, saving time and effort.
- Offers customizable settings for users to control the level of noise reduction according to their preferences.
- No software installation is needed.
❌ Drawbacks of Fotor
- Doesn’t work with severely noise photos
- Only supports JPG and PNG
- Needs paid subscriptions to download enhanced photos
- Denoised photos are blurry
- Enhanced photos come with watermark
✍ Steps to Reduce Noise in Photos on Fotor:
-
Go to the Fotor Image Denoiser webpage and click on the “Remove Noise Now” tab.
-
Drag a noise picture to its screen. Then it will use AI to auto-start enhancing photos.
-
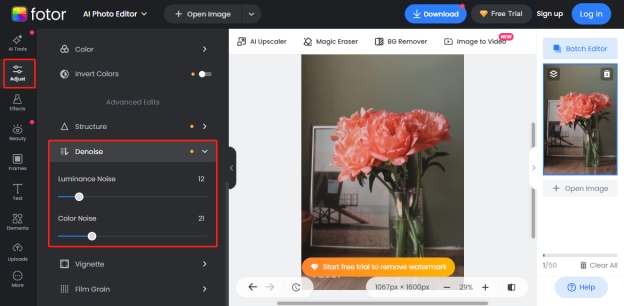
You can also go to the left “Adjust” tab and click on “Denoise”.
-
Move the “Luminance Noise” or “Color Noise” slider to the right for clarity.

photo noise reduction fotor
2. VanceAI
VanceAI Denoiser is another online tool that utilizes AI to remove noise from images. It offers an easy-to-use platform where users can upload their photos, reduce noise, and fix the grainy photos with just a few clicks.
⭐ Features of VanceAI Denoiser
- No need to install any software
- Supports back process photos
- With intuitive and easy-to-use interface
- Allows to select output format and DPI
- Quick process speed
❌ Drawbacks of Fotor
- Only supports JPG and PNG
- Less advanced sharpen, denoise, enhance options
- Low quality results
- Process will failed sometimes
- Need subscription for denoising and enhancing
- Not working with pretty grainy photos
✍ Steps to Reduce Noise in Photos on Fotor:
-
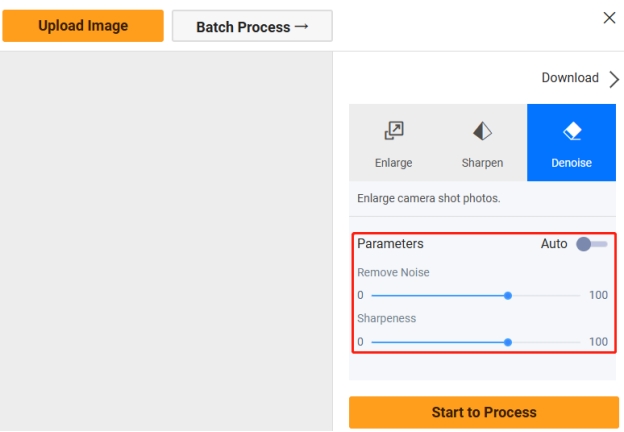
Visit the VanceAI Denoiser website and click “Upload Image”.
Drag and drop your grainy photos to it.
-
Touch on the right “Denoise” tab and move the slider of “Remove Noise” and “Sharpeness”.

3. Nero
Nero provides a free AI-powered tool for noise removal that works well for a variety of image types. It can be used to clean up noisy photos taken in low-light situations, offering both speed and quality in its results.
⭐ Features of Nero Denoiser
- One-click to remove noise from photos
- Web-based tool without software installation
- Allows to zoom and enlarge images without losing quality
- Use AI technology to enhance photos
❌ Drawbacks of Fotor
- No customizable denoise settings
- Only JPG is supported to export
- Limited free trials
- Sometims doesn’t work
✍ Steps of Photo Noise Reduction on Nero:
-
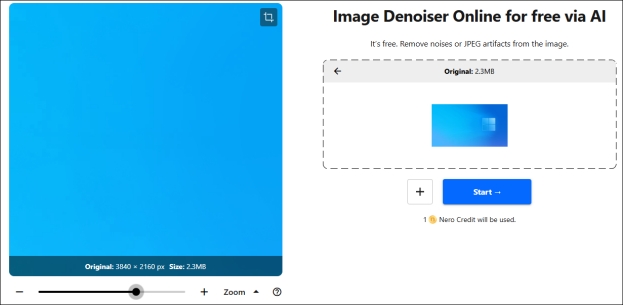
Navigate to Nero Denoiser and then choose “Upload Image”.
Then click the blue “Start” button.
-
Then the AI technology will auto-process this noise image.

Part 6. How to Reduce Noise in Photos on iPhone/Android
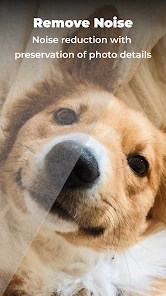
If you're looking to reduce noise in photos on your phone, using an AI app like "AI Photo Enhancer - Denoise It" can help. These apps utilize AI technology to automatically detect and remove noise, improving the quality of your photos in just a few taps.
⭐ Overview and Features:
- Noise reduction for mobile photos: The app effectively handles noise in photos taken on smartphones, improving both detail and clarity.
- Supported formats: The tool supports various photo formats commonly used on mobile devices, including JPEG and PNG.
✍ Steps to Reduce Noise in Photos on Your Phone:
Install and open this app on your phone.
-
Upload the photo you want to enhance by tapping “Upload” or “Select Photo”.
-
Once the photo is loaded, look for the “Denoise” or “Remove Noise” label.
-
Preview the denoise effect and tap “Apply” or “Process” button to start removing.
-
Save and share the improved image.

Conclusion
Photo noise reduction is a key aspect of improving image quality, especially when dealing with photos taken in low-light conditions or with high ISO settings. Using advanced software tools, such as the 4DDiG AI Photo Enhancer, can significantly improve your photos by removing noise while preserving important details.
Whether you're a professional photographer or just someone looking to enhance their images, AI photo noise reduction software is a powerful tool to help you achieve clear, high-quality results.
Secure Download
Secure Download
 ChatGPT
 Perplexity
 Google AI Mode
 Grok
Grok


