Remove Glare and Reflection from Photo on Mobile/Desktop/Online
Glare in photos is a common issue。 It usually occurs if intense light reflects off surfaces like glasses during photography. Also, it happens when sunlight or a flashlight directly into the camera lens. Such sun glare, light glare, flash glare, or glass glare, can obscure important details and diminish the overall quality of your image.
Knowing how to remove glare and reflection from photos is essential for creating clear, professional-looking pictures. This article will explore practical tips and techniques free or paid to get rid of glare on iPhone, Android, desktop, and online, which can restore your photos to their original clarity and quality.

- Part 1: Remove Light Glare from Photo on iPhone/Android 🔥
- Part 2: Get Rid of Glare in Photos Online Free
- Part 3: Remove Reflection from Photo on PC/Mac
- Part 4: Bonus Tip to Enhance Photo Quality to 4K and Remove Blemishes 👍
Part 1. How to Remove Glare from Photo on iPhone & Android with App
Mobile apps make glare removal quick and easy, even on the go. Here are 5 popular apps for iPhone and Android users. Both of them can also reduce skin glare.
1. PhotoDirector
- 💰 Free or Paid: Free version + Premium features require payment (Start from $2.99/mo)
- ✅ Supported Formats: JPEG, PNG, RAW, HEIF, DNG
PhotoDirector makes removing glare from your photos simple and effective on iPhone and Android. With its powerful AI-powered object removal tool, you can eliminate unwanted reflections and glare in just a few taps. Whether it's light spots on glasses, shiny surfaces, or overexposed areas, PhotoDirector ensures a polished, natural-looking result. It is perfect for enhancing your photos without professional editing skills. The app provides precision and ease for achieving glare-free images that are ready to shine on social media or in personal collections.
How to Remove Light Glare from Photo Glasses via PhotoDirector:
-
Install PhotoDirector for free from the App Store or Google Play.
-
Open the app and upload your photo from your gallery or take a new one.
-
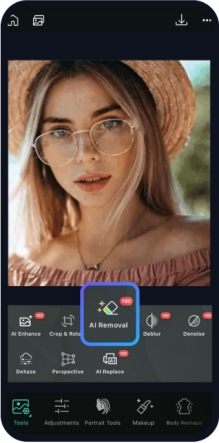
Tap Tools and choose “AI Removal” to start glare removal.

-
Adjust the brush size and swipe over the glare areas for precise removal.
Tap Save to store or share the edited photo on social media.
2. YouCam Perfect
- 💰 Free or Paid: Limited free version + VIP features require payment (Start from $5.99)
- ✅ Supported Formats: JPEG, PNG, RAW, HEIF, DNG
YouCam Perfect makes removing glare from your photos quick and effortless on both iPhone and Android. With its advanced AI-powered tools, you can instantly fix glare issues for a polished and professional look.
Simply upload your photo and let YouCam Perfect’s intelligent editing features identify and reduce reflections or light glare without affecting the overall image quality. Whether it's glasses glare or unwanted light spots, achieve flawless photos in just a few taps, all without needing professional editing skills!
AI Remove Glasses Light Glare Using YouCam Perfect:
-
Get YouCam Perfect from your app store. Open the app and tap “Photo Edit” from the home screen.
-
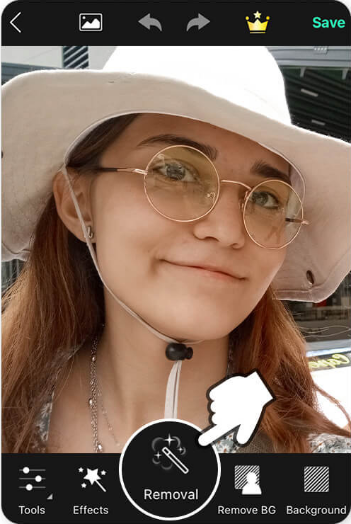
Choose the photo with glare that you want to fix. Then tap the Removal tab at the bottom of the screen.

-
Use the Removal tool to mark the glare area and then hit the “Apply” button. The app’s AI will remove the glare.
Tap Save and share your glare-free photo.
3. TouchRetouch
- 💰 Free or Paid: Limited free version and one-time payment (Start from $3.99/year)
- ✅ Supported Formats: JPEG, PNG, TIFF
TouchRetouch is a mobile photo editor that comes with 4 powerful tools to eliminate unwanted things including various glares (sunlight/flashlight/glass, etc):
- Objects Removal Tool: Apply a lasso or brush to mark and eliminate specific objects.
- Lines Removal Tool: Take lines power lines and others out of the image.
- Meshes Removal Tool: Can get fences and other meshes out of the picture.
- Clone Stamp Remover: Remove unwanted clone stamps and watermarks.
Remove Sun/Glass Glare from Photo with Touchretouch
Here's how to take sunlight, glasses, or flashlight glare out of images with TouchRetouch's Object Removal tool:
Open the TouchRetouch app and upload the glare photo from the gallery.
Choose "Objects" from the bottom menu bar.
On the next screen, select "Brush" or "Lasso" to mark the glare in the photo.
Once marked, hit the lower-right "GO" button to start removing the glare.

4. Facetune
- 💰 Free or Paid: Free trial and subcriptions (Start from $3.99/year)
- ✅ Supported Formats: JPEG, PNG
Similar to the above tools, Facetune is also a photo editor with object remover called "Vanish" and "Patch", which can mark and remove unwanted objects. Also it comes with the Reflection tool, allowing us to adjust the brightness level to reduce the glare lightness. Moreover, it has an Anti-Glare feature to prevent various glares in photos.
Steps to Remove Reflection & Glare from Picture with Facetune
Take throught the following steps to get rid of the glare in photos with Facetune:
Launch the Facetune app and select the glare photo you want to edit from the "Photo" section.
Choose "Patch" and paint over the glare partfrom the bottom menu bar.
Once painted, click "Apply" and adjust blending with "Opacity" slider.

To remove large glare areas such removing glare from glasses in photo, you can also use the "Clone" tool to select a clean source area with the same texture/color. Then adjust brush hardness (30-50%) and paint over glare. Finally, use "Eraser" to refine edges.
5. Lightroom Mobile
- 💰 Free or Paid: Free trial and subcriptions (Start from $11.99/mo)
- ✅ Supported Formats: RAW, DNG, JPEG, TIFF, PSD, HEIF
Lightroom Mobile is the phone version of Adobe Lightroom, which has a Brush tool to select and eliminate the glare and bright spots in Photos. It is not so easy to use as tha above tools. But don't worry. We have listed the detsils below.
Steps to Light Reflection/Glare from Photo with Lightroom Mobile
Go to the "Develop" module in the Lightroom Mobile app.
Pick the "Adjustment Brush" tool and check the "Auto Mask" option.
Mark the glare area using the Brush tool and move the "Highlights" and "Whites" slider to reduce the glare.
Adjust the "Clarity" slider to improve the clarity of the affected area till the glare is invisible.
☞ Those tools can also be used to remove unwanted objects and people. To learn more, please read: How to Remove a Person from a Photo
Part 2. Top 3 Tools Suitable to Remove Glare from Photo Online Free
Online tools offer a convenient way to remove glare without downloading software. One such tool is Lightxeditor.
You can also read this article to find more ways to take glare out of photos online free: How to Remove Glare from Photo Online Free [Best Choice in 2025]
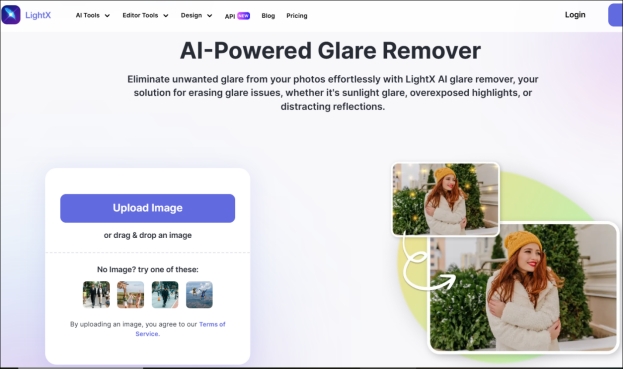
1. LightXEditor - AI Remove Glasses Light Glare
- 💰 Price: Free trial
- ✅ Supported Formats: JPG and PNG
LightXEditor Photo Glare Remover online makes removing glasses' light glare from photos effortless and professional. Simply upload your image, mark the glare areas, and let the advanced AI technology do the rest. The tool intelligently eliminates reflections caused by glasses, restoring natural details and producing high-quality, glare-free results.
It is perfect for fixing sunlight, flash, or indoor lighting issues, LightX ensures your photos look clean and polished. Enjoy fast, easy, and seamless photo editing with LightX's glasses and light glare remover.
2. AI Ease Glare Remover Online Free
- 💰 Price: Has a free version
- ✅ Supported Formats:3GP, PNG, JPEG, BMP, WEBP, and HEIC
AI Ease Photo Glare Remover also equips itself an AI technology. It enables users to brush over unwanted glare and other areas and one-click to take glares out of the photo. Apart from Brush tool, it features a prompt-based removal function, empowering you to enter the specific object name to the prompt box. Then this AI tool will auto-remove the pointed object, which is pretty convenient.
This gadget deals with flash glare, glasses glare, and light reflection in images. Moreover, it supports an extensive range of photos (3GP, PNG, JPEG, BMP, WEBP, and HEIC).

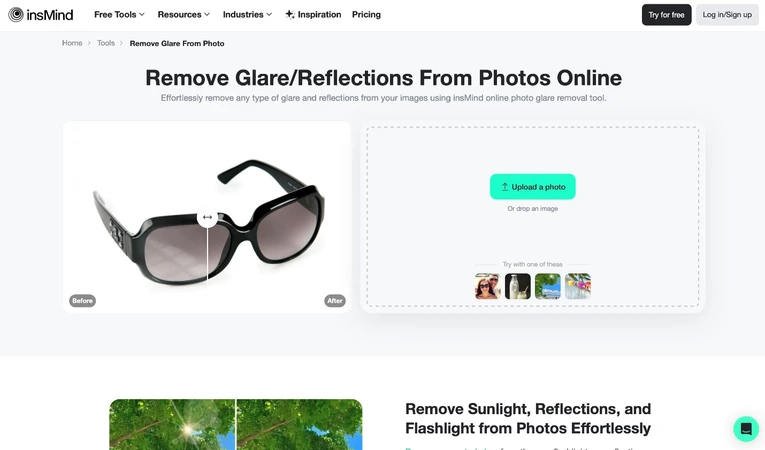
3. InsMind - Remove Glare and Reflection from Photos Online
- 💰 Price: Free trial
- ✅ Supported Formats: JPG and PNG
InsMind is another AI online photo glare removal photo editor online. It can take any type of photo glare and reflections (such as sunlight, light reflection, flashligh, etc.) from the picture. By using several clicks with the brush tool, this tool helps you detect and eliminate the glare automatically and quickly.
What's more, it is a feature-rich tool coming with many additional functions, like background removal, templates, sticker adding, and among others. However, it rquires sign-in to complete the removal process.
⛳ You May Also Like: Photo Blemish Remover Online Free | Top 7 Picks for Flawless Images
Part 3. How to Take Glare Out of Picture with Software on PC/Mac
Professional photo editors like Lightroom, Photoshop, and GIMP have tools to help you remove glare from photos. Below, we show you the steps for each.
1. How to Get Rid of Light Glare from Photo in Photoshop
- 💰 Price: Start from $22.99/mo
- ✅ Supported Formats: PSD, JPEG, PNG, TIFF, RAW, SVG, and more
Photoshop is powerful for removing light glare from photos and restoring clarity and detail. Create a copy of the image layer to keep the original unchanged. Use the Healing Brush Tool or Clone Stamp Tool to paint over the glare and blend it with surrounding areas. For larger glare spots, adjust the brightness or contrast using adjustment layers. The Patch Tool can also work for precise fixes. These techniques ensure your photo looks natural and glare-free.
Remove Reflected Glare in Photoshop:
Open Photoshop, click "File" > "Open" to upload the image with glare you want to remove.
-
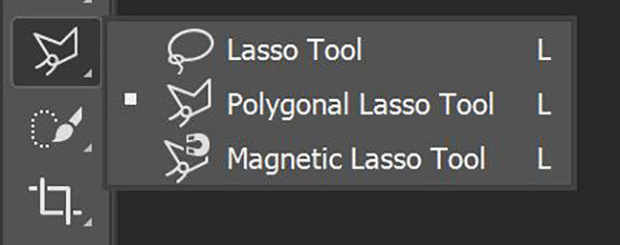
Press L to open the "Polygonal Lasso Tool" or "Lasso Tool". Then circle the glare spot with this tool.

-
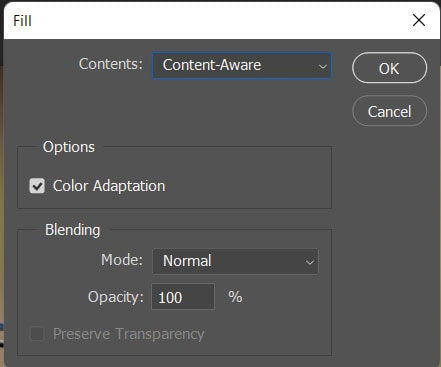
Right click inside the circle and choose “Fill” from the dropdown menu. Then choose “Content-Aware” from the Content section and click OK to apply it.

-
Create a “Levels Adjustment Layer” and match exposure to surrounding pixels. Adjust shadows, mid-tones, and highlights. Then repeat adjustments as needed for both sides of the glasses.
2. How to Get Rid of Glare from Photo in GIMP
- 💰 Price: Completely free (Open source)
- ✅ Supported Formats: JPEG, PNG, PSD, XCF, RAW, BMP, WebP
GIMP (GNU Image Manipulation Program) is a powerful free photo editing software to remove glare from images. To get rid of glare from a photo, open the image in GIMP and use the "Clone Tool" to blend the shiny areas with the surrounding texture. Adjust the opacity and brush size for precise editing. Or use the "Heal Tool" to smooth over the glare. GIMP has layer adjustments and advanced tools to restore photo quality and details.
Remove Light Glare from Photo with GIMP:
-
Launch GIMP and load your photo. Right-click on the layer in the Layers Panel and choose Duplicate Layer. This keeps the original safe.
-
Use the Zoom Tool to focus on the part of the photo with the glare.
-
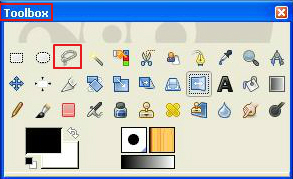
Use the Free Select Tool (the lasso icon) to outline the glare-affected area.

-
Select the Heal Tool from the toolbar (it looks like a bandage). Hold Ctrl and click on a nearby spot with a similar texture to set it as the source. Then, paint over the glare to blend it into the surrounding area.
-
If the Heal Tool doesn’t look right, switch to the Clone Tool (it looks like a stamp). Hold Ctrl to select a source area and paint over the glare. This works well for fixing patterns or textures.
-
If the edited area still looks off, go to “Colors”, then “Brightness-Contrast”, and tweak the settings to match the rest of the photo.
-
Feather the selection to blend the edges. Go to Select, then Feather, and set a small number (like 5-10).
-
Use the Blur/Sharpen Tool to smooth out any harsh spots or edges.
Bonus: How to Upscale Image Resolution to 4K and Retouch Photos👍
After removing glare from your photos, why not increase their quality to 4K or more? With 4DDiG AI Photo Enhancer, you can turn low-quality images into stunning high-resolution images. This advanced tool uses AI to upscale, sharpen, and enhance photo quality without losing details. And it is perfect for restoring old photos, improving clarity, or preparing images for professional use.
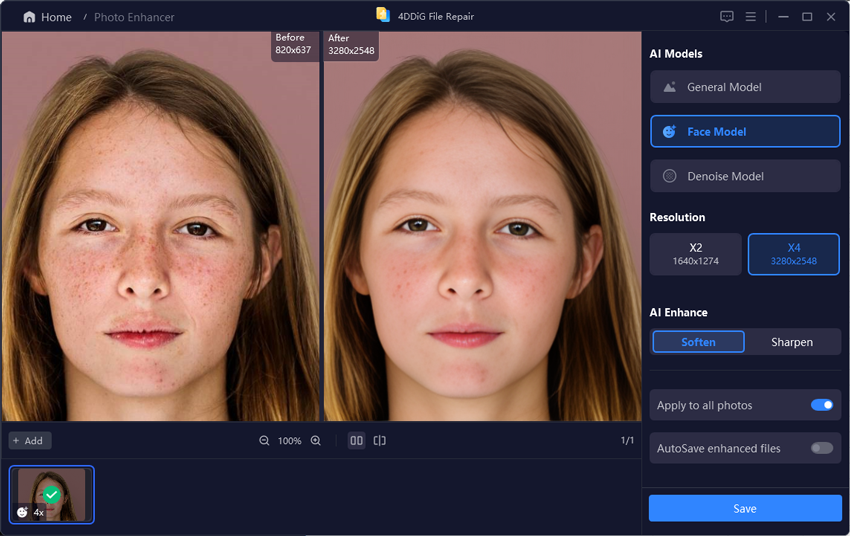
Also, it comes with 4 awesome AI Models (General/Face/Denoise/Colorize). Amid this, The Face Model has the capability to remove flws, like blemishes, pimples, acne, and more from photos. Whether you want to print high-quality photos or share them online, this tool will give your photos a professional look.
Features of 4DDiG AI Photo Enhancer
- Turn low-resolution photos into 4K and higher.
- Enhance photo details and brightness with one click.
- Can retouch photos and remove blemishes for good-looking
- Restore old photos to add color to black-and-white photos.
- Remove noise from photos and improve image clarity with AI sharpening.
- Support many image formats: JPEG, PNG, HEIC, TIFF, WEBP, BMP, and other formats.
- Simple steps for pro results, friendly for new users.
Steps to Enhance Your Photo Quality and Retouch Photo
Secure Download
Secure Download
-
Launch the AI-powered photo enhancer. On its home screen, select “AI Enhancer” > “Photo Enhancer”.

-
Hit the blue "Add Photos" button to upload the glare-free photo you want to enhance.

-
Select from General Model, Denoise Model, or Face Model based on your photo type, adjust resolution (X4 is the best), and click "Enhance."
Tips:
To retouch photos and remove pimples, blemishes, etc., please select the "Face Model" > "Soften".

-
Let the tool process the image to sharpen details, remove flaws, reduce noise, and improve clarity. Inspect the enhanced photo, make adjustments if needed, and click "Save" to export the final version.

Conclusion
Glare can be a big problem in photography, but with the right tools and techniques, you can remove glare and reflection from photo. Whether you use pro photo editors like Lightroom and Photoshop, mobile apps like YouCam Perfect, or online tools like Lightxeditor, you have plenty of options. For those looking to enhance photo quality after glare removal, 4DDiG AI Photo Enhancer stands out as a reliable choice, offering advanced features and superior results.
⛳ You May Also Like: How to Remover Watermark from Photo without Blur
Secure Download
Secure Download
💡 Summarize with AI:
You May Also Like
- Home >>
- Photo Tips >>
- Remove Glare and Reflection from Photo on Mobile/Desktop/Online





 ChatGPT
 Perplexity
 Google AI Mode
 Grok
Grok


