How to Fix a 100% Disk Usage on Windows 10

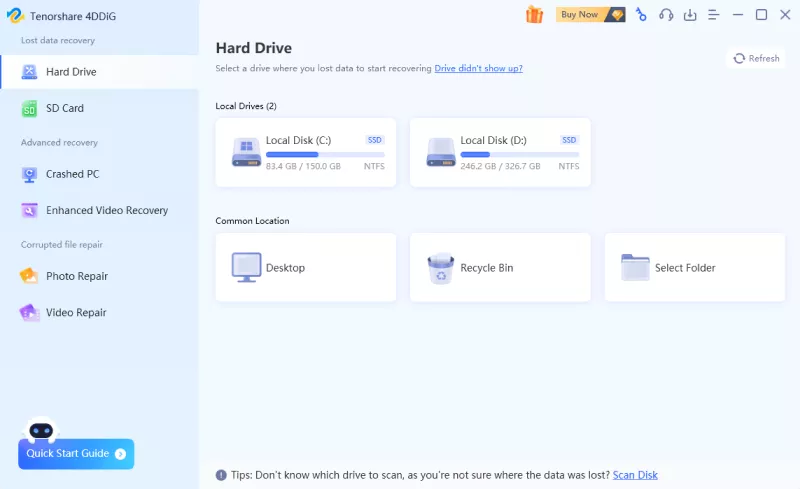
Let’s combat 100% disk usage on Windows 10 with 6 effective solutions in this guide, including disk recovery using 4DDiG Windows Data Recovery.

5 mins read

Updated on 2024-04-29 15:38:03 to Hard Drive

Windows 10, despite its many improvements over previous versions, still faces its fair share of issues. One of the users' most frustrating problems is the dreaded 100 disk usage windows 10. When your disk usage is maxed out, your computer becomes sluggish, and tasks take an eternity to complete. In this comprehensive guide, we will delve into what 100 disk usage windows 10 means, its potential causes, and, most importantly, six effective ways to fix it.

100 disk usage windows

Part 1: What's 100% Disk Usage in Windows 10

Before diving into solutions, it's crucial to understand what 100% disk usage means. When you open the Task Manager on your Windows 10 system, the Disk column consistently shows 100% utilization, even when you're not actively using your computer. This situation can lead to slow performance, delayed application launches, and a frustrating user experience.

Several factors contribute to 100% disk usage, such as background processes, software conflicts, and hardware issues. Identifying the root cause is the first step toward resolving this problem.

Part 2: How to Fix a 100% Disk Usage on Windows 10

Now, let's explore six workable ways to fix the 100% disk usage issue on your Windows 10 system.

Way 1: Restart Your System

Sometimes, a simple restart can work wonders. It may seem overly simplistic, but it can help clear out temporary files, reset background processes, and resolve the issue. To initiate a computer restart:

  • Tap the Windows key.
  • Navigate to the Power icon.
  • Select the Restart option. This action will close all running applications, power down the PC, and reboot.

Even when the system state is brand new and pristine, do you still notice 100% disc usage? If so, it's not a big problem; the explanation is also insignificant. If not, you should take additional steps to restore your computer's disc use.

Way 2: Recover Data from a Failing Hard Drive

Lastly, if you've tried everything to fix your high 100 disk usage windows 10 with no luck, it's time to face the fact that your hard drive might be seriously messed up. When your hard drive is physically damaged, your computer will slow down, keep crashing or freezing, and show that annoying windows 10 100 disk usage problem. In this situation, you should focus on getting your important data from the failing hard drive and then replace it with a new one.

If your computer can still start up normally but can't access your hard drive, you need to act quickly to recover your data. To tackle this, you can use data recovery software like 4DDiG Windows Data Recovery. This software can recover your data and identify and repair disk-related errors. It's a powerful tool to help get your system back on track. By choosing 4DDiG Windows Data Recovery, you're opting for a reliable solution to address the root causes of windows 10 disk usage 100.

FREE DOWNLOAD

Secure Download

FREE DOWNLOAD

Secure Download

  • Restore data from uninitialized or failing hard drive.
  • Recover data from various sources like laptops, PCs, internal/external drives, USB, and etc.
  • Recover more than 2000 file types, such as photos, videos, documents, etc.
  • Restore files lost due to deletion, formatting, system crashes, etc.
  • Launch 4DDiG Windows Data Recovery, select the local disk and click scan.

    nas recovery
  • The scanning results will be presented here. There are categories like Deleted Files, Existing Files, Lost Location, RAW Files, and Tag Files under the Tree View. You can also switch to File View to check file types such as Photo, Video, etc. You can choose what you want to recover.

    tree view
  • After you find the target files, you can preview and recover them to a secure location. In case of disk overwriting, save the recovered files to a different path from where you lost them.

    save-recovered files from local drive

Way 3: Disable Windows Search

Windows Search is a helpful feature that lets you quickly find files and applications on your computer. However, it can also contribute to high disk usage when constantly indexing your files. Disabling Windows Search temporarily can alleviate this issue. Initially, employ the following approach to halt Windows Search and pinpoint the problem temporarily:

  • Press the Windows + R keys to bring up the Run dialog, then type "cmd" and hit Enter to open the Command Prompt.
  • In the Command Prompt, input the "net.exe stop "Windows search" command and press Enter. This command halts the Windows Search function until the next system restarts.
  • Return to the Task Manager and verify if the disk usage percentage has returned to normal. If it has, Windows Search is likely the culprit. In such a case, consider permanently deactivating it.
  • To permanently disable Windows Search, follow these steps:
  • Press the Windows + R keys again and enter "services.msc" in the Run dialog.
  • Within the Services window, locate the "Windows Search" entry and double-click it to access its properties.
  • Under "Startup type," choose "Disabled," and then click "OK" to save the changes you've made.

    disable windows search

Way 4: Check For Malware

Malware and viruses can cause various problems on your computer, including high disk usage. Perform a thorough malware scan using a reputable antivirus program to ensure your system is clean and free from malicious software. To activate Windows Defender:

  • Windows Defender may be opened by going to Settings -> Update & Security -> Windows Defender -> Full.

Part 3: Other Solutions to Fix a 100% Disk Usage on Windows 10

In addition to the initial four solutions, there are six more ways to address the disk usage 100 windows 10 problem.

Way 1: Reset Virtual Memory in Windows 10

Virtual memory, also known as the page file, can sometimes lead to high disk usage. Resetting it can help resolve issues related to virtual memory management. To adjust the virtual memory size on your Windows 10 system, follow these steps:

  • Begin by opening the Settings menu. You can do this by navigating to "System" and selecting "About."
  • In the "Related settings" section, find and click on "System info."
  • Now, on the left-hand side, click on "Advanced system settings."
  • In the "Advanced" tab, which falls under the "Performance" section, click on "Settings."
  • In the "Performance Options" window, again select the "Advanced" tab.
  • In the "Virtual memory" section, click on "Change."
  • You'll see an option labeled "Automatically manage paging file size for all drives." Clear this checkbox.
  • Now, choose the "Custom size" option.
  • Enter your desired values for both "Initial size" and "Maximum size" for the virtual memory.
  • Click "Set," then "OK" to confirm your settings.

    reset virtual memory

Way 2: Update Windows

Outdated system files and drivers can cause various problems, including 100 percent disk usage windows 10 spikes. Ensure your Windows 10 operating system is current by installing Microsoft's latest updates and drivers.

  • Start by clicking the Start button and selecting "Settings." Within the "Settings" menu, proceed to "Update & security," and then navigate to "Windows Update."
  • If you wish to initiate a manual update check, opt for "Check for updates." Next, click on "Advanced options," and within the "Choose how updates are installed" section, opt for "Automatic (recommended)."

    update windows

Way 3: Stop the SuperFetch Service

How to fix 100 disk usage windows 10? SuperFetch is a Windows service designed to optimize the performance of frequently used applications. However, it can sometimes overburden your disk drive. Disabling SuperFetch can help alleviate this issue.

  • Press Windows and R keys to open up the Run dialog. In this dialog, input "services.msc" and press Enter.
  • The Services window will appear. Within this window, locate "Superfetch" in the list.
  • Right-click on "Superfetch," and from the context menu, choose "Properties."
  • If you intend to halt the service, click the "Stop" button. In the "Startup type" dropdown menu, select "Disabled."

    stop the superfetch service

Way 4: Change Energy Options from Balanced to High Performance

Changing your power plan to High Performance ensures that your system prioritizes performance over energy efficiency. It can reduce disk usage during intensive tasks.

    Press WIN+X on your keyboard, click Additional power settings and select Greater Performance to adjust.

    change energy options

Way 5: Run the Check Disk

Running the Check Disk utility can identify and repair disk errors, possibly causing the 100% disk usage problem.

  • Begin by performing a right-click on the specific partition that is encountering issues. From the context menu that appears, opt for "Advanced," and then select "Check File System."
  • You'll be prompted to confirm whether you want to conceal the partition.
  • Within the "Check File System" window, take note of the "Try to fix errors if found" option and ensure it is checked.
  • Now, initiate the error-checking process by clicking the "Start" button to assess your partition for errors.

    run the check disk

Way 6: Change Settings in Google Chrome and Skype

How to fix 100 disk usage in windows 10? Sometimes, third-party applications like Google Chrome and Skype can contribute to high disk usage. Adjusting their settings or limiting their impact on your system can be a potential solution.

For Chrome:

  • Launch Chrome.
  • Navigate to the Settings menu.
  • Within the "Advanced settings" section, locate "Privacy and security."
  • Uncheck the "Use a prediction service to load pages more quickly" option.

    change google settings

For Skype:

  • To initiate Skype for Windows 10, access the Start menu at the bottom left corner of your screen.
  • In the list of available applications, locate "Skype for Windows 10" and click to open it.
  • Go to the "Security" tab and select the "Edit" option.
  • In the "Groups or Usernames" list, choose "ALL APPLICATION PACKAGES."
  • Check the "Write" option to enable "Allow," granting Skype permission to write to your disk.
  • Confirm your changes by clicking "OK."

Part 4: FAQ

Q 1: Why Is Disk Usage 100% in Windows 10?

Disk usage can be 100% for various reasons, including background processes, software conflicts, failing hardware, malware, etc. Identifying the specific cause is essential to fixing the issue.

Q 2: Can Outdated Drivers Cause 100% Disk Usage?

Yes, outdated drivers can contribute to high disk usage. Updating your drivers can resolve this issue.

Q 3: Why Is My Disk Always 100% When Nothing Is Running?

Even when you're not using your computer, various background processes can still be active using your disk. Identifying and managing these processes is crucial to resolving the problem.

Conclusion

Experiencing 100 disk usage windows 10 can be frustrating, but it's not an insurmountable problem. By understanding the root causes and following the six workable ways discussed in this guide, you can effectively tackle the issue and restore your computer's performance. There are multiple solutions, whether it's a simple restart, disk recovery with 4DDiG Windows Data Recovery, or adjusting system settings.

William Bollson (senior editor)

William Bollson, the editor-in-chief of 4DDiG, devotes to providing the best solutions for Windows and Mac related issues, including data recovery, repair, error fixes.

(Click to rate this post)

You rated 4.5 ( participated)