Twitch Videos Not Exporting to YouTube? 7 Fixes Here!
Twitch's export functionality can be frustratingly unreliable, leaving streamers unable to share their content across platforms. Common issues include export processes getting stuck at 0%, complete export failures, and connection problems between Twitch and YouTube accounts.
This comprehensive guide addresses the most frequent "twitch videos not exporting to YouTube" problems and provides proven solutions to restore your export functionality, ensuring your valuable streaming content reaches the wider YouTube audience effectively.
Part 1. Why My Twitch Videos Export to YouTube Failed?
Understanding the root causes of export failures is crucial for implementing the right solutions. Twitch-to-YouTube export issues manifest in various ways, each pointing to specific underlying problems that require targeted approaches.
1. Common Scenarios:
There are several frustrating problems users frequently encounter when trying to export Twitch videos to YouTube:
- “Twitch export to YouTube stuck at 0%”: The export process starts but remains at 0%, indicating a connection issue or file processing error.
- “Twitch export doing nothing”: Clicking the export button yields no response, often due to Twitch Studio glitches or account settings misconfigurations.
- “Twitch export to YouTube failed”: You receive errors like “Export Failed” or “Unable to Process Video,” pointing to file corruption or YouTube upload restrictions.
- YouTube compatibility issues: Videos export but fail to load or play on YouTube, often due to unsupported formats or corrupted files.
How to Fix YouTube Not Loading on PC/iPhone/Android? Fresh Update!
2. Common Reasons:
Why won't my videos upload on Twitch? The reasons varies on different scenarios. Here are some possible culprits:
- File Corruption: Twitch videos (typically MP4) may become corrupted during recording or export due to software crashes, unstable internet, or faulty storage devices like USB drives or SD cards.
- Incompatible Video Formats or Codecs: Twitch exports videos in MP4 (H.264), but YouTube may reject files with unsupported codecs or settings (e.g., high bitrates or non-standard resolutions).
- Twitch Studio or Account Issues: Incorrect export settings, outdated Twitch Studio software, or unlinked YouTube accounts can prevent successful exports.
- YouTube Upload Restrictions: YouTube’s upload limits (e.g., file size, duration, or account verification issues) can block Twitch exports, especially for new or restricted accounts.
- Network Connectivity Problems: Unstable or slow internet connections during export can interrupt the process, causing delays or failures.
- Server-Side Glitches: Temporary issues with Twitch or YouTube servers can halt exports, resulting in errors or stuck uploads.
- Corrupted or Missing Video Index: Similar to AVI index broken issues, MP4 files from Twitch may have damaged metadata or indexes, preventing YouTube from processing them.
How to Fix Twitch Stream Lagging/Buffering - 9 Fixes in 2025
Part 2. How to Fix Twitch Video Not Exporting to YouTube Easily
When Twitch videos fail to export to YouTube, issues like stuck uploads, error messages, or Twitch export doing nothing can be frustrating. Below are seven proven methods to resolve these problems, addressing common causes like account linking issues, format incompatibilities, and upload limits.
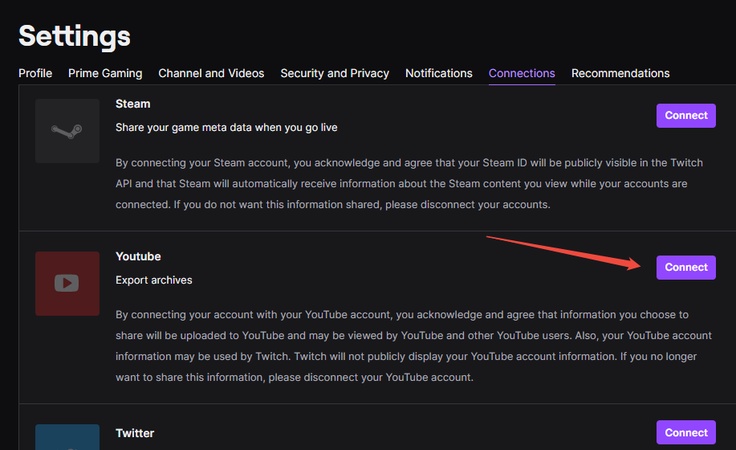
1. Re-link YouTube Account to Twitch
Account connection issues cause approximately 70% of export failures. Re-establishing the link between your Twitch and YouTube accounts refreshes authentication tokens and resolves permission conflicts that develop over time.
-
Log in to your Twitch account and go to the “Creator Dashboard”.
Navigate to “Settings” > “Connections”.
-
Find “YouTube” in the connected accounts section and click “Disconnect” if already linked.
-
Click “Connect” and sign in to your YouTube account (ensure it’s the correct Google account).
-
Authorize Twitch to access YouTube and try exporting again.

2. Export Twitch Videos in YouTube-Compatible Formats
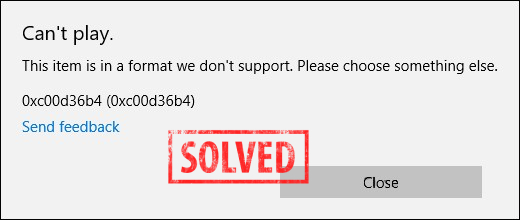
YouTube supports formats like MP4 (H.264 video + AAC audio). If your Twitch VOD is not in a supported format or has encoding issues, the export may fail silently or you may receive”unsupported format” error message. Converting to a YouTube-friendly format resolves playback issues.
-
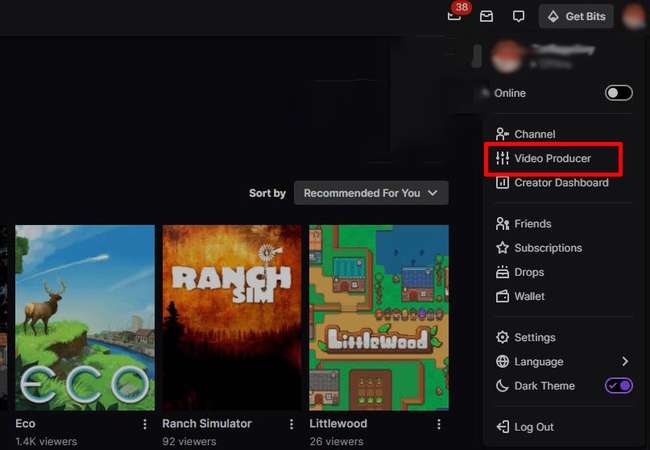
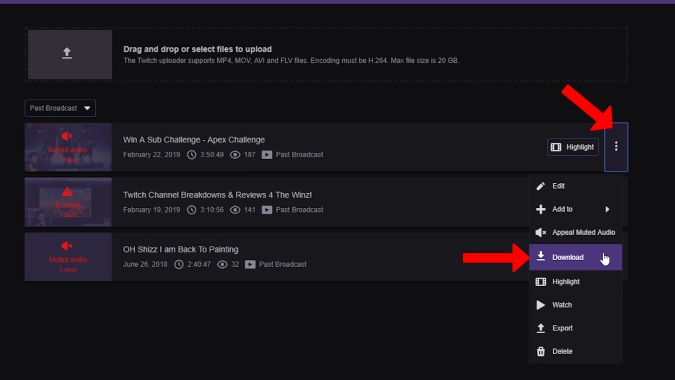
Download your Twitch video from the “Creator Dashboard” > “Content” > “Video Producer”.
-
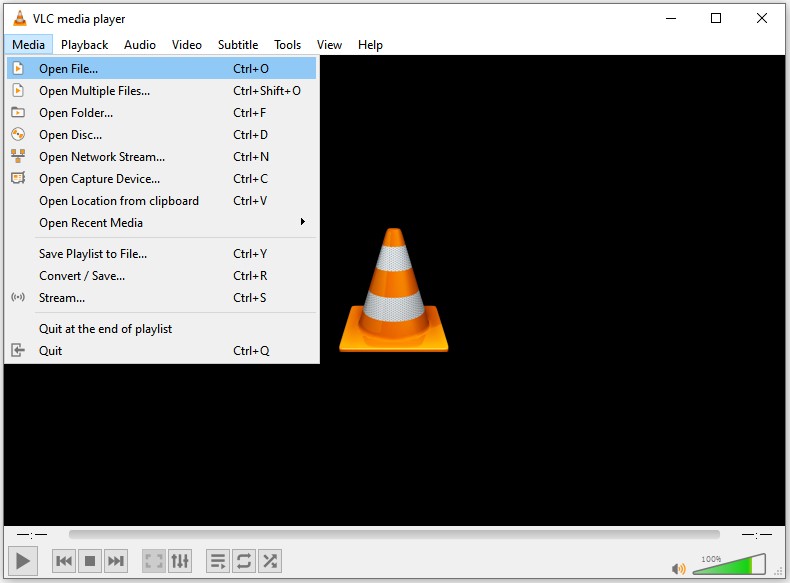
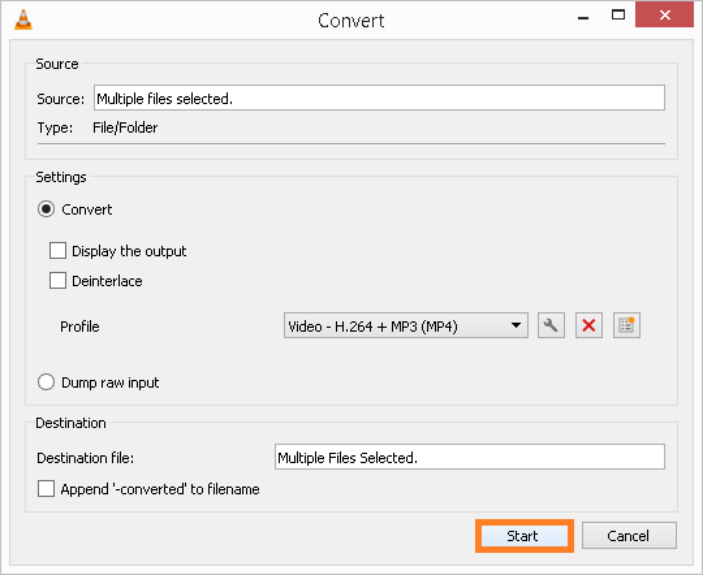
Use a converter like HandBrake (handbrake.fr) or VLC Media Player (from “Media” > “Convert/Save”).
-
Import the video and select MP4 with H.264 codec and 1080p resolution.

Save the converted file and upload it manually to YouTube.
Test playback to confirm compatibility.
3. Export Fewer Than 10 Videos at a Time
Usually, Twitch limits simultaneous exports to YouTube to 10 videos to prevent server overload. Exceeding this can cause the Twitch export doing nothing or failed uploads.
-
Go to “Creator Dashboard” > “Content” > “Video Producer”.

-
Check your export queue for pending videos (visible under “Export Status”).
-
If 10 videos are queued, wait for some to complete or cancel unnecessary exports.
Select a new video and click “Export to YouTube”.
Monitor the export progress and retry if it fails.
4. Reduce Video File Size or Bitrate
Large VODs (especially over 10GB or several hours long) may fail to upload to YouTube due to processing time or bitrate issues, which cause Twitch export to do nothing. Adjusting settings ensures compatibility.
-
In Twitch Studio or your streaming software, set resolution to 1080p or lower and bitrate to 6000 Kbps or less.
-
Download the video from Video Producer and check its size (YouTube’s limit is 128 GB or 12 hours).

-
If oversized, use HandBrake to compress the video (select MP4, reduce bitrate to 5000 Kbps).
Re-export or upload the compressed video to YouTube.
Verify successful export in YouTube Studio.
How to Improve YouTube Video Quality Upload/Download [Tested]
5. Access YouTube Advanced Features and Complete Verification
Unverified YouTube accounts may not support features required to process Twitch VOD exports and can only upload 15-minute videos, blocking most stream exports. When exports fail for videos longer than 15 minutes, or you get the upload limit exceeded messages.
-
Go to youtube.com/verify to complete account verification (phone number and email) if not already done.
-
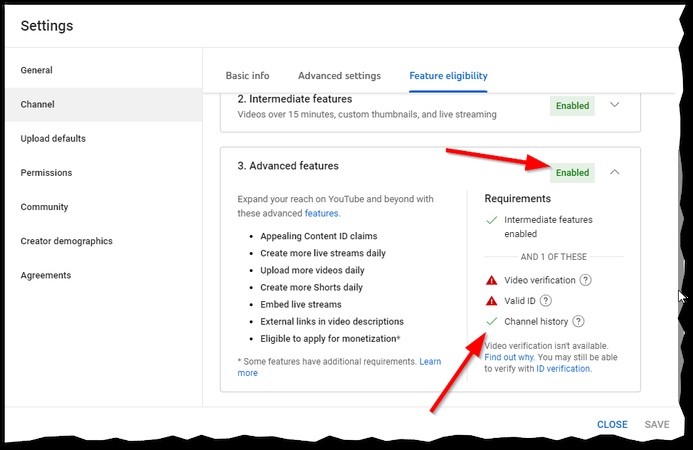
Once verified, log in to YouTube Studio and go to “Settings” > “Channel” > “Feature Eligibility”.
-
Enable “Advanced Features” (e.g., uploads longer than 15 minutes) if prompted.
-
Return to Twitch’s Creator Dashboard and retry exporting the video.
-
Check YouTube Studio for upload status.

6. Upload Twitch Videos Manually to YouTube
Manual uploading bypasses Twitch's export system entirely, eliminating platform-specific bugs. When all automated export methods fail, or for important content that must be preserved.
-
Go to “Creator Dashboard” > “Content” > “Video Producer” and download your video.
-
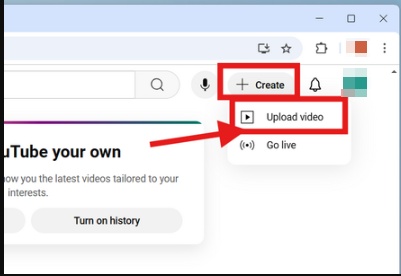
Log in to YouTube Studio and click “Create” > “Upload Videos”.

-
Upload the downloaded MP4 file and add title, description, and tags.
Wait for YouTube to process the video and check for errors.
7. Enable VODs in Twitch Creator Dashboard
VOD functionality must be enabled for exports to work. Without it, Twitch deletes recordings automatically. When export options don't appear or you can't find past broadcasts to export.
-
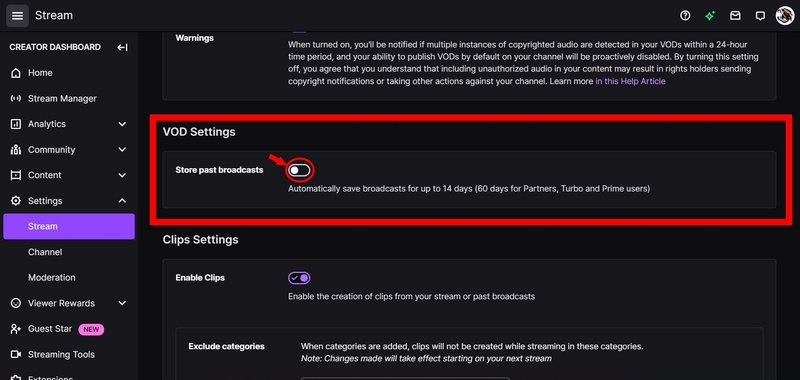
Log in to Twitch Creator Dashboard > Settings > Stream.
-
Under VOD Settings, enable “Store past broadcasts”.

-
Set the storage duration (e.g., 14 days for Affiliates, 60 days for Partners).
-
Stream or upload a video, then go to “Content” > “Video Producer” to export.
Verify the export in YouTube Studio.
Part 3. How to Export Videos from Twitch to YouTube Correctly
Once you've resolved any technical issues from Part 2, follow this streamlined process to successfully export your Twitch content to YouTube. This step-by-step guide ensures optimal results and helps you avoid common pitfalls during the export process.
-
Enable VODs: In Twitch Creator Dashboard > “Settings” > “Stream”, turn on Store past broadcasts to save your streams as VODs.
-
Locate Your Video: Go to “Content” > “Video Producer”, find the desired video, and ensure it’s not expired (check storage duration).
-
Link YouTube Account: Navigate to “Settings” > “Connections”, connect your YouTube account, and verify permissions.
-
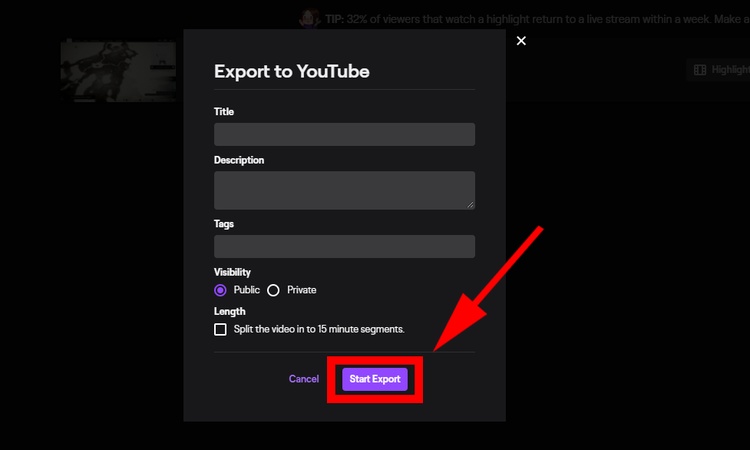
Start Export: In Video Producer, select the video, click the three dots, and choose “Export to YouTube”.

-
Customize Export Settings: Add a title, description, tags, and privacy settings (e.g., Public, Unlisted) in the export window.
-
Monitor Progress: Check the export status in Video Producer. If stuck, ensure fewer than 10 videos are queued.
-
Verify on YouTube: Log in to YouTube Studio to confirm the video uploaded and processed correctly.
Bonus: How to Fix Corrupted Videos Exported from Twitch
Sometimes, Twitch videos fail to export to YouTube due to file corruption caused by software crashes, unstable internet, or faulty storage. 4DDiG Video Repair is a professional tool designed to fix corrupted Twitch videos, ensuring they play and upload smoothly. With a 4.8/5 rating and over 3 million downloads, it batch repairs corrupted MP4, MOV, and other popular formats affected by compression errors, incomplete exports, or index issues with a high success rate.
Secure Download
Secure Download
-
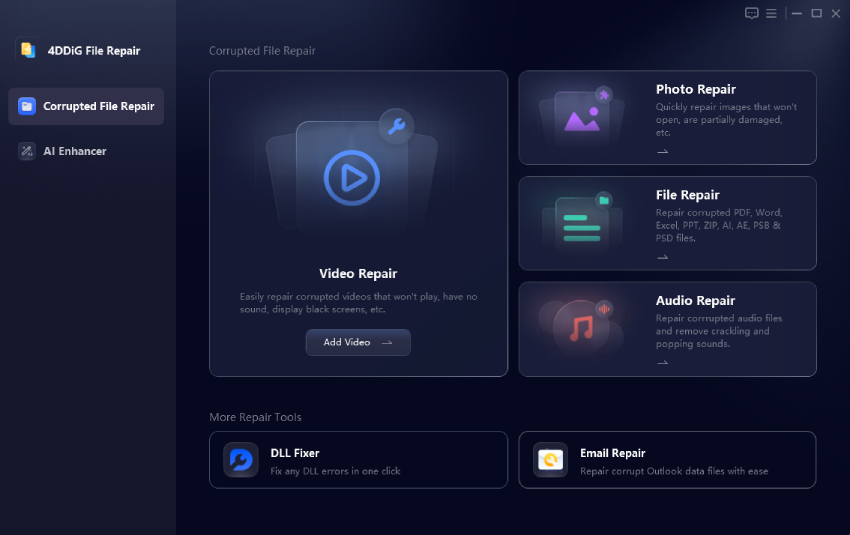
On the home screen of 4DDiG File Repair, choose the left “Corrupted File Repair” tab and click on “Video Repair”.

-
Upload the corrupted Twitch videos from the download folder to 4DDiG through the “Add Videos” button or drag them directly.

-
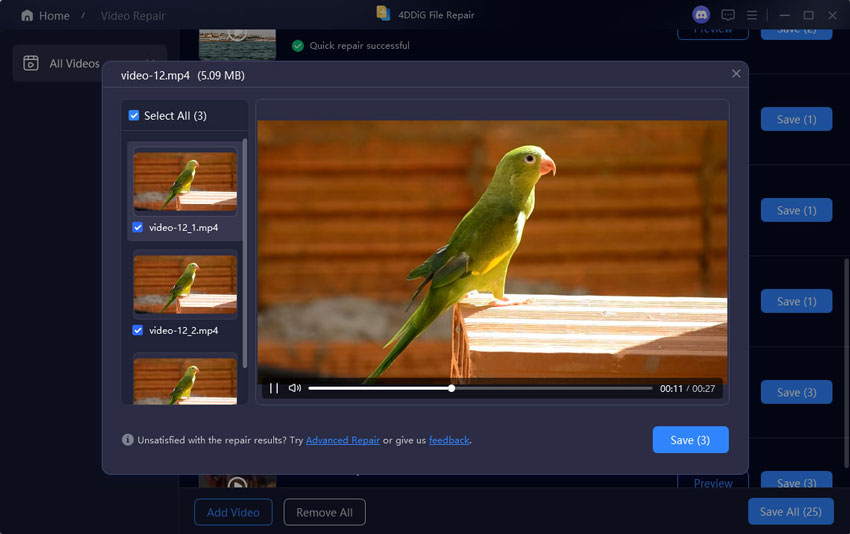
When uploaded, hit the bottom-right “Repair All” button to quick repair those Twitch downloaded videos in batch. You can also use the “Advanced Repair” feature to imporve success rates.

-
Once fixed, check the video playback result and export it for uploading to YouTuve via the “Preview” and “Save All” buttons.

Conclusion
Dealing with Twitch videos not exporting to YouTube can disrupt your content-sharing workflow, but our guide offers 7 effective solutions to tackle issues like stuck exports, corrupted files, or compatibility errors. From relinking accounts to using 4DDiG File Repair for damaged videos, you can restore seamless uploads. Follow our steps to export correctly and prevent future failures.
Secure Download
Secure Download


 ChatGPT
 Perplexity
 Google AI Mode
 Grok
Grok

