How to Fix Twitch Stream Lagging/Buffering - 9 Fixes in 2026
Experiencing Twitch lagging or buffering issues? Download 4DDiG Video Repair to get a smooth and uniterrupted viewing experience ASAP!
Twitch is the most popular video streaming platform in the gaming community, with over 140 million monthly active users. While gamers use the platform to live stream their gameplay, viewers and streamers often complain about Twitch lagging and buffering issues. These problems disrupt the viewing experience and can decrease viewer retention, making them a top priority for Twitch users to address.
Luckily, we’ve found eight effective fixes and will guide you through each fix to help you resolve lagging and buffering. Whether you’re a Twitch streamer or viewer, these solutions will ensure a smooth, uninterrupted streaming experience. So keep reading till the end.
Part 1. Why Is My Twitch Stream Lagging/Buffering?
You might be wondering how Twitch, being such a popular platform, can lag so often or buffer for so long. Here are the possible reasons why Twitch stream lagging or buffering.
- Your internet connection is slow and unstable.
- Some browser extensions are interrupting smooth streaming.
- The streaming video quality is too high for smooth buffering.
- Twitch stream settings are not fully optimized.
- Background running apps are interrupting streaming.
- Your computer’s CPU or GPU is overloaded.
Apart from these, the presence of malware, browser cache malfunctioning, and hardware acceleration interruptions may also lead to Twitch lagging and buffering.
Part 2. How to Fix Twitch Stream Lagging? (for Streamers)
Providing a gameplay streaming experience with no lags or jitters for viewers is essential if streamers want to keep their audience engaged and maintain a loyal following. If you are a streamer who finds your stream is laggy or buffered, here are certain steps you can take to fix the issue.
Way 1. Check Your Internet Speed
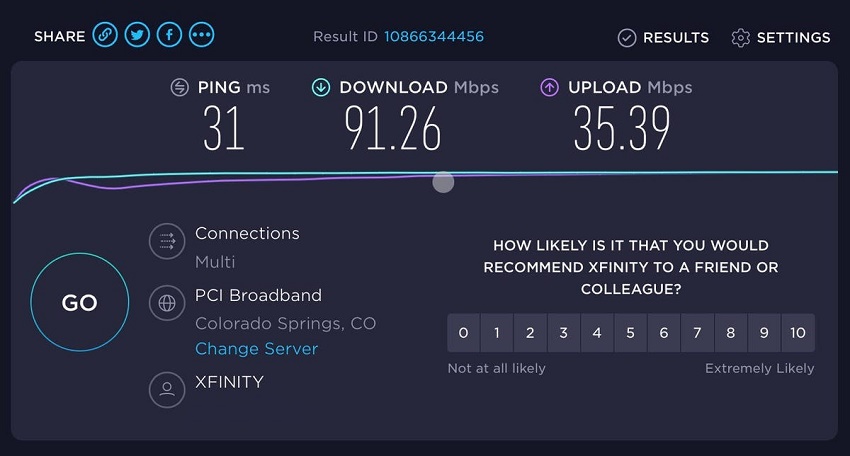
Live streaming requires a fast and stable internet connection to ensure smooth and uninterrupted broadcasts. Twitch recommends a minimum bitrate of 6 Mbps for 1080p (HD) with 60 fps, and 4.5 Mbps for 720p with 60 fps. But if you want to give your fans the streaming experience they expect from a professional gamer, you should guarantee speeds of at least 12 Mbps for broadcasts of 1080p 60 frames, and 6-8 Mbps for 720p broadcasts.
So when you’re experiencing Twitch lagging, check the internet speed for live streaming by visiting Speedtest by Ookla. If it is lower than recommended, restart your router, use a wired Ethernet connection instead of Wi-Fi, and ensure that no other devices are using a lot of bandwidth.
Way 2. Enable Low Latency Mode on Twitch
Twitch has had the Low Latency mode that shortens the time it takes for a live stream to reach viewers from the streamer. This feature helps streamers deduce the delay on the Twitch stream.
Here are steps to enable the Low Latency mode and fix Twitch stream lagging for viewers:
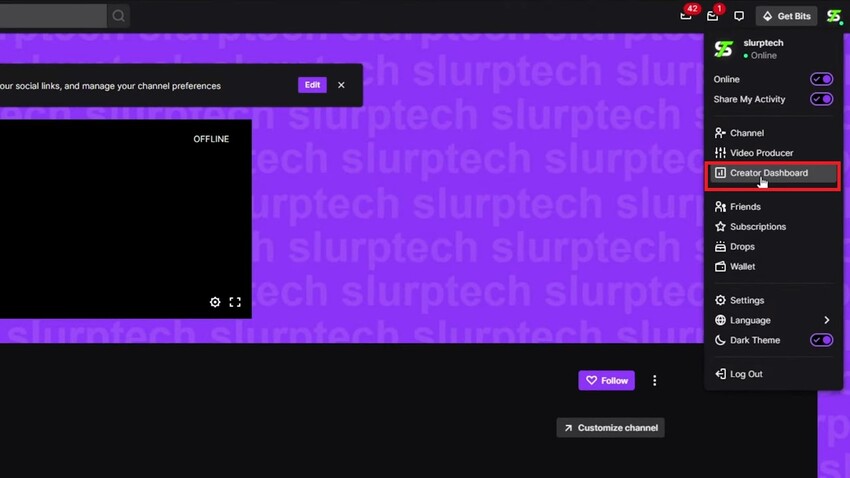
- Open the Twitch website and click on your Profile icon at the top-right corner.
-
Select the Creator Dashboard option from the menu.

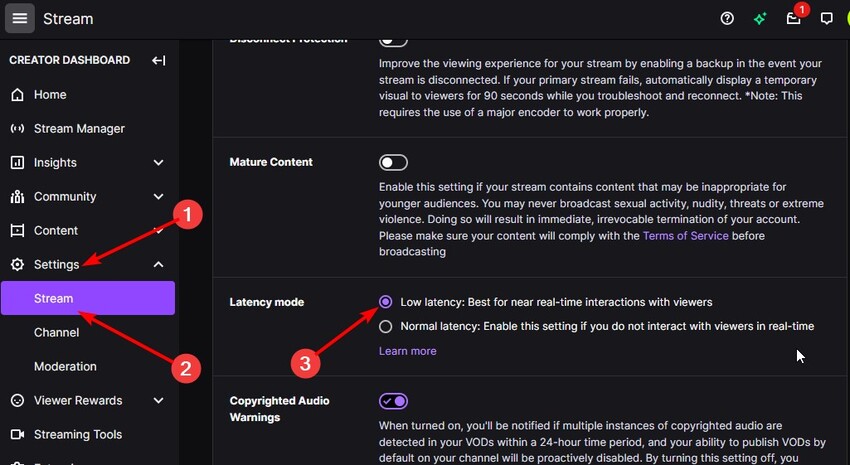
- Expand the Settings option on the left menu. Select the Stream option.
-
Go to the Latency Mode section and select the Low Latency option.

Way 3. Optimize Your Streaming Settings
When the bitrate for live streaming exceeds your bandwidth or the stream resolution is high, it leads to Twitch lagging or buffering problems. Hence, consider optimizing the streaming settings, including adjusting your bitrate, resolution and FPS values, to fix your laggy steam.
Here are the steps on how to fix lag on Twitch stream by changing your output settings.
For OBS Users:
-
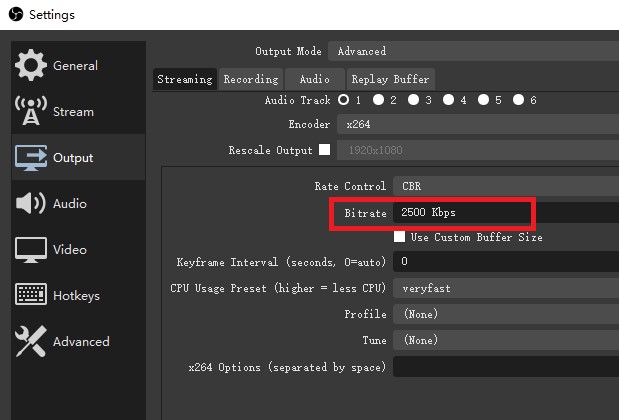
Lower Streaming Bitrate: Open OBS, and navigate to Settings > Output > Streaming > Bitrate. Reduce the bitrate to 2500 Kbps or lower.

-
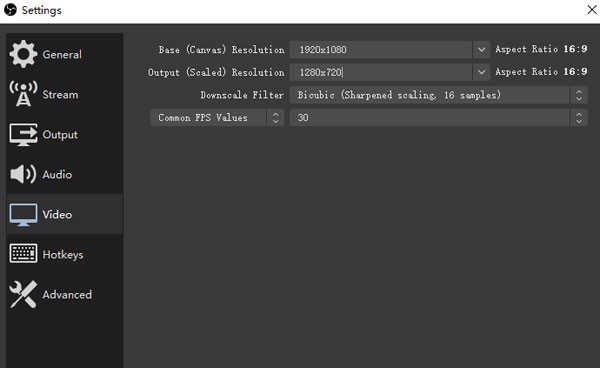
Lower Streaming Resolution: Navigate to Settings > Video. Set all Resolutions to 1280 x 720 including the “Base (Canvas) Resolution” and “Output (Scaled) Resolution.”

- Lower Frame Rate: Navigate to Settings> Video> Common FPS Value. Reduce the value from 60 fps to 30 fps to lower the burden on the network for smoother streaming.
For Twitch Users:
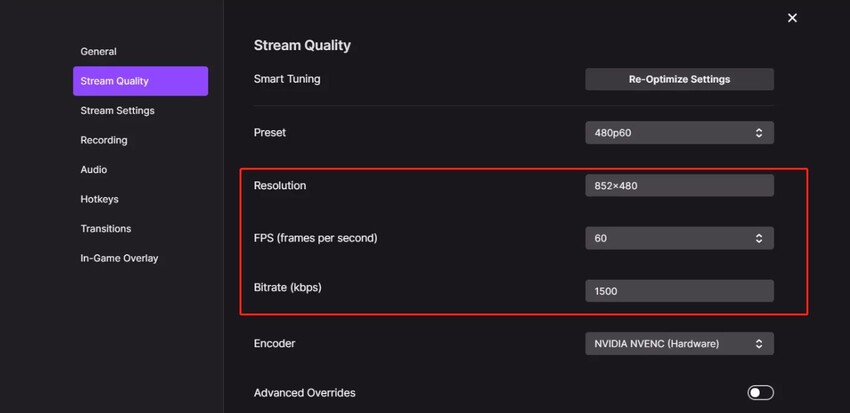
Go to Settings > Stream Quality. Set the resolution to 1280×720 or lower. Set the FPS to 60 or lower. Set the bitrate to 2800 or lower.
Go to Settings > Stream Quality and set the resolution to 1280×720 or lower. Then adjust the FPS to 60 or lower and set the bitrate to 2800 or lower for better streaming performance.
Part 3. How to Fix Twitch Lagging or Buffering (for Viewers)?
If you are watching Twitch streams and they are lagging or buffering at times, there are several steps you can take to get a smooth and buffer-free experience. Let’s get more into that below.
Way 1. Check Your Internet Connection
More often than not, your internet connection is the culprit behind online video streaming issues. Your internet speed could be slow, or the connection could be fluctuating. You can visit SpeedTest to find out if your internet speed is normal as usual.
You should restart your router and modem to reset the internet connection and fix internal glitches. Moreover, you should disconnect other devices from your Wi-Fi connection to boost speed and bandwidth. Sometimes, restarting the computer and revisiting the Twitch stream can fix lagging and buffering issues automatically.
Way 2. Lower the Stream Quality
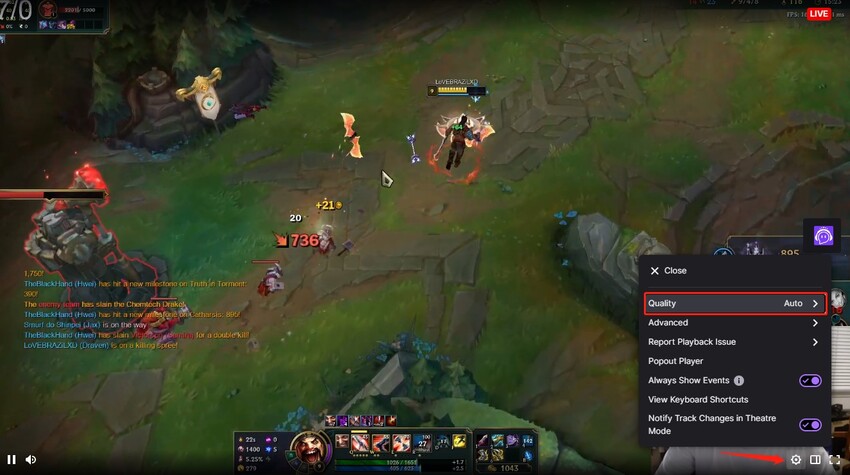
If you are watching Twitch streams at high resolution, the streams will need high internet speed and bandwidth. If your internet connection is not up to par, you will encounter lagging on Twitch. In such cases, you should lower the stream quality, and here are the steps to follow.
- On your web browser, open the Twitch stream that you want to watch.
- Click on the Gear icon that you will find at the bottom-right corner of the player.
-
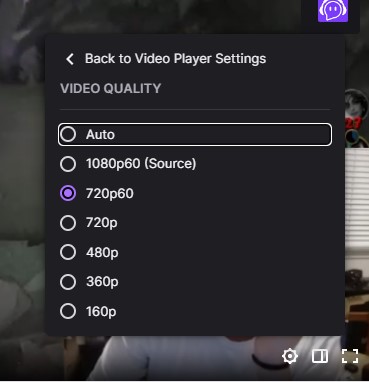
Click on the Quality option, which is set to Auto by default.

-
Select a low-resolution option, such as 720P, from the menu.

If internet speed is the culprit, this should fix the problem. If not, you should try out the following solutions.
Way 3. Disable Browser Extensions
When you have too many browser extensions installed, they can interrupt video streaming by taking up internet bandwidth and occupying CPU power. That is why, when you are facing Twitch lagging issues, you should disable all the browser extensions.
Here are the steps to disable browser extensions in Chrome.
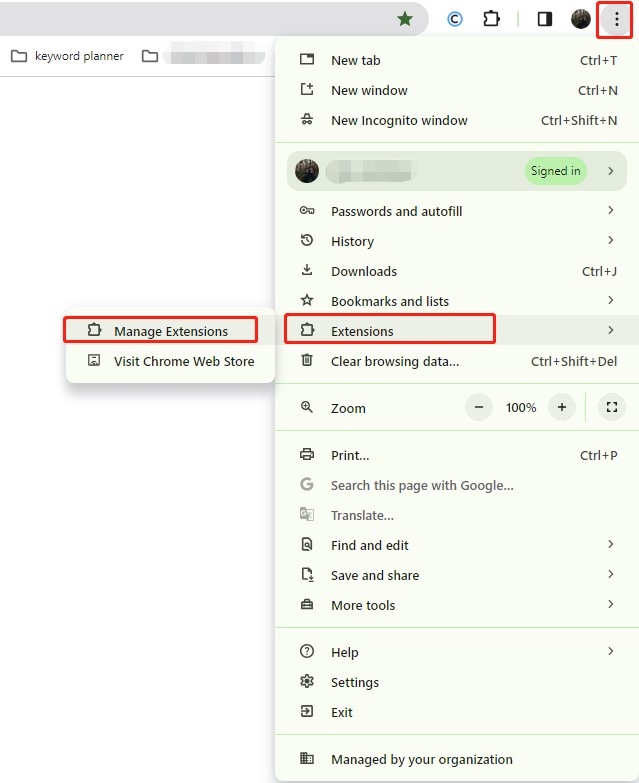
- Open the Chrome browser and click on the three-dot icon located at the top-right corner.
-
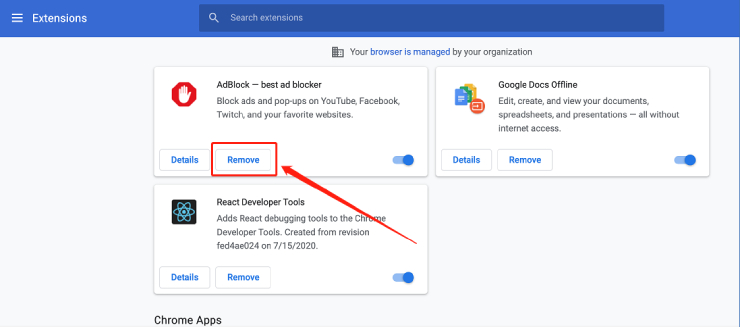
Go to Extensions> Manage Extensions. You will see a list of all the installed extensions.

-
You need to toggle off the active browsers so that they get disabled.

- Restart the Chrome browser and open the Twitch stream again.
If the problem is solved, you can turn on browser extensions one by one and spot those browser extensions that are causing the issue.
Way 4. Disable Graphics Acceleration
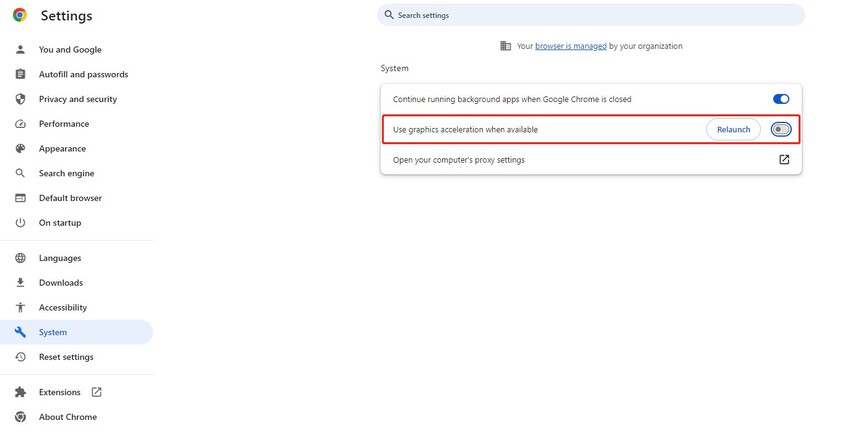
Enabling graphics acceleration can make the browser use the GPU alongside the CPU for better performance, which is generally beneficial for most tasks. However, you might experience problems with graphics acceleration, such as Twitch lagging, buffering or other unexpected behavior.
To resolve this, turn off the graphics acceleration option in Chrome so that the GPU frees up to play Twitch streams smoothly. Here are the steps to follow.
- Open Google Chrome and click the three-dot icon at the top-right corner.
- Click on the Settings option from the menu.
- In the Settings window, click the System option from the left menu.
-
Toggle off the Use graphics acceleration when available option.

Restart the browser and play the Twitch stream now.
Way 5. Use Another Web Browser
Chrome users face the Twitch lagging and buffering issue more often. If you use Chrome and the above solutions are not working out for you, you should consider using another web browser. For example, you can use Mozilla Firefox or Microsoft Edge instead of Chrome to see if the Twitch streams are playing smoothly.
Way 6. Close Unnecessary Applications
Just like browser extensions, applications running in the background can cause problems while playing Twitch streams. This is because they may occupy memory and processing power unnecessarily. If your computer is running many programs at the same time, it might not have the capacity to stream video flawlessly. So if you are having lagging or buffering issues with Twitch, close any unnecessary applications running in the background to free up memory space and CPU power. This will ensure that Twitch streams play smoothly even in high-quality resolution.
Bonus Tip: How to Fix Video Lagging or Buffering?
If you have downloaded any Twitch video clips but, while playing, they are lagging or taking too much time for buffering, the clips are likely damaged. You can fix such lagging and buffering video clips with a professional video repairer. We recommend 4DDiG Video Repair which can repair any lagging, buffering, or choppy video clip instantly. Here are the key features of 4DDiG Video Repair.
- Repairs jerky, choppy, laggy, and even unplayable video files.
- Supports a wide range of video file formats.
- Supports different types of storage devices.
- Fast repair speed and high repair success rate.
- Preview the repaired video files before exporting.
- Intuitive user interface for easy operation.
- Available for Windows and macOS users.
Here are the steps to fix corrupted videos via 4DDiG Video Repair.
-
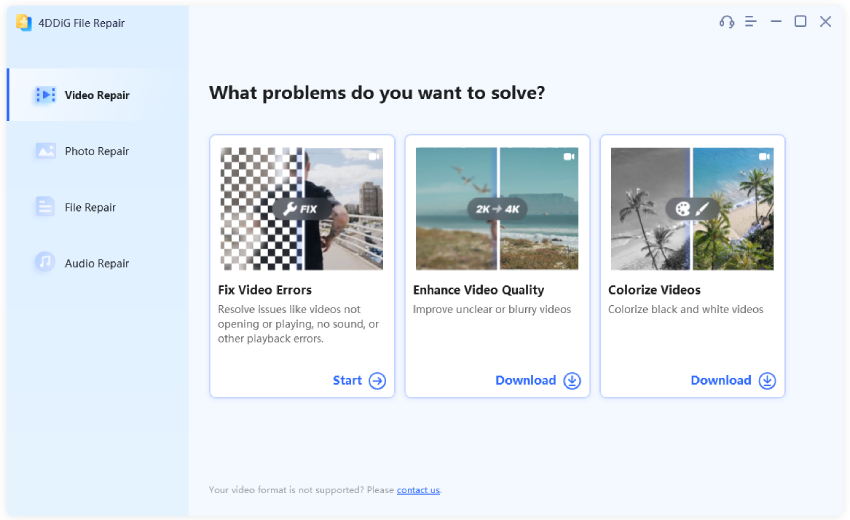
Download and install 4DDiG Video Repair. Launch the application, and under the Video Repair option, navigate to the Fix Video Errors section. Click the Start icon.
FREE DOWNLOADSecure Download
FREE DOWNLOADSecure Download

-
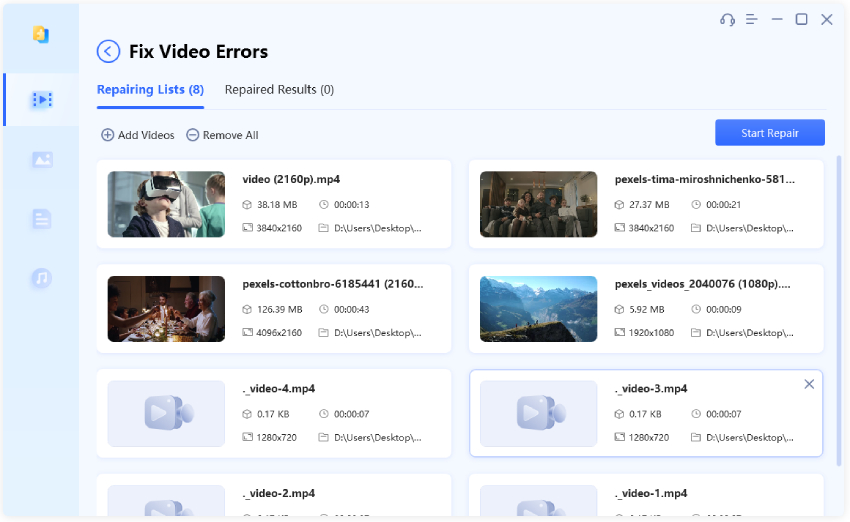
Click the Add Videos button and select the laggy video files from your storage device. Then click the Start Repair button and wait patiently.

-
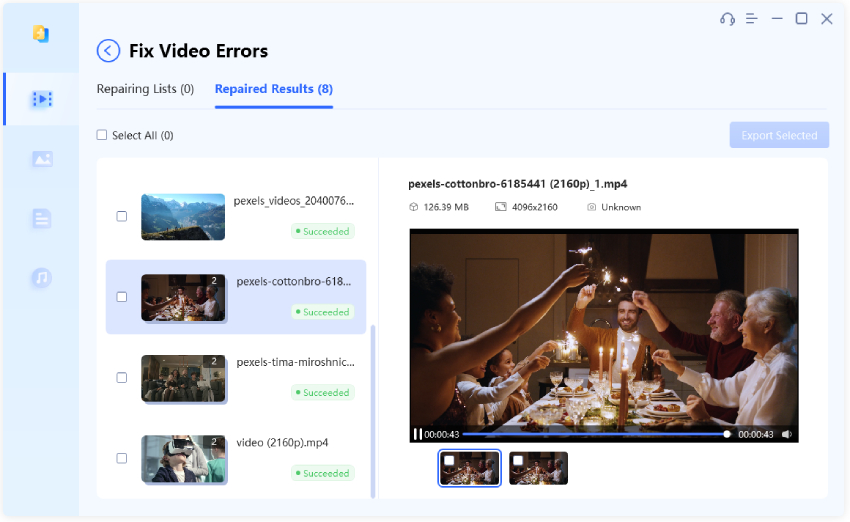
After the repair process is over, you can review the repaired files and save them on your storage device.

Summary
As a Twitch user, nothing is more frustrating than encountering Twitch lagging and buffering issues during live streaming. However, with the solutions outlined here, you can greatly reduce these issues and improve your streaming or viewing experience. Moreover, if you have any lagging or buffering video files, you can use 4DDiG Video Repair to fix the files instantly.
Secure
Download
Secure
Download
💡 Summarize with AI:
You May Also Like
- Home >>
- Video Tips >>
- How to Fix Twitch Stream Lagging/Buffering - 9 Fixes in 2026
 ChatGPT
 Perplexity
 Google AI Mode
 Grok
Grok

