How to Fix It Looks Like You Don't Have Permission to Save Changes to This File
Struggling with 'You Don't Have Permission to Save Changes to This File' error? Learn effective fixes and safeguard your data with 4DDiG Data Recovery.
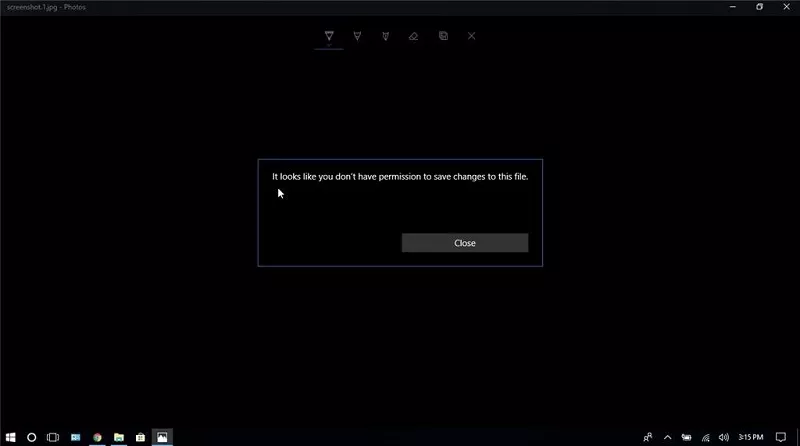
"When I try to save an edited photo (literally all I did was just crop it a bit) I get this error message. It exactly says Try saving a copy instead. It looks as though you don't have permission to save changes to this file."
-From Microsoft forums
This is one of the most commonly asked questions on the Microsoft community from the windows 10 users. Well, it is frustrating to see this messenger after all the time you would have put into creating something great! So in this article, we shall discuss why this error occurs and how we can get rid of the same.
Let’s get straight into understanding why you would come across the message “it looks like you don't have permission to save changes to this file”. Once we understand that, then we can work on the solution. This error pops up when you try to edit a picture on your windows device. The message is quite self-explanatory. But many times, it is seen that even when you have all the permissions required to edit an image, you still get the message you don't have permission to save in this location in windows 10. This can be really annoying. The reason for this message is that when you try editing an image that was previously stored in another drive or one drive, the image gets blocked when you try to open it elsewhere. Now that we know why the message “it looks like you don't have permission to view this file” pops up, let us learn how to make it go away!
Part 1: How Do You Fix You Don't Have Permission to Save Changes to This File
To make the message “it looks like you don't have permissions to save changes to this file” disappear, we have suggested a few successful methods followed by co Microsoft users.
Secure Download
Secure Download
1. Unblock the Picture
When you try to move a photo from a drive or one drive to another location, sometimes the properties of the image are such that you get the pop up in Windows 10 you don't have permission to save in this location. In such a scenario you can follow the below steps to resolve the issue.
- Go to the file location of your image.
-
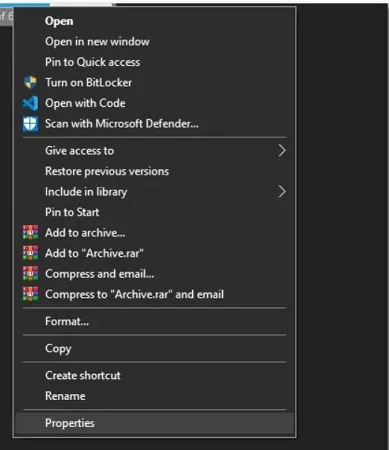
Right-click on the image and select “Properties” from the dropdown.

-
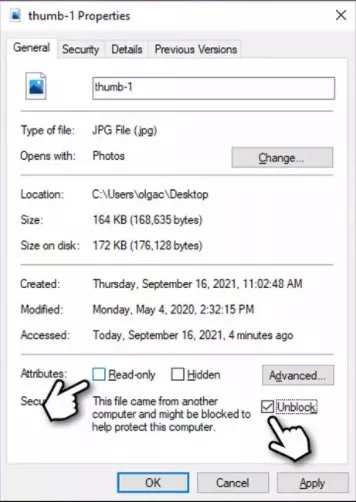
Here, in the “General” tab, you will see the message “This file came from another computer and might be blocked to help protect this computer” at the bottom. There will be a checkbox next to it that reads “unblock”. Make sure you uncheck this box.

- You should also uncheck the box that reads “read-only”. Once you have done this you can click “Apply” and then hit “Ok”.
- This will solve the issue of not being to save the image you edited and the message “try saving a copy instead” will no longer appear.
2. Run The Photo Editing Software as an Administrator
Another popular method that has worked for many users when the message “it looks like you don't have permission to save changes to this file” pops up is by running the photo editing software as an administrator. To do this follow the below steps:
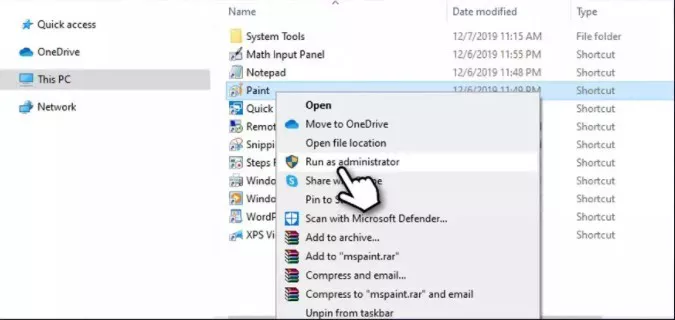
- Locate your photo editing application and right-click on it.
- You will see an option “run as administrator”.
- Click “Yes” when the UAC dialogue box pops up.
-
After this, the message it looks like you don't have permission to save changes to this file should no longer be popping up.

3. Save the Picture to a Different Folder
Sometimes this simple approach of saving the picture to a different folder than the one where the original image was seems to work fine. Try this simple approach first when you see the message “try saving a copy instead”. Your issue might be solved in seconds!
4. Run the SFC Command in CMD
A corrupted system file could also be causing the message “it looks like you don't have permissions to save changes to this file” to pop up. Here’s how you rectify it:
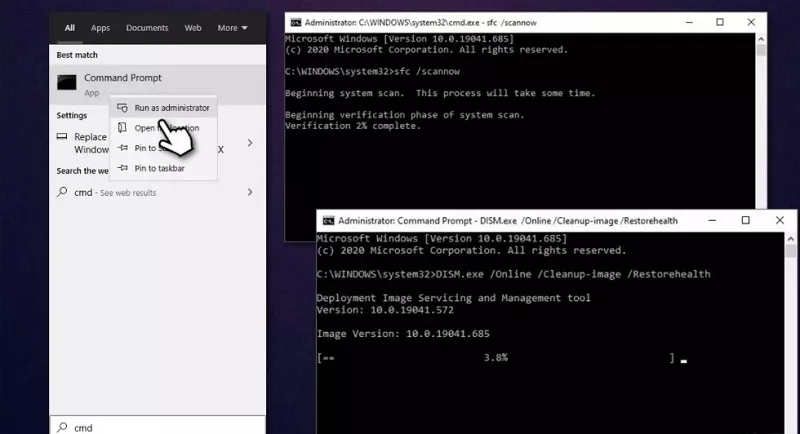
- Type “CMD” in the windows search.
- Right-click on the Command Prompt option and select “Run as administrator”.
- When the UAC box pops up, click “Yes”.
-
Type the following commands in the new window and press enter after each command:
- i. sfc /scannow
- ii. DISM /Online /Cleanup-Image /CheckHealth
- iii. DISM /Online /Cleanup-Image /ScanHealth
- iv. DISM /Online /Cleanup-Image /RestoreHealth

5. Reset Windows Photos APP
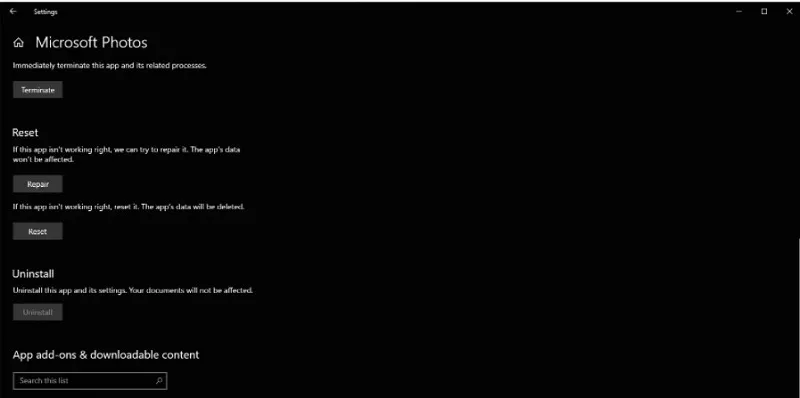
If none of the above methods seems to work for you, then it is time to repair the photos application on your windows system. This is a self-run process that will look for any problems and fix them. If this fails, then you can reset the photos application. It essential means reinstalling the application. Here are the steps to follow:
- Open “Windows setting” by using the windows +I key.
- Here click on “Apps”.
- On the Apps screen search for the “Microsoft Photos” App using the search bar.
- In the Photo app screen, click on the “Advanced options” .
- Scroll down and you will locate the options “Repair” and “Reset”.
-
Try them one at a time and check if the issue is resolved!

Part 2: Recover Lost Photos in Windows
Now comes the important part where we will talk about photos recovery. Have you ever come across lost photos scenarios and not being able to restore from Recycle bin? Well, the moment is indeed disheartening. That’s why, the most recommended thing to do in such case is to use Tenorshare 4DDiG Windows Data Recovery. This tool has highest recovery rate and can recovery more than 1000 file types from your PC, as well as Mac computer.
Here’s how you can use this software to recover your favorite photos.
-
Select the Local Disk
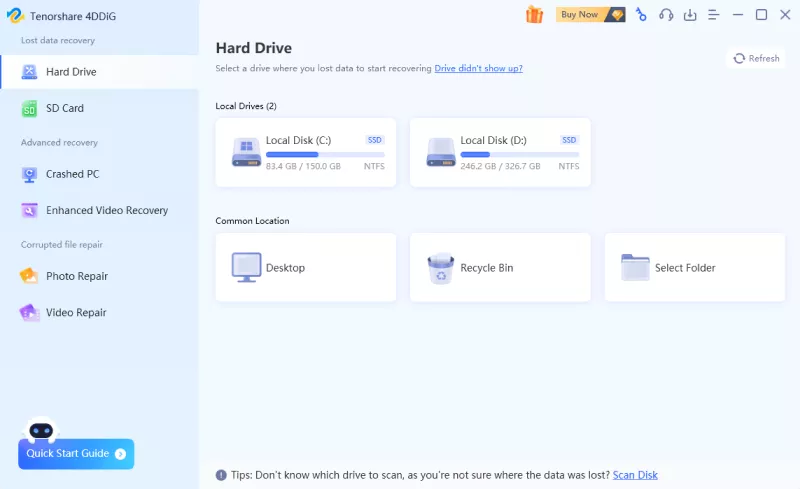
Once you download and install Tenorshare 4DDiG Windows Data Recovery the home interface will be as seen below. Here selects the drive from where you want to recover your photos and click “Scan” to proceed.
FREE DOWNLOADSecure Download
FREE DOWNLOADSecure Download

-
Scan the Photos
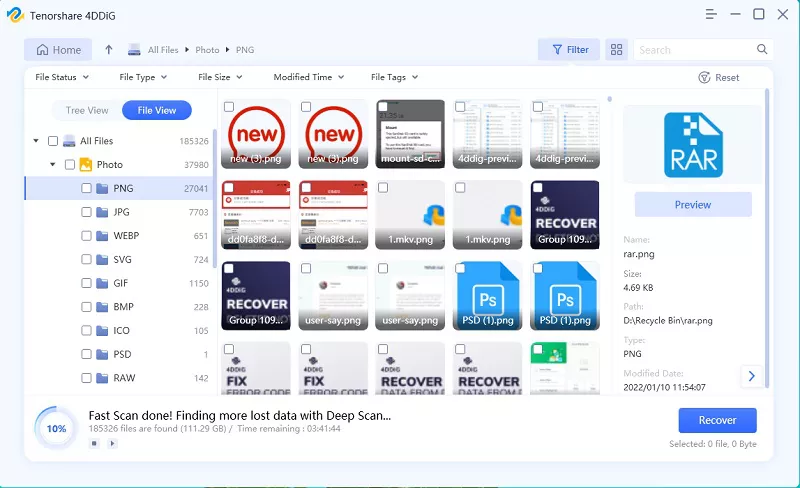
Once the scan starts, you will find that many files start to appear such as deleted files, Existing files and so on. You can stop when you locate the files that you were trying to find.

-
Preview and Recover Photoss from the Local Disk
You can filter and locate the photos you need. Double click a photo will bring the preview window. Choose the photo(s) you need and click the Recover button. In the pop up save window, please choose a new location instead of the original hard drive where the photos located before to save them.

The Bottom Line
Photo editing is a time-consuming process and getting the message "it looks like you don't have permission to save changes to this file" at the end when you are trying to save your work can be annoying. But not to worry anymore! You have now acquired the skills required to resolve the issue if it has to show up again! If you accidentally deleted or lost a photo due to the error message or other possible reasons, we recommend you to choose reliable photo recovery software like Tenorshare 4DDiG.
💡 Summarize with AI:
You May Also Like
- Home >>
- Windows Fix >>
- How to Fix It Looks Like You Don't Have Permission to Save Changes to This File

 ChatGPT
 Perplexity
 Google AI Mode
 Grok
Grok

