Temporary files are necessary for your PC system to run smoothly. But with continuous computer use, they can accumulate over time swallowing up precious disk space. To make more room in the drive, it is vital to delete temporary files in Windows 10. However, if you have accidentally deleted some important temp files, don't panic. It's possible to restore them. In this article, you'll learn how to recover deleted temp files in Windows 10 in three reliable ways. So, keep reading.
Part 1: Can Temp Files Be Recovered?
The good news is: yes! It's possible to recover deleted temp files. When you delete a temporary file, it is moved to the Recycle bin. You can restore it from the bin if required. But if you've emptied the trash, it means they are permanently deleted, and you can't retrieve them from the recycle bin. However, being permanently deleted doesn't mean they are permanently gone. They are just hidden from view, and you can use specialty data recovery software to get them them to your computer.
Also, you can recover temp files from File History, provided that you've set this feature on your computer. The success of your file recovery will depend on how long the temp file was deleted and whether new data has overwritten the vacated storage space.
Part 2: How to Recover Temporary Files in Windows
The methods we're going to talk about below should be followed in ascending order. That's because the first method is the most basic one, but also has the least chance of recovering your files for you. Contrarily, the last method has the highest chance of working, so it's the most advanced. Let's take a look at them now.
Method 1. Quickly Recover Temp Files via 4DDiG Data RecoveryHOT
4DDiG Data Recovery is an effective tool for recovering lost or deleted temporary files. It offers comprehensive scanning capabilities, supports a wide range of file types and storage devices, and provides a preview function to verify files before recovery. With its user-friendly interface and high success rate, 4DDiG is a reliable option for those seeking to restore valuable temporary data.
- Retrieve permanently deleted files from internal and external drives, Recycle Bin, SD cards, and USB drives.
- Retrieve 2000+ types of data, including temp, documents, audio, and video files.
- Restore deleted photos from SD Cards of digital cameras, virus-ridden storage devices, and formatted or hidden partitions.
- Recover formatted, hidden, corrupted, or accidentally deleted data.
- Offer two types of scanning modes to dig deeper for deleted temp files.
Here's how to recover temp files in Windows 10 using 4DDiG:
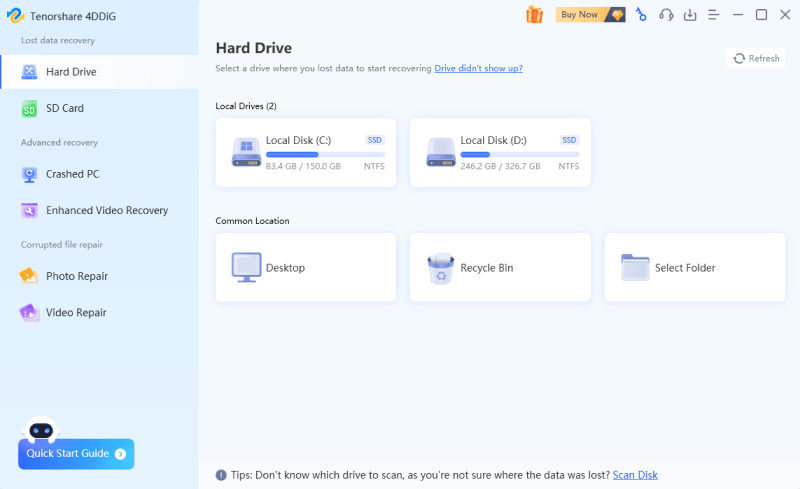
To restore temp files, start by installing and launching the 4DDiG tool on your PC. Choose the storage drive where you've accidentally deleted critical temp data.
FREE DOWNLOADFor PC
Secure Download
FREE DOWNLOADFor MAC
Secure Download

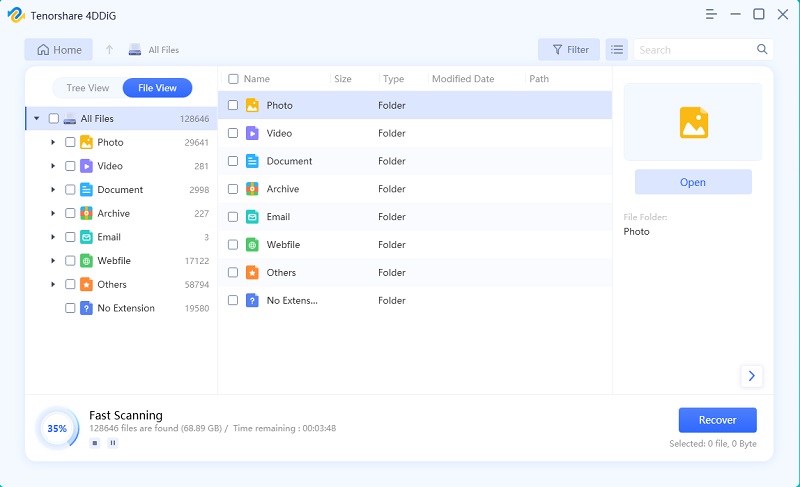
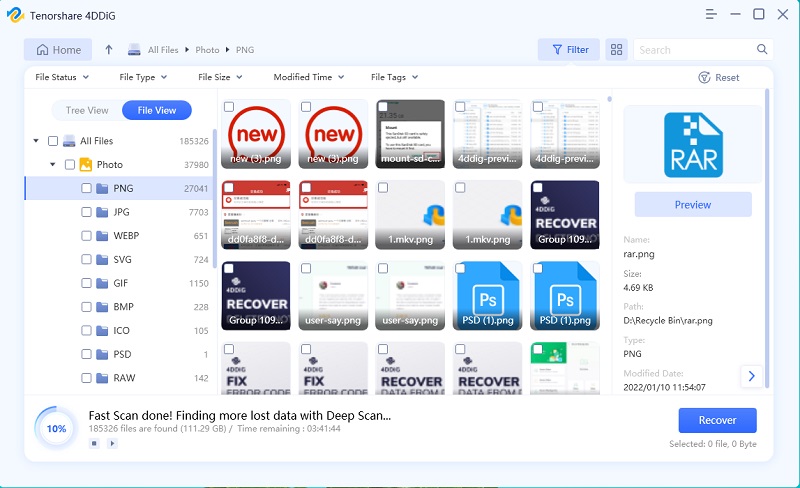
Once you've selected your target drive, press "Start." The tool will look for lost temp files. You can also pause the scan to switch between Tree and File View to look for file categories and details. Or use a filter to narrow your search for the temp files you wish to recover.

Once the scan is finished and you’ve recovered your targeted temp data, press "Recover." This will save the temp files to your desired location.

Method 2. Restore Temp Files from Recycle Bin
When it comes to "how to restore temp files?" the most basic thing to do is to check your computer's Recycle Bin. You see, whatever you delete from your computer moves into Recycle Bin. So long as you haven't emptied the Recycle Bin, there's still a chance you can recover your deleted temporary files.
Here's how to restore temp files from the trash:
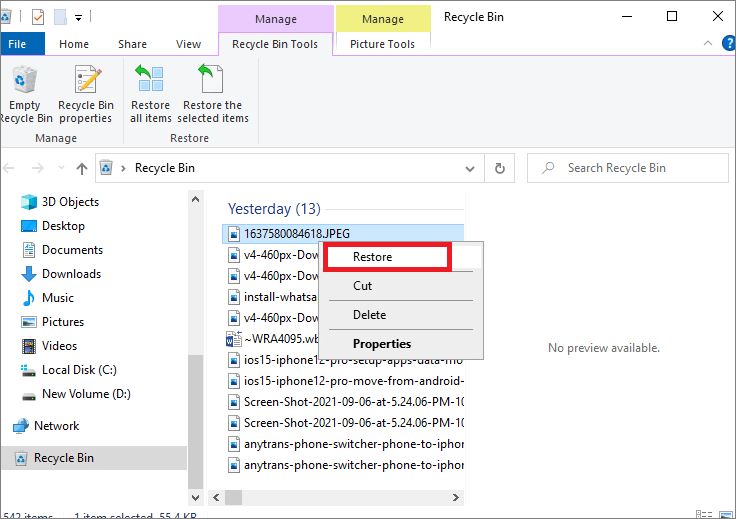
- Open the Recycle Bin on your computer.
- Search for the temp file you want to restore. You can sort the content using the file name, deleted date, size, and type filters.
Once you locate your target file, right-click on it. Choose "Restore."

The temp file will be restored to its original place. You can confirm its recovery by checking its original location on the drive.
The above steps to recover temp files will only work in case you haven't deleted them from the trash. If you've emptied the Recycle Bin, recovering temp files can be challenging. In this case, you can consider using specialized data recovery software for the best chance of restoration.
Method 3. Recover Deleted Temp Files in Windows 10 via File History
Are you still wondering how to recover deleted temporary files because you have emptied the trash bin? Windows has a feature called File History that allows backing up and recovering your data to and from a specific drive in your computer. If you had previously enabled File History and included your temp file folder in the backup, you can still recover them even if you think all hope is lost. But if you hadn't set this feature before, simply skip to the next method.
That said, here's how to recover deleted temporary files using this method.
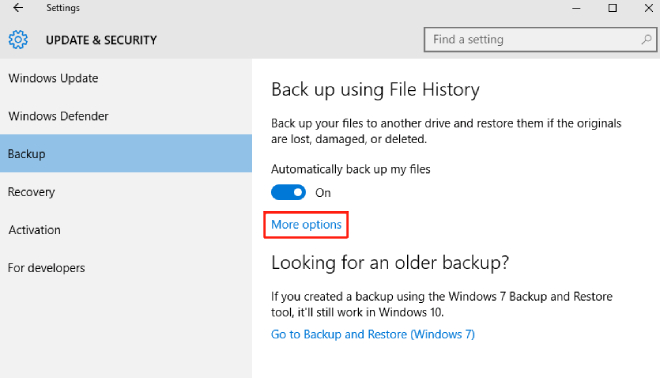
- Open Settings on your computer.
- Navigate to Update and Security.
From the left panel, choose Backup followed by More options.

If you had enabled File History, you should see an option saying, "Restore files from a current backup." Select the option.

- Sort through the temp data directories and choose to restore the files you want.
Hit the Restore button when the scan is complete, and you're good to go.

This method only works if you have File History enabled and configured to back up your temporary files folder. If File History is not enabled or if the folder is not included in the backup, you will not be able to recover the deleted temp files using this method.
Pro Tips to Handle Temp Files
To avoid losing temporary files that you may need, consider the following pro tips to handle your temp files, thus reducing the risk of deleting important data while freeing up disk space.
1. Create Regular Backups and Save FilesIn case of a system failure or accidental deletion of temporary files, a backup is crucial to restoring them. Therefore, make sure to create regular backups and save files on an external drive or cloud-based storage.
2. Check Temp Files for Unsaved WorkTemporary files are often created when you are running a task and haven't saved your work. If you exit a program without saving your original work, your temp file can contain the unsaved work. Checking temp files before deleting them will help you avoid losing valuable data.
3. Enable Storage SenseStorage sense is a built-in Windows 10 feature that deletes unnecessary files automatically to boost your system performance. Enabling it will help free up disk space and regularly optimize your computer's operations so it won't lag. Here's how to enable it.
- Open the Settings app and go to System > Storage > Storage Sense.
- Make sure the toggle for it is turned ON.
Final Words
Deleting temporary files in Windows 10 can help improve system performance and free up disk space. However, the results could be disastrous if you've deleted some critical temp files. Where you can easily recover temp files Windows 10 from the recycle bin, it's challenging to restore them if you've removed them from the trash. Also, remember to act quickly and follow the tips outlined above in the post to restore temp data successfully. Here, a specialty tool like Tenorshare 4DDiG Data Recovery can make all the difference in effective temp file recovery. It offers a high data restoration rate and can retrieve files from all kinds of internal and external drives in just three clicks.


 ChatGPT
 Perplexity
 Google AI Mode
 Grok
Grok
