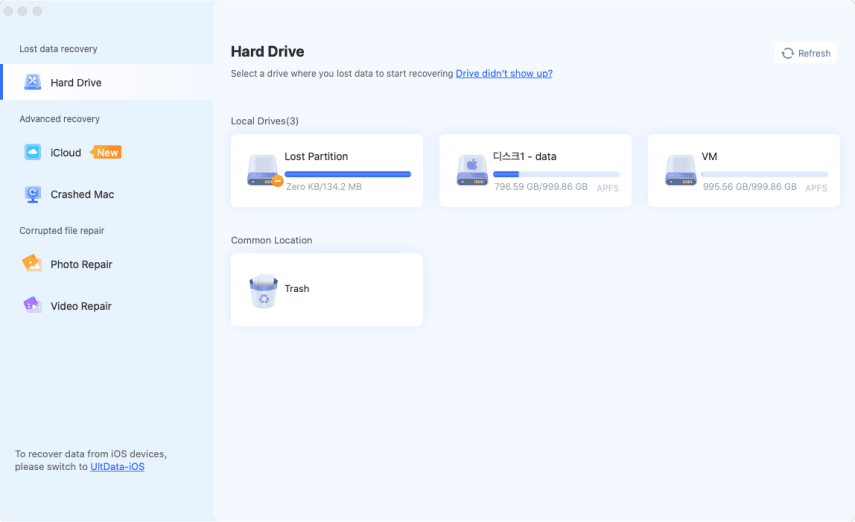
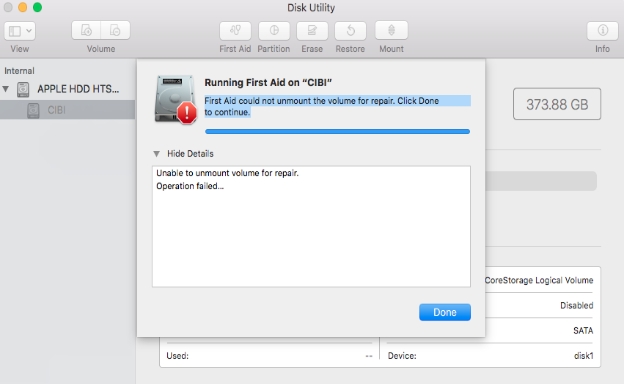
3 Best Ways to Fix Mount Failed with 71 Error

Download 4DDiG Windows Data Recovery to retrieve your deleted/lost and corrupted files due to mount failed with 71 error with just one-click process. Read on to learn more about fixing mount failed with 71 error.

5 mins read

Updated on 2025-02-25 18:38:34 to Windows Fix

Macs are known for their exceptionally reliability and super optimized macOS. However, just like everything in tech is prone to errors, and malfunctioning issues, Mac can also show error mount failed with 71 when connecting an external hard drive. In this situation, Mac recognizes and shows the external drive, but due to mounting issues it restricts the access to the data in the drive. While mount failed with 71 can be frustrating to experience, this guide explains the best methods to fix the mount failed with 71.

ntfs 3g

Part 1: What Cause the Mount Failed with 71 Error

When encountering the "mount failed with 71" error on a Mac, it typically indicates an issue with mounting external drives or network shares. Mac recognizes and shows the drive, but fails to access it. This error can triggered due to the several reasons:

  • Incorrect File System
    macOS primarily supports APFS and HFS+ file systems. Connecting a hard drive with any other file system will result in mounting errors. Ensure that your hard drive is using the correct file system to connect with Mac.
  • Missing or Corrupted File System
    A damaged file system on the disk or the volume can also create mounting issues when connecting to the Mac. This might happen due to power failures, software issues or problems within the disk. If true, it can lead to permanent data loss on the drive.
  • Permission Issues
    It's less frequent to occur, but incorrect permissions on the disk or mount point can also interfere with and lead to mount failing with 71 error. Usually, macOS handles the permissions automatically, but it can also become corrupted.
  • Hardware Problem
    A faulty cable, or port can also trigger this error on Mac when connecting an external drive. In some cases, mac initially allows the access to the drive, but abruptly shows the mount failed with 71 error, which can also cause the permanent data loss.
Note:

Use only reliable and professionally-graded recovery tools to retrieve the data if facing a data loss situation after mount failed with 71. Cracked or 3rd party programs from disreputable developers can cause permanent loss, leaving no chances of recovery with the most powerful tool.

Part 2: Recover Hard Drive with the Mount Failed with 71 Error

One of the efficient ways to recover the data lost due to errors like mount failed with 71 is using the powerful tool - 4DDiG Data Recovery. It's a professional-graded data recovery tool that allows quick, and efficient data recovery in all challenging situations like this.

4DDiG can recover deleted, corrupted, damaged, and lost data to system errors. The smart algorithm allows the program to find the traces of lost files even from the hard drive with damaged & corrupted file systems and lets you recover it with just one-click process.

Key Features:

  • Recovers deleted, lost, corrupted, and damaged files to disk errors like Mount failed with 71.
  • Recover files from formatted, damaged file systems, and bad sectors disk efficiently.
  • Recover 2,000+ different types of files including photos, videos, audio, and docs from 2,000+ storage devices external/internal HDD/SSD, USB and SD card.
  • 99% success rate in retrieving all the types of files even from disk with hardware problems.
  • Preview feature that lets you view the recoverable files before restoring them.
FREE DOWNLOAD

Secure Download

FREE DOWNLOAD

Secure Download

How to Recover hard drive lost data due to mount failed with 71 error using 4DDiG Windows Data Recovery:

  • Install, and launch the 4DDiG on your computer. On the main menu, select the disk from which you want to recover the data, and click on Start.

  • It'll start the scanning process on the selected disk. You can stop or pause this at any moment when required files are identified. You can also use the Filter option to scan for targeted files only.

  • Once the scanning is completed, you can preview the recoverable files with double-click. To retrieve the files, select the files, and hit on the Recover button.

Part 3: How to Fix the Mount Failed with 71 Error

Running into the mount failed with 71 error on your Mac? Don't worry, whether it's a file system glitch or a stubborn formatting issue, we've got the fixes to get your drive back in action!"

Method 1: Reformat Disk to macOS-Compatible Format

If you suspect the mount failed with 71 error is occuring due to the incompatible format of the disk, then consider reformatting it. There are numerous ways to reformat the disk to macOS compatible format, however the most efficient is by using macOS builtin utility.

Before we delve into the steps, note that the formatting of the disk will erase everything - you'll lose every file stored on it. Make sure to back up your data before formatting it.

Steps to follow:

  • Connect the external drive to your Mac, and launch the Disk Utility.

  • Go to the View >> Show All Devices.

  • Select the storage device from the sidebar, and type the name of the drive.

  • Select "GUID Partition Map" from the pop up.

  • Select a file format from the Format pop up ( select APFS, Mac OS Extended or HFS+).

  • Finally click on the Erase button to initiate formatting.

Method 2: Reconnect USB Port/Cable and Disk

If reformatting your drive doesn't resolve the macOS mount failed with 71, make sure it's properly connected with the port. Bad or damaged cable, or faulty port can create a communication issue with the drive and Mac, leading to this error.

  • Inspect the cable properly to see if there's any damage.

  • Test the port by connecting any other to the port.

  • Connect the drive to any other device or a different port.

Method 3: Force Mount Disk using Terminal

If your external hard drive still shows mount failed with 71 error, try force mount disk using the terminal. It's a manual way to mount the disk on the Mac using the Terminal commands:

Follow the steps below:

  • Go to the Terminal, and launch it.

  • Type the diskutil mount / dev/diskxxx (replace the diskxxx with your external hard drive name) and execute the command.

Part 4: FAQs

Q 1: How to fix the read only file system in Mac?

To fix a read-only file system on Mac, run diskutil repairVolume /Volumes/YourDrive in Terminal or use First Aid in Disk Utility. If the issue persists, remount the drive with sudo mount -uw / or reformat it to a compatible file system.

Q 2: How to delete read-only files in macOS?

To delete read-only files in macOS, use Terminal with sudo rm -rf /path/to/file, which overrides restrictions. If permission issues persist, change file ownership with sudo chown $USER /path/to/file before deleting.

Q 3: What file system can macOS read?

macOS can read APFS, HFS+, exFAT, FAT32, and NTFS (read-only by default). For full NTFS write support, third-party tools like Paragon NTFS or Tuxera NTFS are required.

Final Words

Dealing with the "mount failed with 71" error on Mac can be frustrating, especially when you need quick access to your drive. In this guide, we explored the top 3 ways you can easily fix this error, and gain easy access to the drive. If you're facing a data loss situation due to a mount failed with 71 error, you can retrieve the files using 4DDiG Windows Data Recovery. Its user-friendly tool, allowing a quick recovery of lost/deleted and corrupted files with just one-click process.

William Bollson (senior editor)

William Bollson, the editor-in-chief of 4DDiG, devotes to providing the best solutions for Windows and Mac related issues, including data recovery, repair, error fixes.

(Click to rate this post)

You rated 4.5 ( participated)